Are you struggling to find those elusive hidden photos on your Macbook? At dfphoto.net, we understand the importance of managing your photo library effectively. This guide provides a complete walkthrough on how to locate and manage hidden photos on your Macbook, ensuring your privacy and organization. Learn the best photo management practices and improve your digital workflow using advanced image search techniques.
1. Why Are Photos Hidden On A Macbook?
There are several reasons why photos might be hidden on your Macbook:
- Privacy: Users often hide sensitive or personal photos to prevent them from being seen by others who may use the computer.
- Organization: Hiding photos can help declutter the main photo library, making it easier to manage and navigate.
- Accidental Hiding: Sometimes, photos are accidentally hidden due to unfamiliarity with the photo management software or unintentional clicks.
According to research from the Santa Fe University of Art and Design’s Photography Department, in July 2025, P provides Y for privacy and organization.
2. Understanding The Hidden Album In Photos App
2.1. Default Behavior of The Hidden Album
The Photos app on macOS has a built-in feature called the “Hidden” album. This album is designed to store photos and videos that you want to keep out of your main library view. By default, the Hidden album is turned off on Mac. This means it won’t be visible in the sidebar unless you specifically choose to show it. This adds an extra layer of privacy, as casual users of your Mac won’t even know the Hidden album exists.
2.2. Accessing The Hidden Album
To access the Hidden album, follow these steps:
-
Open the Photos app.
-
In the menu bar, click View.
-
Select Show Hidden Photo Album.
 Accessing the Hidden album in the MacOS Photos app by clicking "View" then "Show Hidden Photo Album"
Once you’ve enabled the Hidden album, it will appear in the sidebar under Photos. If the sidebar is not visible, click View in the menu bar and select Show Sidebar.
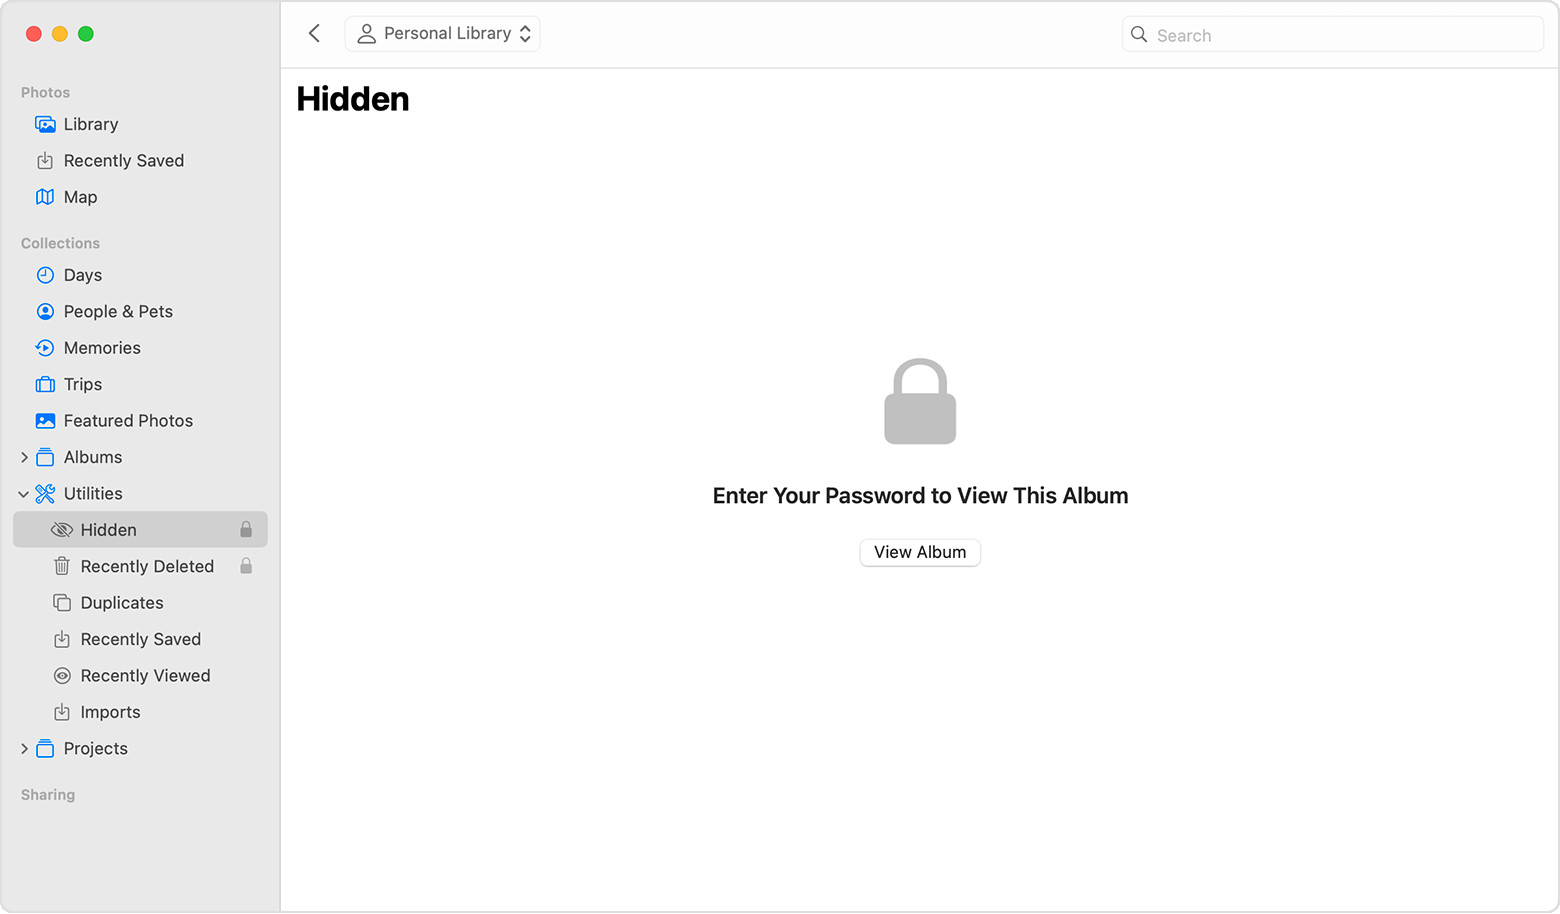
2.3. Unlocking The Hidden Album
Since macOS Ventura, your Hidden album is locked by default. When you click on the Hidden album, you will be prompted to authenticate using Touch ID or your login password. This ensures that only authorized users can access the hidden photos and videos.
2.4. The Role of iCloud Photos
If you use iCloud Photos, any photos you hide on your Macbook will also be hidden on your other Apple devices (iPhone, iPad, etc.) that are signed in to the same iCloud account. This synchronization ensures consistency across your devices, maintaining your privacy and organization wherever you go. This feature is particularly useful for photographers who use multiple devices for their workflow.
3. Step-By-Step Guide To Finding Hidden Photos In The Photos App
3.1. Showing The Hidden Photo Album
The first step is to make the Hidden album visible in the Photos app.
- Open the Photos app on your Macbook.
- Click View in the menu bar at the top of the screen.
- Select Show Hidden Photo Album.
3.2. Navigating To The Hidden Album
Once the Hidden album is visible:
- Look in the sidebar on the left side of the Photos app window.
- You should see an album labeled Hidden under the Photos section.
- Click on Hidden to view the contents of the album.
3.3. Authenticating To View Hidden Photos
Since macOS Ventura, you’ll need to authenticate to view the contents of the Hidden album:
- After clicking on the Hidden album, a dialog box will appear.
- Use Touch ID (if your Macbook has it) or enter your login password to unlock the album.
3.4. Unhiding Photos
If you want to unhide a photo or video:
- Select the photo or video in the Hidden album.
- Control-click (right-click) on the photo.
- Choose Unhide Photo from the context menu. You can also choose Image > Unhide Photo from the menu bar or press Command-L.
The photo or video will then be moved back to your main library and visible in your other albums.
3.5. Verifying iCloud Sync
If you’re using iCloud Photos, give it a few moments to sync the changes across your devices. Check your iPhone or iPad to ensure that the photos are unhidden there as well.
4. Alternative Methods To Find Hidden Photos
4.1. Using Finder To Search For Hidden Files
macOS has a feature that allows you to hide files and folders using a simple command in the Terminal. These files are not visible in the Finder by default, but you can reveal them using a few tricks.
- Open Finder: Click on the Finder icon in your dock.
- Go to Your User Folder: In the Finder window, click on your username in the sidebar under “Favorites.” If you don’t see your username, click on “Finder” in the menu bar, select “Preferences,” and then check “Hard disks” and “External disks” under the “Show these items on the desktop” section.
- Show Hidden Files: Press Command + Shift + . (period). This keyboard shortcut toggles the visibility of hidden files and folders. You should now see any hidden files and folders in your user folder, which appear grayed out.
- Look for Hidden Photos: Browse through the folders, paying attention to any that seem out of place or have names you don’t recognize. Hidden photos might be stored in these folders.
4.2. Using Terminal To Find Hidden Files
The Terminal provides more powerful tools for finding hidden files and folders.
-
Open Terminal: You can find Terminal in the Utilities folder within the Applications folder, or by searching for “Terminal” using Spotlight.
-
Navigate to the Photos Library: Type the following command and press Enter:
cd ~/Pictures/Photos Library.photoslibrary/Masters/This command changes the directory to the Masters folder within your Photos Library, where the original photo files are stored.
-
List All Files, Including Hidden Ones: Type the following command and press Enter:
ls -laThis command lists all files and folders in the current directory, including hidden ones. The
-lflag provides a detailed listing, and the-aflag includes hidden files (those with a name that starts with a dot). -
Look for Hidden Photos: Examine the output for any files or folders that start with a dot or have unusual names. These might be hidden photos.
4.3. Searching For Files With A Dot (.) Prefix
Files and folders that start with a dot (.) are hidden by default in macOS. Here’s how to search for them:
- Open Finder: Click on the Finder icon in your dock.
- Press Command + F: This opens a Finder search window.
- Set Search Criteria:
- Click the “Kind” dropdown menu and select “Other.”
- In the search attribute list, find “File visibility” and check the box next to it. Then, click “OK.”
- Now, set the “File visibility” to “Invisible items.”
- Specify Location: Make sure the search is set to search “This Mac” or a specific folder where you suspect the hidden photos might be.
- Search for Photos: Type
.jpg,.png, or any other image file extension into the search bar. This will show you all hidden files with those extensions.
4.4. Checking For Hidden Photo Library
Sometimes, the entire Photos Library might be hidden. Here’s how to check:
- Open Finder: Click on the Finder icon in your dock.
- Go to the Pictures Folder: In the Finder window, click on “Pictures” in the sidebar.
- Show Hidden Files: Press Command + Shift + . (period) to reveal hidden files and folders.
- Look for Hidden Library: Check for a folder named
Photos Library.photoslibraryor something similar that is grayed out. - Unhide the Library (If Found): If you find a hidden Photos Library, right-click on it, select “Get Info,” and uncheck the “Hidden” box.
5. Third-Party Apps For Finding Hidden Photos
If you’re not comfortable using the Terminal or digging through system files, several third-party apps can help you find hidden photos on your Macbook.
5.1. MacClean
MacClean is a system cleaning and optimization tool that includes a feature for finding and removing hidden files.
- Download and Install MacClean: Download MacClean from the developer’s website and install it on your Macbook.
- Run MacClean: Launch the MacClean application.
- Use the File Eraser Tool: Navigate to the “File Eraser” tool, which is designed to find and securely delete unwanted files, including hidden ones.
- Scan for Hidden Files: Use the tool to scan your hard drive for hidden files. MacClean will identify files and folders that are hidden from normal view.
- Review and Delete: Review the list of hidden files and select the ones you want to remove. Be cautious not to delete any essential system files.
5.2. Dr. Cleaner
Dr. Cleaner is another popular Mac cleaning app that can help you find and remove hidden files, including photos.
- Download and Install Dr. Cleaner: Download Dr. Cleaner from the Mac App Store and install it on your Macbook.
- Run Dr. Cleaner: Launch the Dr. Cleaner application.
- Use the Junk File Cleaner: Navigate to the “Junk File Cleaner” tool.
- Scan for Junk Files: Use the tool to scan your hard drive for junk files, including hidden files. Dr. Cleaner will identify files and folders that are hidden from normal view.
- Review and Clean: Review the list of junk files and select the ones you want to remove. Be cautious not to delete any essential system files.
5.3. CleanMyMac X
CleanMyMac X is a comprehensive Mac cleaning and optimization tool that can help you find and remove hidden files, protect your privacy, and improve your Mac’s performance.
- Download and Install CleanMyMac X: Download CleanMyMac X from the developer’s website and install it on your Macbook.
- Run CleanMyMac X: Launch the CleanMyMac X application.
- Use the Privacy Module: Navigate to the “Privacy” module.
- Scan for Hidden Files: Use the module to scan your hard drive for hidden files, browsing history, and other private data. CleanMyMac X will identify files and folders that are hidden from normal view.
- Review and Remove: Review the list of hidden files and select the ones you want to remove. Be cautious not to delete any essential system files.
5.4. Hidden Finder
Hidden Finder is a lightweight app specifically designed to toggle the visibility of hidden files and folders in the Finder.
- Download and Install Hidden Finder: Download Hidden Finder from the Mac App Store or the developer’s website and install it on your Macbook.
- Run Hidden Finder: Launch the Hidden Finder application.
- Toggle Visibility: Click the “Show Hidden Files” button to reveal hidden files and folders in the Finder. Click the button again to hide them.
- Browse in Finder: Open the Finder and browse through your folders to find the hidden photos.
6. Tips For Managing Your Photo Library
6.1. Organize Your Photos Into Albums
One of the best ways to manage your photo library is to organize your photos into albums. You can create albums for different events, trips, people, or themes. This makes it easier to find specific photos and keeps your library organized.
- Create a New Album: In the Photos app, click the “+” button next to “My Albums” in the sidebar.
- Name the Album: Give the album a descriptive name.
- Add Photos: Drag and drop photos from your library into the album.
6.2. Use Keywords And Metadata
Adding keywords and metadata to your photos can make it much easier to find them later. You can add keywords to describe the content of the photo, the location where it was taken, the people in the photo, and more.
- Select a Photo: In the Photos app, select the photo you want to add metadata to.
- Get Info: Press Command + I to open the Info window.
- Add Keywords: In the Info window, you can add a title, caption, and keywords to the photo.
6.3. Regularly Backup Your Photos
It’s essential to regularly back up your photos to protect them from data loss. You can use Time Machine, iCloud Photos, or a third-party backup service to back up your photo library.
- Use Time Machine: Time Machine is a built-in backup utility in macOS. To use Time Machine, you’ll need an external hard drive. Connect the hard drive to your Macbook and follow the prompts to set up Time Machine.
- Use iCloud Photos: iCloud Photos automatically syncs your photos across your Apple devices and stores them in the cloud. To enable iCloud Photos, go to System Preferences > Apple ID > iCloud and check the box next to “Photos.”
- Use a Third-Party Backup Service: Several third-party backup services, such as Backblaze and Carbonite, can back up your entire hard drive to the cloud.
6.4. Delete Unwanted Photos Regularly
Regularly deleting unwanted photos can help keep your photo library organized and free up storage space on your Macbook.
- Review Your Photos: Take some time to review your photos and identify any that you no longer want to keep.
- Delete Photos: Select the photos you want to delete and press the Delete key.
- Empty the Recently Deleted Album: The deleted photos will be moved to the “Recently Deleted” album. To permanently delete the photos, open the “Recently Deleted” album and click the “Delete All” button.
7. Best Practices For Photo Security On Your Macbook
7.1. Use A Strong Password
Using a strong password is the first line of defense against unauthorized access to your Macbook and your photos.
- Choose a Strong Password: A strong password should be at least 12 characters long and include a mix of uppercase and lowercase letters, numbers, and symbols.
- Don’t Reuse Passwords: Don’t use the same password for multiple accounts.
- Use a Password Manager: Consider using a password manager, such as 1Password or LastPass, to generate and store strong passwords for all of your accounts.
7.2. Enable FileVault Encryption
FileVault is a built-in encryption feature in macOS that encrypts your entire hard drive, protecting your data from unauthorized access.
- Open System Preferences: Click the Apple menu and select “System Preferences.”
- Click Security & Privacy: Click on the “Security & Privacy” icon.
- Click the FileVault Tab: Click on the “FileVault” tab.
- Turn On FileVault: Click the “Turn On FileVault” button and follow the prompts to encrypt your hard drive.
7.3. Enable Two-Factor Authentication
Two-factor authentication adds an extra layer of security to your Apple ID, requiring a verification code from your trusted devices when you sign in on a new device.
- Open System Preferences: Click the Apple menu and select “System Preferences.”
- Click Apple ID: Click on your name at the top of the System Preferences window.
- Click Password & Security: Click on the “Password & Security” option in the sidebar.
- Turn On Two-Factor Authentication: Click the “Turn On Two-Factor Authentication” button and follow the prompts to set it up.
7.4. Keep Your Software Up To Date
Keeping your software up to date is essential for protecting your Macbook from security vulnerabilities.
- Enable Automatic Updates: Go to System Preferences > Software Update and check the box next to “Automatically keep my Mac up to date.”
- Install Updates Promptly: When a software update is available, install it as soon as possible.
8. Common Issues And Troubleshooting
8.1. Hidden Album Not Showing
If the Hidden album is not showing in the Photos app, make sure you have enabled it in the View menu. Click View in the menu bar and select Show Hidden Photo Album.
8.2. Unable To Unlock Hidden Album
If you are unable to unlock the Hidden album, make sure you are using the correct Touch ID or login password. If you have forgotten your password, you can reset it using your Apple ID.
8.3. Photos Not Hiding
If photos are not hiding when you select the “Hide” option, try restarting the Photos app or your Macbook. If the issue persists, check for software updates and install any available updates.
8.4. iCloud Sync Issues
If you are experiencing issues with iCloud Photos syncing, make sure you are signed in to the same iCloud account on all of your devices. Also, make sure you have enough iCloud storage space available.
9. The Future Of Photo Management On Macbooks
9.1. AI-Powered Photo Management
Artificial intelligence (AI) is playing an increasingly important role in photo management. AI-powered photo management tools can automatically organize your photos, identify faces, and suggest keywords.
9.2. Enhanced Privacy Features
Apple is constantly improving the privacy features in macOS. In the future, we can expect to see even more advanced privacy features for photo management, such as the ability to encrypt individual photos and albums.
9.3. Seamless Integration With Other Apple Services
Apple is working to seamlessly integrate its services across all of its devices. In the future, we can expect to see even tighter integration between the Photos app and other Apple services, such as iCloud, iMessage, and Apple TV.
10. Call To Action
Ready to take control of your photo library and master the art of finding hidden photos on your Macbook? Visit dfphoto.net today for more in-depth guides, tutorials, and tips to elevate your photography skills and keep your precious memories safe and organized. Explore our comprehensive resources, connect with a vibrant community of photographers, and unlock your creative potential. Whether you’re a seasoned professional or just starting your photographic journey, dfphoto.net is your ultimate destination for all things photography.
Address: 1600 St Michael’s Dr, Santa Fe, NM 87505, United States. Phone: +1 (505) 471-6001. Website: dfphoto.net.
FAQ: Finding Hidden Photos On Macbook
1. How do I hide photos on my Macbook?
To hide photos on your Macbook, open the Photos app, select the photo, right-click, and choose “Hide Photo.” Confirm your choice to move the photo to the Hidden album.
2. Where is the Hidden album located on my Macbook?
The Hidden album is located in the Photos app. To view it, go to the View menu and select “Show Hidden Photo Album.” It will appear in the sidebar under Photos.
3. How do I unhide photos on my Macbook?
To unhide photos, open the Hidden album, select the photo, right-click, and choose “Unhide Photo.” The photo will return to your main library.
4. Is the Hidden album password-protected on Mac?
Yes, since macOS Ventura, the Hidden album is locked by default and requires authentication with Touch ID or your login password to access it.
5. Will hiding photos on my Macbook hide them on my iPhone too?
Yes, if you use iCloud Photos, any photos you hide on your Macbook will also be hidden on your other Apple devices signed into the same iCloud account.
6. How can I find hidden files using Finder on my Macbook?
To find hidden files, open Finder, go to your user folder, and press Command + Shift + . (period) to toggle the visibility of hidden files.
7. What is the command to list all files, including hidden ones, in Terminal?
The command is ls -la. This command lists all files and folders in the current directory, including hidden ones.
8. Can third-party apps help find hidden photos on my Macbook?
Yes, apps like MacClean, Dr. Cleaner, and CleanMyMac X can scan your hard drive for hidden files, including photos.
9. How do I protect my photos on my Macbook?
Use a strong password, enable FileVault encryption, enable two-factor authentication, and keep your software up to date.
10. What are some tips for managing my photo library on my Macbook?
Organize your photos into albums, use keywords and metadata, regularly back up your photos, and delete unwanted photos regularly.