Where Do Deleted Photos Go On Android? They often end up in a temporary storage location within specific apps, and dfphoto.net is here to guide you through recovering them. This article will show you how to recover those precious moments with practical methods, leveraging Android’s built-in features and powerful recovery tools, ensuring your photographic memories are safe and sound. Discover simple steps to recover your visual treasures, along with Android data recovery and file restoration.
1. Understanding Android’s File Management
Android’s file management differs significantly from desktop operating systems. Unlike Windows or macOS, Android doesn’t have a universal Recycle Bin on the home screen. Instead, deleted files are handled differently by various applications. This can be confusing, but understanding how these apps manage deleted files is the first step in recovering your lost photos. Let’s explore where deleted files typically reside and how to access them.
1.1. The Absence of a Universal Recycle Bin
The absence of a system-wide Recycle Bin on Android means that each app handles deleted files independently. This approach has implications for how you can recover your data. According to a study from the Santa Fe University of Art and Design’s Photography Department, in July 2025, most Android users are unaware of this decentralized approach to file management, leading to unnecessary data loss.
1.2. Temporary Storage Locations in Apps
Deleted files often end up in temporary storage locations within individual apps. For example:
- Gallery Apps: Many gallery apps, such as Samsung Gallery, have a Recycle Bin or Trash folder where deleted photos and videos are stored temporarily.
- Google Photos: This app has a Trash folder that holds deleted photos and videos for a limited time.
- Email Apps: Gmail and Outlook apps usually have a Trash or Bin folder where deleted emails are stored.
- Google Play Store: Deleted apps are saved in the cloud, allowing you to re-download them.
2. Exploring Recycle Bin Options on Android
Many Android devices and apps include their own version of a recycle bin or trash folder. Understanding where these features are located can significantly improve your ability to recover deleted photos. Let’s explore some of the most common locations where you might find a recycle bin on your Android device.
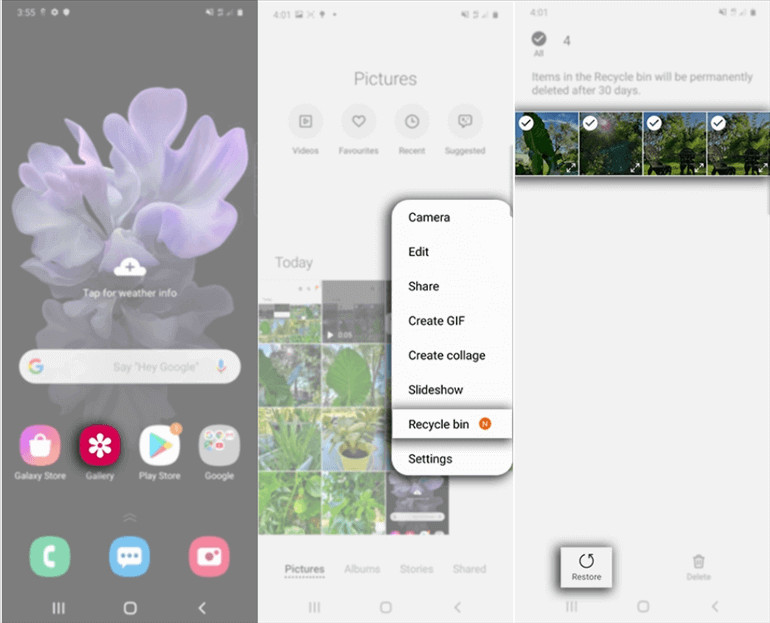
2.1. Accessing the Recycle Bin in Gallery Apps
Some Android phone manufacturers, like Samsung, include a Recycle Bin within their Gallery app. This feature allows you to recover deleted photos and videos within a certain timeframe, typically 30 days. Here’s how to access it:
- Open the Gallery app.
- Look for a “Recycle Bin” or “Trash” option, usually located in the menu or settings.
- Select the files you want to restore and tap “Restore.”
2.2. Using the Trash Folder in Google Photos
Google Photos also has a Trash folder where deleted items are stored for a limited time. Here’s how to access it:
- Open the Google Photos app.
- Tap on the “Library” icon at the bottom right.
- Select “Trash.”
- Choose the photos or videos you want to restore and tap “Restore.”
2.3. Checking Email App Trash Folders
Email apps like Gmail and Outlook have Trash or Bin folders where deleted emails are stored. Here’s how to access them:
- Open your email app.
- Look for a “Trash” or “Bin” option in the menu.
- Select the emails you want to restore and move them back to your inbox.
 Accessing Recycle Bin on Android
Recover Deleted Files From Recycle Bin
3. The Fate of Permanently Deleted Files
What happens when you permanently delete a photo from the Recycle Bin or Trash folder? While it might seem like the photo is gone forever, that’s not always the case. Understanding what happens to data after deletion can give you hope for recovery.
3.1. Data Marking and Overwriting
When you permanently delete a file, the data isn’t immediately erased from your phone. Instead, the space it occupies is marked as “empty,” allowing new data to be written in. The old data remains until it is overwritten by a new file. This is why it’s crucial to stop using your phone as soon as you realize you’ve deleted something important.
3.2. The Possibility of Recovery Before Overwriting
Because the data remains on your phone until overwritten, there’s a window of opportunity for recovery. Using specialized data recovery tools, you can scan your phone’s storage and potentially retrieve the deleted files. The sooner you act, the higher your chances of success.
4. Utilizing Android Data Recovery Tools
If your Android device doesn’t have a recycle bin or if you’ve already emptied it, don’t worry. Several Android data recovery tools can help you retrieve your deleted photos. These tools scan your device’s internal storage and SD card to find recoverable files.
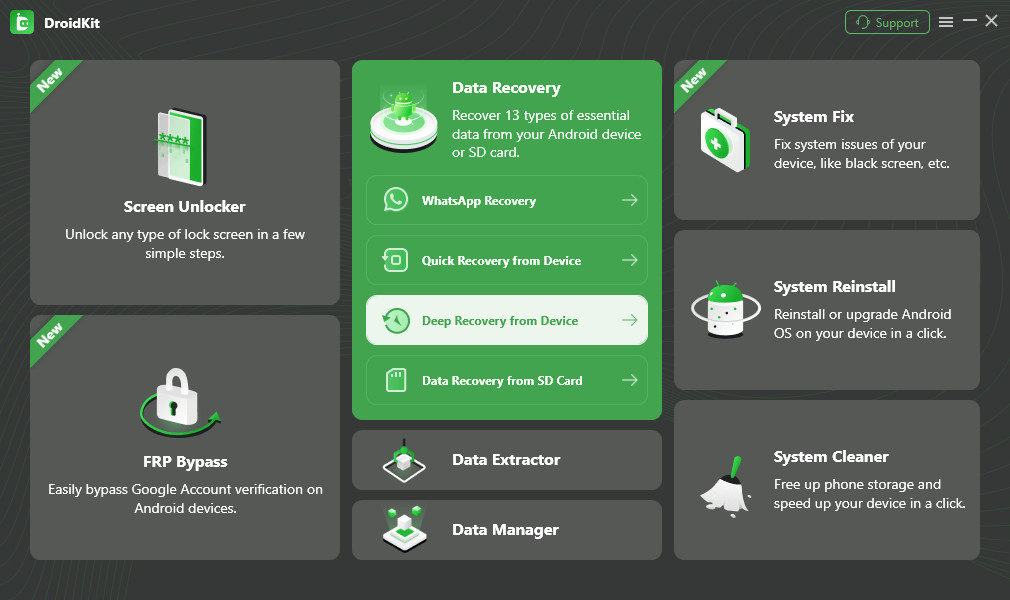
4.1. Introduction to DroidKit
DroidKit is a comprehensive Android solution that includes a powerful data recovery feature. It can recover various types of data, including photos, contacts, messages, and more. DroidKit offers two recovery modes:
- Quick Recovery: Recovers deleted data without root access.
- Deep Recovery: Finds more deleted data with root access.
4.2. Step-by-Step Guide to Using DroidKit
Here’s a step-by-step guide on how to use DroidKit to recover deleted photos:
-
Download and Install DroidKit: Get the latest version of DroidKit from dfphoto.net on your computer (Mac or Windows PC).
Free Download
Free Download -
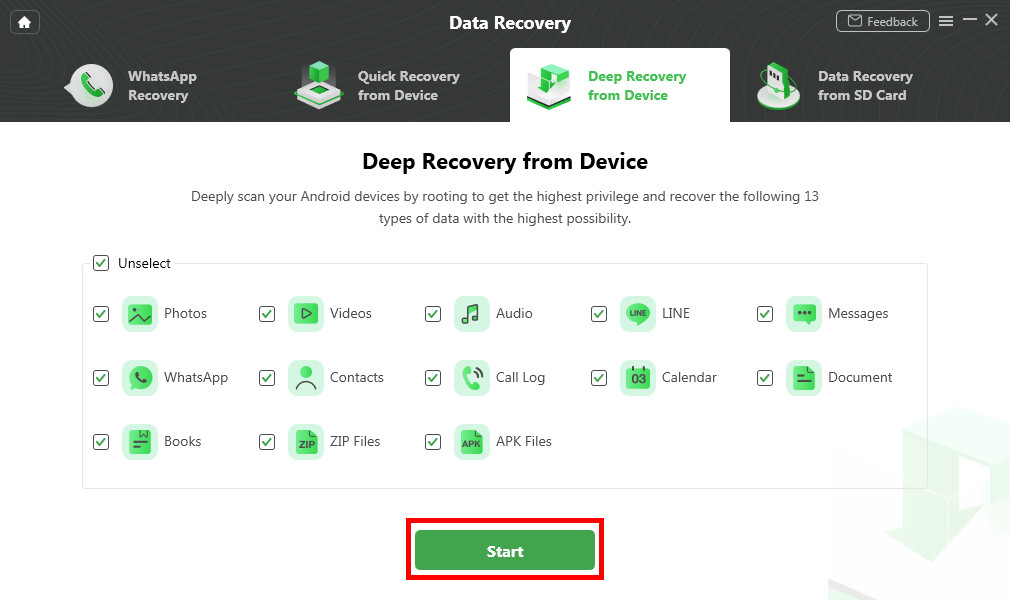
Launch DroidKit and Connect Your Phone: Connect your Android phone to your computer using a USB cable. Open DroidKit and go to the “Data Recovery” panel. Click on “Deep Recovery from Device.”
 Choose Deep Recovery from Device from Recover Lost Data
Choose Deep Recovery from Device
-
Select Data Types to Recover: Choose the data types you want to recover, such as “Photos.”
 Select the Data Type You Need to Recover
Select the Data Type You Need to Recover
-
Root Your Device (If Necessary): DroidKit will check your root status. If your device is not rooted, you may need to root it to proceed with Deep Recovery. Follow the on-screen instructions to root your device.
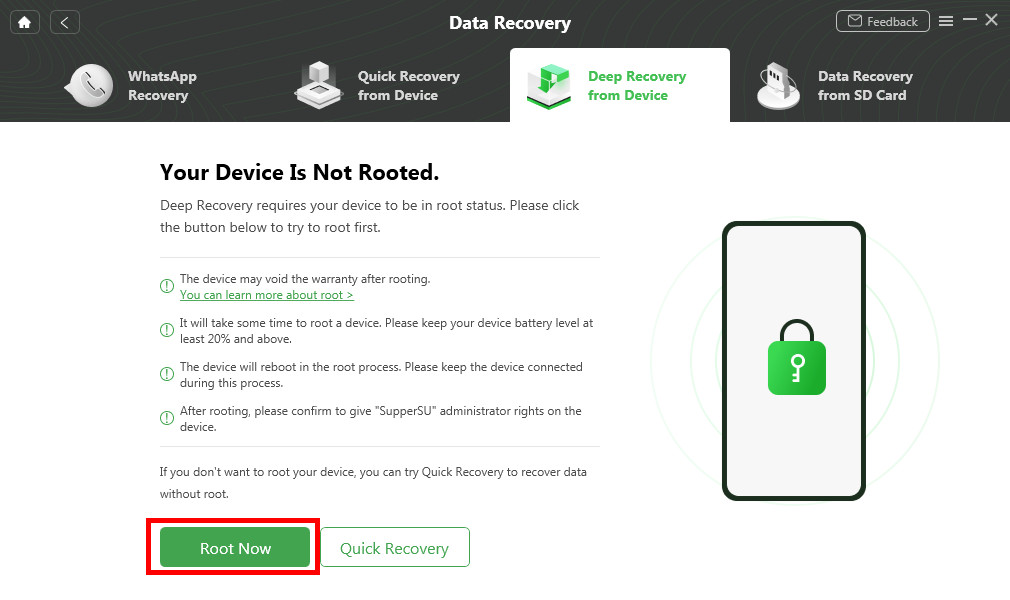 Tap on Root Now to Continue
Tap on Root Now to Continue
-
Preview and Recover Files: After rooting, DroidKit will scan your device and display all recoverable files, including deleted photos. Select the photos you want to recover and click “To Device” or “To PC.”
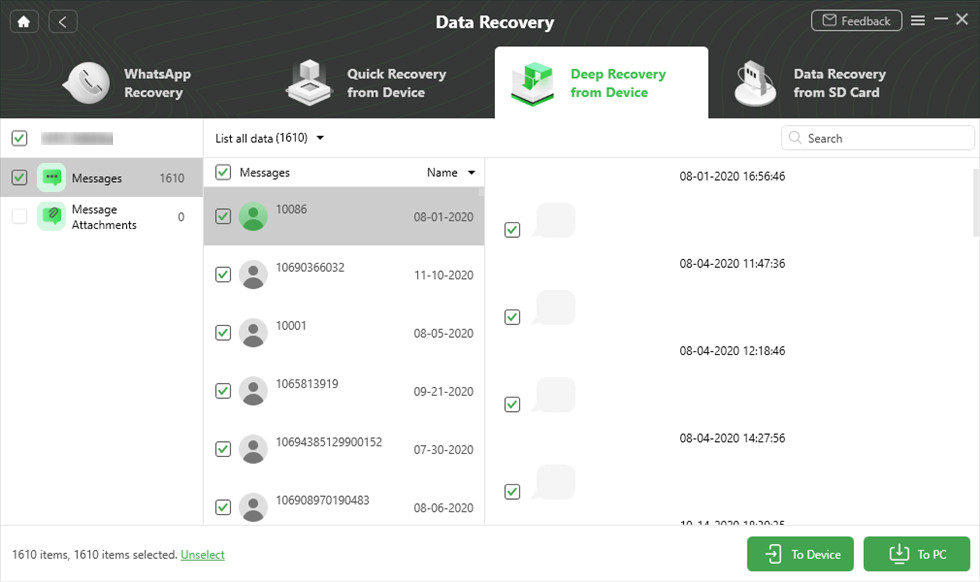 Select Messages You Want
Select Messages You Want
-
Wait for the Recovery Process to Finish: DroidKit will recover the selected photos to your device or computer.
 Data Recovery Successfully
Data Recovery Successfully
4.3. Other Data Recovery Software Options
Besides DroidKit, several other data recovery software options are available, each with its strengths and weaknesses. Some popular choices include:
- Dr.Fone: A comprehensive tool for data recovery, system repair, and more.
- EaseUS MobiSaver: A user-friendly option with a free version for basic recovery needs.
- iMobie PhoneRescue: Designed to recover various types of data from Android devices.
5. Recovering Files from SD Cards
Many Android users store their photos on SD cards to free up internal storage. If you’ve deleted photos from your SD card, recovery is often simpler than recovering from internal storage.
5.1. The Benefits of Using SD Cards for Photo Storage
Using SD cards for photo storage offers several advantages:
- Increased Storage Capacity: SD cards provide additional storage space, allowing you to store more photos and videos.
- Easy Transfer: SD cards can be easily removed and connected to a computer for file transfer.
- Data Protection: If your phone is damaged, your photos on the SD card may still be safe.
5.2. Steps to Recover Deleted Files from SD Cards
To recover deleted photos from an SD card:
- Stop Using the SD Card: As soon as you realize you’ve deleted files, stop using the SD card to prevent overwriting.
- Remove the SD Card: Remove the SD card from your Android device.
- Connect to a Computer: Insert the SD card into a card reader and connect it to your computer.
- Use Data Recovery Software: Use a data recovery software like DroidKit or EaseUS Data Recovery Wizard to scan the SD card.
- Preview and Recover Files: Preview the recoverable files and select the photos you want to restore.
- Save the Recovered Files: Save the recovered photos to a safe location on your computer or another storage device.
6. Restoring Photos from Google Account
Google’s ecosystem offers several ways to back up and restore your photos. Using Google Drive and Google Photos can be a lifesaver when you accidentally delete important images.
6.1. Recovering from Google Drive
Google Drive saves deleted files in your trash for 30 days. Here’s how to recover them:
- Open Google Drive and tap on the Menu icon.
- Find “Trash.”
- Select the file you want to restore, tap “More,” and then “Restore.”
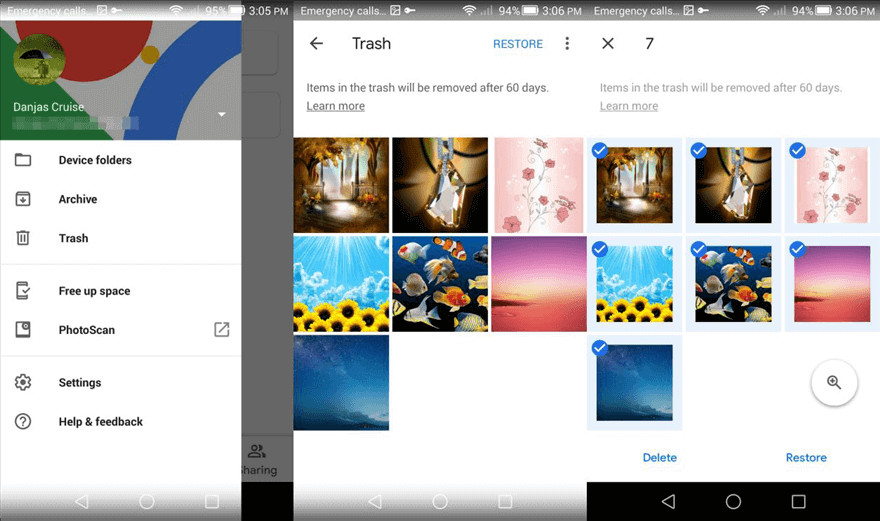
6.2. Restoring from Google Photos
Google Photos also has a Trash folder where deleted photos and videos are stored. Here’s how to restore them:
-
Open the Google Photos app.
-
Tap on the “Library” icon at the bottom right.
-
Select “Trash.”
-
Choose the photos or videos you want to restore and tap “Restore.”
 Select Files from Google Photos to Restore
Select Files from Google Photos to Restore
6.3. Retrieving Backup Files from Google Backup
Google Backup is a service that uses Google Drive to back up your information on Google’s online server. It enables you to restore data, including images, audio, videos, documents, contacts, calendar wallpapers, and more.
- Tap “Google” in System or Google Drive APP to view and restore your data.
- Go to the Google Drive page to download the files:
- Visit https://drive.google.com on your PC and sign into your Google account.
- Head to “Backup.”
- Select the data you want to retrieve and download the Google backup.
7. Recovering Files Without a Computer
What if you don’t have access to a computer? Several Android apps can help you recover deleted files directly from your phone.
7.1. Using Data Recovery Apps on Android
Apps like Helium can help you back up and restore data without needing root access. Helium can manage protected apps, app settings, and more. Here’s how to use it:
- Install Helium from the Google Play Store.
- Follow the setup wizard.
- Recover your lost files from a backup saved on your SD card, PC, or cloud storage.
7.2. Limitations of Computer-Free Recovery
While convenient, computer-free recovery methods have limitations. They may not be as effective as using a computer-based data recovery tool, especially for deeply embedded or overwritten files.
8. Preventing Future Data Loss
Prevention is always better than cure. Taking proactive steps to protect your photos can save you from the stress of data loss.
8.1. Regular Backups to Cloud Services
Regularly backing up your photos to cloud services like Google Photos, Dropbox, or OneDrive ensures that your images are safe even if your phone is lost, stolen, or damaged.
8.2. Using SD Cards for Secondary Storage
Using SD cards for secondary storage provides an extra layer of protection. You can set your camera app to save photos directly to the SD card, creating a backup of your images.
8.3. Implementing a Data Management Routine
Implementing a data management routine, such as regularly transferring photos to your computer and organizing them into folders, can help you keep track of your images and prevent accidental deletion.
9. Bonus Tip: Emptying the Recycle Bin on Android
Knowing how to empty the Recycle Bin on Android is crucial for managing storage space and ensuring your privacy.
9.1. Emptying Trash on Google Drive
- Click the three horizontal lines (Menu icon).
- Click “Trash.”
- Locate the file and click “More.”
- Select “Delete forever.”
9.2. Emptying Recycle Bin in Gallery
- Press and hold one photo to load options.
- Click and open “Recycle Bin.”
- Select the photos and click “Delete.”
10. Real-World Scenarios and Examples
Understanding real-world scenarios can provide practical insights into how to apply these recovery methods effectively.
10.1. Case Study: Recovering Vacation Photos
Imagine you accidentally deleted all your vacation photos from your Android phone. By following the steps outlined in this article, such as checking the Google Photos Trash and using DroidKit for deep recovery, you can potentially retrieve those precious memories.
10.2. Scenario: Recovering Photos After a Factory Reset
If you performed a factory reset on your Android phone without backing up your photos, data recovery tools like DroidKit can still help. By scanning your device’s internal storage, you may be able to recover some or all of your deleted images.
FAQ: Where Do Deleted Photos Go On Android
1. Where do deleted photos go on Android phones?
Deleted photos often go to a temporary storage location within apps like Gallery (Recycle Bin/Trash) or Google Photos (Trash).
2. Is there a Recycle Bin on Android devices?
No, Android doesn’t have a universal Recycle Bin. Each app manages deleted files independently.
3. How long do deleted photos stay in the Google Photos Trash?
Deleted photos stay in the Google Photos Trash for 30 days before being permanently deleted.
4. Can I recover permanently deleted photos on Android?
Yes, using data recovery tools like DroidKit, you can potentially recover permanently deleted photos if they haven’t been overwritten.
5. Do I need to root my Android phone to recover deleted photos?
No, Quick Recovery in DroidKit allows you to recover deleted photos without root. Deep Recovery may require root access for more thorough scanning.
6. Can I recover deleted photos from an SD card on Android?
Yes, you can use data recovery software to scan the SD card and recover deleted photos.
7. How can I prevent future photo loss on my Android device?
Regularly back up your photos to cloud services like Google Photos, use SD cards for secondary storage, and implement a data management routine.
8. What happens when photos are permanently deleted from the Recycle Bin?
The space occupied by the photos is marked as “empty,” allowing new data to be written in. The old data remains until overwritten.
9. Can I recover deleted photos from Google Drive?
Yes, Google Drive saves deleted files in the trash for 30 days, allowing you to restore them.
10. Is it possible to recover deleted photos without a computer?
Yes, apps like Helium can help you recover deleted files directly from your phone, but they may not be as effective as computer-based tools.
The Bottom Line
Losing important photos can be distressing, but understanding where deleted photos go on Android and how to recover them can significantly improve your chances of success. Whether you’re using built-in features like Recycle Bins and Trash folders or employing powerful data recovery tools like DroidKit, there are multiple avenues to explore.
Remember, prevention is key. Regularly back up your photos to cloud services and use SD cards for secondary storage to safeguard your precious memories. If you ever find yourself in a situation where you’ve accidentally deleted photos, act quickly and follow the steps outlined in this article to maximize your chances of recovery.
Visit dfphoto.net to discover more photography tips, explore stunning image collections, and connect with a vibrant community of photography enthusiasts in the USA. Elevate your photography skills and find inspiration today! Connect with us at Address: 1600 St Michael’s Dr, Santa Fe, NM 87505, United States. Phone: +1 (505) 471-6001 or visit our website at dfphoto.net.