Where Did My Photos Go? If you’re asking yourself this question, especially after an accidental deletion or a device hiccup, dfphoto.net is here to help. We’ll delve into the common culprits behind missing images and provide effective solutions for restoring your precious photographic memories, enhancing your photography workflow, and securing your visual assets.
1. Understanding Photo Loss: Why Did My Photos Go Missing?
The sinking feeling when you can’t find your photos is something every photographer dreads. Before we dive into recovery, let’s understand the common reasons behind those lost photos. Understanding these reasons can help you not only recover your images but also prevent future losses.
- Accidental Deletion: This is perhaps the most common cause. A slip of the finger while deleting can send your cherished images to the digital abyss.
- Hardware Failure: Hard drives and memory cards are not infallible. They can fail due to age, physical damage, or electrical issues.
- Software Glitches: Bugs in photo management software or operating systems can sometimes lead to the disappearance of files.
- Cloud Sync Issues: Problems with iCloud, Google Photos, or other cloud services can prevent photos from syncing properly, making them seem lost.
- Incorrect Folder Management: Photos might be misplaced in unexpected folders, making them difficult to find.
- Malware Infections: In rare cases, malware can delete or hide your photos.
- Human Error: Accidentally formatting a memory card or deleting the wrong folder can lead to significant photo loss.
2. The First Line of Defense: Checking the Obvious Places
Before panicking, take a deep breath and check these common locations where your photos might be hiding. These simple checks often yield quick results and save you from more complicated recovery procedures.
2.1. Recently Deleted Album (iOS, macOS, iCloud)
Most operating systems and photo management software have a “Recently Deleted” or “Trash” folder. Photos deleted within the last 30 days (or a similar timeframe) are usually stored here.
How to Check:
- iPhone/iPad: Open the Photos app, scroll to the bottom, and tap “Recently Deleted” under the Utilities section.
- Mac: Open Photos, and select “Recently Deleted” in the sidebar.
- iCloud.com: Go to iCloud.com, sign in, and select “Photos.” Then, look for “Recently Deleted” in the sidebar.
According to Apple Support, photos remain in the Recently Deleted album for 30 days before permanent deletion.
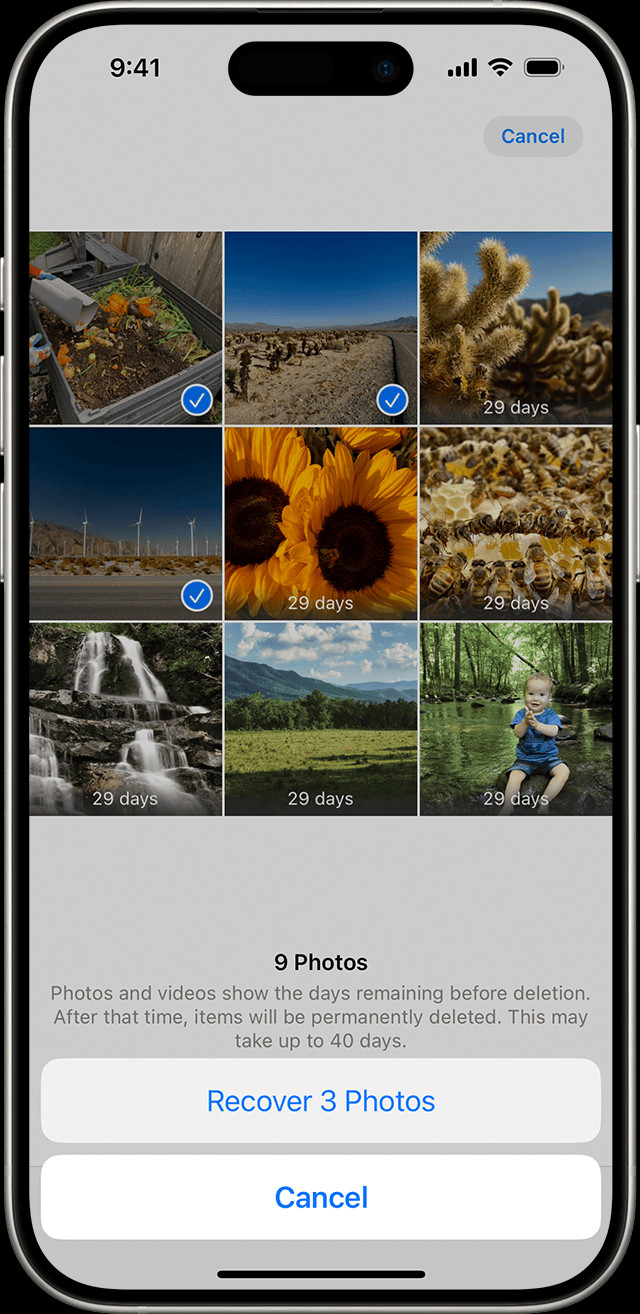 The Recently Deleted album in Photos on iPhone
Alt text: Recovering deleted photos from the Recently Deleted album on an iPhone, showing the Recover button.
2.2. Recycle Bin (Windows)
Windows users should check the Recycle Bin for deleted photos.
How to Check:
- Open the Recycle Bin on your desktop.
- Search for the missing photos.
- Right-click on the photos and select “Restore” to move them back to their original location.
2.3. Hidden Album (iOS, macOS, iCloud)
Sometimes, photos aren’t deleted but simply hidden from the main view.
How to Check:
- iPhone/iPad: Open the Photos app, scroll to the bottom, and tap “Hidden” under the Utilities section.
- Mac: Open Photos, click “View” in the menu bar, and select “Show Hidden Photo Album.” Then, select “Hidden” in the sidebar.
- iCloud.com: Go to iCloud.com, sign in, and select “Photos.” Look for “Hidden” in the sidebar.
According to Apple Support, hiding photos on one device hides them across all devices synced with iCloud Photos.
2.4. Cloud Storage Services (Google Photos, Dropbox, etc.)
If you use cloud storage services, check if your photos are backed up there.
How to Check:
- Open the app or website for your cloud storage service (e.g., Google Photos, Dropbox, OneDrive).
- Search for the missing photos in your albums or folders.
- If found, download them back to your device.
2.5. Shared Albums (iCloud)
If you use iCloud Shared Albums, make sure you’re looking in the correct library view.
How to Check:
- Open the Photos app on your iPhone or iPad.
- Tap the profile button in the upper-right corner.
- Choose “Both Libraries,” “Personal Library,” or “Shared Library” to switch between views.
Apple Support indicates that the Shared Library icon marks photos in the Shared Library, while the Personal Library icon marks photos in the Personal Library.
3. Diving Deeper: Advanced Recovery Techniques
If the simple checks don’t work, it’s time to explore more advanced recovery techniques. These methods involve using specialized software and tools to scan your storage devices for lost or deleted photos.
3.1. Photo Recovery Software
Photo recovery software can scan your hard drives, memory cards, and other storage devices for deleted photos. These tools often use advanced algorithms to identify and recover files, even if they’ve been partially overwritten.
Popular Photo Recovery Software:
| Software Name | Platform | Key Features |
|---|---|---|
| Recuva | Windows | Free version available, deep scan mode, recovers from various storage devices |
| EaseUS Data Recovery Wizard | Windows/Mac | Recovers from formatted drives, supports various file types, preview before recovery |
| Disk Drill | Windows/Mac | Recovers from internal and external drives, supports various file systems, data protection features |
| Stellar Photo Recovery | Windows/Mac | Recovers from corrupted memory cards, supports RAW file formats, repairs damaged photos |
| PhotoRec | Cross-Platform | Free and open-source, recovers a wide range of file types, command-line interface |
How to Use Photo Recovery Software (General Steps):
- Download and Install: Download and install the photo recovery software of your choice.
- Select the Drive: Launch the software and select the drive or memory card where you lost your photos.
- Scan for Lost Files: Start the scanning process. The software will scan the drive for deleted or lost files.
- Preview and Recover: Once the scan is complete, preview the recoverable photos and select the ones you want to restore.
- Save to a Safe Location: Save the recovered photos to a different drive or location to avoid overwriting the original data.
Important Considerations:
- Stop Using the Drive: Immediately stop using the drive or memory card where you lost your photos. The more you use it, the higher the risk of overwriting the deleted files.
- Recover to a Different Drive: Always recover the photos to a different drive or location. Saving them back to the same drive can overwrite the original data and make recovery impossible.
- Deep Scan: If a quick scan doesn’t find your photos, try a deep scan. This takes longer but can find more files.
3.2. Data Recovery Services
If the photo recovery software fails, or if your storage device is physically damaged, consider using a professional data recovery service. These services have specialized equipment and expertise to recover data from damaged or failing drives.
When to Use a Data Recovery Service:
- Physically Damaged Drive: If your hard drive or memory card is physically damaged (e.g., dropped, water damage).
- Drive Not Recognized: If your computer doesn’t recognize the drive or memory card.
- Failed Recovery Attempts: If you’ve tried photo recovery software and haven’t been successful.
- Critical Data: If the photos are extremely important and you can’t afford to lose them.
Finding a Reputable Data Recovery Service:
- Research: Look for data recovery services with good reviews and a proven track record.
- Free Evaluation: Choose a service that offers a free evaluation to assess the damage and provide a quote.
- No Data, No Fee: Look for a service with a “no data, no fee” policy, meaning you only pay if they successfully recover your data.
3.3. Checking for Backup Copies
Regular backups are crucial for protecting your photos. Check your backup drives or services for copies of your missing photos.
Where to Look for Backups:
- External Hard Drives: If you use external hard drives for backups, connect them to your computer and search for your photos.
- NAS Devices: If you use a network-attached storage (NAS) device, access it and check for your photos.
- Cloud Backup Services: If you use cloud backup services like Backblaze or Carbonite, log in to your account and download your photos.
- Time Machine (Mac): If you use a Mac, check your Time Machine backups.
4. Best Practices for Preventing Photo Loss in the Future
Losing photos can be a traumatic experience. To prevent future losses, adopt these best practices for photo storage and backup.
4.1. Implement a Robust Backup Strategy
A robust backup strategy is the cornerstone of photo protection. The 3-2-1 rule is a widely recommended approach.
The 3-2-1 Backup Rule:
- 3 Copies: Keep at least three copies of your photos.
- 2 Different Media: Store the copies on at least two different types of storage media (e.g., hard drive, cloud).
- 1 Offsite Location: Keep one copy offsite, in case of fire, theft, or other disasters.
4.2. Use Cloud Storage Services
Cloud storage services provide an easy and reliable way to back up your photos. They offer automatic backups, version history, and accessibility from anywhere.
Popular Cloud Storage Services:
| Service | Storage Capacity | Pricing | Key Features |
|---|---|---|---|
| iCloud Photos | 5GB (Free) | Starts at $0.99/month for 50GB | Seamless integration with Apple devices, automatic syncing |
| Google Photos | 15GB (Free) | Starts at $1.99/month for 100GB | AI-powered organization, automatic backups, sharing options |
| Dropbox | 2GB (Free) | Starts at $11.99/month for 2TB | File sharing, version history, integration with other apps |
| OneDrive | 5GB (Free) | Starts at $1.99/month for 100GB | Integration with Microsoft Office, automatic backups, file sharing |
| Backblaze | Unlimited | $7/month per computer | Unlimited storage, automatic backups, version history |
4.3. Regularly Check and Maintain Your Storage Devices
Regularly check the health of your hard drives and memory cards. Look for signs of failure, such as unusual noises, slow performance, or file corruption.
Tools for Checking Hard Drive Health:
- Windows: Use the built-in “Check Disk” utility.
- Mac: Use the “Disk Utility” app.
- Third-Party Tools: Use tools like CrystalDiskInfo or SeaTools.
4.4. Practice Safe File Management
Good file management practices can prevent accidental deletion and make it easier to find your photos.
Tips for Safe File Management:
- Organize Your Photos: Create a clear folder structure for your photos, organized by date, event, or project.
- Use Descriptive File Names: Use descriptive file names that include the date, location, and subject of the photo.
- Double-Check Before Deleting: Always double-check before deleting any files or folders.
- Empty the Trash Regularly: Empty the Trash or Recycle Bin regularly, but only after you’ve confirmed that you don’t need any of the deleted files.
4.5. Be Careful with Memory Cards
Memory cards are susceptible to damage and corruption. Handle them with care and follow these tips.
Tips for Handling Memory Cards:
- Use High-Quality Cards: Use high-quality memory cards from reputable brands.
- Format Cards Regularly: Format your memory cards regularly in your camera to prevent file corruption.
- Don’t Remove Cards During Writing: Don’t remove memory cards from your camera or computer while they are writing data.
- Store Cards Safely: Store memory cards in protective cases to prevent physical damage.
4.6. Protect Against Malware
Malware can delete or corrupt your photos. Use a reputable antivirus program and keep it up to date.
Tips for Protecting Against Malware:
- Install Antivirus Software: Install a reputable antivirus program and keep it up to date.
- Scan Regularly: Scan your computer and storage devices regularly for malware.
- Be Careful with Downloads: Be careful when downloading files from the internet. Only download files from trusted sources.
- Avoid Suspicious Links: Avoid clicking on suspicious links in emails or on websites.
5. Understanding File Systems and Photo Storage
A deeper understanding of file systems and how photos are stored can be helpful in preventing data loss and improving recovery chances.
5.1. File Systems Explained
A file system is the method your operating system uses to organize and store files on a storage device. Different file systems have different characteristics and are suited for different purposes.
Common File Systems:
| File System | Operating System | Key Features |
|---|---|---|
| NTFS | Windows | Robust, supports large files, security features |
| APFS | macOS | Modern, optimized for SSDs, encryption, snapshots |
| FAT32 | Cross-Platform | Simple, compatible with many devices, limited file size (4GB) |
| exFAT | Cross-Platform | Supports large files, compatible with many devices, commonly used for memory cards and external drives |
Understanding File System Fragmentation:
Over time, files on a storage device can become fragmented, meaning they are stored in non-contiguous blocks. This can slow down performance and increase the risk of data loss.
- Defragmentation: Defragmenting your hard drive can improve performance by reorganizing the files into contiguous blocks. Windows has a built-in defragmentation tool. macOS generally doesn’t require defragmentation due to its file system design.
5.2. Photo File Formats
Understanding different photo file formats can help you choose the best format for your needs and understand how they are stored.
Common Photo File Formats:
| File Format | Description | Pros | Cons |
|---|---|---|---|
| JPEG | Lossy compression, widely used for photos, good for web and sharing | Small file size, compatible with most devices and software | Loss of quality with each save, not ideal for editing |
| TIFF | Lossless compression, high quality, used for professional photography and archiving | High quality, good for editing and printing | Large file size, not as widely compatible as JPEG |
| RAW | Uncompressed, unprocessed data from the camera sensor, provides the most flexibility for editing | Maximum quality, allows for extensive editing and adjustments | Very large file size, requires specialized software for viewing and editing |
| PNG | Lossless compression, supports transparency, used for graphics and web images | Good quality, supports transparency | Larger file size than JPEG for photos |
Choosing the Right File Format:
- JPEG: Use for everyday photos, web images, and sharing.
- TIFF: Use for professional photography, archiving, and printing.
- RAW: Use for serious editing and when you need the highest possible quality.
- PNG: Use for graphics, web images with transparency, and when you need lossless compression.
5.3. SSD vs. HDD for Photo Storage
Solid-state drives (SSDs) and hard disk drives (HDDs) have different characteristics that affect their suitability for photo storage.
SSD (Solid-State Drive):
- Pros: Faster read and write speeds, more durable, lower power consumption, quieter.
- Cons: More expensive per gigabyte, limited write cycles (though this is less of a concern with modern SSDs).
HDD (Hard Disk Drive):
- Pros: Cheaper per gigabyte, larger storage capacities.
- Cons: Slower read and write speeds, less durable, higher power consumption, noisier.
Which is Better for Photo Storage?
- SSD: Ideal for storing your operating system, photo editing software, and actively used photo libraries. The faster speeds will significantly improve performance.
- HDD: Ideal for long-term storage and backups. The lower cost per gigabyte makes it more economical for large photo archives.
6. Utilizing dfphoto.net for Your Photography Needs
At dfphoto.net, we understand the importance of protecting your photographic memories. We offer a range of resources to help you improve your photography workflow, prevent data loss, and find inspiration.
6.1. Explore Tutorials and Guides
dfphoto.net provides a wealth of tutorials and guides on various photography topics, including:
- Photo Editing Techniques: Learn how to use software like Adobe Photoshop and Lightroom to enhance your photos.
- Backup Strategies: Discover the best backup methods for protecting your photo library.
- File Management Tips: Get tips on organizing your photos and preventing data loss.
- Equipment Reviews: Read reviews of the latest cameras, lenses, and accessories.
6.2. Connect with the Photography Community
Join the dfphoto.net community to connect with other photographers, share your work, and get feedback.
- Forums: Participate in discussions on various photography topics.
- Galleries: Showcase your photos and get inspired by others.
- Workshops and Events: Attend online and in-person workshops and events to improve your skills.
6.3. Find Inspiration
dfphoto.net is a great place to find inspiration for your photography.
- Featured Photographers: Discover talented photographers and their stunning work.
- Photo Contests: Participate in photo contests and challenge yourself creatively.
- Articles and Blog Posts: Read articles and blog posts on various photography topics, including composition, lighting, and storytelling.
7. Answering Your Questions: FAQs About Missing Photos
Here are some frequently asked questions about missing photos, along with concise answers to help you quickly resolve your issues.
7.1. Where Do Deleted Photos Go on My iPhone?
Deleted photos on your iPhone go to the “Recently Deleted” album in the Photos app, where they remain for 30 days before being permanently deleted.
7.2. How Can I Recover Permanently Deleted Photos?
Recovering permanently deleted photos is difficult but possible with data recovery software or professional data recovery services, which scan your device for traces of the deleted files.
7.3. Why Are My iCloud Photos Not Syncing?
iCloud Photos may not be syncing due to insufficient storage, disabled iCloud Photos, or a poor internet connection; check your settings and connection to resolve the issue.
7.4. How Do I Unhide Photos on My Mac?
To unhide photos on your Mac, open Photos, click “View” in the menu bar, select “Show Hidden Photo Album,” then select the Hidden album and unhide the desired photos.
7.5. What Is the Best Photo Recovery Software?
The best photo recovery software depends on your needs, but popular options include Recuva, EaseUS Data Recovery Wizard, and Disk Drill, each offering different features and success rates.
7.6. How Can I Back Up My Photos to the Cloud?
To back up your photos to the cloud, use services like iCloud Photos, Google Photos, Dropbox, or OneDrive, ensuring automatic syncing is enabled in the settings.
7.7. What Is the 3-2-1 Backup Rule?
The 3-2-1 backup rule advises keeping three copies of your data, on two different types of storage media, with one copy stored offsite.
7.8. How Do I Check the Health of My Hard Drive?
To check the health of your hard drive, use built-in tools like “Check Disk” on Windows or “Disk Utility” on macOS, or third-party tools like CrystalDiskInfo.
7.9. What Is the Difference Between JPEG and RAW?
JPEG is a lossy compression format suitable for sharing, while RAW is an uncompressed format retaining all image data for maximum editing flexibility.
7.10. Should I Use SSD or HDD for Photo Storage?
Use SSDs for faster access to frequently used photos and editing software, and HDDs for long-term storage and backups due to their higher capacity and lower cost per gigabyte.
8. Conclusion: Safeguarding Your Photographic Legacy
Losing photos can be a disheartening experience, but with the right knowledge and tools, you can recover your lost images and prevent future losses. By understanding the common causes of photo loss, implementing a robust backup strategy, and practicing safe file management, you can safeguard your photographic legacy for years to come. Remember to explore the resources available at dfphoto.net to enhance your photography journey and protect your precious memories.
Ready to take control of your photo storage and recovery? Visit dfphoto.net today to explore our comprehensive guides, connect with a vibrant community of photographers, and discover the tools you need to safeguard your visual assets. Don’t let photo loss hold you back—start building a secure and inspiring photography workflow today.
Address: 1600 St Michael’s Dr, Santa Fe, NM 87505, United States.
Phone: +1 (505) 471-6001
Website: dfphoto.net
Alt text: Recovering deleted photos using Disk Drill data recovery software, displaying a list of recoverable files.