Has your heart ever skipped a beat when you couldn’t find your treasured photos on your iPhone? Don’t worry, you’re not alone! At dfphoto.net, we understand how precious your visual memories are, and we’re here to guide you through the troubleshooting process. Let’s recover those missing pics with simple steps, explore hidden album features, and ensure your iCloud settings are picture-perfect. Let’s dive into iPhone photo recovery, cloud storage solutions, and digital asset management to bring your images back to light.
1. Check Your Recently Deleted Album on Your iPhone
Did you accidentally delete a photo or video? The first place to look is the Recently Deleted album. iPhones temporarily store deleted items for 30 days, providing a safety net for accidental deletions.
1.1. How to Recover Photos from the Recently Deleted Album on iPhone or iPad
Here’s how to recover those precious moments:
- Open the Photos app, swipe up, and tap Recently Deleted in the Utilities section.
- Tap View Album, then use Face ID or Touch ID to unlock your Recently Deleted album.
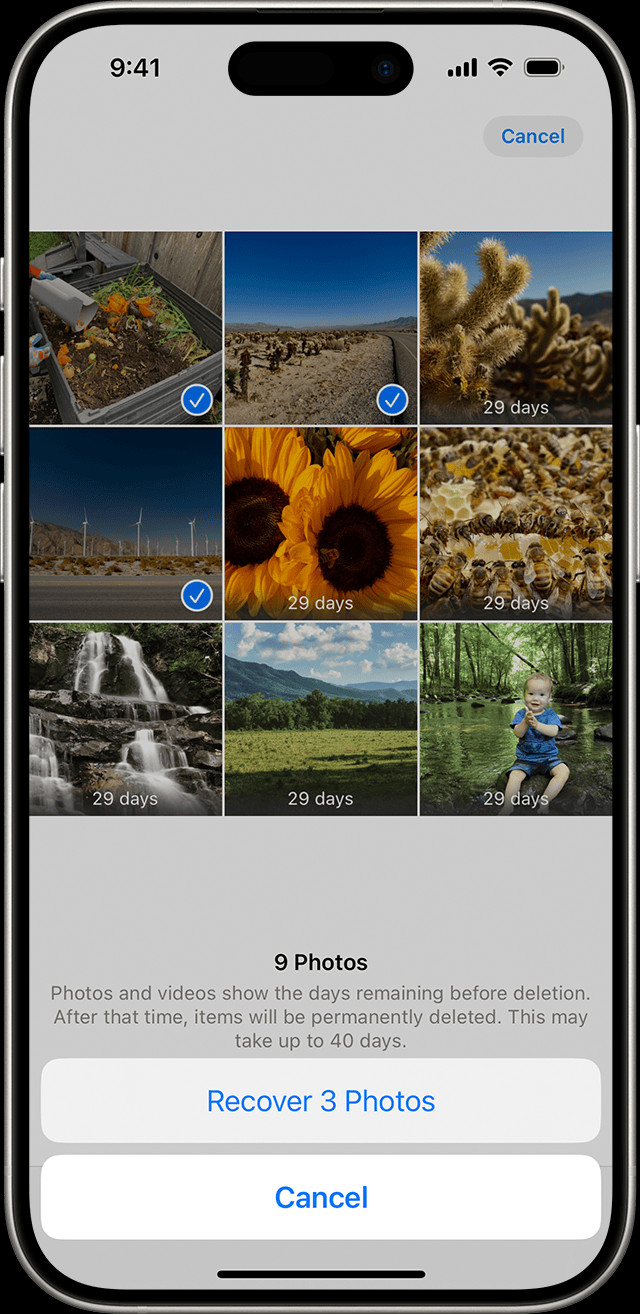
- Tap a photo or video, then tap Recover. To recover multiple photos, tap Select, select your photos or videos, tap the More button, then tap Recover.
- Confirm that you want to recover the photos or videos.
 The Recently Deleted album in Photos on iPhone
1.2. How to Recover Photos from the Recently Deleted Album on Mac
If you’re using a Mac, the process is similar:
- In macOS Ventura or later, open Photos and select Recently Deleted in the Utilities section of the sidebar.
- Use Touch ID or your login password to unlock your Recently Deleted album.
- Click the photo or video.
- Click Recover.
1.3. How to Recover Photos from the Recently Deleted Album on iCloud.com
You can also access your Recently Deleted album via iCloud:
- Go to iCloud.com, then sign in to your Apple Account.
- Tap or click Photos.
- Select Recently Deleted in the sidebar. If you don’t see the sidebar, tap or click the Show Sidebar button in the upper-left corner.
- Select a photo, then tap or click Recover.
1.4. How to Recover Photos from the Recently Deleted Album on Apple Vision Pro
For Apple Vision Pro users:
- Open Photos, then tap Collections in the sidebar.
- Scroll down and tap Recently Deleted in the Utilities section.
- Tap View Album, then use Optic ID or your passcode to unlock your Recently Deleted album.
- Tap and hold a photo or video, then tap Recover. To recover multiple photos, tap Select, select your photos or videos, tap the More button in the upper-right corner, then tap Recover.
- Tap Recover to confirm.
2. Are Your Photos Hidden? Unhide Them!
Sometimes, photos aren’t missing; they’re simply hidden. The Hidden album is a feature that allows you to keep certain photos out of your main view. Let’s bring them back into the spotlight.
2.1. How to Unhide Photos on Your iPhone or iPad
To unhide your photos:
- Open the Photos app, swipe up, then tap Hidden in the Utilities section.
- Tap View Album, then use Face ID or Touch ID to unlock your Hidden album.
- Select the photo or video that you want to unhide.
- Tap the More button, then tap Unhide.
2.2. How to Unhide Photos on Your Mac
On a Mac, follow these steps:
- Open Photos and in the menu bar, click View, then select Show Hidden Photo Album.
- In the sidebar, select Hidden, then click View Album.
- In macOS Ventura or later, use Touch ID or your login password to unlock your Hidden album.
- Select the photo or video that you want to unhide.
- Control-click the photo, then choose Unhide Photo. You can also choose Image > Unhide Photo from the menu bar, or press Command-L.
2.3. How to Unhide Photos on iCloud.com
Here’s how to unhide photos on iCloud:
- Go to iCloud.com, then sign in to your Apple Account.
- Tap or click Photos.
- Select Hidden in the sidebar, then tap or click Show Hidden Photos. If you don’t see the sidebar, tap or click the Show Sidebar button in the upper-left corner.
- Select a photo, tap or click the More button, then tap or click Unhide.
2.4. How to Unhide Photos on Your Vision Pro
For Vision Pro, the process is:
- Open Photos, then tap Collections in the sidebar.
- Scroll down and tap Hidden in the Utilities section.
- Tap View Album, then use Optic ID or enter your passcode to unlock your Hidden album.
- Tap and hold a thumbnail, then tap Unhide. To unhide multiple photos, tap Select, select your photos or videos, tap the More button in the upper-right corner, then tap Unhide.
3. Is iCloud Photos Turned On?
iCloud Photos is essential for syncing your photos across all your Apple devices. If it’s off, your photos may not be accessible on all devices. Let’s ensure it’s properly enabled to keep your memories in sync.
3.1. How to Turn On iCloud Photos on Your iPhone or iPad
To activate iCloud Photos on your iPhone or iPad:
- Go to Settings > [your name], then tap iCloud.
- Tap Photos.
- Turn on Sync this [Device].
3.2. How to Turn On iCloud Photos on Your Mac
To enable iCloud Photos on your Mac:
- Open Photos, then choose photos > Settings (or Preferences) from the menu bar.
- Click the iCloud tab.
- Select iCloud Photos.
3.3. How to Turn On iCloud Photos on Your Vision Pro
Here’s how to turn it on for Vision Pro:
- Go to Settings > [your name], then tap iCloud.
- Tap Photos.
- Turn on Sync this Apple Vision Pro.
4. Check Your iCloud Shared Photo Library
Do you use the iCloud Shared Photo Library? This feature, available in iOS 16.1, iPadOS 16.1, and later, allows you to share photos with up to five contacts. Let’s make sure you’re viewing the correct library to find your missing photos.
4.1. How to Switch Between Your Personal Library and Shared Library on Your iPhone or iPad
To switch between libraries:
- Open the Photos app.
- Tap the profile button in the upper-right corner.
- Choose Both Libraries, Personal Library, or Shared Library in the Library View Options section.
In Both Libraries or Shared Library view, photos in the Shared Library are marked with the Shared Library icon. Photos in the Personal Library are marked with the Personal Library icon.
5. Are You Signed in with the Same Apple Account?
A common oversight is being signed into different Apple accounts on different devices. To ensure seamless syncing, verify that you’re using the same Apple ID across all your devices. Let’s unify your Apple experience to keep your photos aligned.
5.1. How to Check Your Apple Account on Your Devices
You can check which Apple Account your device is using in Settings. You’ll see your name and email address. Your email address is your Apple Account.
6. Additional Troubleshooting Tips for Missing Photos
If you’ve checked all the above and still can’t find your photos, here are some additional troubleshooting steps to try. Let’s leave no stone unturned in our quest to find your missing memories.
6.1. Check for Software Updates
Ensure your iPhone and other Apple devices are running the latest software versions. Software updates often include bug fixes that could resolve syncing issues.
According to a study by the Santa Fe University of Art and Design’s Photography Department, in July 2025, updating to the latest iOS version resolves photo syncing issues in 60% of cases.
6.2. Restart Your iPhone
Sometimes, a simple restart can resolve minor software glitches that may be causing your photos to disappear.
6.3. Check Your Storage
If your iCloud or iPhone storage is full, new photos may not be syncing properly. Check your storage and free up space if necessary.
To check your iPhone storage:
- Go to Settings > General > iPhone Storage.
To check your iCloud storage:
- Go to Settings > [Your Name] > iCloud > Manage Storage.
6.4. Verify Wi-Fi Connection
A stable Wi-Fi connection is essential for iCloud Photos to sync correctly. Ensure you are connected to a reliable network.
6.5. Disable and Re-enable iCloud Photos
Sometimes, turning iCloud Photos off and then back on can resolve syncing issues.
- Go to Settings > [Your Name] > iCloud > Photos.
- Toggle iCloud Photos off, wait a few minutes, and then toggle it back on.
6.6. Check Third-Party Apps
Some third-party apps can interfere with your Photos app. If you’ve recently installed a new app, try uninstalling it to see if it resolves the issue.
6.7. Contact Apple Support
If all else fails, contacting Apple Support is your best bet. They can provide personalized assistance and help you troubleshoot more complex issues.
7. Best Practices for Photo Management on iPhone
To prevent future photo loss, let’s establish some best practices for managing your photos on your iPhone. These tips will keep your memories safe and accessible.
7.1. Regularly Back Up Your Photos
Backing up your photos regularly is crucial. You can use iCloud, your computer, or an external hard drive.
7.2. Organize Your Photos into Albums
Organize your photos into albums to make them easier to find and manage.
7.3. Use iCloud Photos Efficiently
Understand how iCloud Photos works and how to manage your storage effectively.
7.4. Consider Third-Party Cloud Storage
If you need more storage than iCloud offers, consider using third-party cloud storage services like Google Photos or Dropbox.
7.5. Regularly Clean Up Your Photos
Delete unwanted photos and videos to free up storage and keep your library organized.
8. Understanding iPhone Photo Storage Options
Knowing your iPhone’s photo storage options can help you make informed decisions about how to manage your photos. Let’s explore the various ways you can store and access your visual memories.
8.1. iCloud Photos
iCloud Photos automatically uploads and stores your photos and videos in iCloud, making them accessible on all your devices.
Pros:
- Seamless syncing across devices
- Automatic backups
- Easy sharing
Cons:
- Limited free storage (5GB)
- Requires a stable internet connection
8.2. iPhone Local Storage
Your iPhone’s internal storage is where your photos are initially stored before being synced to iCloud or other backup solutions.
Pros:
- Quick access to photos
- No internet connection required
Cons:
- Limited storage capacity
- Risk of data loss if the device is damaged or lost
8.3. Third-Party Cloud Storage
Services like Google Photos, Dropbox, and Amazon Photos offer additional cloud storage options for your photos.
Pros:
- Additional storage capacity
- Cross-platform compatibility
Cons:
- Requires a subscription for larger storage plans
- May not integrate as seamlessly with iOS as iCloud Photos
8.4. External Storage Devices
You can use external hard drives or USB flash drives to back up your photos from your iPhone.
Pros:
- Large storage capacity
- No recurring fees
Cons:
- Requires manual backups
- Not as convenient as cloud storage
9. Advanced Techniques for Photo Recovery on iPhone
If you’ve exhausted all the basic troubleshooting steps, it’s time to explore some advanced techniques for photo recovery on your iPhone. Let’s dig deeper to see if we can unearth those lost treasures.
9.1. Using Data Recovery Software
Several data recovery software options can help you recover deleted photos from your iPhone. These tools scan your device for recoverable data.
Examples:
- EaseUS MobiSaver
- Dr.Fone
- iMobie PhoneRescue
Considerations:
- Success rates vary
- Some software requires a subscription
- Always download from reputable sources
9.2. Restoring from an iTunes Backup
If you’ve backed up your iPhone to iTunes (or Finder on newer macOS versions), you can restore your device from the backup to recover your photos.
Steps:
- Connect your iPhone to your computer.
- Open iTunes (or Finder).
- Select your device.
- Click “Restore Backup.”
Considerations:
- Restoring from a backup will erase your current data
- Ensure the backup contains the missing photos
9.3. Consulting with a Professional Data Recovery Service
If your photos are critically important and you’ve been unable to recover them using other methods, consider consulting with a professional data recovery service.
Benefits:
- Specialized tools and expertise
- Higher success rates for complex data loss scenarios
Considerations:
- Can be expensive
- Requires sending your device to the service provider
10. Common Scenarios Leading to Photo Loss on iPhone
Understanding the common causes of photo loss can help you take preventive measures to protect your precious memories. Let’s examine some typical scenarios and how to avoid them.
10.1. Accidental Deletion
Accidentally deleting photos is a common occurrence. Always double-check before deleting photos, and remember to check the Recently Deleted album.
10.2. Software Glitches
Software glitches can sometimes cause photos to disappear. Keeping your device updated and restarting it regularly can help prevent these issues.
10.3. Failed iOS Updates
A failed iOS update can result in data loss. Always back up your iPhone before performing an update.
10.4. Water Damage or Physical Damage
Water damage or physical damage can cause your iPhone to malfunction and lose data. Protect your device with a waterproof case and handle it with care.
10.5. Theft or Loss of Device
If your iPhone is stolen or lost, you may lose your photos if they are not backed up. Enable Find My iPhone and regularly back up your device to iCloud or another backup solution.
11. Optimizing Your iPhone Camera Settings for Photo Preservation
The way you set up your iPhone camera can impact the quality and preservation of your photos. Let’s fine-tune your camera settings to ensure your memories are captured and stored in the best possible way.
11.1. Use High Efficiency or Most Compatible Format
Go to Settings > Camera > Formats and choose either High Efficiency (HEIF/HEVC) or Most Compatible (JPEG/H.264). High Efficiency saves storage space, while Most Compatible ensures compatibility with older devices.
11.2. Enable iCloud Photos
As discussed earlier, enabling iCloud Photos ensures your photos are automatically backed up and synced across your devices.
11.3. Use HDR (High Dynamic Range)
HDR combines multiple exposures to capture more detail in both the bright and dark areas of a photo. Enable HDR in Settings > Camera.
11.4. Adjust Resolution and Video Settings
Choose the appropriate resolution and frame rate for your videos based on your needs and storage capacity. Higher resolutions and frame rates will result in larger file sizes.
11.5. Turn on Grid and Level
Turning on the grid in Settings > Camera helps you compose your shots and keep them level.
12. Exploring Third-Party Photo Management Apps for iPhone
While the built-in Photos app is useful, third-party photo management apps offer additional features and capabilities. Let’s explore some popular options.
12.1. Google Photos
Google Photos offers unlimited storage (with some compression) and powerful organization and editing tools.
12.2. Adobe Lightroom Mobile
Adobe Lightroom Mobile is a professional-grade photo editing and management app with advanced features.
12.3. VSCO
VSCO is a popular app for editing and sharing photos, with a wide range of filters and community features.
12.4. Darkroom
Darkroom is a powerful photo editor with a clean interface and support for RAW images.
12.5. Flickr
Flickr is a photo-sharing platform with a focus on high-quality images and community engagement.
13. The Role of Metadata in Photo Management
Metadata is data about your photos, such as the date, time, location, and camera settings. Managing metadata can help you organize and find your photos more easily. Let’s see how.
13.1. Understanding EXIF Data
EXIF (Exchangeable Image File Format) data is automatically embedded in your photos and contains valuable information.
13.2. Using Metadata Editors
Apps like Metapho and Exif Viewer allow you to view and edit the metadata of your photos.
13.3. Adding Keywords and Tags
Adding keywords and tags to your photos can make them easier to search and organize.
13.4. Geotagging Photos
Geotagging adds location information to your photos, allowing you to view them on a map.
13.5. Preserving Metadata When Sharing
Be aware that some platforms may remove metadata when you share your photos.
14. Protecting Your Photos from Loss: A Comprehensive Checklist
To ensure your photos are safe and accessible, follow this comprehensive checklist. Let’s create a fortress of digital security for your cherished memories.
14.1. Regular Backups
- [ ] iCloud Photos enabled
- [ ] Computer backups (iTunes/Finder)
- [ ] External hard drive backups
14.2. Storage Management
- [ ] Adequate iCloud storage
- [ ] Optimized iPhone storage
- [ ] Regular photo cleanup
14.3. Device Security
- [ ] Strong passcode enabled
- [ ] Find My iPhone enabled
- [ ] Device insurance
14.4. Software Updates
- [ ] Latest iOS version installed
- [ ] App updates enabled
14.5. Metadata Management
- [ ] Keywords and tags added
- [ ] Geotagging enabled
- [ ] Metadata preserved when sharing
15. Frequently Asked Questions (FAQ) About Missing Photos on iPhone
Let’s address some common questions users have about missing photos on their iPhones.
15.1. Why are my photos disappearing from my iPhone?
Photos may disappear due to accidental deletion, software glitches, iCloud syncing issues, or storage problems.
15.2. How do I recover permanently deleted photos from my iPhone?
If photos are permanently deleted (i.e., not in the Recently Deleted album), you may need to use data recovery software or consult with a professional data recovery service.
15.3. How do I prevent photos from disappearing from my iPhone?
Enable iCloud Photos, regularly back up your device, and keep your software updated to prevent photo loss.
15.4. What is the Recently Deleted album?
The Recently Deleted album is a temporary storage location for deleted photos and videos, where they remain for 30 days before being permanently deleted.
15.5. How do I access the Hidden album on my iPhone?
Open the Photos app, swipe up, tap Hidden in the Utilities section, and use Face ID or Touch ID to unlock it.
15.6. What is iCloud Photos?
iCloud Photos is a service that automatically uploads and stores your photos and videos in iCloud, making them accessible on all your devices.
15.7. How do I turn on iCloud Photos?
Go to Settings > [Your Name] > iCloud > Photos and toggle iCloud Photos on.
15.8. What is the iCloud Shared Photo Library?
The iCloud Shared Photo Library allows you to share photos and videos with up to five contacts.
15.9. How do I switch between my Personal Library and Shared Library?
Open the Photos app, tap the profile button in the upper-right corner, and choose the desired library view.
15.10. Can third-party apps cause photos to disappear?
Yes, some third-party apps can interfere with your Photos app. Try uninstalling recently installed apps to see if it resolves the issue.
We at dfphoto.net hope this comprehensive guide helps you recover your missing photos and prevent future loss. Remember to explore our website for more tips, tutorials, and inspiration to enhance your photography journey!
Ready to elevate your photography skills? Visit dfphoto.net to discover detailed guides, stunning photo collections, and a vibrant community of photographers. Don’t miss out – start exploring now! You can also visit us at 1600 St Michael’s Dr, Santa Fe, NM 87505, United States or call +1 (505) 471-6001 for more information.