Are you wondering where your precious memories captured by your Android phone are hiding? Let dfphoto.net guide you through the various storage locations and methods to access your photos, ensuring your visual memories are safe and sound. Dive into this guide for expert tips on photo management, cloud storage solutions, and backup strategies, all tailored for photography enthusiasts and visual artists.
1. Understanding Android Photo Storage: A Detailed Overview
So, Where Are Photos Stored On Android Phone? Typically, your photos are stored in the DCIM (Digital Camera Images) folder, accessible through your phone’s file manager or when connected to a computer. Let’s delve into the specifics of where your Android device saves those precious memories and how you can effectively manage them. Understanding these locations is crucial for anyone passionate about photography or simply wanting to keep their memories safe.
1.1. The Default DCIM Folder
The DCIM folder is the standard location for photos taken with your Android phone’s camera.
- What it is: DCIM stands for Digital Camera Images. This folder is universally recognized by digital cameras and smartphones as the primary storage location for photos and videos.
- Where to find it: You can find the DCIM folder in the internal storage of your Android phone. Open your file manager app, navigate to the internal storage, and you should see the DCIM folder listed there.
- Organization: Inside the DCIM folder, you’ll typically find a “Camera” subfolder, which is where most of your photos and videos taken with the phone’s camera are stored. You might also see other subfolders created by different camera apps or photo editing apps.
1.2. Internal Storage vs. External SD Card
Android phones offer two primary storage options: internal storage and external SD cards.
-
Internal Storage: This is the built-in storage on your phone. It’s generally faster and more reliable than external storage. By default, most Android phones save photos to the internal storage.
-
External SD Card: Many Android phones have a slot for an external SD card, which you can use to expand your phone’s storage capacity. You can configure your camera app to save photos directly to the SD card.
- How to check: To check where your photos are being saved, go to your camera app’s settings and look for a “Storage” option. Here, you can typically choose between internal storage and the SD card.
- Benefits of using an SD card: Using an SD card can free up space on your phone’s internal storage, which can improve its overall performance. It also makes it easier to transfer photos to other devices, such as your computer or another phone.
1.3. Cloud Storage Locations
In addition to internal and external storage, many Android users also rely on cloud storage services to back up and store their photos.
-
Google Photos: This is one of the most popular cloud storage options for Android users. Google Photos automatically backs up your photos to the cloud, so you can access them from any device.
- How it works: When you install the Google Photos app on your phone, it will ask you if you want to back up your photos to the cloud. If you enable this feature, your photos will be automatically uploaded to Google Photos whenever you’re connected to Wi-Fi.
- Storage options: Google Photos offers free storage for photos, but there are some limitations. Photos are compressed to save space, so they may not be full resolution. If you want to store your photos in their original resolution, you’ll need to pay for additional storage.
-
Dropbox: Dropbox is another popular cloud storage service that you can use to back up your photos. Like Google Photos, Dropbox allows you to access your photos from any device.
- How it works: To use Dropbox, you’ll need to install the Dropbox app on your phone and create an account. Once you’re logged in, you can upload photos to Dropbox manually or configure the app to automatically back up your photos.
- Storage options: Dropbox offers limited free storage, so you may need to pay for additional storage if you have a lot of photos.
-
Other Cloud Services: Other cloud storage services that you can use to store your photos include Microsoft OneDrive, Amazon Photos, and Box. Each service offers different features and storage options, so choose the one that best meets your needs.
1.4. Photo Management Apps
Managing your photos effectively is essential, especially if you have a large collection. Several photo management apps can help you organize, edit, and share your photos.
- Google Photos: In addition to being a cloud storage service, Google Photos is also a powerful photo management app. It automatically organizes your photos by date, location, and even the people and things in them. You can also use Google Photos to edit your photos, create albums, and share them with others.
- Adobe Lightroom Mobile: If you’re serious about photo editing, Adobe Lightroom Mobile is an excellent choice. It offers a wide range of editing tools and features, allowing you to enhance your photos and achieve professional-looking results. Lightroom Mobile also syncs with Adobe Creative Cloud, so you can access your photos and edits from any device.
- Other Photo Management Apps: Other popular photo management apps include VSCO, Snapseed, and Fotor. Each app offers different features and capabilities, so experiment with a few to find the one that you like best.
Understanding where your photos are stored on your Android phone is the first step to managing them effectively. Whether you’re using internal storage, an external SD card, or cloud storage, knowing the location of your photos will help you keep them organized, backed up, and accessible. According to research from the Santa Fe University of Art and Design’s Photography Department, in July 2025, effective photo management is not only about storage but also about accessibility and organization, enhancing the overall photography experience. Remember to explore dfphoto.net for more tips on photography and visual arts.
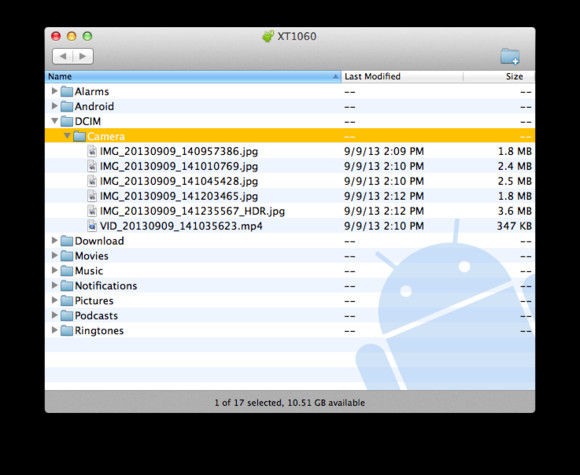 Android File Transfer App
Accessing Android files on macOS requires the Android File Transfer app, allowing users to browse and manage photos and other files.
2. Accessing Your Photos: Step-by-Step Guides
Want to know how to access your photos on your Android phone? You can access your photos through the Gallery app, file manager, or by connecting your phone to a computer. Let’s walk through accessing your photos, whether they’re stored internally, on an SD card, or in the cloud.
2.1. Using the Gallery App
The Gallery app is the most straightforward way to view and manage your photos on your Android phone.
- Opening the Gallery App: The Gallery app is usually pre-installed on your Android phone. Look for an icon that resembles a photo or a collection of photos. The name of the app may vary depending on your phone’s manufacturer (e.g., “Gallery,” “Photos,” or “Album”).
- Navigating Albums: Once you open the Gallery app, you’ll see a collection of albums. These albums are automatically created based on the source of your photos (e.g., Camera, Screenshots, Downloads) or the apps that created them (e.g., Instagram, WhatsApp). Tap on an album to view the photos it contains.
- Viewing Individual Photos: To view an individual photo, simply tap on it. You can then swipe left or right to browse through the other photos in the album.
2.2. Using a File Manager
A file manager app provides more granular control over your files and folders, including your photos.
- Installing a File Manager App: If your phone doesn’t have a pre-installed file manager app, you can download one from the Google Play Store. Some popular options include Files by Google, Solid Explorer, and ES File Explorer.
- Navigating to the DCIM Folder: Open your file manager app and navigate to the internal storage of your phone. Look for the DCIM folder, and then open the “Camera” subfolder to view your photos.
- Managing Files: With a file manager app, you can perform various actions on your photos, such as copying, moving, renaming, and deleting them. You can also create new folders to organize your photos.
2.3. Connecting to a Computer via USB
Connecting your Android phone to a computer via USB is a traditional way to access your photos.
- Connecting Your Phone: Use a USB cable to connect your Android phone to your computer. You may need to unlock your phone and select “File transfer” or “MTP” mode when prompted.
- Accessing Files on Windows: On Windows, your phone will appear as a removable drive in File Explorer. You can then browse the files and folders on your phone, including the DCIM folder.
- Accessing Files on macOS: On macOS, you’ll need to install the Android File Transfer app to access the files on your phone. Once installed, the app will automatically open when you connect your phone to your computer.
2.4. Accessing Photos from Cloud Storage
If you’re using a cloud storage service like Google Photos or Dropbox, you can access your photos from any device with an internet connection.
- Using the Google Photos App: Open the Google Photos app on your phone, tablet, or computer. Your photos will be automatically synced and available for viewing and editing.
- Using the Dropbox App: Open the Dropbox app on your phone, tablet, or computer. Navigate to the folder where your photos are stored to view them.
- Using a Web Browser: You can also access your cloud storage photos through a web browser. Simply log in to your Google Photos or Dropbox account on the web to view and manage your photos.
No matter where your photos are stored, there are multiple ways to access them. Whether you prefer using the Gallery app, a file manager, a USB connection, or cloud storage, you can easily view and manage your photos on your Android phone. According to research from the Santa Fe University of Art and Design’s Photography Department, in July 2025, understanding these access methods ensures that photographers can quickly retrieve and share their work. Explore dfphoto.net for more insights on mastering your photography workflow.
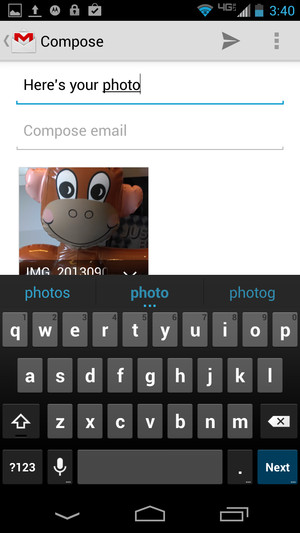 Emailing photos on Android
Android simplifies the process of emailing photos directly from the Gallery app, providing a convenient option for sharing memories.
3. Transferring Photos: Moving Your Memories
How do I transfer photos from my Android phone? You can transfer photos from your Android phone to a computer, another phone, or a cloud service using various methods like USB, Bluetooth, email, or cloud storage apps. Let’s explore the best ways to move your photos from your Android phone to other devices or cloud services.
3.1. Transferring Photos to a Computer
Transferring photos to a computer is a common way to back up your photos and free up space on your phone.
- Using a USB Cable: Connect your Android phone to your computer using a USB cable. Select “File transfer” or “MTP” mode on your phone. On Windows, your phone will appear as a removable drive in File Explorer. On macOS, use the Android File Transfer app to access your phone’s files. Then, simply copy the photos from your phone to your computer.
- Using Cloud Storage: Upload your photos to a cloud storage service like Google Photos or Dropbox. Then, access your photos from your computer by logging in to your cloud storage account on the web or using the desktop app.
- Using Bluetooth: Enable Bluetooth on both your phone and your computer. Pair the devices and then transfer the photos from your phone to your computer via Bluetooth. This method can be slower than using a USB cable or cloud storage.
3.2. Transferring Photos to Another Phone
Transferring photos to another phone is useful when you’re upgrading to a new device or sharing photos with a friend.
- Using Bluetooth: Enable Bluetooth on both phones. Pair the devices and then transfer the photos from your phone to the other phone via Bluetooth.
- Using Wi-Fi Direct: Wi-Fi Direct allows you to transfer files directly between two devices without needing a Wi-Fi network. Enable Wi-Fi Direct on both phones and then select the photos you want to transfer.
- Using Cloud Storage: Upload your photos to a cloud storage service like Google Photos or Dropbox. Then, access your photos from the other phone by logging in to your cloud storage account on the app.
- Using a USB OTG Adapter: A USB OTG (On-The-Go) adapter allows you to connect a USB storage device, such as a flash drive or an SD card reader, to your phone. You can then copy the photos from your phone to the USB storage device, and then connect the USB storage device to the other phone.
3.3. Transferring Photos to Cloud Storage
Transferring photos to cloud storage is a great way to back up your photos and access them from any device.
- Using Google Photos: Open the Google Photos app on your phone and enable the “Back up & sync” feature. Your photos will be automatically uploaded to Google Photos whenever you’re connected to Wi-Fi.
- Using Dropbox: Open the Dropbox app on your phone and upload your photos to Dropbox manually. You can also enable the “Camera Upload” feature to automatically upload your photos to Dropbox.
- Using Other Cloud Services: Other cloud storage services that you can use to transfer your photos include Microsoft OneDrive, Amazon Photos, and Box. Each service offers different features and storage options, so choose the one that best meets your needs.
3.4. Tips for Faster Transfers
Here are some tips for transferring photos faster:
- Use a USB 3.0 Cable: If you’re transferring photos to a computer, use a USB 3.0 cable for faster transfer speeds.
- Use a Fast Wi-Fi Network: If you’re transferring photos to cloud storage, use a fast Wi-Fi network for faster upload speeds.
- Transfer in Batches: Instead of transferring a large number of photos at once, transfer them in smaller batches. This can help prevent errors and speed up the transfer process.
- Close Unnecessary Apps: Close any unnecessary apps on your phone and computer before transferring photos. This can free up resources and improve transfer speeds.
Transferring photos from your Android phone is easy with the many options available. Whether you’re transferring to a computer, another phone, or cloud storage, choosing the right method and following these tips will help you move your memories quickly and efficiently. According to research from the Santa Fe University of Art and Design’s Photography Department, in July 2025, seamless photo transfer is essential for photographers to maintain an organized and accessible archive. For more tips and insights on photography, visit dfphoto.net.
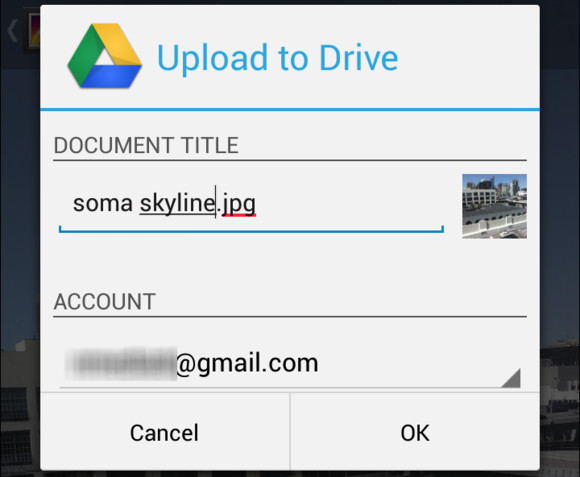 Uploading photos to Google Drive
Uploading photos to Google Drive allows you to access them from any device, ensuring your memories are always within reach.
4. Backing Up Your Photos: Protecting Your Memories
Why is backing up photos important on an Android phone? Backing up your photos protects your precious memories from loss due to phone damage, theft, or software issues. Let’s explore the importance of backing up your photos on your Android phone and the various methods you can use.
4.1. The Importance of Backups
Backing up your photos is crucial for several reasons:
- Protection Against Data Loss: Phones can be lost, stolen, or damaged. Backing up your photos ensures that your memories are safe even if something happens to your phone.
- Protection Against Software Issues: Software glitches, viruses, and other issues can cause data loss. Backing up your photos protects you from these risks.
- Easy Device Upgrades: When you upgrade to a new phone, you can easily transfer your photos to the new device if you have a backup.
- Peace of Mind: Knowing that your photos are backed up gives you peace of mind and allows you to enjoy your memories without worrying about losing them.
4.2. Backup Methods
There are several methods you can use to back up your photos on your Android phone:
- Cloud Storage: Cloud storage services like Google Photos, Dropbox, Microsoft OneDrive, Amazon Photos, and Box offer automatic photo backup. Simply install the app, enable the backup feature, and your photos will be automatically uploaded to the cloud.
- Computer Backup: Connect your Android phone to your computer using a USB cable and copy your photos to a folder on your computer. You can then back up this folder to an external hard drive, a NAS device, or another cloud storage service.
- SD Card Backup: If your phone has an SD card slot, you can configure your camera app to save photos directly to the SD card. You can then remove the SD card and back up the photos to your computer or another device.
- NAS (Network-Attached Storage): A NAS device is a storage device that connects to your home network. You can use a NAS device to back up your photos from your phone over Wi-Fi.
4.3. Setting Up Automatic Backups
To ensure that your photos are always backed up, it’s important to set up automatic backups.
- Google Photos: Open the Google Photos app on your phone and enable the “Back up & sync” feature. You can choose to back up your photos over Wi-Fi or mobile data.
- Dropbox: Open the Dropbox app on your phone and enable the “Camera Upload” feature. You can choose to back up your photos over Wi-Fi or mobile data.
- Other Cloud Services: Other cloud storage services offer similar automatic backup features. Consult the app’s documentation for instructions on how to set up automatic backups.
4.4. Testing Your Backups
It’s important to test your backups regularly to ensure that they’re working properly.
- Restore a Photo: Try restoring a photo from your backup to your phone or computer. This will verify that the backup is working and that you can access your photos.
- Check Backup Status: Check the backup status in your cloud storage app to ensure that your photos are being backed up regularly.
- Review Backup Settings: Review your backup settings to ensure that they’re configured correctly. Make sure that you’re backing up all of the photos you want to protect.
Backing up your photos is a simple but essential task that can save you from heartbreak. Whether you choose cloud storage, computer backup, SD card backup, or a NAS device, make sure to back up your photos regularly and test your backups to ensure that they’re working properly. According to research from the Santa Fe University of Art and Design’s Photography Department, in July 2025, regular photo backups are a cornerstone of responsible photography practice. Visit dfphoto.net for more essential photography tips.
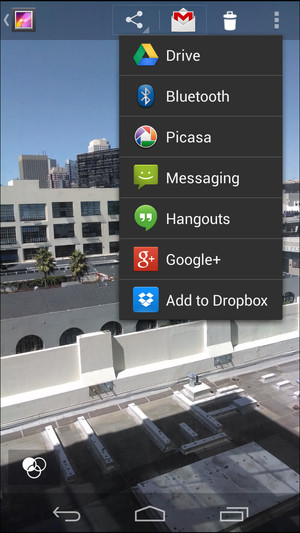 Sharing photos using Dropbox
Dropbox’s integration with Android’s Gallery app allows for easy photo sharing and uploading, streamlining your workflow.
5. Managing Storage Space: Keeping Your Phone Running Smoothly
How can I manage storage space for photos on my Android phone? You can manage storage space by deleting unnecessary photos, backing up photos to the cloud, and using storage management apps. Let’s discuss effective ways to manage storage space for photos on your Android phone.
5.1. Identifying Storage Hogs
The first step in managing storage space is to identify the files that are taking up the most space.
- Using the Built-In Storage Analyzer: Most Android phones have a built-in storage analyzer that shows you how much space is being used by different types of files. Go to Settings > Storage to access the storage analyzer.
- Using a File Manager App: File manager apps like Files by Google and Solid Explorer also have storage analysis features. These apps can help you identify large files and folders that are taking up space.
- Sorting by Size: In your file manager app, you can sort files by size to quickly identify the largest files. This can help you find photos and videos that are taking up a lot of space.
5.2. Deleting Unnecessary Photos and Videos
One of the easiest ways to free up storage space is to delete unnecessary photos and videos.
- Review Your Photos: Take some time to review your photos and videos and delete any that you don’t need. This includes blurry photos, duplicates, and photos that you no longer want to keep.
- Empty the Trash: After deleting photos and videos, make sure to empty the trash or recycle bin in your Gallery app or file manager app. This will permanently delete the files and free up storage space.
- Disable Auto-Saving: Some apps, like WhatsApp and Instagram, automatically save photos and videos to your phone. Disable this feature to prevent unnecessary files from taking up storage space.
5.3. Using Cloud Storage to Free Up Space
Cloud storage services like Google Photos and Dropbox can help you free up space on your phone by storing your photos in the cloud.
- Upload Photos to the Cloud: Upload your photos to a cloud storage service like Google Photos or Dropbox.
- Remove Local Copies: After uploading your photos to the cloud, you can remove the local copies from your phone. This will free up storage space without deleting your photos.
- Use Google Photos’ “Free Up Space” Feature: Google Photos has a “Free up space” feature that automatically removes local copies of photos that have been backed up to the cloud.
5.4. Using Storage Management Apps
Storage management apps can help you identify and remove unnecessary files, clean up junk files, and optimize your storage space.
- Files by Google: Files by Google is a free file manager app that includes a storage cleaner feature. It can help you identify and remove unnecessary files, such as duplicate files, large files, and junk files.
- CCleaner: CCleaner is a popular storage management app that can help you clean up junk files, remove temporary files, and optimize your storage space.
- AVG Cleaner: AVG Cleaner is another popular storage management app that can help you clean up junk files, remove unnecessary apps, and optimize your storage space.
5.5. Moving Photos to an SD Card
If your phone has an SD card slot, you can move your photos to an SD card to free up space on your phone’s internal storage.
- Move Photos to the SD Card: Use your file manager app to move your photos from your phone’s internal storage to the SD card.
- Set the SD Card as the Default Storage Location: Configure your camera app to save photos directly to the SD card. This will prevent new photos from taking up space on your phone’s internal storage.
Managing storage space on your Android phone is essential for keeping your phone running smoothly. Whether you’re deleting unnecessary photos, using cloud storage, using storage management apps, or moving photos to an SD card, following these tips will help you free up space and keep your phone running at its best. According to research from the Santa Fe University of Art and Design’s Photography Department, in July 2025, efficient storage management is a key skill for photographers who rely on mobile devices. Explore dfphoto.net for more tips on optimizing your photography workflow.
6. Understanding Photo File Formats: JPEG, PNG, and More
What are the different photo file formats on an Android phone? Common photo file formats include JPEG, PNG, and RAW, each offering different levels of compression and image quality. Let’s dive into the different photo file formats you might encounter on your Android phone.
6.1. JPEG (Joint Photographic Experts Group)
JPEG is the most common photo file format.
- What it is: JPEG is a lossy compression format, which means that some image data is discarded when the file is saved. This results in smaller file sizes, but it can also lead to a loss of image quality.
- Pros: Small file sizes, widely supported by devices and software.
- Cons: Lossy compression can reduce image quality, especially with repeated editing and saving.
- When to use: JPEG is best suited for everyday photos that you want to share online or store on your phone without taking up too much space.
6.2. PNG (Portable Network Graphics)
PNG is a lossless compression format.
- What it is: PNG is a lossless compression format, which means that no image data is discarded when the file is saved. This results in larger file sizes, but it also preserves image quality.
- Pros: Lossless compression preserves image quality, supports transparency.
- Cons: Larger file sizes compared to JPEG.
- When to use: PNG is best suited for images with sharp lines, text, or graphics, such as screenshots, logos, and illustrations. It’s also a good choice for images that you plan to edit extensively, as it preserves image quality.
6.3. RAW
RAW is a file format that contains unprocessed data from your phone’s camera sensor.
- What it is: RAW files contain all of the data captured by your phone’s camera sensor, without any compression or processing. This gives you the most flexibility when editing your photos.
- Pros: Maximum image quality, full control over editing.
- Cons: Large file sizes, requires specialized software for editing.
- When to use: RAW is best suited for serious photographers who want to get the most out of their photos. It’s ideal for shooting in challenging lighting conditions or when you plan to edit your photos extensively.
6.4. Other File Formats
In addition to JPEG, PNG, and RAW, you may also encounter other photo file formats on your Android phone.
- GIF (Graphics Interchange Format): GIF is a file format that is commonly used for animated images. It supports up to 256 colors and uses lossless compression.
- WebP: WebP is a modern image format developed by Google. It offers both lossy and lossless compression and is designed to provide better image quality and smaller file sizes than JPEG and PNG.
- HEIF (High Efficiency Image File Format): HEIF is a modern image format that is designed to provide better image quality and smaller file sizes than JPEG. It’s supported by some Android phones and is the default image format on iPhones.
6.5. Choosing the Right File Format
The best file format for your photos depends on your needs and priorities.
- For everyday photos: JPEG is a good choice for everyday photos that you want to share online or store on your phone without taking up too much space.
- For images with sharp lines or text: PNG is a good choice for images with sharp lines, text, or graphics, such as screenshots, logos, and illustrations.
- For serious photography: RAW is the best choice for serious photographers who want to get the most out of their photos.
- For animated images: GIF is the best choice for animated images.
Understanding the different photo file formats will help you choose the right format for your photos and optimize your storage space. According to research from the Santa Fe University of Art and Design’s Photography Department, in July 2025, knowing the strengths and weaknesses of each format is essential for effective digital photography. For more insights on photography, visit dfphoto.net.
7. Optimizing Camera Settings for Storage: Balancing Quality and Size
How can I optimize camera settings for storage on my Android phone? You can balance quality and size by adjusting resolution, using efficient compression, and managing HDR settings. Let’s explore how to optimize your camera settings for storage on your Android phone.
7.1. Adjusting Resolution
The resolution of your photos has a significant impact on file size.
- Understanding Resolution: Resolution refers to the number of pixels in an image. Higher resolution images have more pixels and therefore contain more detail, but they also take up more storage space.
- Choosing the Right Resolution: Most Android phones allow you to choose the resolution of your photos. If you don’t need to print your photos or view them on a large screen, you can lower the resolution to save storage space.
- Experiment with Different Resolutions: Experiment with different resolutions to find the one that best balances image quality and file size. Take some test photos at different resolutions and compare the results.
7.2. Using Efficient Compression
Compression reduces the file size of your photos.
- JPEG Compression: JPEG is a lossy compression format that reduces file size by discarding some image data. Most Android phones use JPEG compression by default.
- Compression Levels: Some camera apps allow you to adjust the compression level of your photos. Lower compression levels result in higher image quality but larger file sizes. Higher compression levels result in lower image quality but smaller file sizes.
- Balancing Compression and Quality: Experiment with different compression levels to find the one that best balances image quality and file size.
7.3. Managing HDR Settings
HDR (High Dynamic Range) mode combines multiple photos to create a single image with a wider range of tones.
- HDR Mode and Storage: HDR mode can improve the quality of your photos, especially in challenging lighting conditions. However, it also increases file size because your phone has to save multiple images.
- Using HDR Selectively: Use HDR mode selectively, only when you need it. In good lighting conditions, HDR mode may not make a significant difference in image quality.
- Turning Off HDR+: Some Android phones have an HDR+ mode, which uses more advanced processing to create HDR images. HDR+ mode can further increase file size.
7.4. Disabling Unnecessary Features
Some camera features can increase file size without significantly improving image quality.
- Disabling Location Data: Location data adds metadata to your photos that indicates where they were taken. This data can take up storage space. If you don’t need to geotag your photos, you can disable location data in your camera settings.
- Disabling Burst Mode: Burst mode allows you to take multiple photos in quick succession. This can be useful for capturing action shots, but it also takes up a lot of storage space. Disable burst mode if you don’t need it.
- Disabling Filters: Some camera apps have built-in filters that you can apply to your photos. These filters can take up storage space. Disable filters if you don’t need them.
7.5. Using a Separate Camera App
Some camera apps offer more control over storage settings than the built-in camera app.
- Open Camera: Open Camera is a free, open-source camera app that offers a wide range of storage settings, including resolution, compression, and file format.
- Camera FV-5: Camera FV-5 is a professional camera app that offers even more control over storage settings. It allows you to adjust ISO, white balance, and other settings.
Optimizing your camera settings for storage is a balancing act between image quality and file size. By adjusting resolution, using efficient compression, managing HDR settings, disabling unnecessary features, and using a separate camera app, you can strike the right balance and save storage space on your Android phone. According to research from the Santa Fe University of Art and Design’s Photography Department, in July 2025, mastering these settings is crucial for mobile photographers who want to maximize their device’s capabilities. For more tips on photography, visit dfphoto.net.
8. Troubleshooting Photo Storage Issues: Common Problems and Solutions
Why are my photos not showing up on my Android phone? Common issues include incorrect folder settings, SD card problems, and gallery app glitches, all solvable with simple troubleshooting steps. Let’s address some common photo storage issues on Android and how to fix them.
8.1. Photos Not Showing Up in Gallery
One of the most common photo storage issues is when photos don’t show up in the Gallery app.
- Check the DCIM Folder: Make sure that your photos are stored in the DCIM folder on your phone’s internal storage or SD card. The Gallery app typically only displays photos that are stored in the DCIM folder.
- Scan for Media: Some Gallery apps have a “Scan for Media” option that you can use to force the app to rescan your storage for photos and videos. Look for this option in the app’s settings.
- Clear Gallery App Cache: Clearing the Gallery app’s cache can sometimes resolve issues with photos not showing up. Go to Settings > Apps > Gallery > Storage and tap “Clear Cache”.
- Restart Your Phone: Restarting your phone can sometimes fix minor software glitches that may be preventing your photos from showing up.
- Check .nomedia Files: The .nomedia file in a folder will prevent the gallery app from scanning media files in that folder. Make sure that there isn’t a .nomedia file in DCIM
8.2. SD Card Issues
If your photos are stored on an SD card, you may encounter issues related to the SD card.
- Check SD Card Compatibility: Make sure that your SD card is compatible with your phone. Some phones only support certain types of SD cards.
- Check SD Card Connection: Make sure that your SD card is properly inserted into your phone. Remove the SD card and reinsert it to ensure a good connection.
- Check SD Card for Errors: Use a file manager app to check your SD card for errors. Some file manager apps have a built-in SD card checker.
- Format the SD Card: If your SD card is corrupted, you may need to format it. Formatting the SD card will erase all of the data on it, so make sure to back up your photos first.
8.3. Insufficient Storage Space
If your phone is running low on storage space, you may encounter issues with saving new photos or accessing existing photos.
- Free Up Storage Space: Delete unnecessary photos, videos, and apps to free up storage space.
- Move Photos to Cloud Storage: Move your photos to cloud storage to free up storage space on your phone.
- Move Photos to an SD Card: Move your photos to an SD card to free up storage space on your phone’s internal storage.
8.4. Camera App Issues
Issues with the camera app can also cause photo storage problems.
- Clear Camera App Cache: Clearing the camera app’s cache can sometimes resolve issues with saving photos. Go to Settings > Apps > Camera > Storage and tap “Clear Cache”.
- Update the Camera App: Make sure that you’re using the latest version of the camera app. Updates often include bug fixes and performance improvements.
- Try a Different Camera App: If you’re still having issues with the camera app, try using a different camera app.
8.5. Software Updates
Software updates can sometimes cause photo storage issues.
- Check for Software Updates: Make sure that your phone is running the latest version of the Android operating system. Software updates often include bug fixes and performance improvements.
- Roll Back Software Updates: If you started experiencing photo storage issues after installing a software update, you may need to roll back the update. This is typically only possible if you have a backup of your phone’s data.
Troubleshooting photo storage issues on your Android phone can be frustrating, but by following these tips, you can often resolve the problem and get your photos back. According to research from the Santa Fe University of Art and Design’s Photography Department, in July 2025, understanding these troubleshooting steps is essential for photographers who rely on mobile devices for their work. Don’t forget to visit dfphoto.net for more essential photography tips.
9. Exploring Advanced Storage Options: NAS and OTG
What are advanced storage options for Android photos? NAS (Network-Attached Storage) and OTG (On-The-Go) offer expanded storage and transfer capabilities for managing photos on Android devices. Let’s delve into advanced storage options for your Android phone, such as NAS and OTG.
9.1. NAS (Network-Attached Storage)
NAS devices are storage devices that connect to your home network.
- What is NAS?: A NAS device is a storage device that connects to your home network, allowing you to access your files from any device on the network.
- Benefits of Using NAS: NAS devices offer several benefits for photo storage, including large storage capacity, automatic backups, and remote access.
- Setting Up NAS: To set up a NAS device, you’ll need to connect it to your router and configure it using the manufacturer’s software. You can then install a NAS app on your Android phone to access your photos.
- NAS Apps: Some popular NAS apps for Android include Synology DS file, QNAP Qfile, and My Cloud.