Are you wondering what size photo you need for a locket? At dfphoto.net, we understand the importance of preserving precious memories. This guide provides expert advice on selecting, sizing, and printing the perfect locket photos, ensuring your cherished moments are beautifully displayed. Explore various photo sizes, shapes, and printing tips for optimal results, while enhancing your photography skills.
1. Understanding Locket Photos
Lockets are timeless pieces of jewelry that hold sentimental value, often containing small photos of loved ones. Selecting the right image and ensuring it fits perfectly can be a delicate process. But fear not, because you will be fully versed on this matter very soon.
1.1. What is the Significance of Locket Photos?
Locket photos serve as intimate keepsakes, allowing individuals to carry cherished memories with them. These tiny images often represent family, friends, or beloved pets, making the locket a deeply personal item. Lockets are typically given as gifts to commemorate special events like births, weddings, or anniversaries, turning them into treasured heirlooms.
1.2. Why is Choosing the Right Photo Important?
The photo you choose for your locket should resonate with personal significance. It should be a clear and recognizable image that evokes positive emotions. Selecting a photo that captures the essence of the person or moment you wish to remember is crucial for maximizing the locket’s sentimental value.
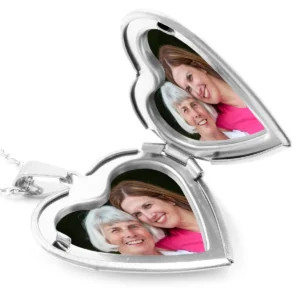 Heart Shaped Locket Photos
Alt text: Heart-shaped locket showcasing a loving couple’s portrait, symbolizing cherished memories and personal keepsakes
1.3. What Are the Key Considerations When Selecting a Photo?
When selecting a photo, consider the following:
- Image Clarity: Choose a high-resolution photo to ensure clarity when printed in a small size.
- Subject Matter: Opt for a photo where the subject’s face is easily discernible.
- Background: Select a photo with a simple, uncluttered background to avoid distractions.
- Emotional Connection: Pick an image that holds personal meaning and evokes positive memories.
2. Determining the Correct Locket Photo Size
The correct locket photo size is crucial for a perfect fit. Since lockets come in various shapes and sizes, measuring your locket accurately is the first step.
2.1. Why Does Locket Size Matter?
The size of your locket directly impacts the appearance of the photo inside. A photo that is too large will need to be trimmed, potentially cutting off important details. A photo that is too small will look insignificant and may not fill the space properly.
2.2. How to Measure Your Locket for the Photo
Follow these steps to measure your locket accurately:
- Gather Supplies: You will need a ruler or tape measure, a pencil, and a piece of paper.
- Open the Locket: Lay the locket open on a flat surface.
- Measure the Photo Area: Measure the height and width of the space where the photo will sit.
- Record Measurements: Write down the measurements in millimeters (mm) for accuracy.
2.3. What are the Standard Locket Photo Sizes?
While there is no universal standard, common locket photo sizes range from 15mm x 15mm to 25mm x 25mm. However, it’s essential to measure your specific locket to ensure a precise fit. Remember, each locket is unique, and accuracy is key.
3. Preparing Your Photo for Printing
Once you know the correct size, you’ll need to prepare your photo for printing. This involves cropping and possibly editing the image to ensure it looks its best in the locket.
3.1. How to Crop Your Photo to the Right Size
Cropping your photo ensures that the most important elements are visible within the locket’s dimensions. Follow these steps:
- Use Photo Editing Software: Open your photo in a photo editing program on your computer or smartphone.
- Select the Crop Tool: Choose the crop tool and enter the exact dimensions you measured from your locket.
- Adjust the Crop: Position the crop box over the area of the photo you want to include in the locket.
- Save the Cropped Photo: Save the cropped photo as a new file to preserve the original image.
3.2. What Editing Techniques Can Enhance Your Locket Photo?
Enhancing your locket photo involves adjusting brightness, contrast, and sharpness to make the image stand out. Consider these techniques:
- Brightness and Contrast: Adjust these settings to make the photo clearer and more vibrant.
- Sharpness: Increase sharpness slightly to enhance details, but avoid over-sharpening, which can make the image look grainy.
- Color Correction: Correct any color imbalances to ensure the photo looks natural.
3.3. How to Ensure High Resolution for Small Prints
To ensure your small locket photo looks sharp and clear, start with a high-resolution image. A resolution of at least 300 DPI (dots per inch) is recommended. This ensures that even when the photo is printed in a small size, the details remain crisp and defined.
4. Printing Your Locket Photos
Printing locket photos can be done at home or through a professional service. Each method has its advantages, depending on your needs and resources.
4.1. What Are the Options for Printing Locket Photos?
You have several options for printing locket photos:
- Home Printing: Use your home printer and photo paper to print the photos yourself.
- Online Photo Services: Upload your photos to an online service like PostSnap, which specializes in locket photos.
- Local Photo Labs: Visit a local photo lab or print shop for professional printing services.
4.2. How to Print Locket Photos at Home
Printing at home can be convenient and cost-effective. Here’s how to do it:
- Load Photo Paper: Load high-quality photo paper into your printer.
- Adjust Printer Settings: Set your printer to the highest quality photo printing mode.
- Print a Test Sheet: Print a test sheet on plain paper to check the size and alignment.
- Print Your Locket Photos: Print your locket photos and allow them to dry completely before handling.
4.3. What Are the Benefits of Using a Professional Printing Service?
Professional printing services offer several benefits:
- High-Quality Prints: Professional printers produce superior image quality with accurate colors and sharp details.
- Specialized Services: Some services, like PostSnap, specialize in locket photos, offering perfectly sized prints.
- Convenience: Online services allow you to upload your photos and receive the prints by mail, saving time and effort.
 Photo for locket
Alt text: A person delicately placing a small, rectangular photo into a silver locket, capturing a moment of personalization and sentimental value
5. Step-by-Step Guide to Printing Locket Photos with PostSnap
Using PostSnap simplifies the process of printing perfectly sized locket photos. Here’s a detailed guide:
5.1. How to Navigate to the Locket Photo Section
- Visit PostSnap: Go to the PostSnap website.
- Find Locket Photos: Navigate to the “Locket Photos” section.
- Get Started: Click on the “Get Started” button to begin the process.
5.2. Entering the Dimensions of Your Locket
- Input Width and Height: Enter the width and height dimensions you measured from your locket in millimeters.
- Double-Check Measurements: Ensure the measurements are accurate to avoid printing errors.
- Select Units: Confirm that the units are set to millimeters (mm).
5.3. Customizing Your Photo Print
- Choose Color Options: Select whether you want your photos printed in full color or black and white.
- Select Finish: Choose between a gloss or matte finish. Matte finishes often work best in lockets to reduce glare.
- Upload Your Photo: Click the “Upload” button and select the photo you prepared earlier.
5.4. Cropping and Tiling Your Photo
- Adjust Crop Box: Move the red crop box to ensure you are getting the right crop for your locket.
- Preview Image: Check the preview below to see how your photo will look when printed.
- Enable Tiling: Make sure to toggle the “Tiling” option on. This multiplies your image across the print, providing multiple copies for experimentation.
5.5. Finalizing and Ordering Your Print
- Approve Your Print: Once you are satisfied with the crop and settings, approve your print.
- Check Out: Proceed to the checkout and complete your order.
- Await Delivery: Wait for your locket photos to arrive in the mail.
6. Trimming and Fitting Your Locket Photo
Once your prints arrive, the final step is trimming and fitting the photo into your locket.
6.1. What Tools Do You Need for Trimming?
Gather the following tools for trimming:
- Sharp Scissors: Use curved nail scissors or embroidery scissors for clean edges.
- Pencil: For tracing the template.
- Locket Template: Either the one provided with the locket or one you created.
- Tweezers: Pointed tweezers work best for inserting the photo.
- Craft Glue (Optional): For securing the photo in place.
6.2. How to Use a Template to Trim Your Photo
- Place Template: Place your template over one of your tiled photos.
- Trace Around Template: Trace around the template with a pencil to create a faint trim line.
- Trim Carefully: Use sharp scissors to carefully trim along the traced line.
- Test Fit: Check if the trimmed photo fits into the locket. If not, trim small slivers off the edges until it fits smoothly.
6.3. Tips for Fitting the Photo into Your Locket
- Insert Photo: Insert the trimmed photo into your locket.
- Press Gently: Use pointed tweezers to gently press around the edges until the photo fits under the lip of the locket.
- Secure with Glue (Optional): If the photo doesn’t stay in place, add a small dot of craft glue to the back of the print before inserting it.
- Smooth Out Folds: If there are any folds or creases, carefully re-trim small slivers off the edges until the photo fits smoothly.
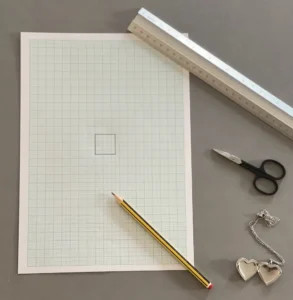 locket photo template
Alt text: A hand holding a paper template over a printed sheet of photos, illustrating the process of aligning and tracing for precise locket photo trimming
7. Creative Ideas for Locket Photos
Beyond traditional portraits, there are numerous creative ways to use locket photos.
7.1. What Other Types of Photos Can You Include?
Consider these alternative photo ideas:
- Pet Photos: Include a photo of your beloved pet.
- Scenic Views: Use a small landscape or scenic view that holds personal significance.
- Artwork: Insert a miniature piece of artwork or a meaningful symbol.
7.2. How Can You Personalize Locket Photos?
Personalize your locket photos by:
- Adding Text: Include a small quote, date, or name on the photo.
- Using Filters: Apply artistic filters to create a unique look.
- Creating a Collage: Combine multiple small images into a collage.
7.3. How to Use Locket Photos in Other Jewelry Pieces
Locket photos can be used in other jewelry pieces such as:
- Charms: Create small photo charms for bracelets.
- Pendants: Design custom pendants with embedded photos.
- Keychains: Add miniature photos to keychains for a personal touch.
8. Maintaining Your Locket and Photos
Proper maintenance will ensure your locket and photos remain in excellent condition for years to come.
8.1. How to Clean Your Locket Safely
- Use a Soft Cloth: Gently wipe the locket with a soft, dry cloth to remove dirt and fingerprints.
- Avoid Harsh Chemicals: Do not use harsh chemicals or abrasive cleaners, as they can damage the locket’s finish.
- Professional Cleaning: For valuable lockets, consider professional jewelry cleaning services.
8.2. How to Protect Your Locket Photos from Damage
- Laminate Photos: Consider laminating your locket photos to protect them from moisture and wear.
- Use Photo Sealant: Apply a photo sealant spray to protect the photo from fading and damage.
- Store Properly: When not wearing the locket, store it in a jewelry box or pouch to protect it from scratches and dust.
8.3. What Are the Best Storage Practices for Lockets?
Follow these storage practices to keep your locket in good condition:
- Individual Pouches: Store lockets in individual pouches to prevent scratching.
- Dry Environment: Keep lockets in a dry environment to prevent tarnishing.
- Avoid Direct Sunlight: Store lockets away from direct sunlight to prevent fading of the photos.
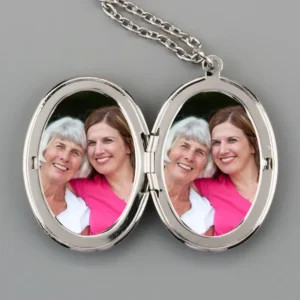 Oval shaped locket with photos
Alt text: An oval locket features two side-by-side images of a smiling toddler, capturing the timeless essence of family love and precious memories encased in jewelry.
9. Advanced Tips and Tricks for Locket Photography
Take your locket photography skills to the next level with these advanced tips and tricks.
9.1. Using Natural Light for Better Photos
Natural light can significantly enhance your photos. Here’s how to use it effectively:
- Shoot Outdoors: Take photos outdoors in natural light, avoiding direct sunlight, which can cause harsh shadows.
- Use Reflectors: Use reflectors to bounce light onto your subject, filling in shadows and creating a more balanced exposure.
- Shoot During Golden Hour: The hour after sunrise and the hour before sunset, known as the golden hour, provides warm, soft light that is ideal for portrait photography.
9.2. How to Take Sharp Photos with Your Smartphone
- Clean Your Lens: Wipe your smartphone lens with a clean, lint-free cloth before taking photos.
- Use Both Hands: Hold your smartphone with both hands to stabilize it and reduce camera shake.
- Tap to Focus: Tap on the screen to focus on your subject, ensuring it is sharp and clear.
- Avoid Digital Zoom: Avoid using digital zoom, which can reduce image quality. Instead, move closer to your subject.
9.3. Editing Photos on Mobile Devices
Mobile photo editing apps offer powerful tools for enhancing your photos on the go. Some popular apps include:
- Adobe Lightroom Mobile: Offers professional-grade editing tools for adjusting exposure, contrast, and color.
- Snapseed: Provides a range of filters and editing options, including selective adjustments and healing tools.
- VSCO: Features a wide selection of stylish filters and editing tools for creating unique looks.
10. The Future of Locket Photos
As technology evolves, so do the possibilities for locket photos.
10.1. What Are the Emerging Trends in Locket Photography?
Emerging trends include:
- Digital Lockets: Lockets with digital screens that can display multiple photos and videos.
- Augmented Reality Lockets: Lockets that use augmented reality to overlay digital content onto the physical photo.
- Interactive Lockets: Lockets with built-in sensors that respond to touch or movement.
10.2. How Technology is Changing Locket Design
Technology is influencing locket design by:
- 3D Printing: Allowing for the creation of custom-shaped lockets.
- Laser Engraving: Enabling intricate designs and personalized messages to be added to lockets.
- Smart Materials: Incorporating materials that can change color or display information.
10.3. What Innovations Can We Expect in the Future?
Future innovations may include:
- Holographic Photos: Lockets that display 3D holographic images.
- AI-Powered Photo Selection: AI algorithms that automatically select the best photos for your locket based on facial recognition and aesthetic criteria.
- Biometric Lockets: Lockets that use biometric sensors to verify the wearer’s identity and display personalized content.
FAQ: Frequently Asked Questions About Locket Photos
1. What is the best size photo for a locket?
The best size photo for a locket typically ranges from 15mm x 15mm to 25mm x 25mm, but it’s essential to measure your specific locket for an accurate fit.
2. How do I measure my locket for a photo?
To measure your locket, open it and use a ruler or tape measure to measure the height and width of the photo area in millimeters.
3. Can I print locket photos at home?
Yes, you can print locket photos at home using a high-quality printer and photo paper. Make sure to adjust the printer settings for the best results.
4. What is tiling when printing locket photos?
Tiling is a feature that multiplies your image across the print, providing multiple copies for experimentation when trimming the photo to fit the locket.
5. How do I crop my photo to the right size for a locket?
Use photo editing software to crop your photo, entering the exact dimensions you measured from your locket. Ensure the most important elements are within the crop area.
6. What if my locket doesn’t have a template?
If your locket doesn’t have a template, measure the photo area and create your own template using graph paper, tracing paper, and sharp scissors.
7. Should I choose a gloss or matte finish for my locket photo?
Matte finishes generally work better for locket photos as they reduce glare and make the image easier to see.
8. How can I protect my locket photo from damage?
Protect your locket photo by laminating it, applying a photo sealant spray, and storing the locket in a jewelry box or pouch.
9. What are some creative ideas for locket photos besides portraits?
Consider using photos of pets, scenic views, artwork, or creating a collage of multiple images for a personalized touch.
10. How do I clean my locket safely?
Clean your locket safely by gently wiping it with a soft, dry cloth. Avoid harsh chemicals and abrasive cleaners, and consider professional cleaning for valuable lockets.
Conclusion
Creating the perfect locket photo involves careful selection, precise sizing, and thoughtful printing. Whether you choose to print at home or use a professional service like PostSnap, the tips and techniques outlined in this guide will help you create a cherished keepsake. Remember, dfphoto.net is here to inspire and equip you with the knowledge to capture and preserve your most precious memories.
For more detailed guides, stunning photography inspiration, and a vibrant community of photography enthusiasts, visit dfphoto.net today. Explore our extensive resources and elevate your photography skills to new heights. Discover the beauty of photography with dfphoto.net and capture the moments that matter most.
