Framing your cherished photographs not only preserves them but also enhances their visual appeal. So, what size mat do I need for an 8×10 photo? Understanding the relationship between photo size, mat dimensions, and frame size is essential for achieving a professional and aesthetically pleasing result. At dfphoto.net, we guide you through selecting the perfect mat size for your 8×10 photos, ensuring they look their best. Explore our resources to master photo presentation, picture framing ideas, and matting techniques.
1. Understanding the Basics of Photo Matting
Matting a photo involves placing a border, typically made of mat board, between the photo and the frame. This not only adds a visual element but also serves to protect the photo.
1.1. What is a Photo Mat?
A photo mat is a border made of acid-free paperboard that surrounds a photograph within a frame. It separates the photo from the glazing (glass or acrylic) and enhances the overall presentation. Matting also prevents the photo from sticking to the glass, which can cause damage over time.
1.2. Why Use a Mat for an 8×10 Photo?
Using a mat for an 8×10 photo offers several benefits:
- Protection: It prevents the photo from touching the glass, reducing the risk of damage from moisture or sticking.
- Aesthetics: It enhances the visual appeal of the photo, drawing the viewer’s eye to the image and creating a sense of depth.
- Professional Look: A mat adds a polished, professional touch to your framed photo.
- Breathing Room: It provides visual space around the image, preventing it from feeling cramped within the frame.
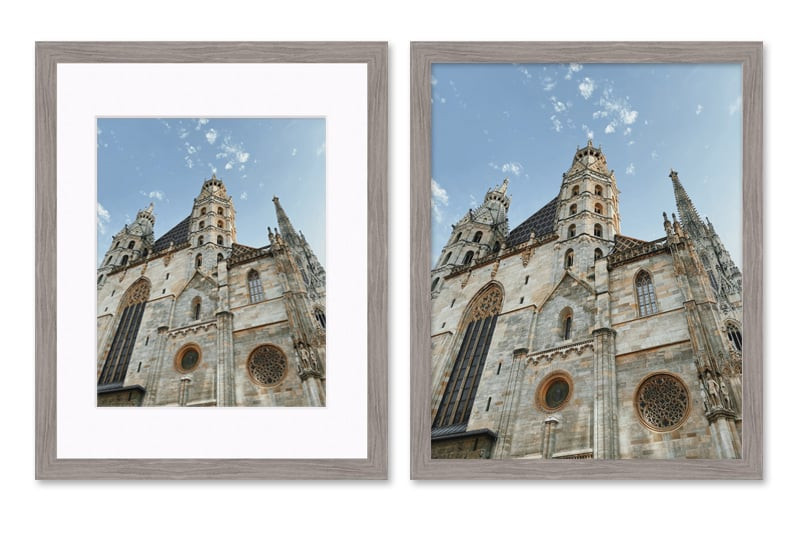 Framed and Matted Church
Alt text: Comparison of a framed photo with and without a mat, showcasing the enhanced visual appeal and professional look of the matted image.
2. Determining the Ideal Mat Size for Your 8×10 Photo
Choosing the right mat size depends on the desired aesthetic and the overall dimensions you want for the framed piece. Here’s a breakdown of common options and considerations.
2.1. Standard Mat Sizes for 8×10 Photos
The most common frame sizes used with an 8×10 photo are 11×14 and 16×20. These sizes allow for a balanced mat border around the photo.
| Frame Size | Mat Opening | Print Size |
|---|---|---|
| 11 x 14 | 7.5 x 9.5 | 8 x 10 |
| 16 x 20 | 10.5 x 13.5 | 8 x 10 |
2.2. Calculating Mat Dimensions
To calculate the mat dimensions, consider the following:
- Photo Size: 8×10 inches.
- Frame Size: The outer dimensions of the frame.
- Mat Border Width: The width of the mat around the photo.
Formula:
- Mat Outer Dimensions = Frame Size
- Mat Opening Dimensions = Photo Size – 0.25 inches (to ensure the mat slightly overlaps the photo, preventing it from falling through)
- Mat Border Width = (Mat Outer Dimensions – Mat Opening Dimensions) / 2
Example:
For an 8×10 photo in an 11×14 frame:
- Mat Outer Dimensions: 11×14 inches
- Mat Opening Dimensions: 7.75 x 9.75 inches
- Mat Border Width: [(11-7.75)/2] x [(14-9.75)/2] = 1.625 x 2.125 inches
2.3. Common Mat Border Widths
- Standard Border: 2-3 inches is a common choice for a balanced look.
- Wide Border: 3-5 inches can create a more dramatic effect, drawing more attention to the photo.
- Narrow Border: 1-2 inches offers a subtle, minimalist appearance.
2.4. Visualizing Different Mat Sizes
To better understand how different mat sizes affect the overall appearance of your framed 8×10 photo, consider these examples:
- 11×14 Frame with a 2-inch Mat Border: This provides a classic, balanced look. The mat adds enough space around the photo to draw the eye without overwhelming the image.
- 16×20 Frame with a 4-inch Mat Border: This creates a more dramatic and gallery-like presentation. The wider mat border makes the photo feel more significant and adds a sense of importance.
- 11×14 Frame with an Off-Center Mat: Experimenting with asymmetrical mat borders can add a contemporary, artistic touch. For example, you might have a wider border at the bottom and narrower borders on the sides and top.
Visualizing these options can help you determine the best fit for your personal style and the specific characteristics of your photograph. Remember, the goal is to enhance the photo, not overshadow it.
3. Step-by-Step Guide to Choosing the Right Mat
Choosing the right mat involves several considerations, from the size and color to the material and style.
3.1. Measure Your Photo
Accurately measure your 8×10 photo to ensure the mat opening is the correct size. It’s best to measure in millimeters for precision.
3.2. Select Your Frame Size
Decide on the frame size you want to use. Common options include 11×14, 16×20, or custom sizes.
3.3. Determine the Mat Border Width
Choose the desired width of the mat border. A standard border is 2-3 inches, but you can adjust this based on your aesthetic preferences.
3.4. Calculate the Mat Opening Size
Subtract 0.25 inches from both the width and height of your photo to determine the mat opening size. For an 8×10 photo, the mat opening should be 7.75 x 9.75 inches.
3.5. Choose Mat Color and Material
Select a mat color that complements your photo and the surrounding decor. Acid-free mat board is essential to protect your photo from damage over time. Common mat colors include white, off-white, black, and gray.
3.6. Consider Double Matting
Double matting involves using two layers of mat board, with a narrow inner mat that provides a subtle accent color. This can add depth and visual interest to your framed photo.
3.7. Test Your Combination
Before finalizing your choice, test the combination of photo, mat, and frame to ensure they work well together. You can do this by laying the mat over your photo and placing it inside the frame to get a sense of the final result.
4. Mat Color and Material Choices
The color and material of your mat can significantly impact the overall look of your framed photo.
4.1. Common Mat Colors and Their Impact
- White or Off-White: These are classic choices that provide a clean, neutral look. They work well with most photos and decor styles.
- Black: A black mat can create a dramatic effect, especially with black and white photos. It adds contrast and draws the viewer’s eye to the image.
- Gray: Gray mats offer a sophisticated, modern look. They can be a good choice for photos with cool tones.
- Colored Mats: Colored mats can add personality and complement specific colors in your photo. However, it’s important to choose a color that enhances the photo without overpowering it.
4.2. Acid-Free vs. Non-Acid-Free Mats
Acid-free mats are essential for preserving your photos over time. Non-acid-free mats can cause yellowing and deterioration of the photo, especially in the long term. Always choose acid-free mats for valuable or sentimental photos.
4.3. Mat Board Materials
- Paper Mat Board: This is the most common and affordable option. It’s available in a wide range of colors and thicknesses.
- Rag Mat Board: Made from 100% cotton rag, this is the highest quality option. It’s acid-free and lignin-free, offering the best protection for your photos.
- Alpha-Cellulose Mat Board: This is a mid-range option that offers good protection at a more affordable price than rag mat board.
5. Custom Mat Cutting Options
For unique sizes or design preferences, custom mat cutting is an excellent option.
5.1. Benefits of Custom Mat Cutting
- Precise Fit: Custom mat cutting ensures a perfect fit for your photo and frame.
- Unique Designs: You can create custom mat designs, such as multiple openings or decorative cuts.
- Personalization: Custom mats allow you to personalize your framed photos to match your style and decor.
5.2. How to Order a Custom Mat
- Measure Your Photo: Accurately measure your photo in millimeters for the best results.
- Choose Your Frame Size: Determine the size of the frame you want to use.
- Specify Mat Dimensions: Provide the outer dimensions of the mat and the dimensions of the mat opening.
- Select Mat Color and Material: Choose the color and material of your mat board.
- Place Your Order: Submit your measurements and preferences to a custom mat cutting service.
5.3. DIY Mat Cutting
If you prefer to cut your own mats, you’ll need a mat cutter, a straight edge, and a supply of mat board. This can be a cost-effective option for those who enjoy DIY projects, but it requires precision and practice.
6. Framing Considerations for 8×10 Photos
In addition to choosing the right mat, selecting the right frame is crucial for enhancing your photo.
6.1. Frame Styles and Materials
- Wood Frames: Wood frames offer a classic, timeless look. They’re available in a variety of finishes, from natural wood to painted colors.
- Metal Frames: Metal frames provide a sleek, modern appearance. They’re a good choice for contemporary photos and decor styles.
- Acrylic Frames: Acrylic frames offer a minimalist, frameless look. They’re a good option for showcasing photos without distraction.
6.2. Glazing Options: Glass vs. Acrylic
- Glass: Glass is a common glazing option that provides clarity and scratch resistance. However, it can be heavy and prone to breakage.
- Acrylic: Acrylic is a lightweight, shatter-resistant alternative to glass. It’s a good choice for large frames or homes with children or pets.
6.3. Frame Color and Its Impact
The color of your frame can significantly impact the overall look of your framed photo. Choose a frame color that complements your photo and the surrounding decor.
- Black Frames: Black frames add contrast and draw attention to the photo.
- White Frames: White frames provide a clean, neutral look that works well with most photos.
- Wood Frames: Wood frames offer a warm, natural appearance that complements a variety of photos.
- Metal Frames: Metal frames provide a sleek, modern look that works well with contemporary photos.
7. The Psychology of Displaying Photos
How you display your photos can influence the way they are perceived and appreciated.
7.1. How Matting Affects Perception
Matting creates a visual buffer between the photo and the frame, allowing the viewer to focus on the image without distraction. It also adds a sense of importance and professionalism.
7.2. Creating a Focal Point
By choosing the right mat and frame, you can create a focal point that draws the viewer’s eye to the photo. This can be especially effective with larger photos or those with strong visual elements.
7.3. Enhancing Emotional Impact
The way you frame and display your photos can enhance their emotional impact. For example, a warm-toned mat and frame can evoke feelings of nostalgia and comfort, while a cool-toned mat and frame can create a sense of calm and serenity.
8. Real-World Examples of Matting Choices
Examining real-world examples can provide inspiration and guidance when selecting mat sizes and colors for your 8×10 photos.
8.1. Black and White Photography
For black and white photos, a bright white or off-white mat is a classic choice. It offers a clean contrast that highlights the tones and details of the image. Alternatively, a black mat can create a dramatic and modern look, intensifying the contrast.
- Example: An 8×10 black and white portrait in an 11×14 frame with a bright white mat creates a timeless and elegant display.
8.2. Color Photography
When framing color photos, consider the dominant colors in the image. A neutral mat, such as white, off-white, or light gray, is often the safest choice as it won’t clash with the photo’s colors. However, you can also choose a mat color that complements or accentuates specific hues in the photo.
- Example: An 8×10 landscape photo with vibrant greens and blues can be beautifully displayed in a 16×20 frame with a soft gray-green mat.
8.3. Vintage or Sepia-Toned Photos
For vintage or sepia-toned photos, a cream or antique white mat can enhance the nostalgic feel. These warm tones complement the photo’s colors and add to its historical charm.
- Example: An 8×10 vintage family photo in an 11×14 frame with a cream mat and a distressed wood frame evokes a sense of history and sentimentality.
8.4. Artistic Prints
Artistic prints and illustrations allow for more creative matting choices. Consider using a double mat with a narrow inner mat in a complementary color to add depth and visual interest.
- Example: An 8×10 abstract print in a 16×20 frame with a white outer mat and a thin inner mat in a bold color, such as navy or deep red, can make the artwork pop.
By studying these examples, you can gain inspiration and a better understanding of how different matting choices can enhance the overall presentation of your 8×10 photos.
9. Maintaining and Protecting Your Framed Photos
Proper care and maintenance are essential for preserving your framed photos for years to come.
9.1. Cleaning Glass and Frames
Use a soft, lint-free cloth and a mild glass cleaner to clean the glass or acrylic glazing of your framed photos. Avoid using harsh chemicals or abrasive cleaners, which can damage the surface.
9.2. Preventing Fading and Damage
- Avoid Direct Sunlight: Direct sunlight can cause photos to fade over time. Hang your framed photos in a location away from direct sunlight.
- Control Humidity: High humidity can damage photos and frames. Keep your framed photos in a dry, well-ventilated area.
- Use UV-Protective Glazing: UV-protective glazing can help prevent fading and damage from ultraviolet light.
9.3. Storing Unframed Photos
If you have unframed photos that you want to store, keep them in acid-free sleeves or boxes. Store them in a cool, dry place away from direct sunlight.
10. Expert Tips for Perfect Photo Presentation
Follow these expert tips to achieve the perfect photo presentation every time.
10.1. Rule of Thirds in Matting
Apply the rule of thirds to your matting design by creating a slightly wider border at the bottom of the mat. This can help balance the composition and draw the viewer’s eye to the photo.
10.2. Using Spacers to Prevent Damage
Use mat spacers to create a gap between the photo and the glazing. This can help prevent the photo from sticking to the glass or acrylic and reduce the risk of damage from moisture.
10.3. Choosing the Right Frame for Your Decor
Consider your home decor when choosing a frame for your photo. A frame that complements your decor will enhance the overall look of your framed photo.
10.4. Seeking Professional Advice
If you’re unsure about choosing the right mat and frame for your photo, seek advice from a professional framer. They can provide expert guidance and help you achieve the perfect presentation.
11. Addressing Common Framing Mistakes
Avoiding common framing mistakes can save you time and money while ensuring your photos look their best.
11.1. Using the Wrong Mat Size
Using a mat that’s too small or too large can detract from the photo. Always measure your photo and calculate the mat dimensions carefully.
11.2. Choosing the Wrong Mat Color
Choosing a mat color that clashes with the photo can be distracting. Stick to neutral colors or choose a color that complements the photo.
11.3. Not Using Acid-Free Materials
Using non-acid-free mats and backing boards can damage your photos over time. Always use acid-free materials to protect your photos.
11.4. Overlooking Glazing Options
Choosing the wrong glazing can affect the clarity and protection of your photo. Consider the pros and cons of glass and acrylic before making a decision.
12. The Role of Lighting in Displaying Photos
Proper lighting can enhance the visual appeal of your framed photos.
12.1. Natural vs. Artificial Light
- Natural Light: Natural light can enhance the colors and details of your photos. However, direct sunlight can cause fading, so it’s best to use indirect natural light.
- Artificial Light: Artificial light can provide consistent, controlled illumination. Use LED lights or other energy-efficient bulbs to avoid damaging your photos.
12.2. Positioning Lights for Best Effect
Position lights to avoid glare and reflections on the glazing. Angle the lights to illuminate the photo evenly and highlight its details.
12.3. Avoiding Harsh Shadows
Avoid harsh shadows that can obscure parts of the photo. Use diffused lighting to create a soft, even illumination.
13. Trends in Photo Framing and Display
Staying up-to-date with the latest trends in photo framing and display can help you create a stylish and contemporary look.
13.1. Minimalist Frames
Minimalist frames with clean lines and simple designs are a popular trend. These frames allow the photo to take center stage without distraction.
13.2. Gallery Walls
Gallery walls featuring a collection of framed photos are a stylish way to display multiple images. Mix and match frame styles and sizes to create a unique, personalized display.
13.3. Floating Frames
Floating frames create the illusion that the photo is floating within the frame. These frames offer a modern, elegant look.
13.4. Sustainable Framing Materials
As sustainability becomes increasingly important, eco-friendly framing materials are gaining popularity. Look for frames made from recycled wood or other sustainable materials.
14. Resources for Learning More About Framing
Explore these resources to expand your knowledge of photo framing and display.
14.1. Online Tutorials
Many websites and video platforms offer tutorials on photo framing techniques. These tutorials can provide step-by-step guidance on measuring, cutting, and assembling frames.
14.2. Books on Framing and Display
Books on framing and display can provide in-depth information on the history, techniques, and trends in photo presentation.
14.3. Local Framing Workshops
Local framing workshops offer hands-on training in photo framing techniques. These workshops can be a great way to learn from experienced framers and meet other photography enthusiasts.
15. Frequently Asked Questions (FAQs)
Here are some frequently asked questions about choosing the right mat size for an 8×10 photo:
15.1. What is the standard mat size for an 8×10 photo?
The standard mat size for an 8×10 photo depends on the frame size. Common frame sizes are 11×14 and 16×20. For an 11×14 frame, the mat opening is typically 7.5×9.5 inches.
15.2. Can I use a frame without a mat?
Yes, you can use a frame without a mat. However, a mat can enhance the visual appeal of the photo and provide protection.
15.3. How do I measure my photo for a mat?
Measure the width and height of your photo in millimeters for the most accurate results.
15.4. What color mat should I choose?
Choose a mat color that complements your photo and the surrounding decor. White, off-white, black, and gray are common choices.
15.5. What is acid-free mat board?
Acid-free mat board is made from materials that won’t damage your photos over time. Always choose acid-free mats for valuable or sentimental photos.
15.6. Can I cut my own mats?
Yes, you can cut your own mats with a mat cutter, a straight edge, and a supply of mat board. However, this requires precision and practice.
15.7. What is double matting?
Double matting involves using two layers of mat board, with a narrow inner mat that provides a subtle accent color.
15.8. How do I clean my framed photos?
Use a soft, lint-free cloth and a mild glass cleaner to clean the glass or acrylic glazing of your framed photos.
15.9. How do I prevent my photos from fading?
Avoid direct sunlight, control humidity, and use UV-protective glazing to prevent your photos from fading.
15.10. Where can I buy custom mats?
You can order custom mats from online retailers or local framing shops.
Understanding these nuances allows you to make informed decisions that will enhance your photographic displays. At dfphoto.net, we are dedicated to providing you with the resources and inspiration you need to create stunning photo presentations.
Choosing the right mat size for an 8×10 photo is essential for enhancing its visual appeal and protecting it for years to come. By following this comprehensive guide, you can select the perfect mat and frame to showcase your cherished memories. Remember, exploring the resources at dfphoto.net will further enhance your understanding and skills in photography and presentation. Don’t forget to check out our articles on photographic techniques, visual storytelling, and artistic inspiration. Visit dfphoto.net today, located at 1600 St Michael’s Dr, Santa Fe, NM 87505, United States, or call us at +1 (505) 471-6001. Let dfphoto.net be your guide to mastering the art of photography and presentation.