Crafting the perfect passport photo is crucial, and understanding the specific size requirements is the first step. At dfphoto.net, we simplify this process, ensuring your photos meet all official guidelines, eliminating potential delays. Dive in to master passport photography, exploring camera settings and printing tips.
1. What is the Standard Passport Photo Size in the US?
The standard passport photo size in the United States is 2×2 inches (51×51 mm). This requirement applies to both printed and digital photos used for passport applications. The photo must be square, with the head centered and sized appropriately within the frame.
1.1 Why is the 2×2 Inch Size Important?
The 2×2 inch size is crucial because it is the universal standard set by the U.S. Department of State. This standardized size allows for easy processing and recognition during the passport application review. According to the U.S. Department of State, failing to adhere to this size can result in rejection of the application, causing significant delays.
1.2 How Does This Size Compare to Other Countries?
While 2×2 inches is the US standard, passport photo sizes vary internationally. For instance, in the UK, the standard size is 35×45 mm (approximately 1.38×1.77 inches). In Canada, the required size is 50×70 mm (approximately 2×2.75 inches). It’s essential to check the specific requirements of the country for which you are applying.
1.3 What Happens If My Photo Isn’t the Right Size?
Submitting a photo that doesn’t meet the 2×2 inch requirement will likely lead to rejection of your passport application. The automated systems and passport officials rely on consistent sizing to process applications efficiently. Retaking the photo and resubmitting can cause delays in obtaining your passport.
2. What Are the Key Dimensions for a US Passport Photo?
Besides the overall size, specific head dimensions must be met. The height of your head, measured from the bottom of your chin to the top of your head (including hair), should be between 1 inch and 1 3/8 inches (25 mm – 35 mm). Also, the eye level should be between 1 1/8 inches to 1 3/8 inches (28 mm – 35 mm) from the bottom of the photo.
2.1 How to Measure Head Size Accurately?
To accurately measure head size, use a ruler or a digital measuring tool. Ensure the measurement is taken from the bottom of the chin to the top of the head, including hair. Keep the measurement within the specified range of 1 inch to 1 3/8 inches.
2.2 What is the Importance of Eye Level in Passport Photos?
Eye level is critical because it helps ensure proper alignment and facial recognition. The specified range ensures that your eyes are positioned correctly in the photo, making it easier for passport officials and facial recognition software to identify you.
2.3 Tools for Checking Dimensions
Several tools can assist in checking dimensions. Digital photo editors like Adobe Photoshop or GIMP allow you to measure and crop images accurately. Online passport photo tools, often available on websites like dfphoto.net, can also automatically check and adjust the dimensions to meet requirements.
3. How Do Digital Passport Photo Requirements Differ?
Digital passport photos share the same dimensional requirements as printed ones (2×2 inches). However, they also have specific resolution and file size guidelines. The photo must be at least 600×600 pixels and should not exceed a file size of 240KB. The file format should be JPEG.
3.1 What is the Required Resolution for Digital Photos?
The U.S. Department of State requires a minimum resolution of 600×600 pixels for digital passport photos. This resolution ensures the image is clear and detailed enough for identification purposes.
3.2 What File Formats Are Acceptable?
The only acceptable file format for digital passport photos is JPEG (.jpg). This format is widely compatible and maintains a good balance between image quality and file size.
3.3 How to Adjust the File Size of Your Photo?
If your digital photo exceeds the 240KB file size limit, you can reduce it using photo editing software. In Adobe Photoshop, use the “Save for Web” option to compress the image while maintaining acceptable quality. Online tools like TinyJPG can also compress JPEG files efficiently.
4. Can I Take a Passport Photo with My Phone?
Yes, you can take a passport photo with your phone, but it’s crucial to follow all guidelines. Ensure your phone camera has sufficient resolution (at least 600×600 pixels). Use good lighting, a plain background, and position yourself correctly in the frame.
4.1 Best Practices for Using a Smartphone Camera
- Lighting: Use natural, diffused light. Avoid direct sunlight, which can cause shadows and glare.
- Background: Use a plain white or light-colored background. A white wall or sheet works well.
- Stability: Use a tripod or have someone hold the phone steady to avoid blurry photos.
- Distance: Maintain a proper distance to ensure your face is in focus and the proportions are accurate.
4.2 Apps and Tools for Smartphone Passport Photos
Several apps can help you take and format passport photos on your smartphone. Popular options include:
- Passport Photo Booth: Available on iOS and Android, this app guides you through the process and ensures your photo meets all requirements.
- ID Photo: This app lets you create, print, or email passport photos.
- EpSos.de ID Photo: A free Android app that helps you resize and adjust photos.
4.3 Common Mistakes to Avoid When Using a Phone
- Shadows: Avoid shadows on your face or background.
- Glare: Ensure your glasses do not have any glare.
- Blurry Photos: Make sure the photo is sharp and in focus.
- Incorrect Size: Verify that the final image is 2×2 inches and meets resolution requirements.
5. What Background is Required for a Passport Photo?
The background must be plain white or off-white. It should be free from patterns, shadows, or objects. This ensures that your face is the main focus and meets the strict requirements for facial recognition.
5.1 Why is a Plain Background Necessary?
A plain background is essential because it ensures that the focus remains on your face. Intricate backgrounds or shadows can interfere with facial recognition software and may lead to rejection of your application.
5.2 Suitable Background Options at Home
- White Wall: A plain white wall is the ideal background.
- White Sheet: Hang a white sheet or cloth behind you, ensuring it is smooth and wrinkle-free.
- Light Grey: A light grey background is also acceptable if a pure white one is not available.
5.3 How to Correct Background Issues?
If your background isn’t perfect, you can use photo editing software to correct it. In Photoshop, you can use the “Magic Wand” tool to select the background and fill it with white. Online tools like Clipping Magic can also remove and replace backgrounds easily.
6. What to Wear and Not Wear in a Passport Photo?
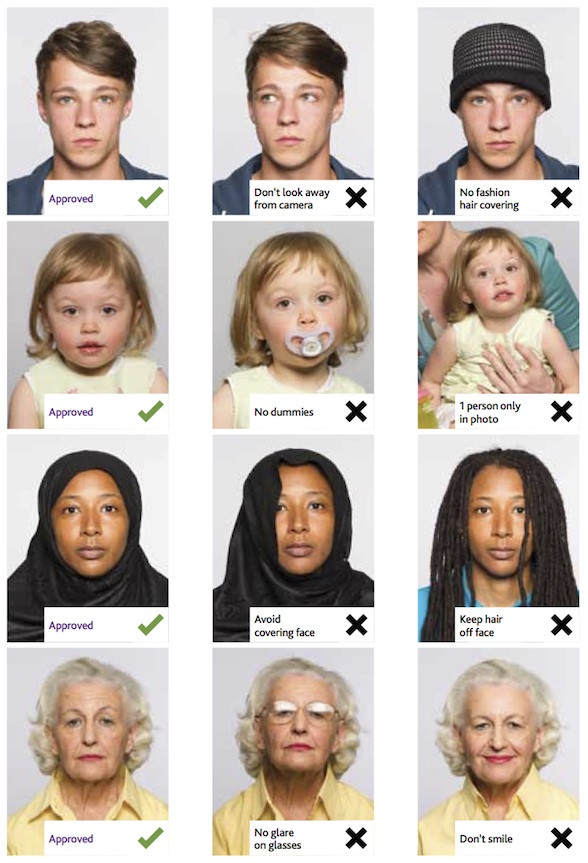
Wear everyday attire. Uniforms, clothing that resembles a uniform, and camouflage attire are not allowed. Avoid wearing white as it can blend with the background. Head coverings are only permitted for religious or medical reasons, with a signed statement confirming this.
6.1 Acceptable Clothing Options
- Casual Attire: Wear regular, everyday clothing.
- Colored Shirts: Choose colors that contrast with the white background, such as blue, green, or red.
- Simple Jewelry: Small, non-distracting jewelry is usually acceptable.
6.2 Unacceptable Clothing and Accessories
- Uniforms: Avoid wearing any type of uniform.
- Camouflage: Do not wear camouflage attire.
- White Clothing: Avoid wearing white as it can blend with the background.
- Sunglasses: Sunglasses and tinted glasses are not permitted.
- Hats: Hats and head coverings are generally not allowed unless for religious or medical reasons.
6.3 Rules for Religious Head Coverings
If you wear a head covering for religious reasons, submit a signed statement verifying that the head covering is part of traditional religious attire. Ensure that the head covering does not obscure your face and that your full facial features are visible.
7. Can You Smile in a Passport Photo?
The official guidelines state that you should have a neutral facial expression with both eyes open. A natural smile is allowed, but it should not be excessive or distort your facial features.
7.1 What is Considered a Neutral Expression?
A neutral expression means your mouth should be closed, and your facial muscles should be relaxed. Avoid frowning, squinting, or raising your eyebrows excessively.
7.2 Why is an Excessive Smile Not Allowed?
An excessive smile can distort your facial features, making it harder for facial recognition software and passport officials to accurately identify you. The goal is to present a clear and consistent representation of your face.
7.3 Tips for a Natural and Acceptable Smile
- Relax Your Face: Start by relaxing your facial muscles.
- Slight Smile: Allow for a slight, natural smile that doesn’t reveal your teeth excessively.
- Open Eyes: Ensure your eyes are open and visible.
- Practice: Practice in front of a mirror to find a comfortable and acceptable expression.
8. What Are the Rules for Glasses in Passport Photos?
As of November 1, 2016, glasses are generally not allowed in U.S. passport photos. If you must wear glasses for medical reasons, you need to provide a signed statement from a doctor. Ensure that your eyes are clearly visible and that there is no glare, reflections, or shadows on the lenses.
8.1 Why Are Glasses Generally Not Allowed?
Glasses can obstruct facial features and create glare or reflections, making it difficult for facial recognition systems. The U.S. Department of State aims to eliminate these obstructions to ensure clear and accurate identification.
8.2 Exceptions for Medical Reasons
If you must wear glasses for medical reasons, you need to provide a signed statement from a doctor explaining the necessity. The statement should be submitted along with your passport application.
8.3 How to Ensure Clear Visibility When Glasses Are Necessary?
- Clean Lenses: Ensure your lenses are clean and free from smudges.
- Adjust Frames: Adjust your frames to sit high on your nose and avoid covering your eyes.
- Lighting: Use diffused lighting to minimize glare and reflections.
- Angle: Slightly tilt your head to avoid direct reflections on the lenses.
9. How to Take Passport Photos for Babies and Infants?
Taking passport photos for babies and infants requires patience and adherence to specific guidelines. The baby should be alone in the photo, and their eyes should be open. If the baby is under one year old, the eyes do not necessarily need to be open. Support the baby’s head with your hand, but ensure your hand is not visible in the photo.
9.1 Positioning the Baby Correctly
- Lay the Baby Down: Place the baby on a white sheet or blanket in a well-lit area.
- Support the Head: If necessary, support the baby’s head with your hand, ensuring it is not visible in the photo.
- Neutral Expression: While not mandatory for infants, try to capture a neutral expression if possible.
9.2 Tips for Getting a Good Shot
- Use Natural Light: Natural light is best. Avoid using flash, which can startle the baby.
- Be Patient: It may take several attempts to get a good photo.
- Use Toys or Sounds: Use toys or gentle sounds to get the baby’s attention.
- Take Multiple Shots: Take multiple photos to increase your chances of getting a good one.
9.3 Common Challenges and Solutions
- Baby Won’t Open Eyes: Try taking the photo when the baby is awake and alert. Gentle sounds or toys can help.
- Baby Moves Too Much: Enlist the help of another person to keep the baby still.
- Shadows: Ensure there are no shadows on the baby’s face or background.
10. What are the Common Reasons for Passport Photo Rejection?
Common reasons for passport photo rejection include incorrect size, poor image quality, shadows, incorrect background, wearing glasses (when not medically necessary), and inappropriate facial expressions. Avoiding these pitfalls can ensure your application is processed smoothly.
10.1 Incorrect Size and Dimensions
Ensure the photo is exactly 2×2 inches (51×51 mm) and that the head size is within the specified range of 1 inch to 1 3/8 inches.
10.2 Poor Image Quality
The photo must be clear, in focus, and free from pixelation or distortion. Use a high-resolution camera and good lighting.
10.3 Shadows and Lighting Issues
Avoid shadows on your face or background. Use diffused, natural lighting to ensure even illumination.
10.4 Incorrect Background
The background must be plain white or off-white. Remove any patterns, objects, or shadows from the background.
10.5 Wearing Glasses (When Not Medically Necessary)
As of November 1, 2016, glasses are generally not allowed. If you must wear glasses for medical reasons, provide a signed statement from a doctor.
10.6 Inappropriate Facial Expressions
Maintain a neutral expression or a slight, natural smile. Avoid excessive smiling, frowning, or squinting.
11. Where Can I Get Passport Photos Taken?
You can get passport photos taken at various locations, including pharmacies, retail stores, photo studios, and online services. Each option offers different levels of convenience and cost.
11.1 Pharmacies and Retail Stores
Pharmacies like CVS and Walgreens, and retail stores like Walmart and Target, offer passport photo services. These are convenient options with generally quick turnaround times.
- Pros: Convenient, quick service, readily available.
- Cons: May not always guarantee compliance, variable photo quality.
11.2 Professional Photo Studios
Professional photo studios offer high-quality passport photos with guaranteed compliance. They have experienced photographers and professional equipment.
- Pros: High-quality photos, guaranteed compliance, professional service.
- Cons: More expensive, may require an appointment.
11.3 Online Passport Photo Services
Online passport photo services allow you to upload a photo and have it processed and printed. Some services also offer digital photos that you can submit online.
- Pros: Convenient, affordable, can be done from home.
- Cons: Requires a good quality photo, may need to print photos yourself.
11.4 Government Passport Agencies
Some government passport agencies also offer photo services. This can be a convenient option if you are already visiting the agency for other passport-related matters.
- Pros: Guaranteed compliance, convenient if visiting the agency.
- Cons: May not be available at all locations, may have limited hours.
12. What Are the Best Online Passport Photo Services?
Several online services can help you create compliant passport photos. These services typically allow you to upload a photo, which they then resize, crop, and adjust to meet the official requirements.
12.1 Persofoto
Persofoto is a popular online passport photo service that guarantees compliance with official requirements. They offer both printed and digital photos.
- Features: Automatic resizing, cropping, and background removal, compliance guarantee.
- Pricing: Varies depending on the options selected.
12.2 PhotoAid
PhotoAid is another reliable online service that uses AI technology to ensure your photo meets all requirements.
- Features: AI-powered photo analysis, compliance check, background removal.
- Pricing: Offers various packages, including digital and printed photos.
12.3 iVisa Photos
iVisa Photos is a user-friendly online service that offers quick and easy passport photo creation.
- Features: Simple interface, compliance check, options for digital and printed photos.
- Pricing: Affordable pricing with fast turnaround times.
12.4 DIYPassport
DIYPassport is a free online tool that helps you create passport photos from your own images. It offers basic editing features to ensure compliance.
- Features: Free to use, basic editing tools, compliance guidelines.
- Pricing: Free.
13. How Much Does a Passport Photo Cost?
The cost of a passport photo varies depending on where you get it taken. Pharmacies and retail stores typically charge between $10 and $20. Professional photo studios may charge $20 to $30. Online services often offer more competitive pricing, ranging from $5 to $15.
13.1 Cost Comparison of Different Options
- Pharmacies/Retail Stores: $10 – $20
- Professional Photo Studios: $20 – $30
- Online Services: $5 – $15
- Government Passport Agencies: Varies, typically around $15
13.2 Factors Influencing the Price
- Location: Prices may vary depending on the location and demand.
- Service Quality: Professional studios and online services that guarantee compliance may charge more.
- Additional Services: Services like background removal, editing, and expedited delivery can increase the price.
13.3 Ways to Save Money on Passport Photos
- Use Online Services: Online services are often more affordable than traditional options.
- Take Your Own Photo: If you have a good camera and follow the guidelines, you can save money by taking your own photo.
- Look for Coupons: Check for coupons or discounts offered by pharmacies, retail stores, and online services.
14. Can You Reuse an Old Passport Photo?
No, you cannot reuse an old passport photo. The photo must be recent, taken within the last six months, and accurately reflect your current appearance. According to the U.S. Department of State, using an old photo can lead to rejection of your application.
14.1 Why Are Recent Photos Required?
Recent photos are required to ensure that the passport accurately identifies you. Facial features can change over time, and using an outdated photo can cause issues with facial recognition and identity verification.
14.2 What Constitutes a “Recent” Photo?
A recent photo is one that was taken within the last six months. It should accurately reflect your current appearance, including hairstyle, facial hair, and any significant changes in weight or appearance.
14.3 How to Ensure Your Photo Meets the Recency Requirement?
- Take a New Photo: The best way to ensure compliance is to take a new photo specifically for your passport application.
- Check the Date: If you are unsure when a photo was taken, check the date on the digital file or the back of the printed photo.
- Compare to Current Appearance: Compare the photo to your current appearance to ensure it accurately reflects your facial features.
15. Tips for Printing Your Digital Passport Photo
If you choose to take your passport photo digitally, you’ll need to print it. Here are some tips to ensure your printed photo meets all requirements:
15.1 Choosing the Right Paper
Use high-quality photo paper with a matte or glossy finish. Plain white paper is not acceptable.
15.2 Printer Settings
Set your printer to the highest quality settings. Ensure that the print size is set to 2×2 inches.
15.3 How to Ensure Proper Alignment
- Use a Template: Use a passport photo template to ensure proper alignment and sizing.
- Crop Carefully: Crop the photo carefully to ensure that it meets the head size and eye level requirements.
- Print a Test Sheet: Print a test sheet to check the alignment and sizing before printing the final photos.
16. Passport Photo Requirements for Different Age Groups
Passport photo requirements vary slightly for different age groups, particularly for babies and young children.
16.1 Infants and Babies
- The baby should be alone in the photo.
- The eyes do not necessarily need to be open if the baby is under one year old.
- Support the baby’s head with your hand, but ensure your hand is not visible.
16.2 Children
- Children should be on their own in the picture.
- Children under 6 do not have to be looking directly at the camera or have a plain expression.
16.3 Adults
- Adults must follow all standard passport photo requirements, including a neutral expression, open eyes, and no glasses (unless medically necessary).
17. How to Handle Special Cases in Passport Photos
Special cases, such as medical conditions or disabilities, may require additional considerations when taking passport photos.
17.1 Medical Conditions
If you have a medical condition that affects your appearance, such as facial paralysis or a skin condition, provide a signed statement from a doctor explaining the condition and how it affects your ability to meet the standard requirements.
17.2 Disabilities
If you have a disability that makes it difficult to meet the standard requirements, such as difficulty holding your head still or keeping your eyes open, provide a signed statement from a doctor explaining the disability and how it affects your ability to meet the requirements.
17.3 Religious Attire
If you wear religious attire, such as a hijab or turban, provide a signed statement verifying that the attire is part of traditional religious practice. Ensure that the attire does not obscure your face.
18. The Impact of Poor Quality Passport Photos on Your Application
Submitting a poor-quality passport photo can have significant consequences, including delays in processing your application or outright rejection.
18.1 Potential Delays
If your photo does not meet the requirements, your application may be delayed while you retake and resubmit a new photo.
18.2 Risk of Rejection
In some cases, submitting a non-compliant photo can lead to rejection of your passport application, requiring you to start the process over.
18.3 Additional Costs
If your application is delayed or rejected due to a poor-quality photo, you may incur additional costs, such as fees for expedited processing or overnight shipping.
19. Understanding Passport Photo Requirements for International Travel
If you are planning international travel, it is essential to understand the passport photo requirements for the specific country you are visiting.
19.1 Variations in Size and Dimensions
Passport photo sizes and dimensions vary from country to country. Check the specific requirements of the country you are visiting to ensure compliance.
19.2 Background and Clothing Rules
Background and clothing rules may also vary. Some countries may require a specific color background or have restrictions on what you can wear in the photo.
19.3 Facial Expression and Glasses Policies
Facial expression and glasses policies may differ. Some countries may allow a slight smile, while others require a neutral expression. Glasses may be permitted in some cases but not in others.
20. How to Stay Updated on Passport Photo Regulations
Passport photo regulations can change over time, so it is essential to stay updated on the latest requirements.
20.1 Official Government Websites
Check the official websites of government agencies, such as the U.S. Department of State, for the most up-to-date information on passport photo regulations.
20.2 Reliable Online Resources
Follow reliable online resources, such as passport photo services and travel websites, for updates on passport photo requirements.
20.3 Passport Agencies and Consulates
Contact passport agencies and consulates for clarification on any questions or concerns you may have about passport photo regulations.
Navigating the intricacies of passport photo sizes and requirements doesn’t have to be a headache. At dfphoto.net, we’re committed to providing you with the knowledge and tools necessary to ensure your photos meet every standard, guaranteeing a smooth passport application process. Visit our site to explore detailed guides, resources, and services that will help you master the art of passport photography. Whether you’re a seasoned photographer or a first-time applicant, dfphoto.net is your trusted partner in capturing the perfect shot.
 Adult Passport Photo Example
FAQ About Passport Photo Size
What is the standard size for a US passport photo?
The standard size for a US passport photo is 2×2 inches (51×51 mm). This size is required for both printed and digital photos.
Can I use a photo booth to take my passport photo?
Yes, you can use a photo booth, but ensure it provides photos that meet the 2×2 inch size requirement and other guidelines.
How recent does my passport photo need to be?
Your passport photo must be taken within the last six months to accurately reflect your current appearance.
What should I wear for my passport photo?
Wear everyday attire. Avoid uniforms, white clothing, and head coverings unless for religious or medical reasons.
Am I allowed to smile in my passport photo?
A neutral expression is preferred, but a slight, natural smile is acceptable as long as it doesn’t distort your facial features.
Are glasses allowed in passport photos?
As of November 1, 2016, glasses are generally not allowed in US passport photos unless you have a medical reason and provide a doctor’s note.
What is the background requirement for a passport photo?
The background must be plain white or off-white, free from patterns, shadows, or objects.
Can I take my passport photo with my smartphone?
Yes, you can, but ensure the photo meets all size, resolution, and quality requirements. Use good lighting and a plain background.
What if my passport photo is rejected?
If your photo is rejected, you will need to retake the photo and resubmit it with your application. Common reasons for rejection include incorrect size, poor image quality, and inappropriate expression.
Where can I get my passport photo taken?
You can get your passport photo taken at pharmacies, retail stores, professional photo studios, online services, and some government passport agencies.
Discover the art of perfect passport photography and embark on a journey of visual excellence with dfphoto.net!