Etsy listing photos are crucial for attracting customers and driving sales, requiring careful attention to detail in photography and visual presentation. Getting the size right for your Etsy listing photos is essential to showcasing your products in the best possible light. This detailed guide from dfphoto.net will walk you through everything you need to know about Etsy image sizes, optimization, and techniques to ensure your products look their absolute best and stand out from the crowd, helping you convert views into sales and build a thriving shop.
1. What is the Recommended Size for Etsy Listing Photos?
The recommended size for Etsy listing photos is crucial for optimal display and customer engagement. To ensure your photos look their best, adhere to these guidelines:
- Image Dimension: Aim for 2,000 pixels on the shorter side.
- File Size: Keep your file size below 1MB.
- Orientation: Use either square or horizontal orientations.
- Aspect Ratio: Use 1:1 for desktop thumbnails and 4:3 for general display.
- Resolution: Set your resolution to 72PPI (pixels per inch).
- File Format: Use JPG, PNG, or GIF (though transparent PNGs and animated GIFs aren’t allowed for listing photos).
- Color Mode: Use sRGB.
- Number of Images Per Listing: Utilize the maximum of 10 images, with a minimum of 5.
- Product Shot: Ensure your product is centered to avoid unwanted cropping.
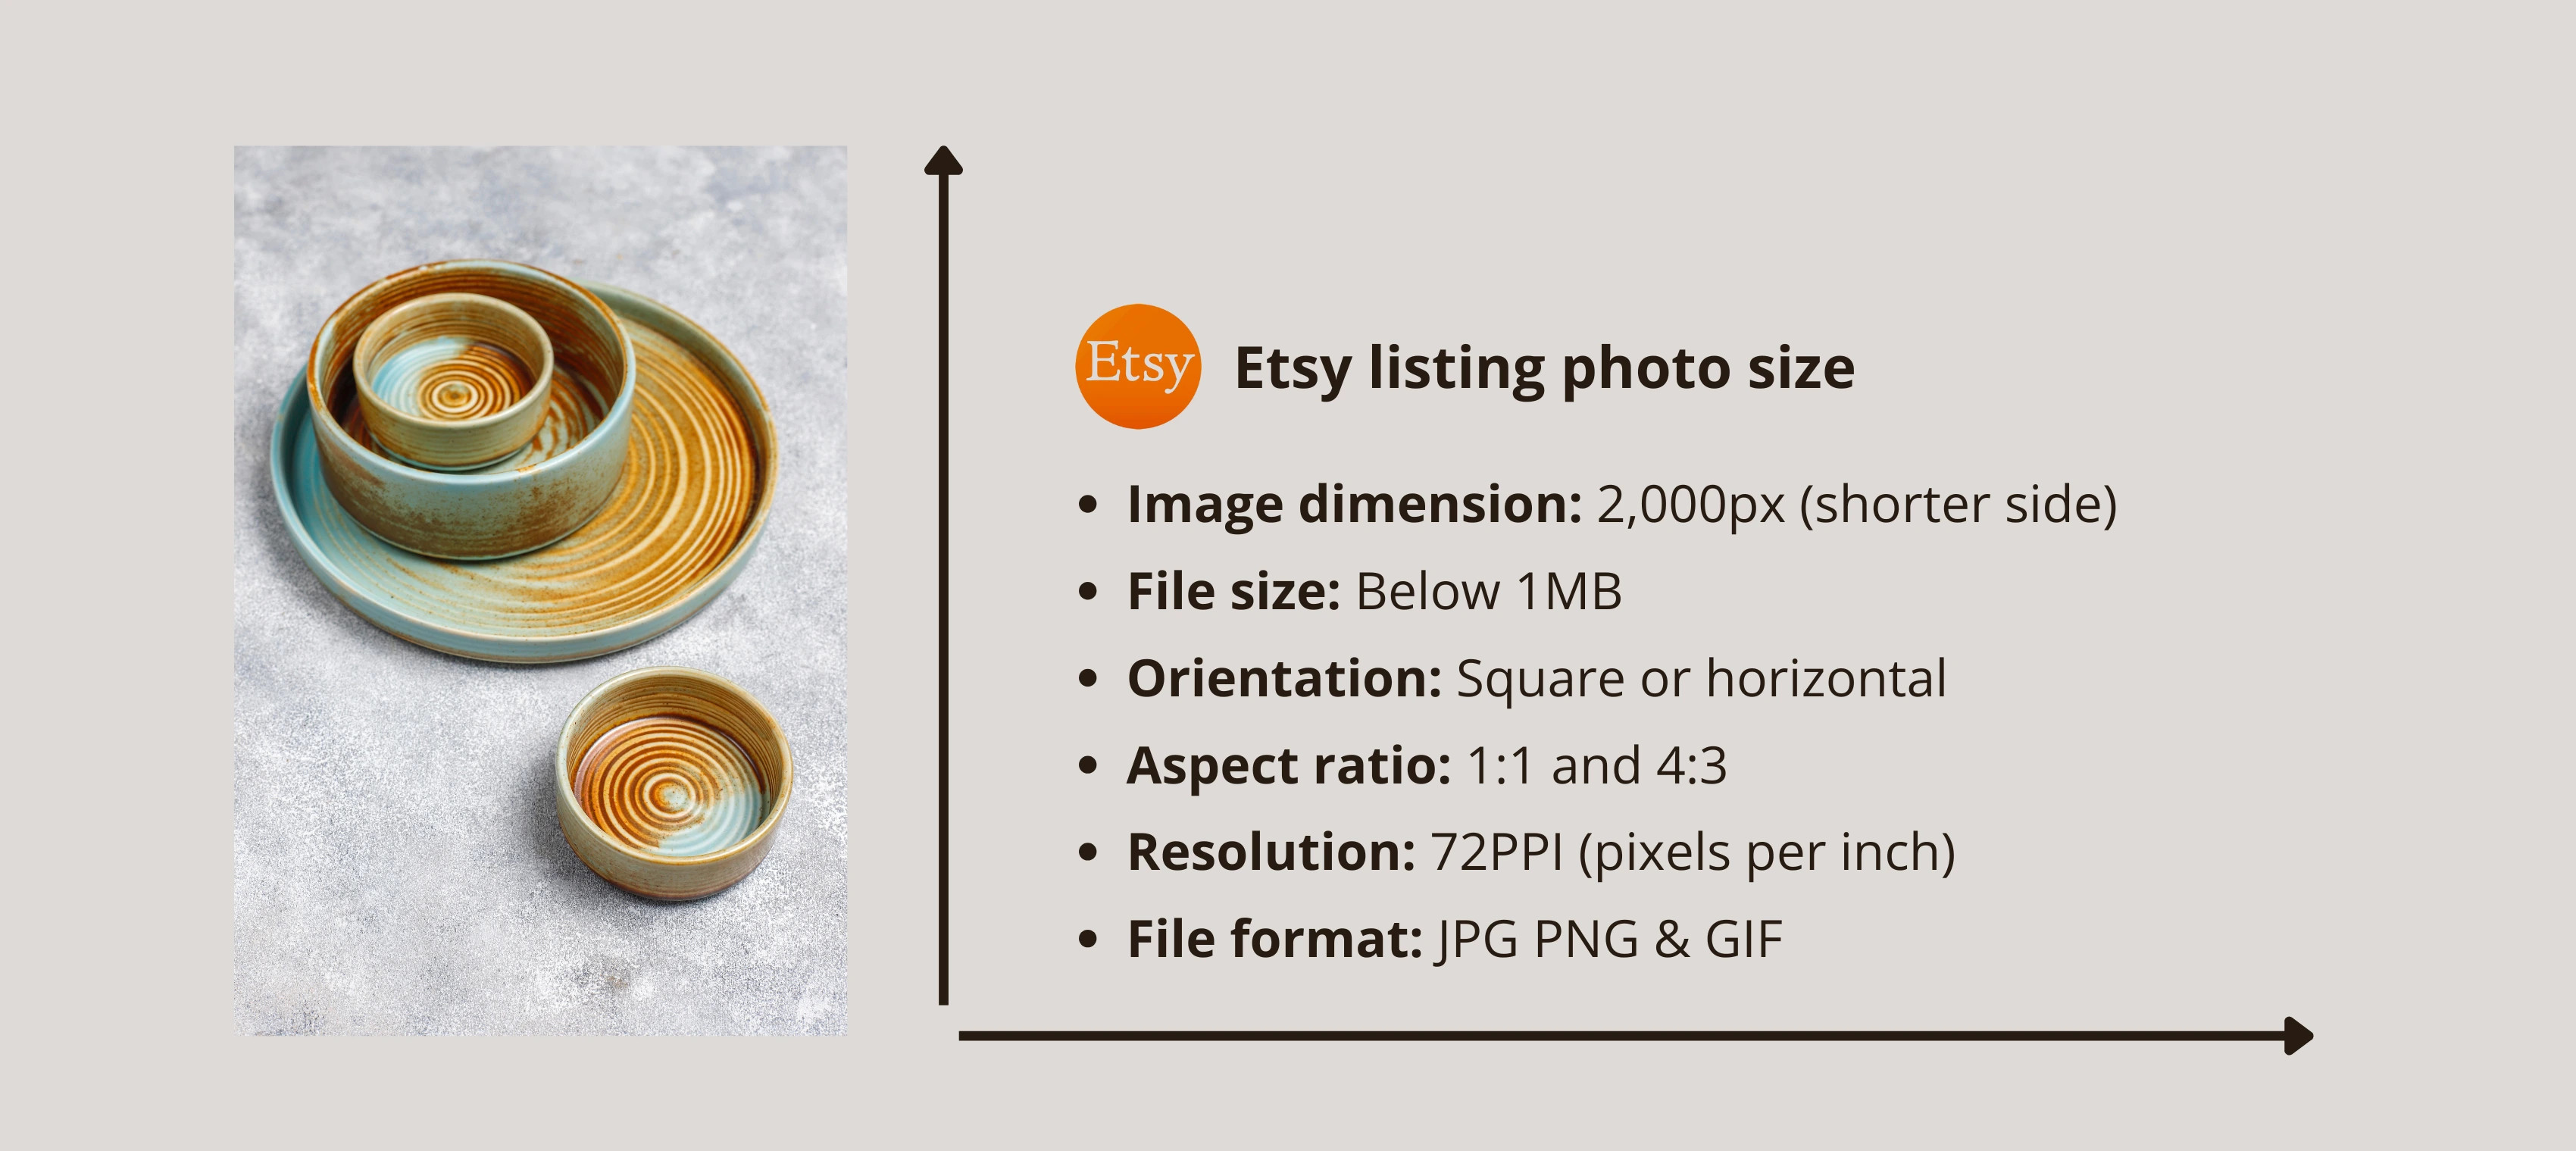 Etsy listing photo size guide with a ceramic dish set.
Etsy listing photo size guide demonstrating optimal dimensions for a ceramic dish set.
Paying close attention to the thumbnail image during the uploading process is key. As the first image potential customers see, it greatly influences their perception of your products. Etsy automatically crops thumbnail images to fit different devices, so ensure your product is centered with enough border around it to avoid any crucial details being cut off. Remember, maintaining a consistent image shape across all photos for a single listing enhances visual coherence. An image resizer, especially one that handles multiple images at once, can be a significant asset here.
2. What are the Other Essential Etsy Image Sizes?
Etsy’s visual appeal goes beyond listing photos; other image types contribute to a cohesive and professional storefront. Besides listing photos, Etsy requires specific image sizes for various elements of your shop. Here’s a detailed breakdown:
| Image Type | Recommended Dimensions |
|---|---|
| Listing Photos | 2,000px (short side) x 2,000–3,000px (long side) |
| Shop Icon | 500 x 500px |
| Profile Picture | 400 x 400px |
| Team Logo | 170 x 100px |
| Order Receipt Banner | 760 x 100px |
| Mini Shop Banner | 1600 x 213px |
| Big Shop Banner | 1600 x 400px |
| Carousel Banner | 1200 x 300px |
| Collage Banner (2 Images) | 600 x 300px minimum |
| Collage Banner (3 Images) | 400 x 300px minimum |
| Collage Banner (4 Images) | 300 x 300px minimum |
These sizes ensure that your shop looks professional and appealing across all devices and platforms.
3. Why is Resizing Images Important for Etsy?
Resizing is vital for maintaining a professional and smooth-running Etsy shop. High-quality photos significantly influence purchase decisions, with studies showing that some e-commerce brands see up to 45% higher conversions with good pictures. When images meet Etsy’s size requirements, display issues are prevented across all devices. Not adhering to the correct dimensions can result in cropped or distorted images, which can frustrate potential buyers and negatively impact sales.
4. How Can I Resize My Etsy Listing Photos Using Photoroom?
Photoroom offers a straightforward solution for resizing your Etsy photos. It’s particularly efficient if you’re handling multiple images. Here’s how to resize using the Photoroom mobile app, with a similar process available on the web version:
- Open Photoroom: Select the Resize tool and upload your image.
- Enter Etsy: Type Etsy in the search bar and choose Etsy Square, or enter custom dimensions to automatically resize your image.
- Finalize: Click Done to complete the process.
- Export: Click Export to download the resized image.
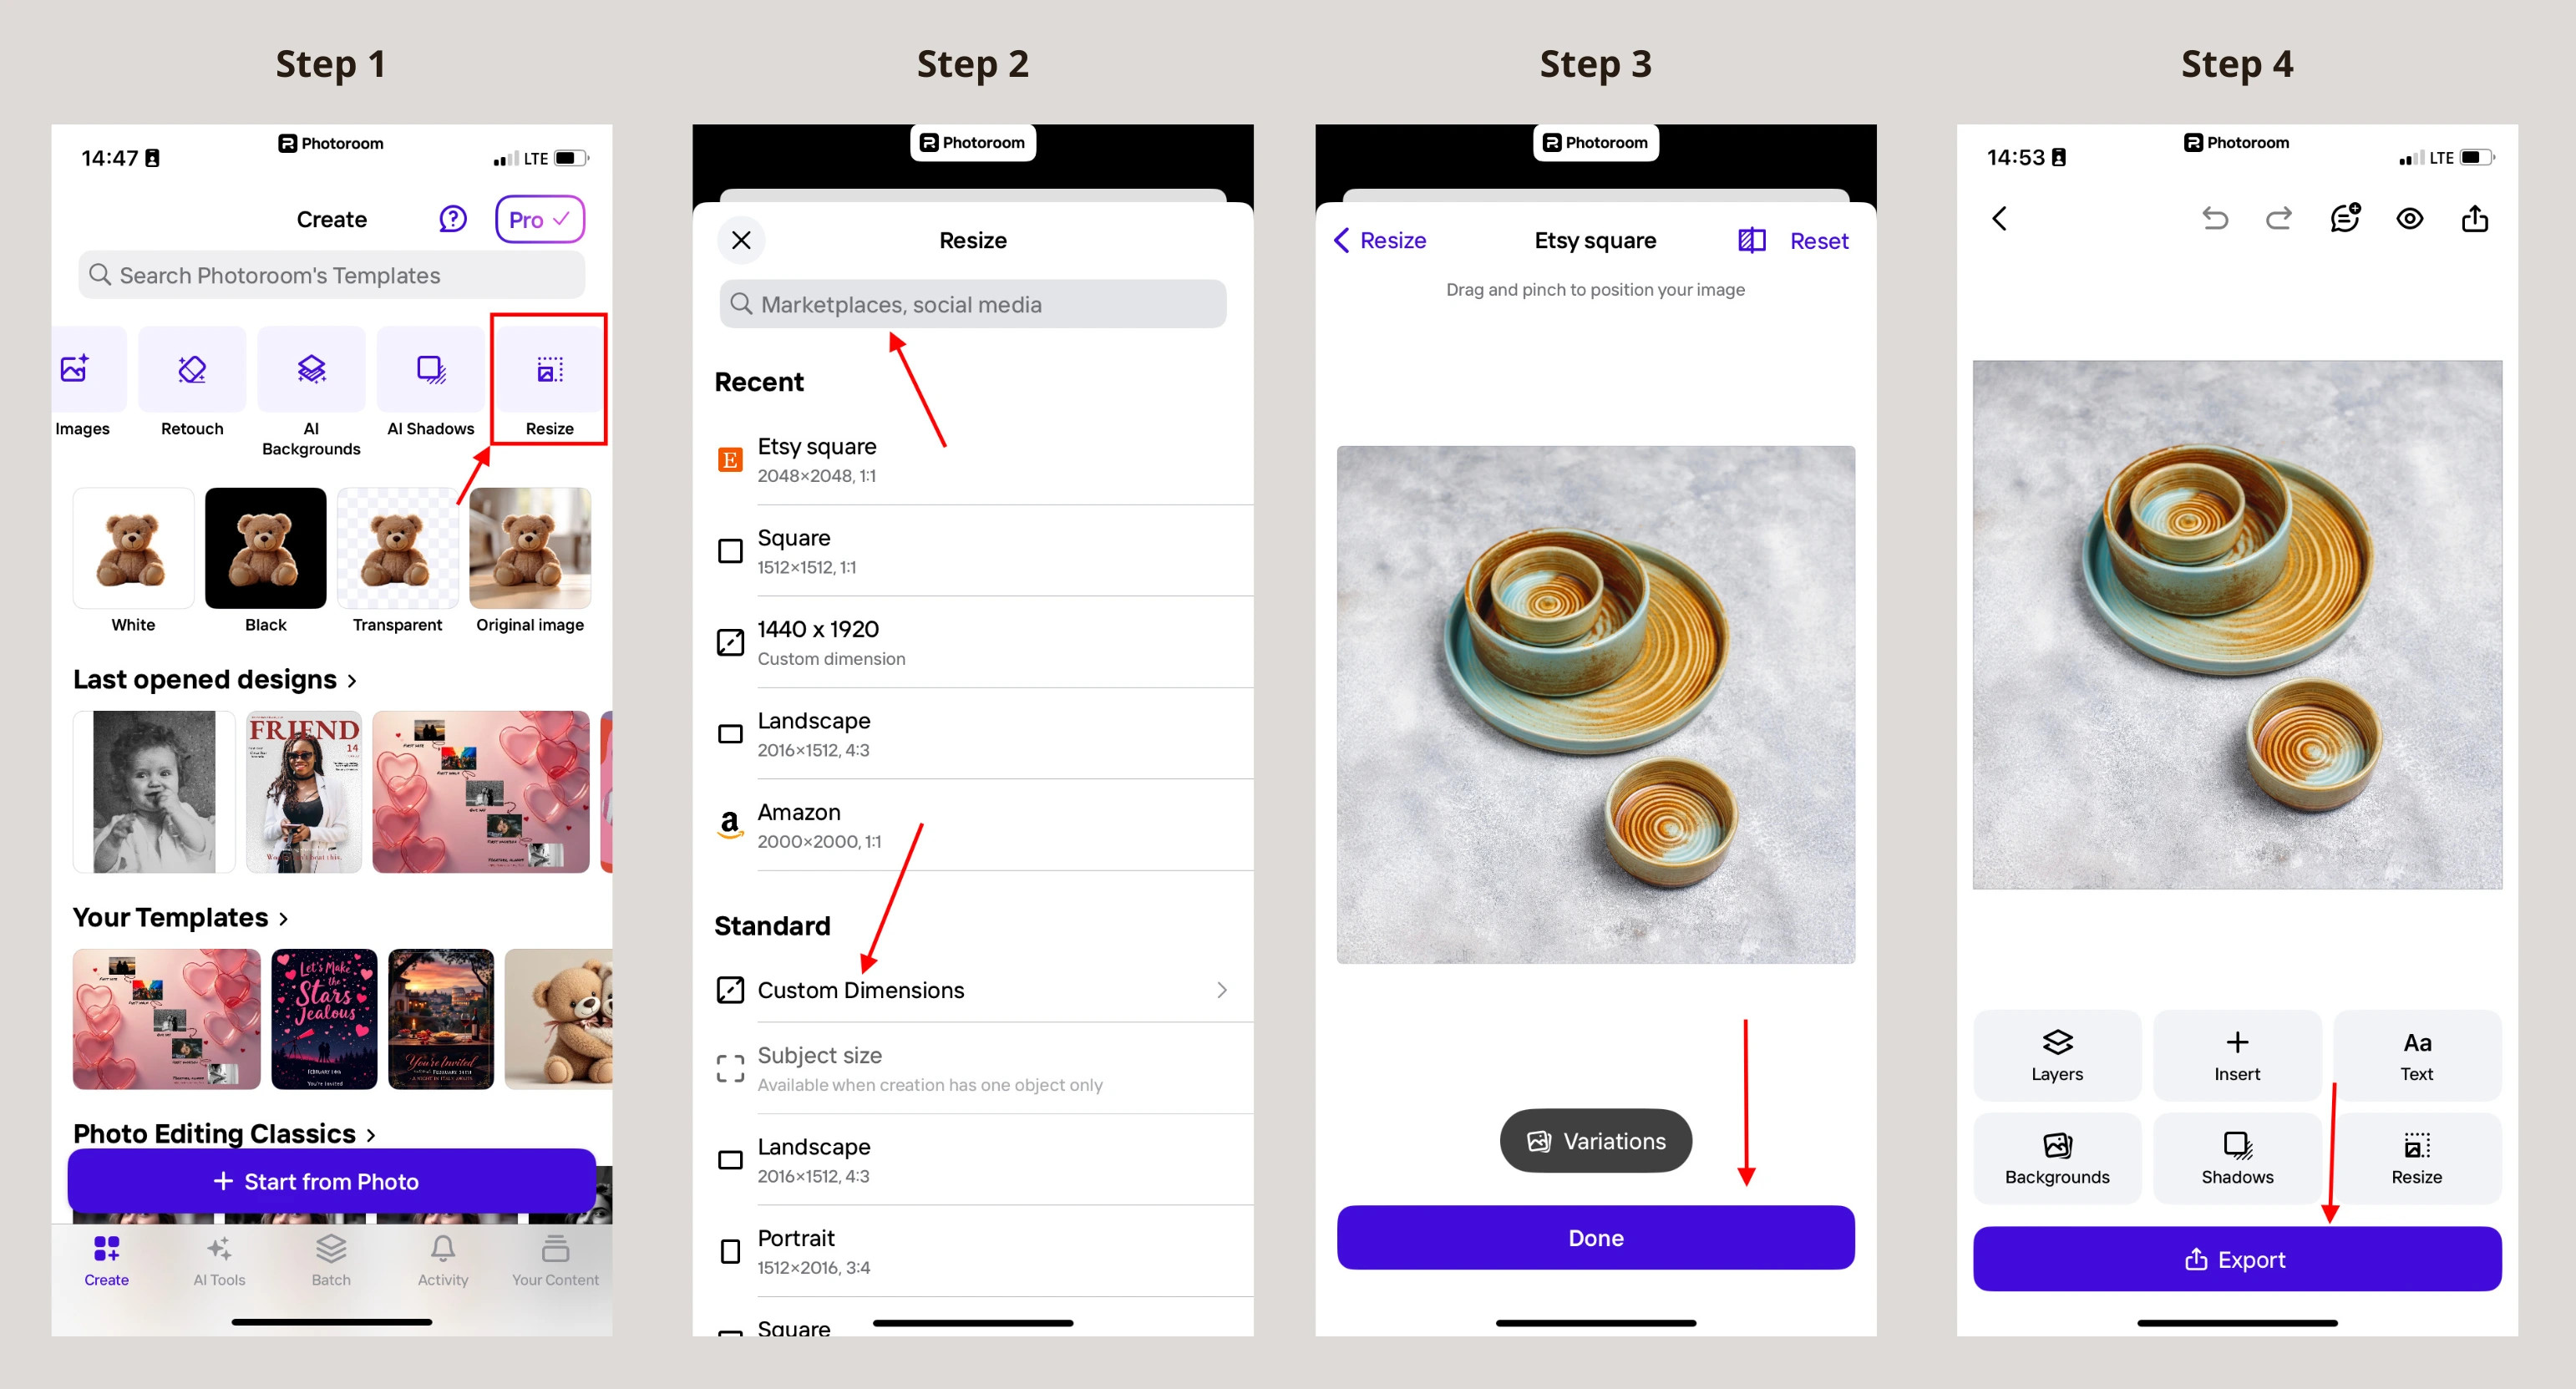 Resizing an image in Photoroom for Etsy: select resize, choose Etsy square, adjust, and export.
Resizing an image in Photoroom demonstrating how to select the resize tool, choose the Etsy square format, adjust the image, and export the final version.
For Photoroom Pro users, the Resize tool automatically expands your background using the AI Expand feature, which is great for filling in white space around resized images. If you don’t have the Pro plan, the “Zoom fill” option is available, though it may cut off parts of your product if it’s near the edge. For those seeking to resize multiple product photos efficiently, Photoroom’s Batch Mode feature is available to save time and maintain a consistent look across all your product images.
5. What is the Process for Resizing Etsy Listing Photos on a Mac?
Mac users can resize images using the built-in Preview tool:
- Open Image: Open the image with the Preview tool.
- Adjust Size: Select Tools in the menu bar, then click on “Adjust size”.
- Set Dimensions: Uncheck the “Scale proportionally” field to enter your desired measurements.
- Input Values: Fill in the width, height, and pixel/inch (PPI).
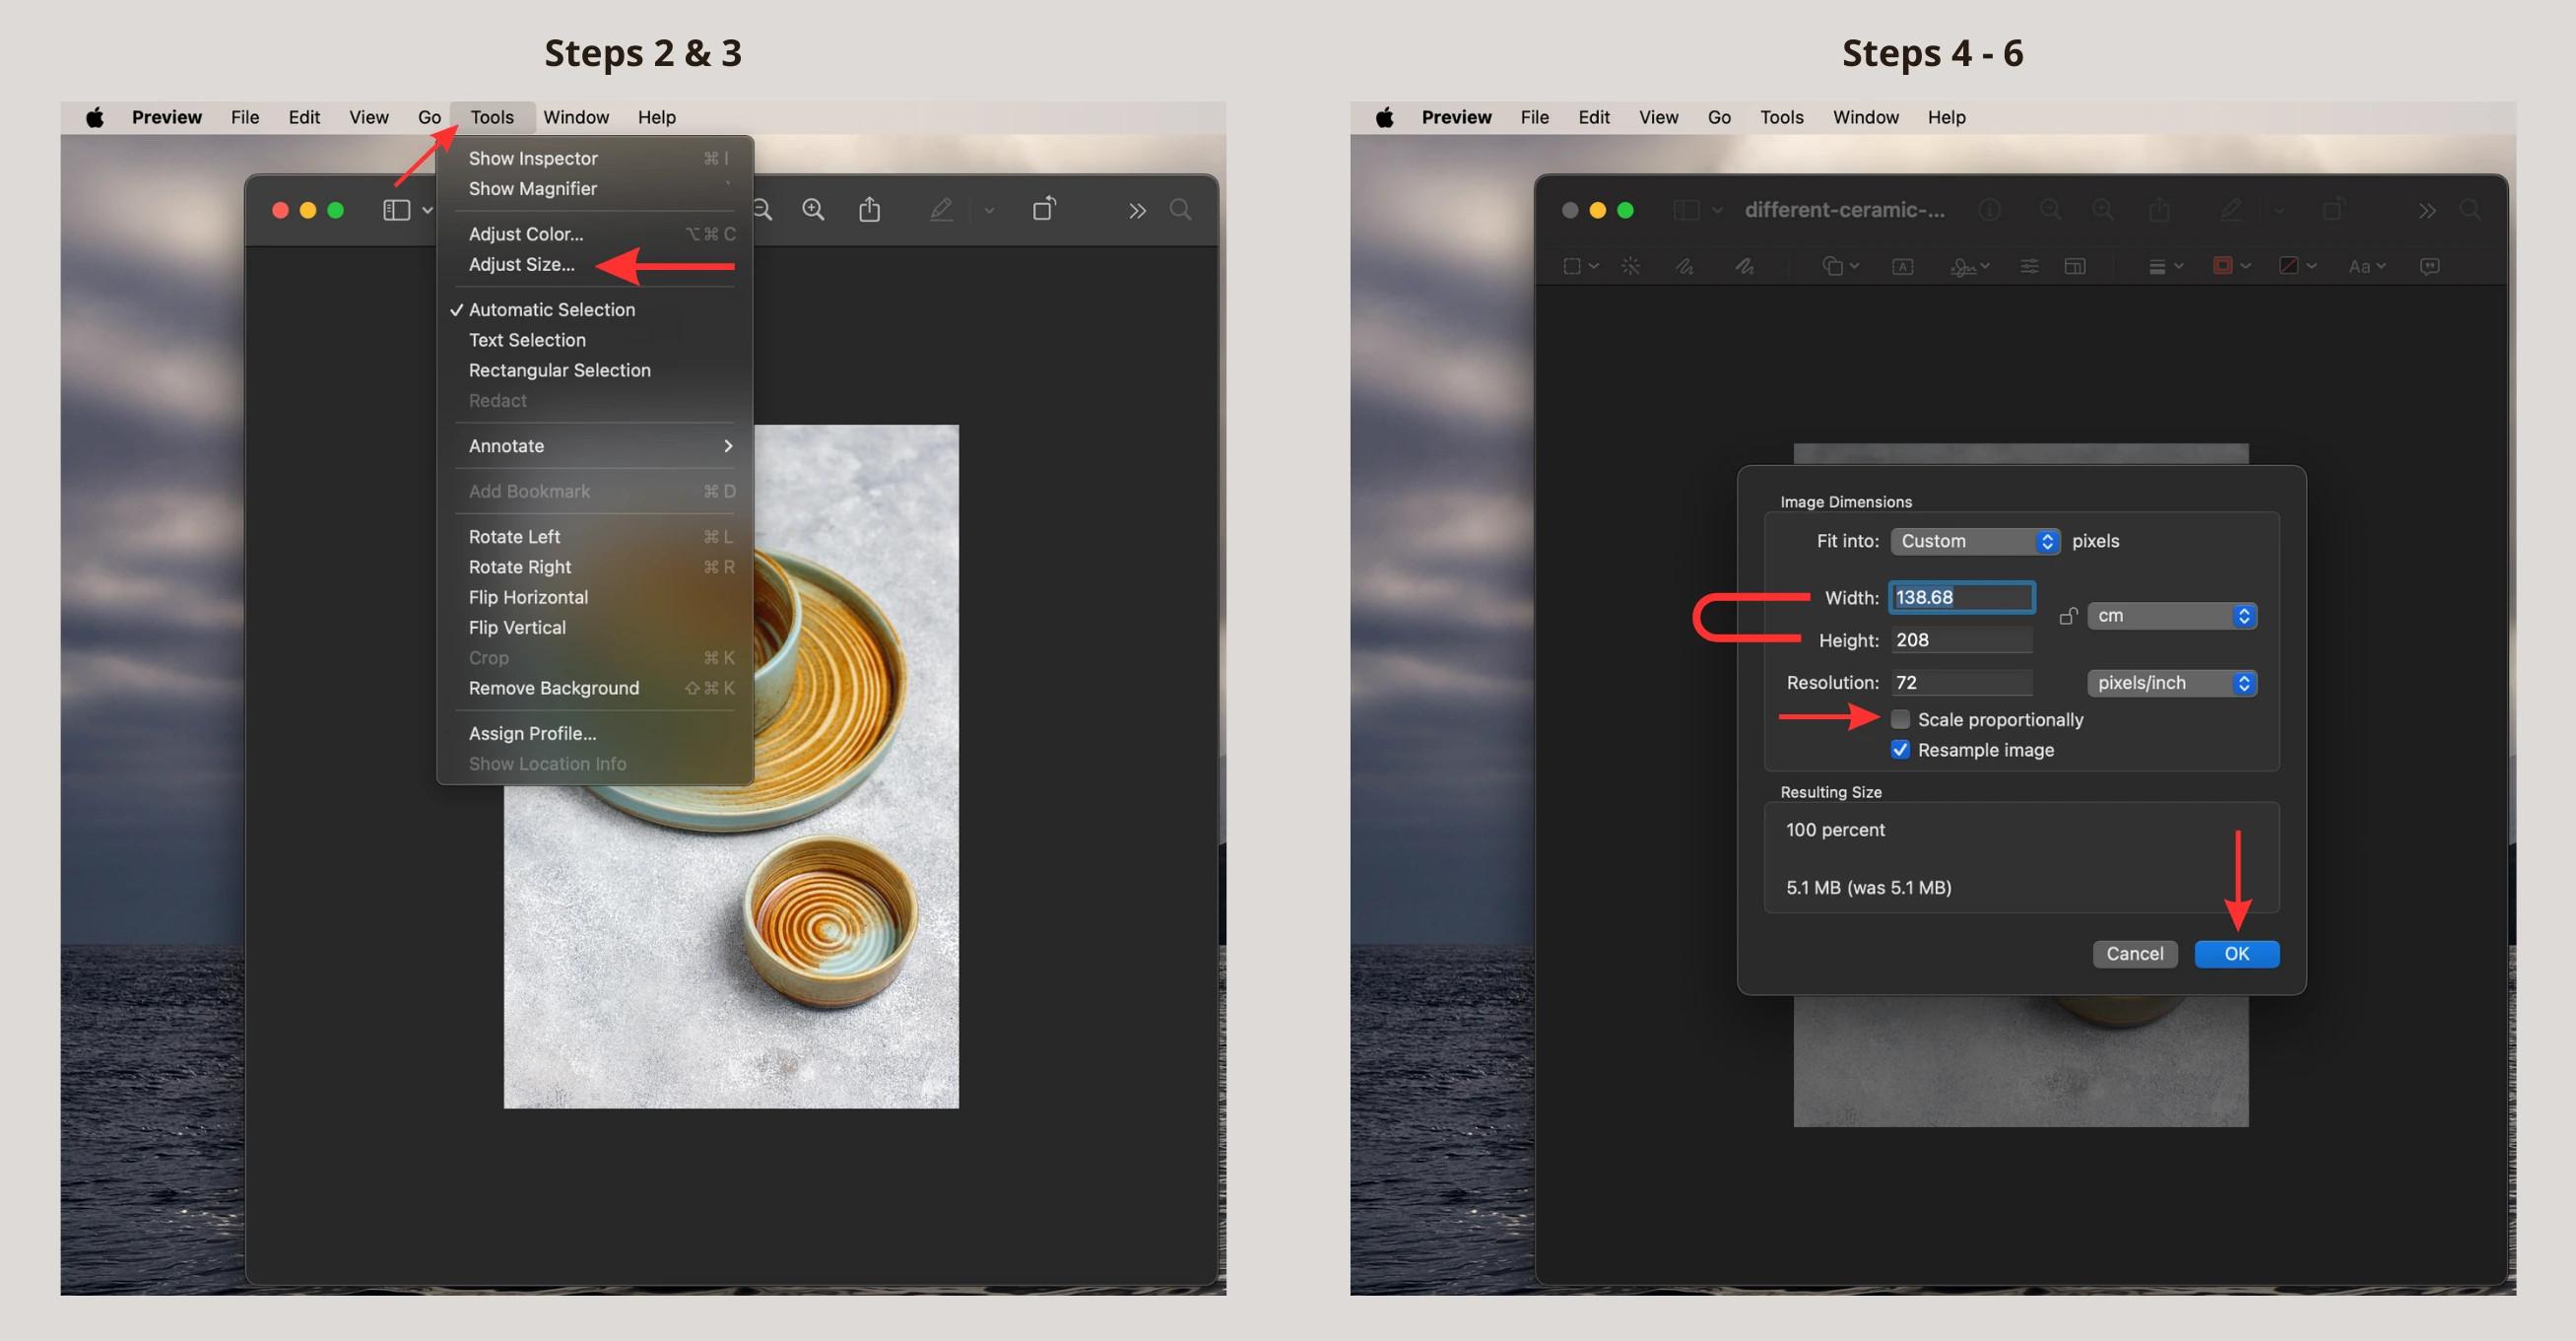 Resizing an image on Mac Preview: go to Tools, select Adjust Size, set dimensions, then click OK.
Resizing an image using Mac Preview, showing the steps to go to Tools, select Adjust Size, set the desired dimensions, and click OK to finalize.
6. What Steps are Required to Resize Etsy Listing Photos on Windows?
Windows users can resize images using the Photos app:
- Open Image: Open the image with the Photos app.
- Resize Image: Click on the three dots to open a list of options and select Resize image.
- Set Pixels: Click on Pixels and enter your required width and height.
- Save: Save the resized image to your chosen folder.
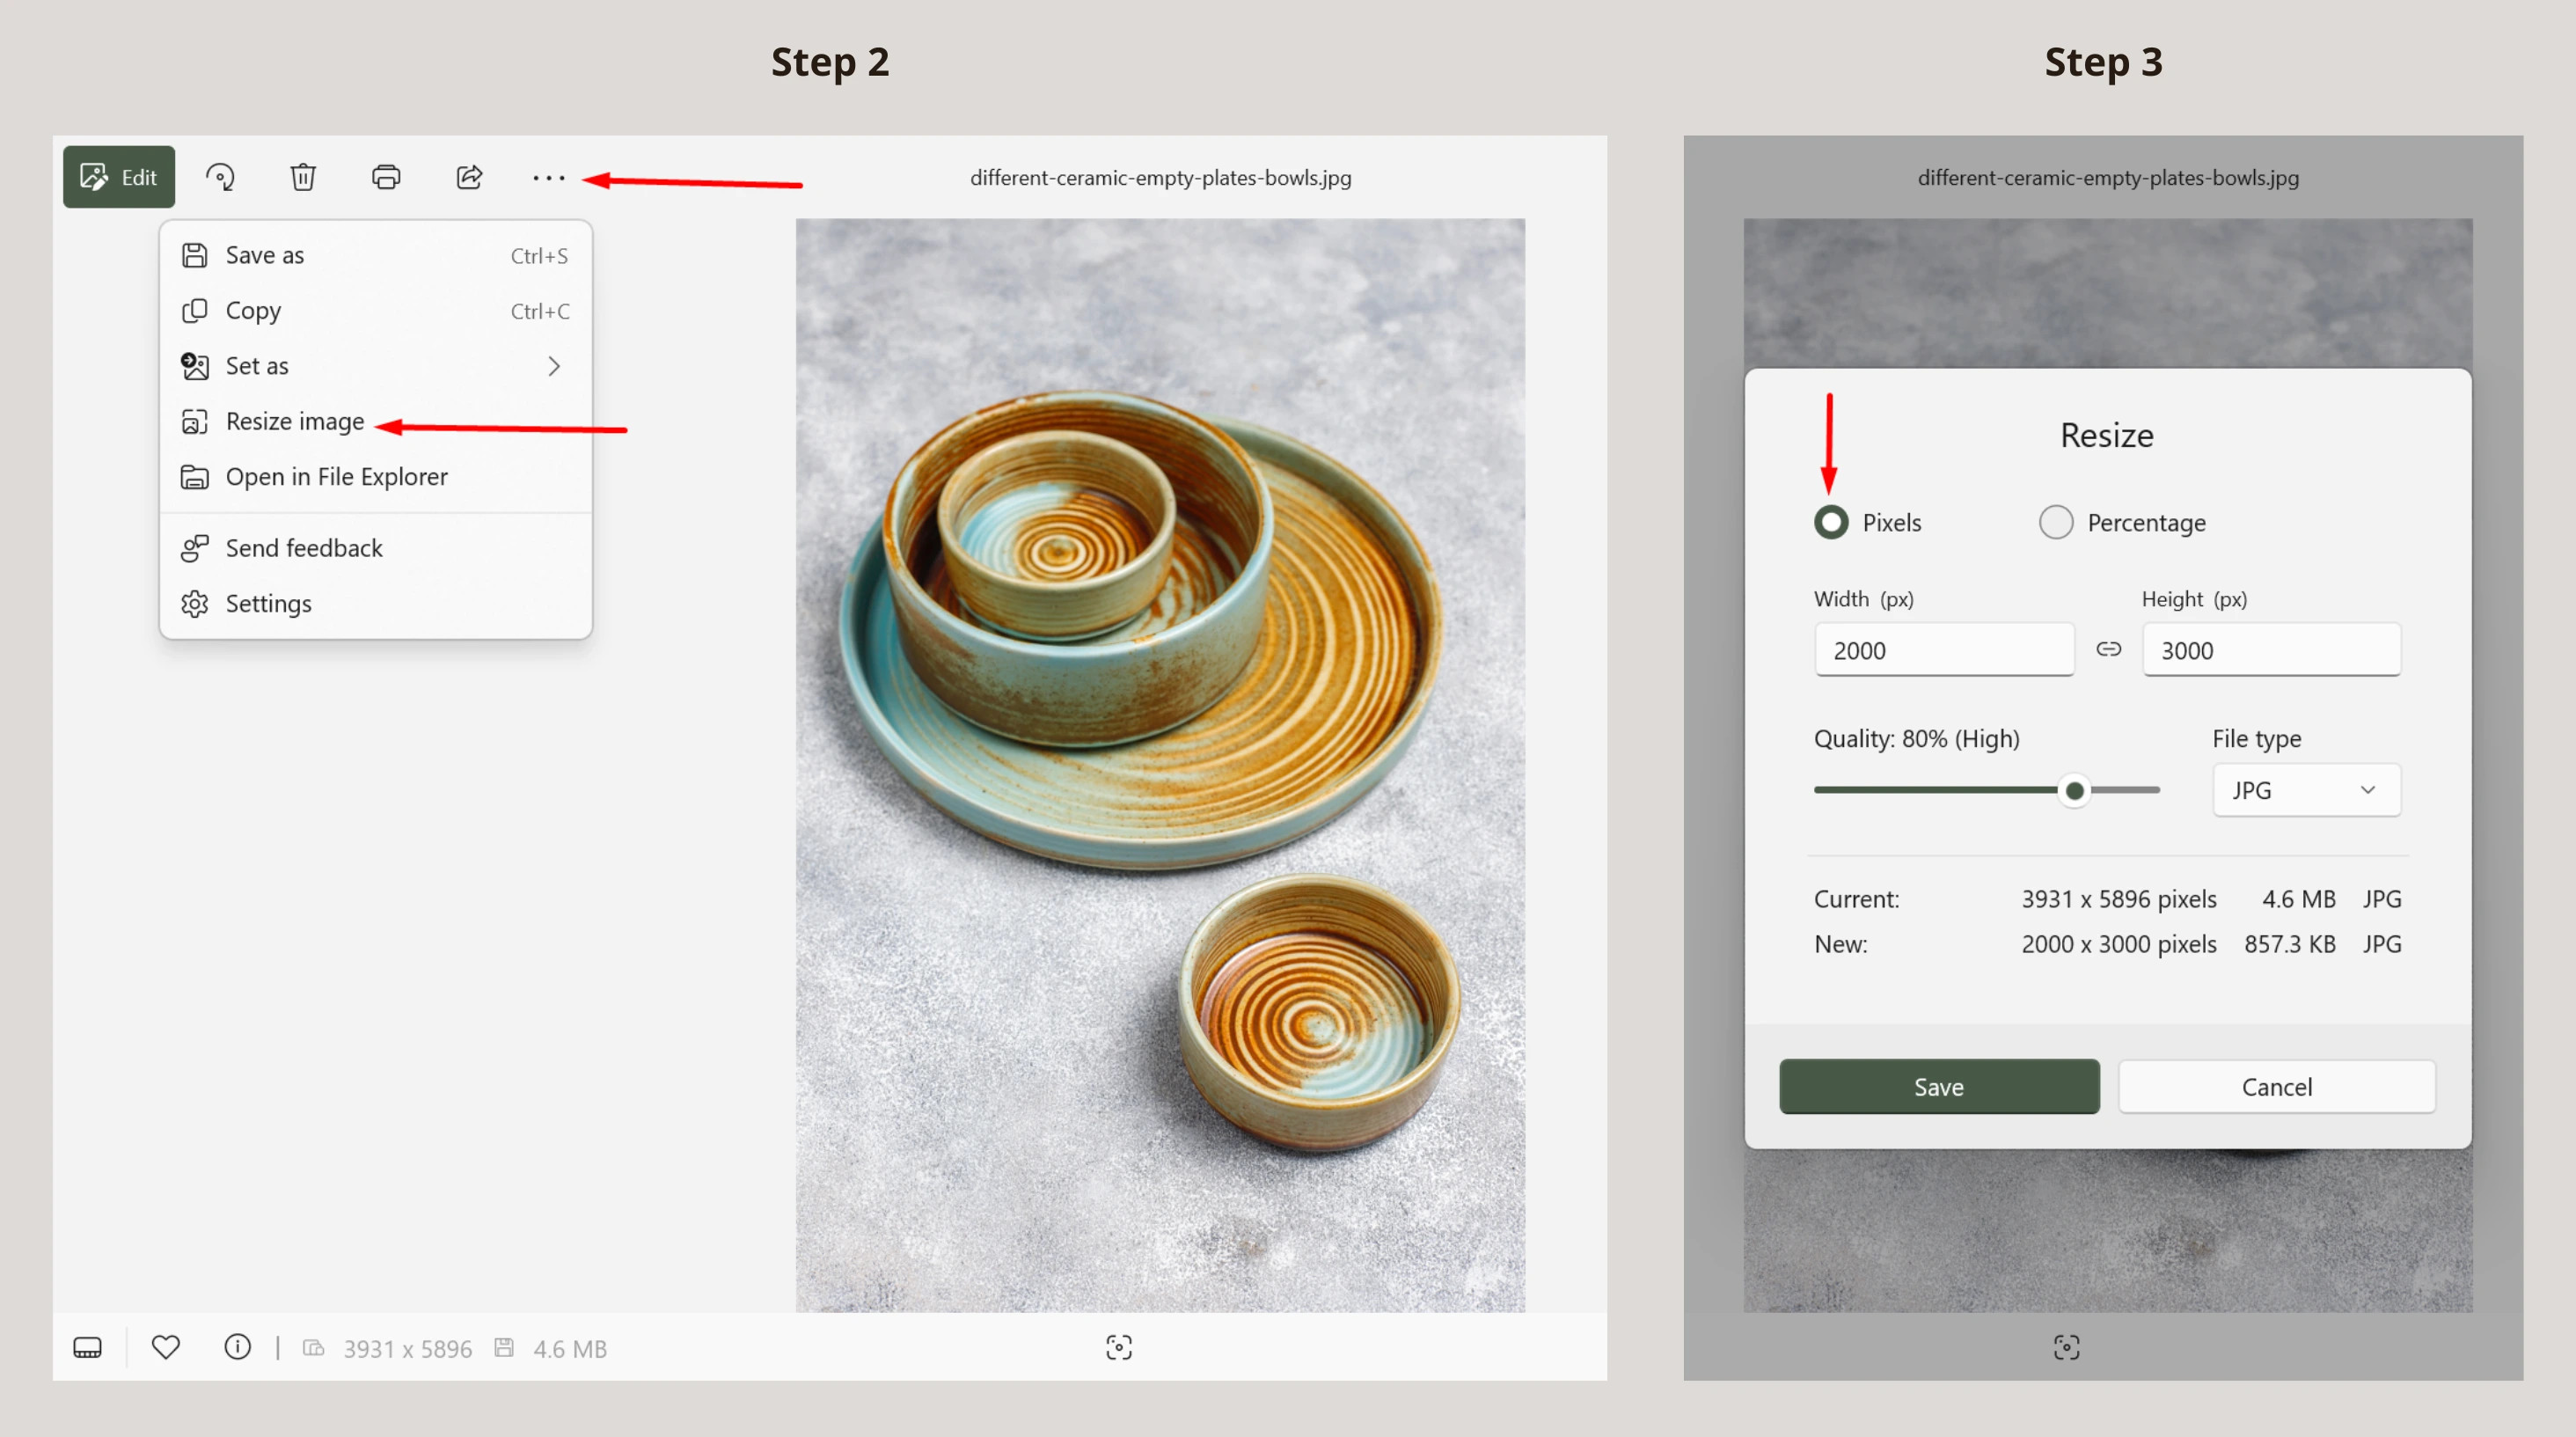 Resizing an image in Windows Photos: open menu, select resize, set pixels, adjust quality, save.
Resizing an image in Windows Photos, outlining the process to open the menu, select resize, set the desired pixel dimensions, adjust quality settings, and save the edited image.
If Windows doesn’t resize the image to your preferred dimensions, consider using a dedicated photo editor for more precise control.
7. How Can I Capture the Perfect Etsy Listing Image Photo?
Capturing the perfect Etsy photo means presenting your product attractively and ensuring potential buyers appreciate its value and uniqueness. Here are essential tips:
- Use Natural Lighting: Natural light brings out true colors and eliminates harsh shadows. Photograph near a window or outdoors, avoiding direct sunlight. If natural light isn’t available, use soft artificial lighting.
- Use a Neutral Background: A simple, neutral background keeps the focus on your product. White, light grays, or beiges work well.
- Showcase Different Angles: Provide a comprehensive view by capturing your product from various angles, including close-ups of intricate details.
- Use Props Sparingly: Props add context but shouldn’t distract from the main product. Keep it simple and relevant.
- Keep it Steady: Use a tripod or steady surface to ensure your photos are sharp and clear.
- Enhance, Don’t Alter: Adjust brightness, contrast, and sharpness to enhance your product, but keep edits minimal to maintain authenticity.
7.1. How Does Natural Lighting Improve Etsy Product Photos?
Natural lighting enhances product photos by providing a soft, diffused glow that reveals the true colors of the product and minimizes harsh shadows. It’s ideal for creating inviting and realistic images that appeal to potential buyers. If you don’t have access to natural light, you could utilize advanced editing tools to increase the brightness.
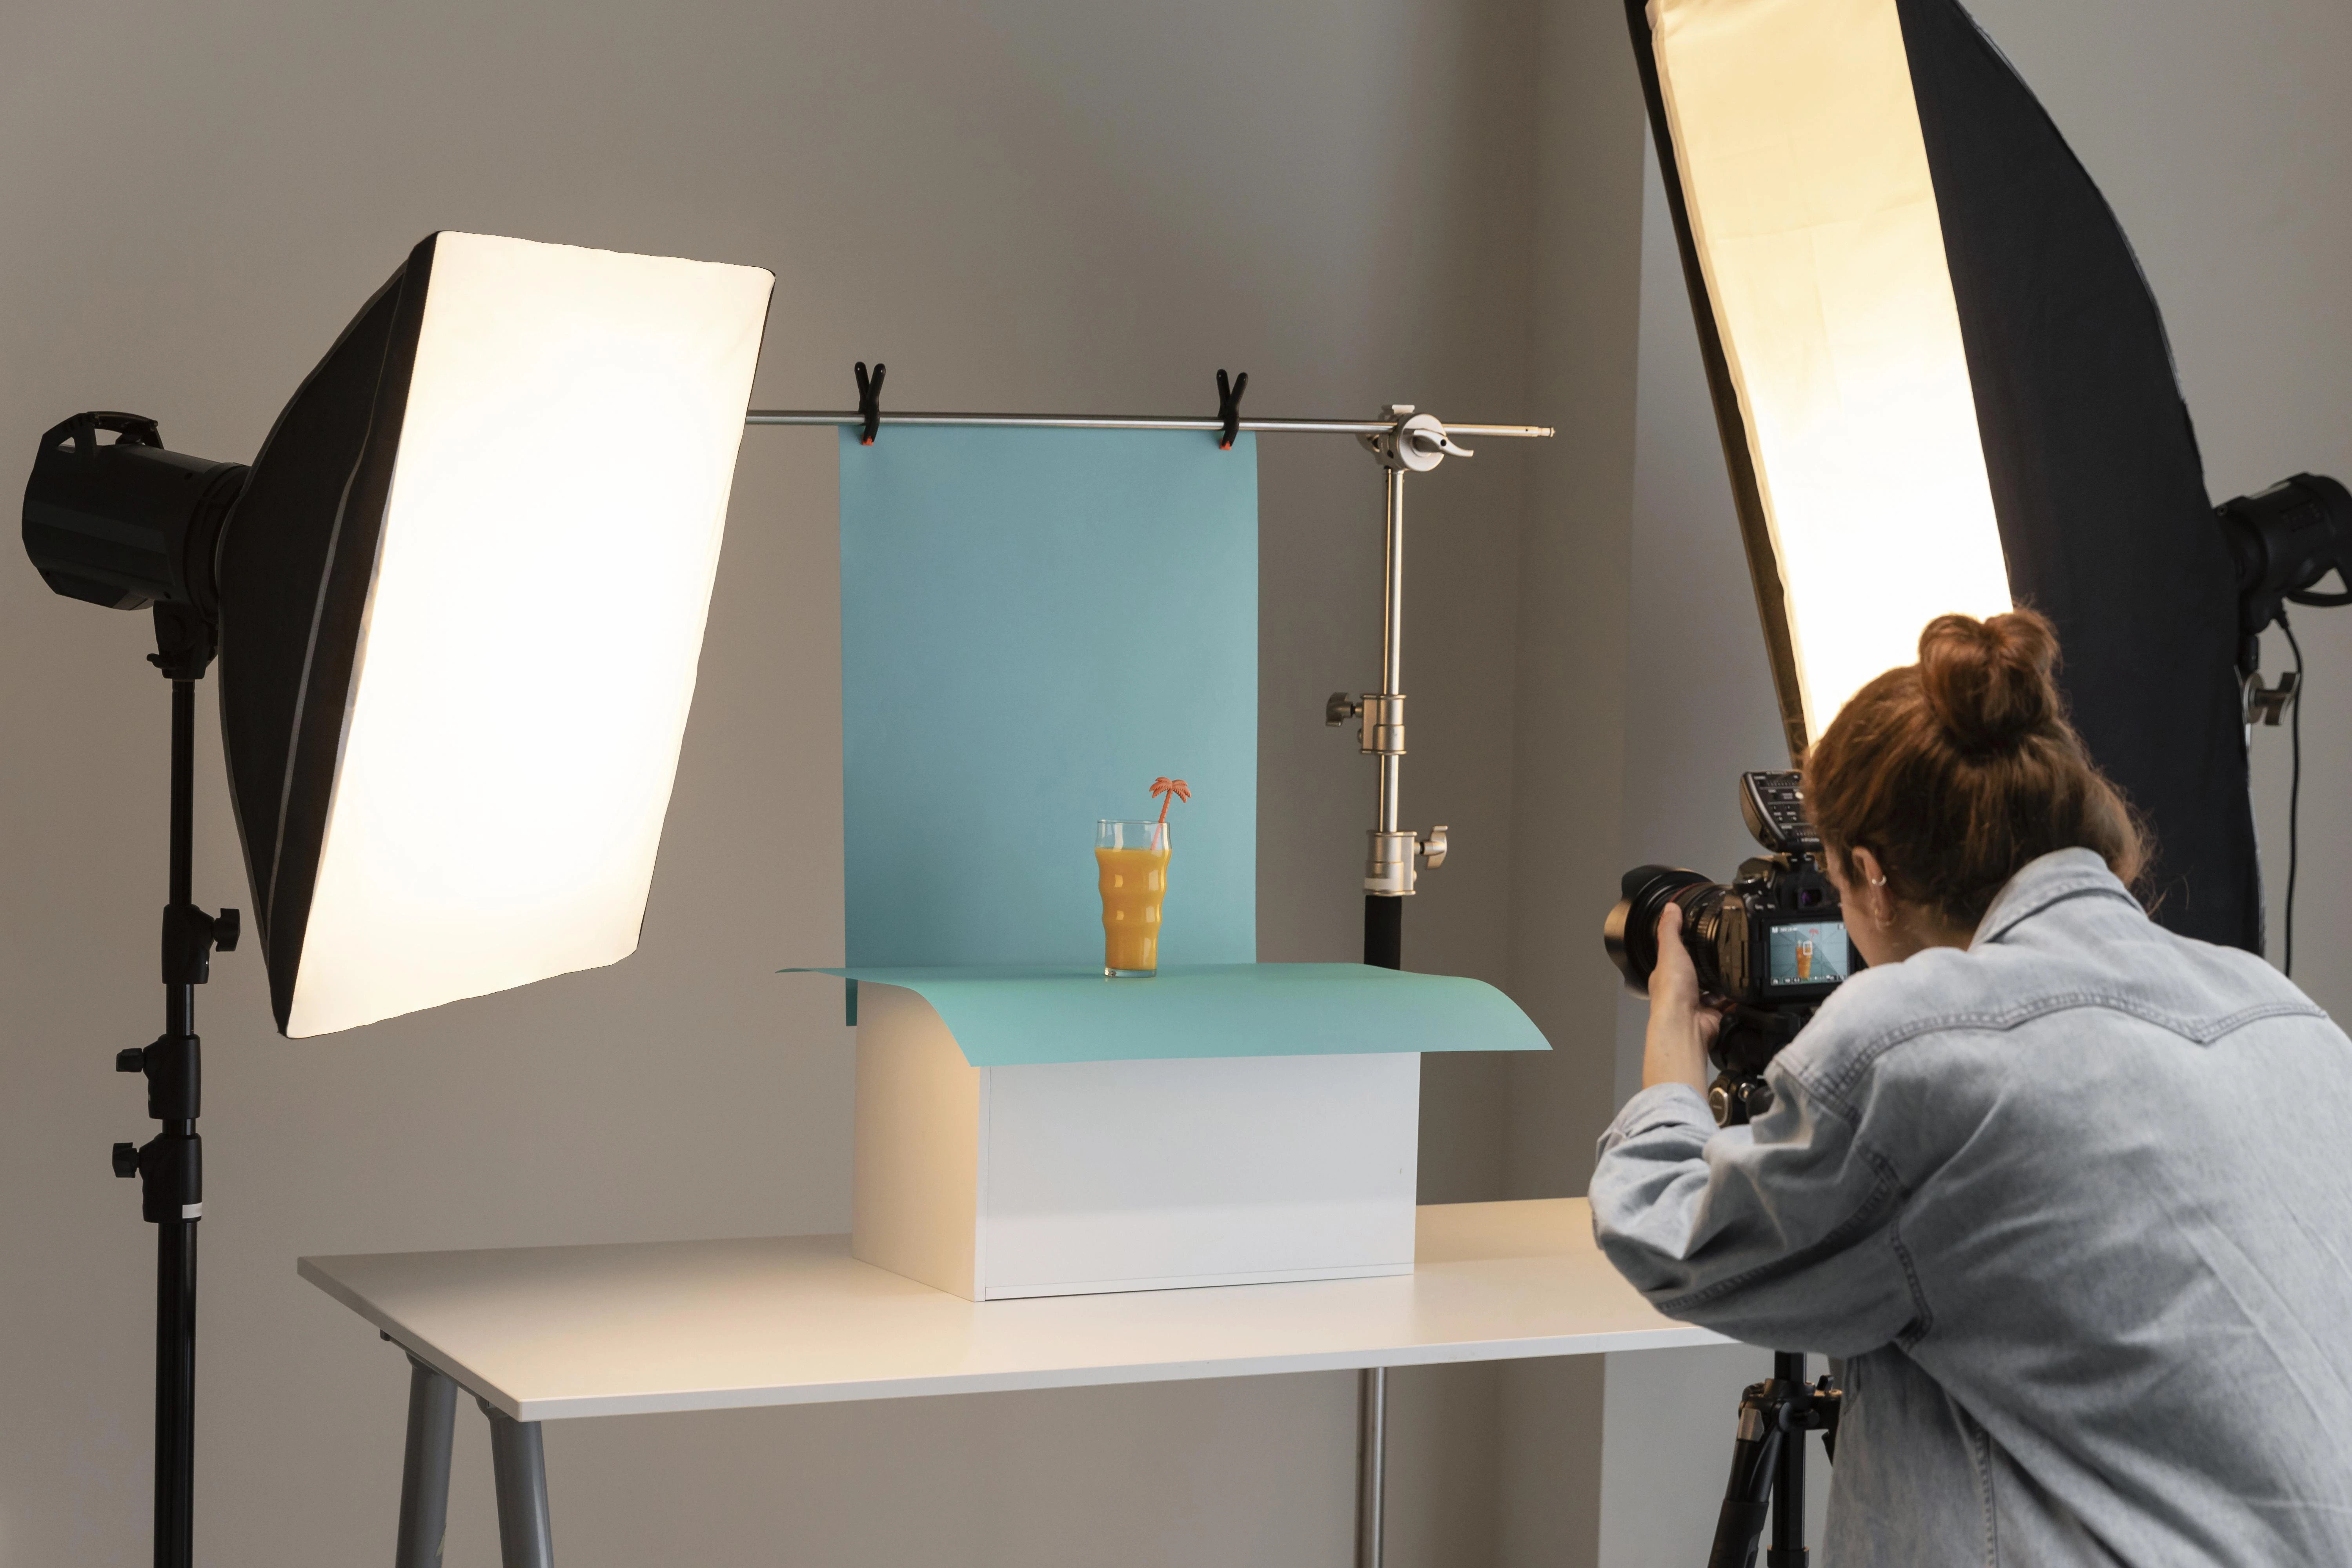 Photographer in a studio captures a drink setup with soft-box lighting and a blue backdrop.
A photographer in a studio setting, capturing a drink setup using soft-box lighting against a blue backdrop.
7.2. Why is a Neutral Background Recommended for Etsy Listings?
A neutral background ensures that the product remains the central focus of the image without distractions. It helps buyers concentrate on the product’s features and details, enhancing its appeal. You can easily change your picture’s background to a neutral one by first removing the current background, next, adding a background color of your choice, and finally, adding a shadow to the image to make it look realistic.
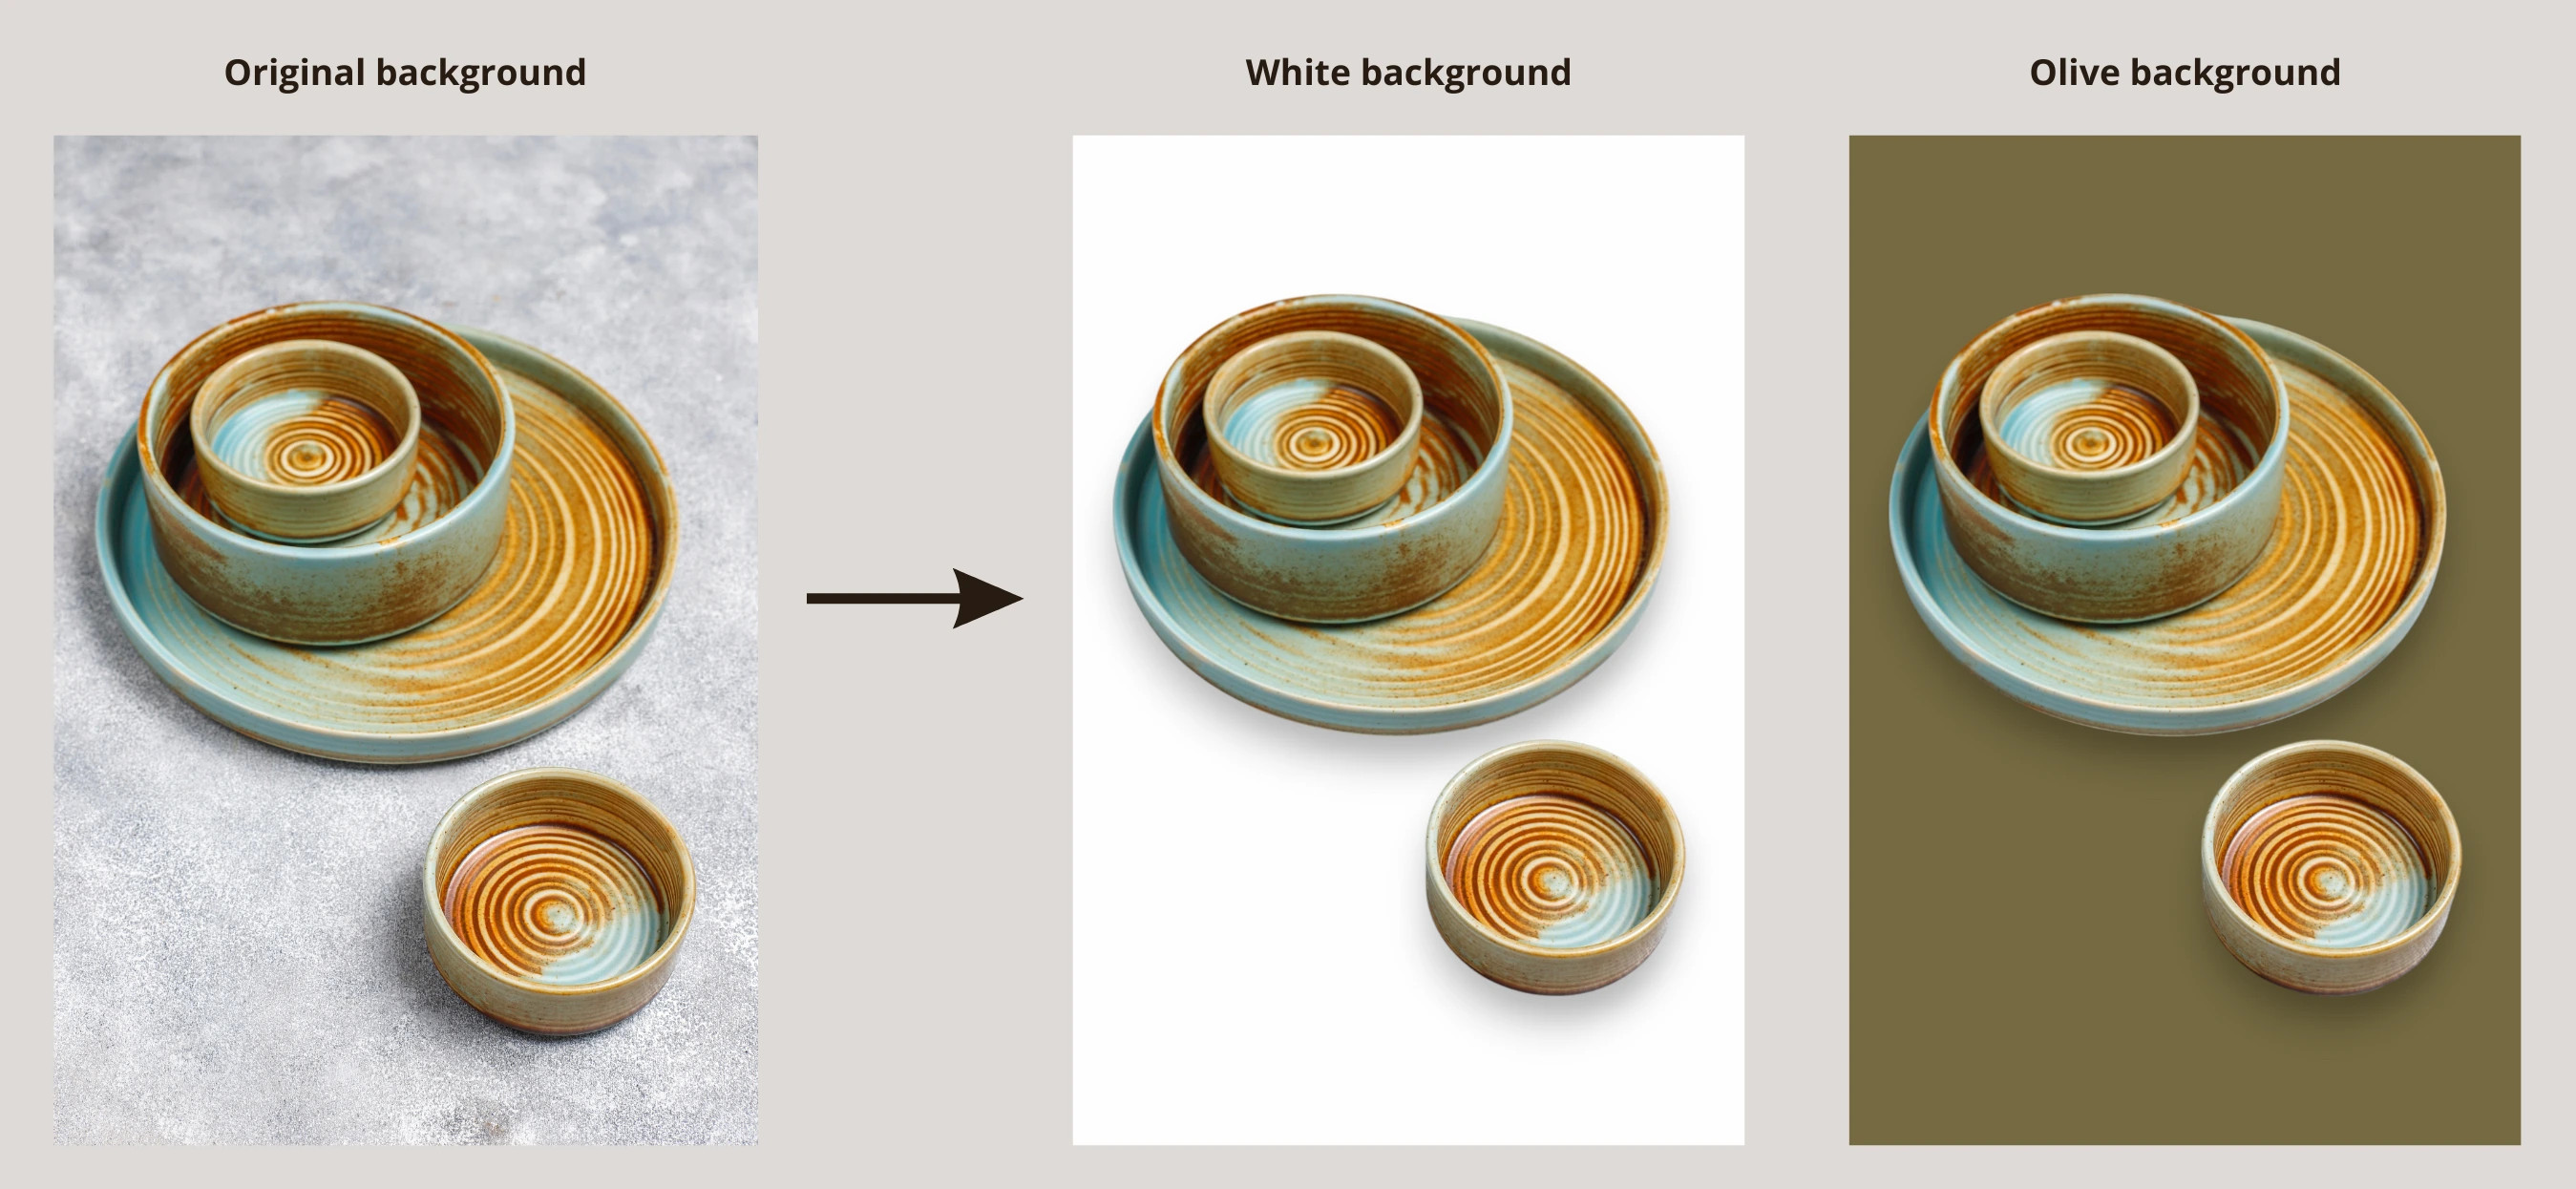 Ceramic dish set with background changes: original, white, and olive, showing editing variations.
Ceramic dish set displayed with various background changes, including original, white, and olive, illustrating different editing options.
7.3. How Does Showcasing Different Angles Benefit Etsy Listings?
Showcasing different angles allows potential buyers to get a comprehensive understanding of the product, similar to inspecting it in person. This approach helps build trust and provides a clear view of the product’s design and functionality. For example, Chai, owner of Chai Creations captures her products from multiple angles, giving a well-rounded view to help customers visualize her product.
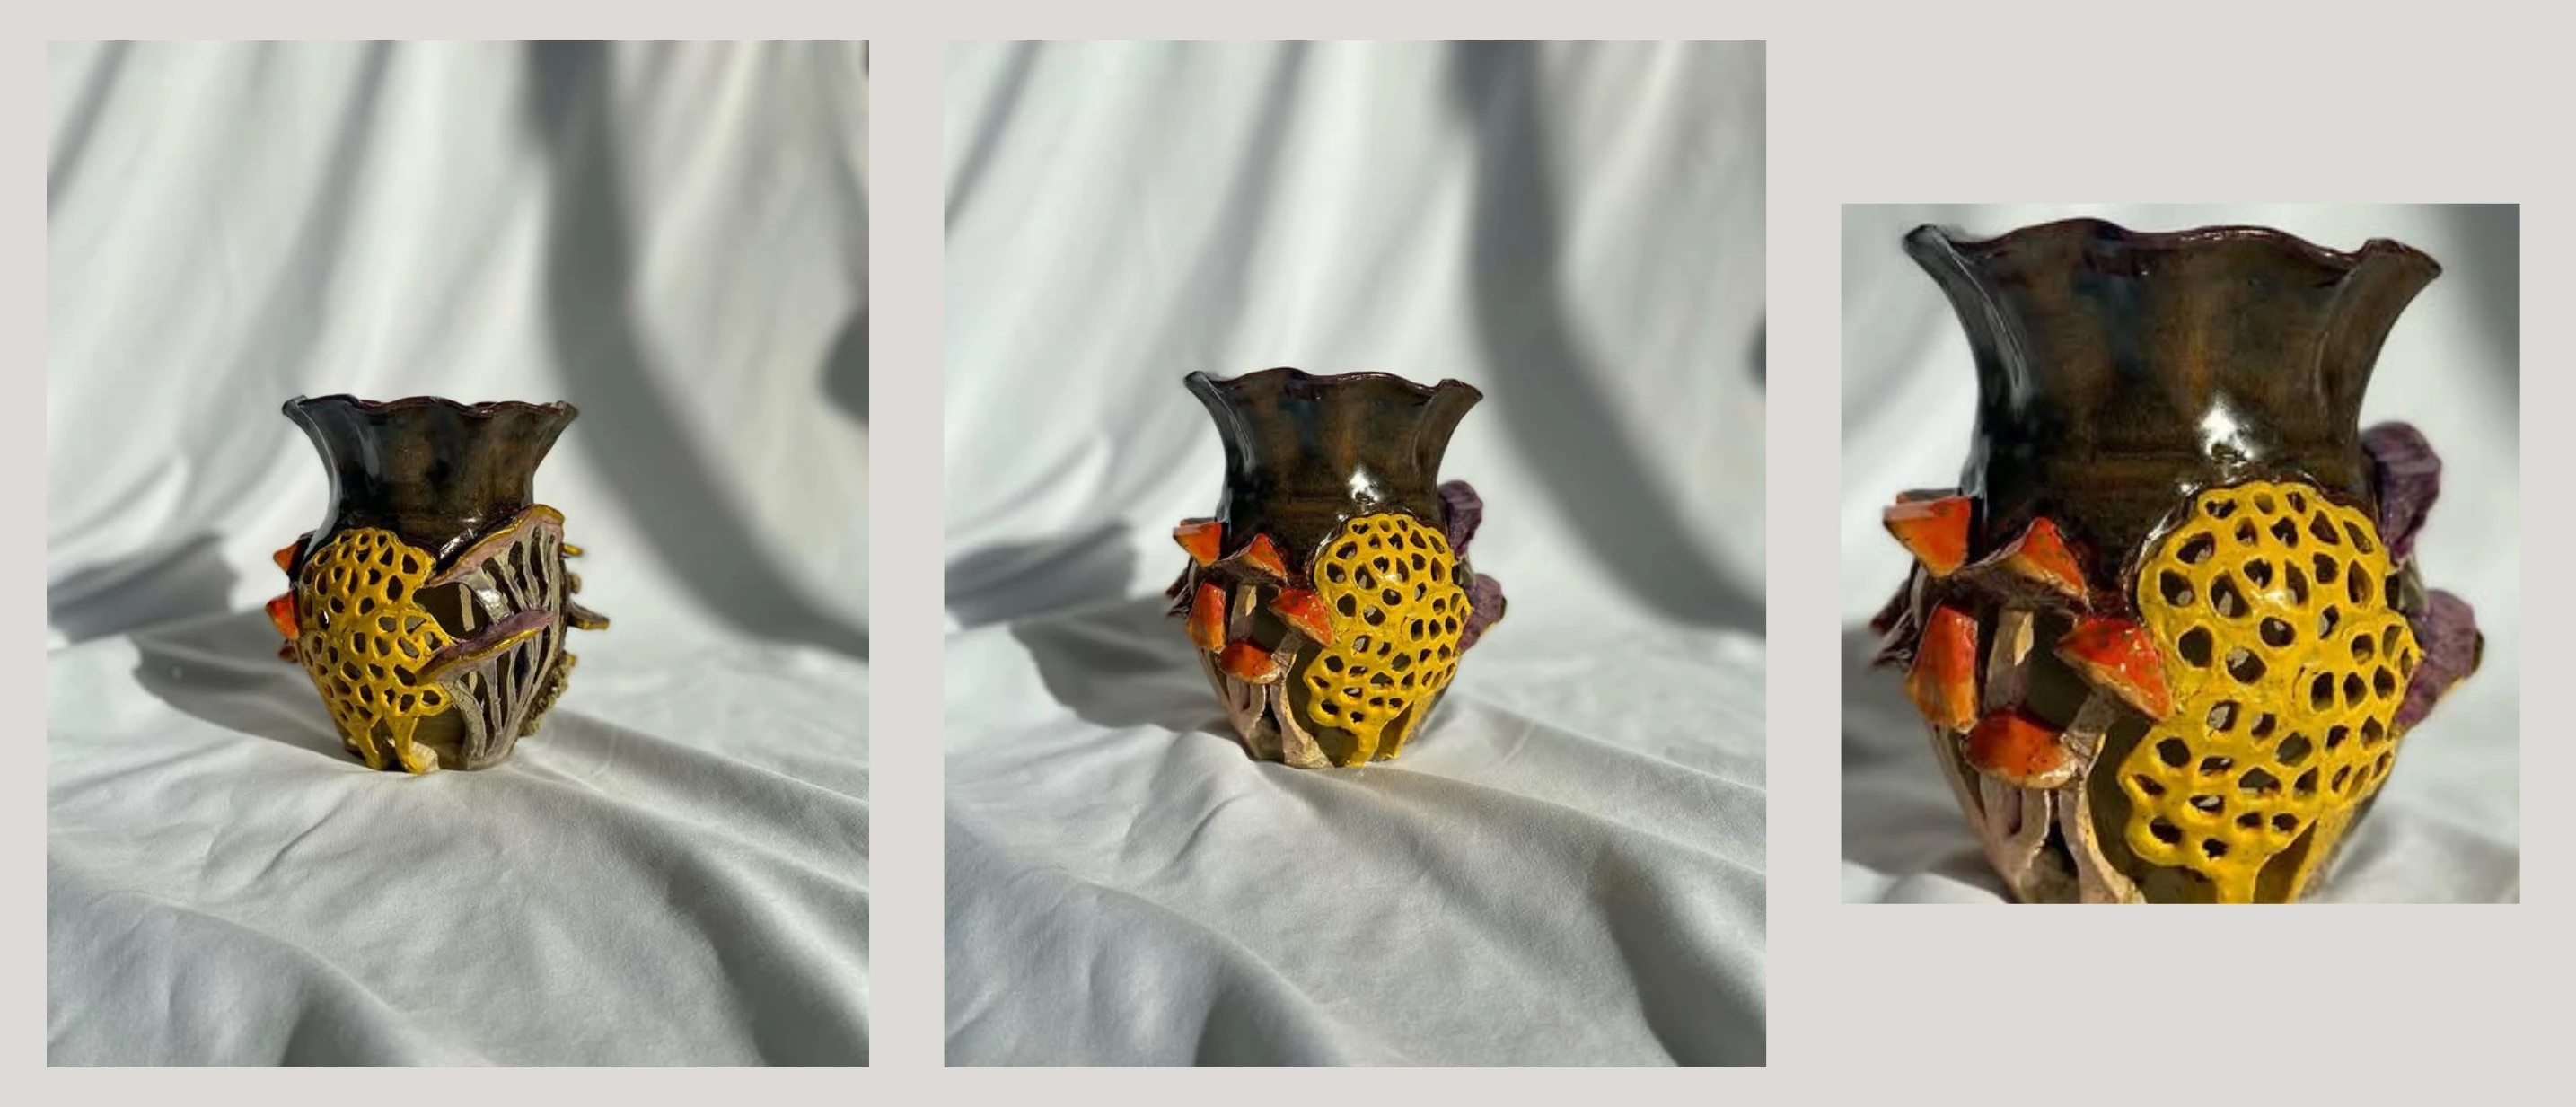 Handcrafted ceramic vase with detailed textures and colors, displayed from three different angles.
A handcrafted ceramic vase showcasing detailed textures and colors, displayed from three different angles to provide a comprehensive view.
7.4. What Role Do Props Play in Etsy Product Photography?
Props add context to the product, helping potential buyers visualize its use and benefits. However, it’s crucial to use props sparingly to avoid overshadowing the product itself. A simple way to add props to your image is by using a tool that can generate image backgrounds.
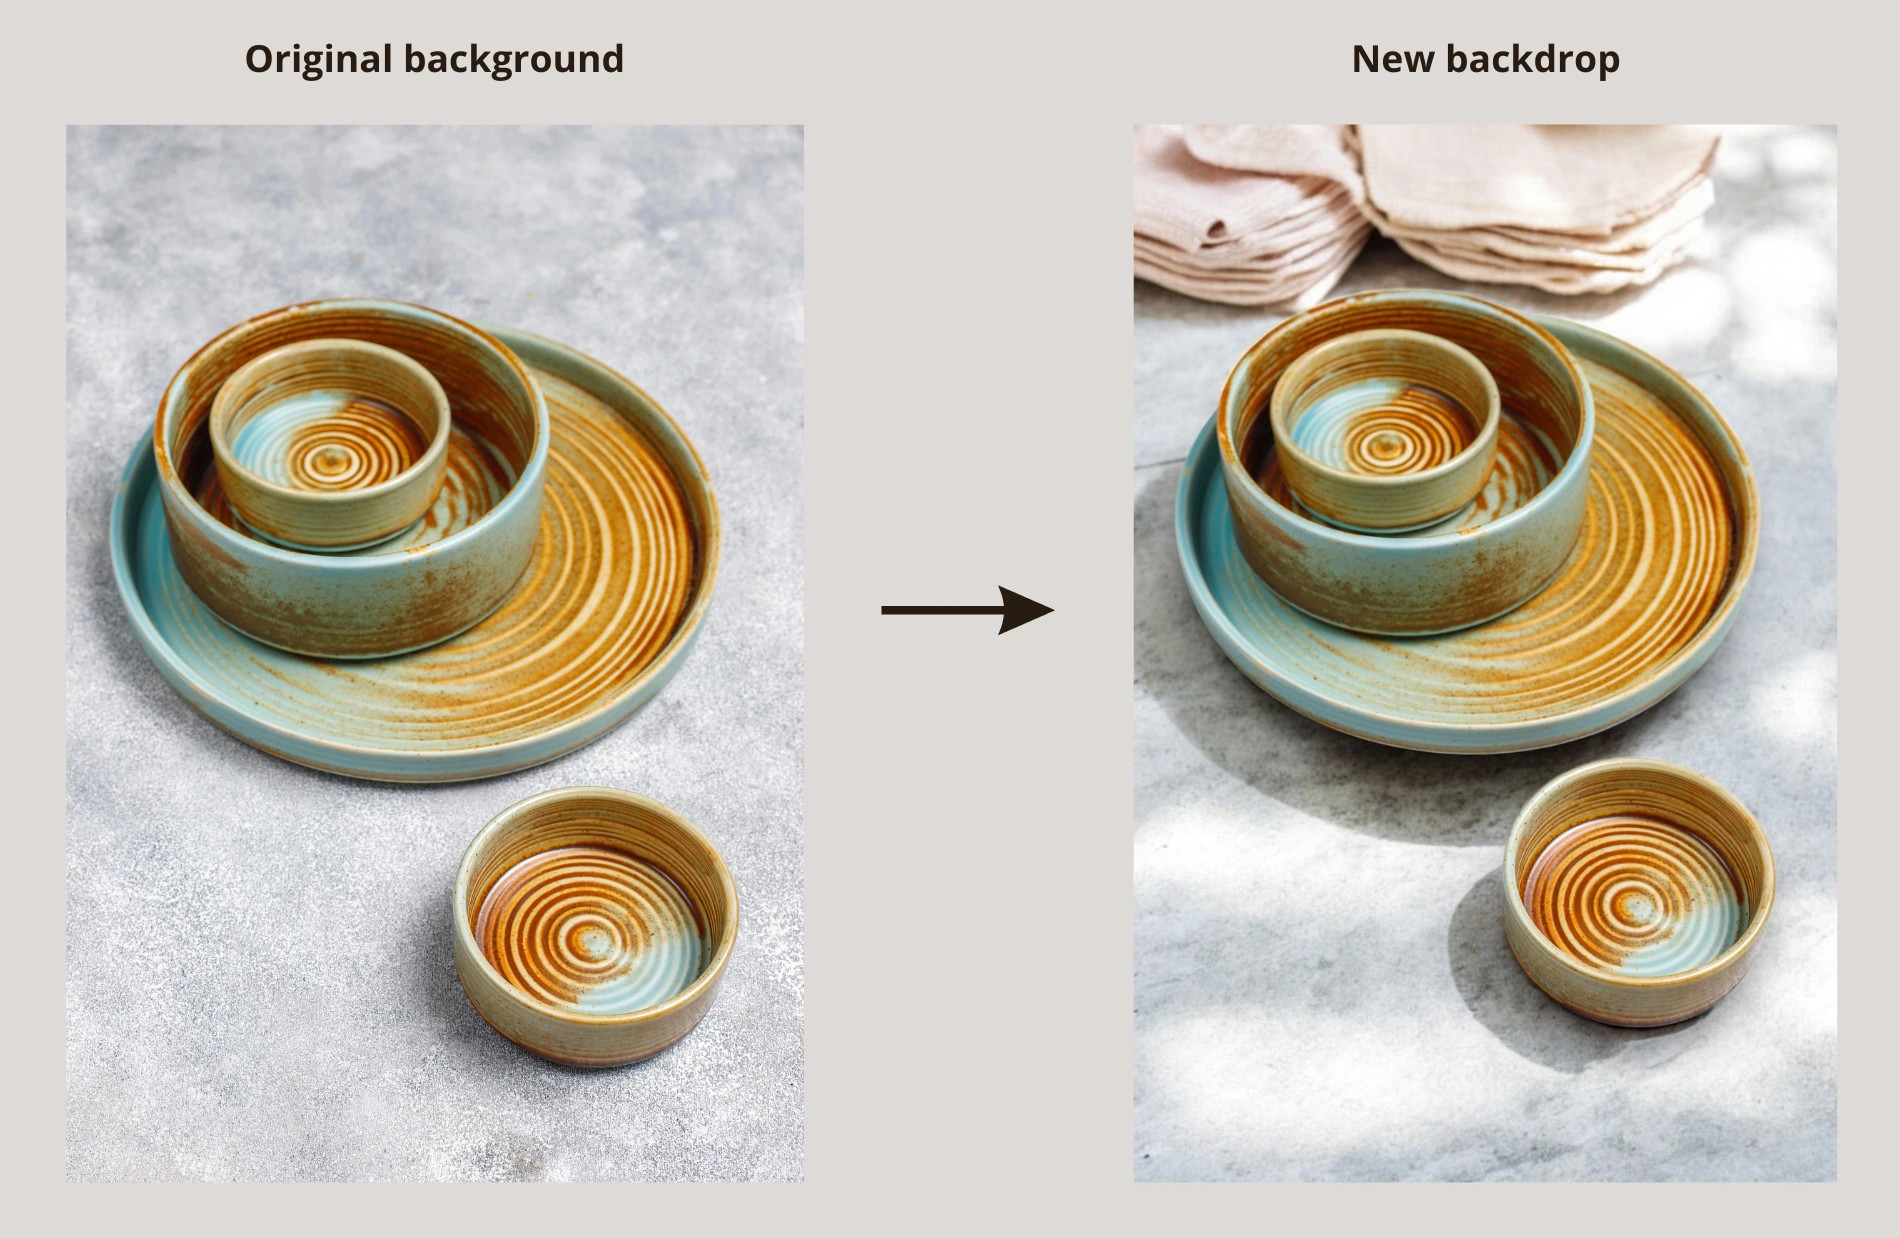 Ceramic dish set with background change from gray to a warm, sunlit scene with folded linens.
Ceramic dish set displayed with a background change from a plain gray to a warm, sunlit scene featuring folded linens.
7.5. Why is Image Stability Important for Etsy Photos?
Image stability ensures that photos are sharp and clear, which is essential for presenting a professional image to potential buyers. Blurry photos can deter customers, so using a tripod or steady surface is highly recommended. If you don’t have a tripod or can’t seem to get a steady shot, you can go ahead and take your photo, then use an image upscaler afterward to improve your picture’s quality.
 Blurry candle photo improved with Photoroom, enhancing sharpness, clarity, and overall detail.
A blurry photo of a candle improved using Photoroom, enhancing sharpness, clarity, and overall detail.
7.6. How Should Editing be Approached in Etsy Product Photography?
Editing should enhance the quality of the photo without altering its authenticity. Adjustments to brightness, contrast, and sharpness can make the product more appealing, but it’s important to keep edits minimal to maintain a realistic representation.
8. What Common Mistakes Should Be Avoided When Creating Images for Etsy?
Avoiding common mistakes ensures your Etsy images attract and convert potential buyers. Here are crucial pitfalls to steer clear of:
- Uploading Low-Resolution or Pixelated Images: Ensure images are sharp and clear to maintain buyer confidence.
- Using the Wrong Aspect Ratio: Adhere to Etsy’s recommended aspect ratios to avoid cropping important details.
- Ignoring Etsy’s File Size Limit: Keep images under 1MB to ensure fast loading times and prevent upload issues.
8.1. Why is Uploading Low-Resolution or Pixelated Images a Mistake?
Uploading low-resolution or pixelated images can significantly harm buyer confidence. Shoppers rely on photos to make purchasing decisions, and blurry images suggest a lack of quality in the product itself. Etsy’s recommended resolution is at least 72PPI, with the shorter side being at least 2,000px, ensuring clarity and preventing distortion when zooming in.
8.2. What Happens When the Wrong Aspect Ratio is Used?
Using the wrong aspect ratio leads to automatic cropping, which cuts off essential product details and presents an unprofessional listing. Etsy’s thumbnails display in a square (1:1) format, while listing images generally work best at 4:3 or 1:1. Centering your product and ensuring it fits within these dimensions before uploading can prevent awkward cuts.
8.3. Why is Ignoring Etsy’s File Size Limit a Problem?
Ignoring Etsy’s file size limit can lead to longer loading times, which frustrates buyers and can cause them to leave your shop. Large files may also fail to upload, leaving your listing incomplete. Keeping images crisp and fast requires compressing them to stay under Etsy’s limit without sacrificing quality.
9. How Can I Create the Best Etsy Listing Photo Size with Photoroom?
Photoroom simplifies the process of creating optimized Etsy listing photos, ensuring they look sharp and professional on any device. By adhering to Etsy’s size guidelines and using Photoroom, you can quickly resize and enhance your product images, freeing up time to focus on growing your shop.
10. FAQs on Etsy Listing Photo Size
Here are some frequently asked questions about Etsy listing photo sizes:
10.1. What Size Should Images Be on Etsy?
The appropriate size depends on the image type. Listing photos, shop icons, and profile pictures all have different size requirements. Always check Etsy’s latest recommendations before uploading to ensure optimal display.
10.2. What Size Should Etsy Listing Photos Be?
Etsy listing photos should have a shorter side of at least 2,000 pixels to maintain sharpness and quality. Keep the file size under 1MB to ensure fast loading. For aspect ratio, Etsy uses 1:1 (square) for thumbnails and 4:3 for general listing images to prevent cropping issues.
10.3. What Size is an Etsy Video in Pixels?
Etsy recommends uploading videos that are at least 1080 pixels wide to ensure clarity and high quality on desktop and mobile screens.
10.4. What is the Best Size for Etsy Thumbnails?
The best size for Etsy thumbnails is a 1:1 (square) format on desktop and 4:3 on other devices. Center your product in the image and leave enough border space to avoid losing important details.
By adhering to these guidelines, your Etsy shop will present a professional and visually appealing storefront that attracts customers and boosts sales.
Optimizing your Etsy listing photos is a blend of art and technical know-how. From ensuring your photos meet Etsy’s size requirements to capturing them in the best light, every detail counts. dfphoto.net offers a wealth of resources to help you master these skills. Explore our tutorials on advanced photography techniques, discover inspiration from stunning photo collections, and connect with a vibrant community of photographers. Address: 1600 St Michael’s Dr, Santa Fe, NM 87505, United States. Phone: +1 (505) 471-6001. Website: dfphoto.net. Don’t just list your products; showcase them in a way that captivates and converts. Visit dfphoto.net today and take your Etsy shop to the next level, where you can explore various photography techniques, find inspiration, and stay updated on the latest equipment. Elevate your Etsy shop’s appeal with stunning visuals and transform your passion into profit.