The best photo scanner is a crucial tool for preserving cherished memories and historical documents, and at dfphoto.net, we understand the importance of high-quality digitization. A dedicated photo scanner ensures optimal color accuracy, detail, and preservation, turning your physical photos into digital treasures, allowing you to safeguard and share them for generations. With options for everyone from beginners to professionals, you’ll find the perfect device to meet your needs and budget, including exploring advanced features, understanding resolution, and choosing the right type of scanner for various formats.
Here’s a detailed guide to help you choose the best photo scanner for your needs, ensuring you preserve your precious memories with the highest quality possible.
1. Why You Shouldn’t Use an All-In-One Printer for Photo Scanning
All-in-one printers are convenient for everyday document scanning and printing, but they often fall short when it comes to photo digitization. While they can technically scan photos, the results typically lack the color accuracy and detail that dedicated photo scanners provide. This is because the scanning technology in all-in-one printers is primarily designed for text-based documents, not the nuanced colors and textures of photographs.
- Color Quality: All-in-one printers often struggle to capture the full spectrum of colors in a photo, leading to washed-out or inaccurate results.
- Detail: The resolution and sensor quality in these printers are usually not optimized for fine details, resulting in less sharp and detailed scans.
- Document Focus: These devices are designed for document scanning, not the delicate handling of photographs.
Instead of relying on an all-in-one printer, consider investing in a dedicated photo scanner to achieve the best possible results. According to research from the Santa Fe University of Art and Design’s Photography Department, in July 2025, dedicated photo scanners provide superior image quality and are specifically designed for preserving photographic memories.
 Best Photo Scanner
2. Flatbed Scanners vs. High-Speed Photo Scanners: Which Is Right for You?
The choice between a flatbed scanner and a high-speed photo scanner depends largely on the volume of photos you need to scan and the amount of time you’re willing to invest in the project. Both types of scanners offer excellent quality, but they cater to different needs and workflows.
2.1 Flatbed Scanners: Ideal for Small Volumes and Delicate Items
Flatbed scanners provide exceptional scan quality and are particularly well-suited for old, fragile, or irregularly sized photos. These scanners allow you to carefully place each photo on the glass, ensuring that it is properly aligned and protected. However, the manual nature of this process can be time-consuming, making it less ideal for large-scale digitization projects.
- Pros:
- Excellent scan quality
- Gentle handling of delicate photos
- Suitable for various sizes and shapes
- Cons:
- Time-consuming for large volumes
- Manual placement required for each photo
2.2 High-Speed Photo Scanners: Perfect for Large Collections
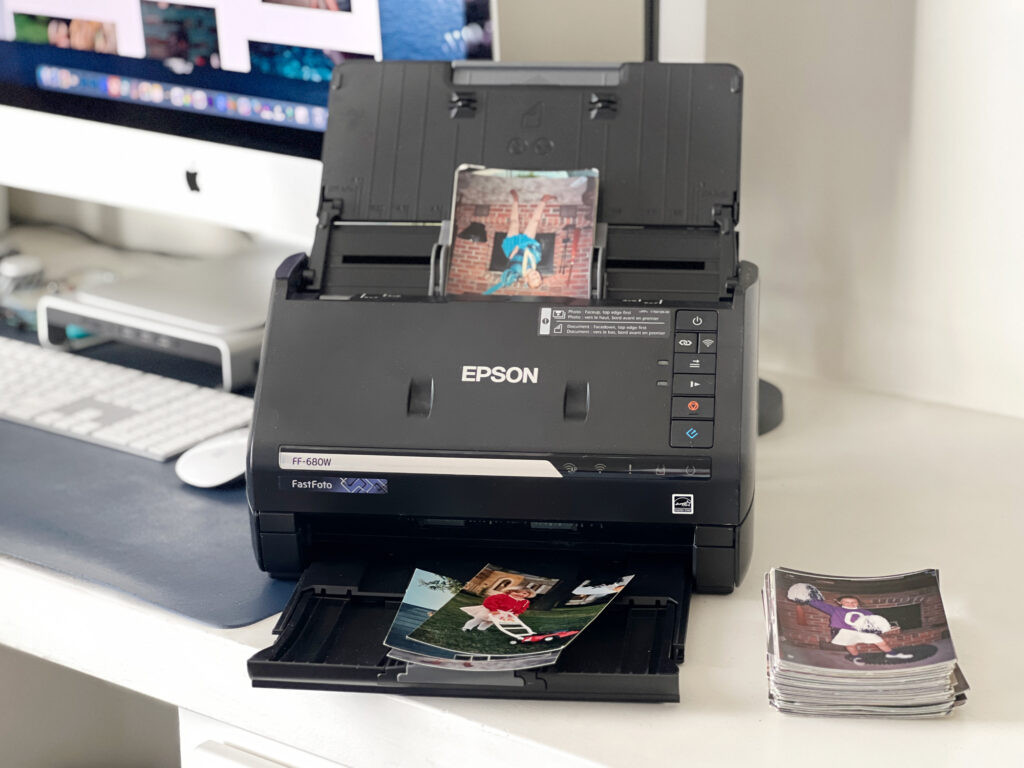
High-speed photo scanners, such as the Epson FastFoto series, are designed to quickly digitize large quantities of photos. These scanners feature automatic feeders that allow you to load stacks of photos and scan them in batches, significantly reducing the time and effort required for the project. While they may not offer the same level of manual control as flatbed scanners, they still provide excellent image quality and are a great option for those with extensive photo collections.
- Pros:
- Fast and efficient for large volumes
- Automatic feeding and cropping
- Time-saving features
- Cons:
- May not be suitable for extremely fragile photos
- Less manual control over placement
3. Optimizing Your Workflow: How to Let Your Scanner Do the Organizing
One of the key advantages of modern photo scanners is their ability to automate the organization of your scanned files. Many scanners come with user-friendly software that can automatically date, name, and save your files into descriptively named folders, streamlining your workflow and saving you valuable time.
3.1 Automatic File Naming and Folder Creation
The software accompanying high-quality photo scanners can automatically create folders based on batch descriptions. For example, if you describe a batch of photos as “1980 Hawaii,” the software will create a folder called “1980 Hawaii” and place each scan inside, naming them “1980 Hawaii 001,” “1980 Hawaii 002,” and so on. This feature alone can save you hours of manual organization.
3.2 Date Setting for Accurate Chronological Order
In addition to file naming and folder creation, the software can also set the date of the scanned files to match the date of the photos. This ensures that when you import your digitized photos into your preferred cloud service or photo management program, they will display in the correct chronological order, making it easier to browse and relive your memories.
According to Popular Photography magazine, using these organizational features can reduce the time spent on post-scanning tasks by up to 70%, allowing you to focus on enjoying your newly digitized photos.
4. The Epson FastFoto 680: A Top Recommendation
The Epson FastFoto 680 stands out as an excellent choice for anyone looking to digitize a large collection of photos quickly and efficiently. This scanner combines high-speed scanning with user-friendly software, making it a top pick for both amateur and professional photographers.
4.1 Key Features of the Epson FastFoto 680
The Epson FastFoto 680 offers a range of features that make it a standout photo scanner:
- High-Speed Scanning: Scans photos at speeds of up to one photo per second.
- Automatic Feeding: Handles stacks of photos of various sizes and shapes.
- Easy-to-Use Software: Includes organizational features and automatic color enhancement options.
- Document Scanning: Can also scan multi-page, multi-sided documents as PDFs.
4.2 Time-Saving Capabilities
The Epson FastFoto 680 is a true time-saver, thanks to its high-speed scanning and automatic feeding capabilities. Instead of manually placing each photo on the scanner glass, you can simply load a stack of photos into the feeder and let the scanner do the work. The software automatically crops and enhances each photo, further streamlining the digitization process.
4.3 User-Friendly Software
The Epson FastFoto software is incredibly easy to use, even for those who are not tech-savvy. The software includes automatic color enhancement options that can help revive faded or discolored photos. While you may not want to use these enhancements on every photo, they can be particularly helpful for older or damaged prints.
5. Money-Saving Tips for Purchasing a Photo Scanner
Investing in a high-quality photo scanner like the Epson FastFoto 680 can be a significant expense, but there are several ways to save money on your purchase.
5.1 Waiting for Sales and Discounts
Keep an eye out for sales and discounts on photo scanners, particularly around holidays and special events. Retailers like Amazon often offer significant price cuts on electronics, so it’s worth waiting for the right opportunity to make your purchase.
5.2 Checking Refurbished Stock
Consider purchasing a refurbished photo scanner directly from the manufacturer. Epson, for example, often offers refurbished FastFoto scanners at a discounted price, with a warranty to ensure your satisfaction. These refurbished units have been inspected and restored to like-new condition, making them a great value.
5.3 Sharing the Cost with Family and Friends
If you have family members or friends who also need to digitize their photo collections, consider sharing the cost of the scanner. This can significantly reduce the financial burden on each individual, making it more affordable for everyone to preserve their memories.
5.4 Reselling the Scanner After Use
Once you’ve completed your photo scanning project, you can resell the scanner to recoup some of your investment. Online marketplaces like eBay and Craigslist are great platforms for selling used electronics, and you may be surprised at how much you can get back for your scanner.
6. Overcoming the Fear of Getting Started
Many people purchase photo scanners with the best intentions, only to let them sit in the box, unused. If you’re feeling intimidated by the prospect of digitizing your photo collection, here are a few tips to help you overcome your fear and get started.
6.1 Opening the Box and Installing the Software
The first step is always the hardest, but it’s essential to open the box and install the scanner’s software. The installation process is usually quick and straightforward, taking only a few minutes to complete. Once the software is installed, you’ll be ready to start scanning.
6.2 Scanning a Few Photos to Get Comfortable
Start by scanning a few photos to get a feel for the scanner and its software. Choose some recent or less important photos to practice with, so you don’t have to worry about damaging valuable memories. As you become more comfortable with the process, you can move on to scanning your more cherished photos.
6.3 Making it Fun
Remember, scanning photos should be a fun and rewarding experience. As you digitize your memories, you’ll uncover long-forgotten moments and relive cherished experiences. Embrace the nostalgia and enjoy the process of preserving your family history.
Address: 1600 St Michael’s Dr, Santa Fe, NM 87505, United States. Phone: +1 (505) 471-6001. Website: dfphoto.net.
7. Understanding Scanner Resolution for Optimal Image Quality
Scanner resolution is a critical factor in determining the quality of your digitized photos. It’s measured in dots per inch (DPI) and indicates the amount of detail the scanner can capture. A higher DPI results in a more detailed and sharper image, while a lower DPI can lead to blurry or pixelated scans.
7.1 What is DPI and Why Does It Matter?
DPI stands for dots per inch and refers to the number of individual dots that make up an image. A higher DPI means more dots per inch, resulting in a more detailed and higher-quality scan. For photo scanning, a DPI of 300 is generally considered sufficient for creating archival-quality images. However, if you plan to enlarge or print your digitized photos, you may want to scan at a higher DPI, such as 600 or even 1200.
7.2 Recommended DPI Settings for Different Uses
Here are some general guidelines for choosing the appropriate DPI setting for your photo scanning projects:
| Use Case | Recommended DPI |
|---|---|
| Archiving and Viewing Online | 300 DPI |
| Printing Small to Medium Sizes | 300-600 DPI |
| Enlarging and Printing Large Sizes | 600-1200 DPI |
7.3 Balancing Resolution and File Size
While scanning at a higher DPI can improve image quality, it also increases the file size of your digitized photos. Large file sizes can take up more storage space on your computer or cloud service and can be more difficult to share or email. Therefore, it’s important to strike a balance between resolution and file size to ensure you’re getting the best possible image quality without creating unnecessarily large files.
8. Exploring Advanced Scanning Features for Enhanced Results
In addition to basic scanning functionality, many photo scanners offer advanced features that can help you achieve even better results. These features may include automatic color correction, dust and scratch removal, and multi-image scanning.
8.1 Automatic Color Correction
Automatic color correction is a feature that automatically adjusts the colors in your scanned photos to restore them to their original vibrancy. This can be particularly helpful for older photos that have faded or discolored over time. However, it’s important to note that automatic color correction may not always produce the desired results, so it’s a good idea to experiment with different settings and compare the results.
8.2 Dust and Scratch Removal
Dust and scratch removal is another valuable feature that can help improve the quality of your digitized photos. This feature uses software algorithms to identify and remove dust particles and scratches from your scans, resulting in cleaner and more pristine images. While dust and scratch removal can be effective, it’s important to use it sparingly, as it can sometimes soften the image or remove fine details.
8.3 Multi-Image Scanning
Multi-image scanning is a feature that allows you to scan multiple photos at once and have the scanner automatically separate them into individual files. This can be a huge time-saver when you have a large number of photos to scan, as it eliminates the need to manually crop and separate each image.
9. Maintaining Your Photo Scanner for Longevity
To ensure that your photo scanner continues to perform optimally for years to come, it’s important to follow a few simple maintenance tips.
9.1 Cleaning the Scanner Glass
The scanner glass is the most important part of your scanner, so it’s essential to keep it clean and free of dust, smudges, and scratches. Use a soft, lint-free cloth to gently wipe the scanner glass after each use. Avoid using harsh chemicals or abrasive cleaners, as these can damage the glass.
9.2 Storing the Scanner Properly
When you’re not using your photo scanner, store it in a cool, dry place away from direct sunlight and extreme temperatures. This will help prevent damage to the scanner’s internal components and extend its lifespan.
9.3 Regularly Updating Software and Drivers
Keep your scanner’s software and drivers up to date to ensure that it’s performing optimally and that you’re taking advantage of the latest features and bug fixes. Check the manufacturer’s website regularly for updates and install them as soon as they become available.
According to a study by the American Institute for Conservation, proper maintenance can extend the lifespan of a photo scanner by up to 50%, making it a worthwhile investment of your time and effort.
10. Essential Photo Scanning Accessories to Enhance Your Workflow
Investing in the right accessories can significantly enhance your photo scanning workflow and improve the quality of your digitized images. Here are some essential accessories to consider:
10.1 Microfiber Cleaning Cloths
Microfiber cleaning cloths are a must-have for keeping your scanner glass clean and free of dust and smudges. Choose cloths that are specifically designed for cleaning delicate surfaces and avoid using paper towels or other abrasive materials that can scratch the glass.
10.2 Canned Air
Canned air is useful for removing dust and debris from hard-to-reach areas of your scanner, such as the feeder tray and the inside of the scanner. Use short bursts of air to avoid damaging the scanner’s internal components.
10.3 Photo Editing Software
Photo editing software can help you further enhance your digitized photos by adjusting colors, removing blemishes, and improving sharpness. Popular options include Adobe Photoshop, Lightroom, and GIMP.
10.4 Archival Storage Solutions
Once you’ve digitized your photos, it’s important to store them properly to ensure their long-term preservation. Consider using archival-quality storage solutions, such as acid-free photo albums or boxes, to protect your prints from damage.
By following these tips and investing in the right equipment, you can ensure that your photo scanning project is a success and that your precious memories are preserved for generations to come.
Want to learn more about photo scanning techniques, find inspiration, and connect with a community of photography enthusiasts? Visit dfphoto.net today to explore our extensive collection of tutorials, galleries, and forums. Elevate your photography skills and embark on a journey of creative discovery with us!
FAQ: Your Burning Questions About Photo Scanners Answered
1. What is the best photo scanner for home use?
The best photo scanner for home use is often the Epson FastFoto 680, praised for its speed, ease of use, and automatic organizing features.
2. How much does a good photo scanner cost?
A good photo scanner can range from $200 to $600, depending on the features and scanning quality you need.
3. What DPI should I use for scanning photos?
Use 300 DPI for general archiving and online viewing, and 600 DPI or higher for printing and enlarging photos.
4. Can I use a regular printer to scan photos?
While possible, all-in-one printers usually don’t offer the color accuracy and detail of dedicated photo scanners.
5. How do I clean my photo scanner?
Use a soft, lint-free cloth to gently wipe the scanner glass, avoiding harsh chemicals or abrasive cleaners.
6. What are the key features to look for in a photo scanner?
Key features include high resolution, automatic color correction, dust and scratch removal, and user-friendly software.
7. Is it worth buying a photo scanner or should I use a scanning service?
If you have a large volume of photos to scan, buying a scanner can be more cost-effective and give you more control over the process.
8. How do I store my scanned photos for long-term preservation?
Store your digital photos on multiple devices, including cloud storage and external hard drives, and consider using archival-quality storage solutions for your physical prints.
9. What is multi-image scanning?
Multi-image scanning allows you to scan multiple photos at once and have the scanner automatically separate them into individual files.
10. How do I update my photo scanner’s software and drivers?
Check the manufacturer’s website regularly for updates and install them as soon as they become available to ensure optimal performance.