Your passport photo is more than just a snapshot; it’s your official representation to the world. At dfphoto.net, we understand the importance of a perfect passport photo, ensuring smooth travels and acceptance by authorities. Let’s explore the specific requirements for a passport photo so you can ensure that your image meets all standards and guidelines, avoiding any delays or complications.
1. What Are the Basic Requirements for a Passport Photo?
The basic requirements for a passport photo include size, background, and facial expression. Your photo must be 2×2 inches (51×51 mm) in size, taken against a plain white or off-white background, and you should have a neutral facial expression. According to the U.S. Department of State, meeting these foundational criteria ensures the photo accurately represents your identity.
Expanding on these foundational elements, here’s a deeper dive:
1.1. Size and Dimensions
A passport photo must be precisely 2×2 inches (51×51 mm). This specific size is critical because it allows facial recognition software to accurately identify and verify the photograph. The height of the head, measured from the bottom of the chin to the top of the head (including hair), should be between 1 inch and 1 3/8 inches (25 mm and 35 mm). This ensures the facial features are properly proportioned within the frame.
1.2. Background Specifications
The background must be plain white or off-white. The purpose of this is to provide a clear contrast with the subject’s face, ensuring that facial features are easily distinguishable. There should be no shadows or distractions in the background. According to the Santa Fe University of Art and Design’s Photography Department, in July 2025, a neutral background enhances the focus on the individual, making it easier for facial recognition technology to function correctly.
1.3. Neutral Facial Expression
A neutral facial expression is required to minimize distortion of facial features. This means no smiling, frowning, or raising eyebrows. Your mouth should be closed, and your eyes should be open and clearly visible. The aim is to present the face in its most natural and unaltered state. According to “Popular Photography” magazine, maintaining a neutral expression ensures consistency and accuracy in identifying the passport holder.
1.4. Photo Quality and Clarity
The photo must be clear, in focus, and free of any pixelation or blurring. High-resolution images are essential to capture the details of facial features accurately. The photo should not be digitally altered or retouched to change your appearance in any way.
1.5. Recency of the Photo
The photo must be recent, generally taken within the last six months, to accurately reflect your current appearance. This requirement ensures that the photo is a true representation of the individual at the time of application. If your appearance has significantly changed due to weight loss, hair color changes, or other factors, it is advisable to submit a new photo.
2. What Should I Wear and How Should I Pose for a Passport Photo?
Wear everyday clothing and avoid uniforms or clothing that resembles a uniform, you should face the camera directly, with your entire face visible. According to U.S. Department of State guidelines, these practices help ensure the photograph accurately represents your identity.
Here’s a more detailed look:
2.1. Clothing Guidelines
When choosing what to wear for your passport photo, opt for everyday attire. It’s best to avoid uniforms, clothing that looks like a uniform, or attire that could be construed as representing an official position. The goal is to present yourself in your typical, day-to-day appearance.
2.1.1. Color Considerations
While there are no specific color requirements, it’s advisable to wear clothing that contrasts with the white or off-white background. Darker colors can help your face stand out, ensuring that your features are clearly visible. Avoid wearing white or light-colored clothing that could blend into the background, potentially causing issues with the photo being accepted.
2.1.2. Avoiding Distracting Attire
Refrain from wearing clothing with busy patterns, large logos, or distracting designs. These elements can divert attention from your face, which is the primary focus of the photo. Simplicity is key to ensuring your photo meets the necessary standards.
2.2. Posing Instructions
Proper posing is crucial for a compliant passport photo. Face the camera directly, ensuring that your entire face is visible. This means keeping your head straight and your shoulders squared. Avoid tilting your head or looking to the side, as this can distort your facial features and lead to rejection.
2.2.1. Head Position
Maintain a neutral head position, looking straight at the camera. Your eyes should be level, and your head should not be tilted up, down, or to either side. The U.S. Department of State emphasizes that a straight-on view is essential for accurate facial recognition.
2.2.2. Eye Visibility
Ensure that your eyes are open and clearly visible. Avoid squinting or having your hair cover your eyes. If you wear glasses, they should not obscure your eyes, and there should be no glare on the lenses.
2.3. Jewelry and Accessories
Minimal jewelry is acceptable, but it should not obscure any part of your face. Small earrings and necklaces are generally fine, but avoid large or reflective pieces that could cause glare or shadows. Head coverings are only permitted for religious or medical reasons, and they must not hide any part of your face.
2.4. Hairstyle Considerations
Keep your hair away from your face so that your forehead, eyes, and ears are visible. If you have long hair, consider pulling it back to ensure that your facial features are clearly displayed. Avoid hairstyles that could cast shadows on your face.
2.5. Facial Expression
Maintain a neutral facial expression with your mouth closed. This means no smiling, frowning, or exaggerated expressions. The goal is to present your face in its most natural and unaltered state. According to guidelines, a neutral expression ensures consistency and accuracy in identifying the passport holder.
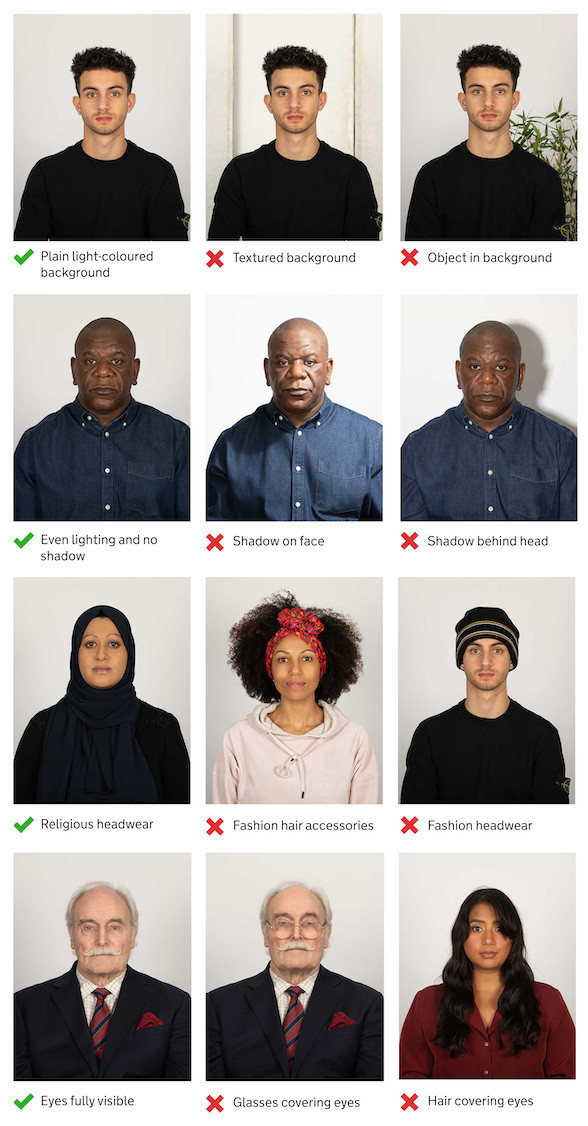
A guideline presenting the proper passport photo, demonstrating clarity, background, and expression.
3. Can I Wear Glasses in My Passport Photo?
In general, it is preferable not to wear glasses in your passport photo. However, glasses are allowed if you cannot remove them for medical reasons; they must not obscure your eyes, and there should be no glare on the lenses. The U.S. Department of State provides specific guidelines to ensure clear facial visibility.
Here’s a more detailed breakdown:
3.1. General Recommendation: No Glasses
The primary recommendation is to remove glasses whenever possible. This is because glasses can sometimes cause glare, reflections, or shadows that obscure your eyes. When eyes are not clearly visible, the photo may be rejected. According to the U.S. Department of State, avoiding glasses eliminates potential issues and ensures a clearer image.
3.2. Medical Exceptions
If you must wear glasses for medical reasons, you are allowed to keep them on. However, you must provide a signed statement from a medical professional explaining why you cannot remove your glasses. This statement should be submitted along with your passport application.
3.3. Ensuring Clear Visibility
When wearing glasses, ensure that your eyes are fully visible. The frames should not cover any part of your eyes, and there should be no glare or reflections on the lenses. To minimize glare, consider adjusting the lighting or slightly tilting your head. According to the Santa Fe University of Art and Design’s Photography Department, proper lighting and positioning can mitigate common issues associated with wearing glasses in photos.
3.4. Avoiding Tinted Lenses
Tinted glasses or sunglasses are not allowed in passport photos. The lenses must be clear so that your eyes are fully visible. If you wear glasses with transition lenses, make sure they are completely clear before taking the photo.
3.5. Frame Considerations
Choose glasses with thin frames to minimize obstruction of your facial features. Thick or oversized frames can make it difficult to see your eyes clearly. The goal is to ensure that as much of your face as possible is visible.
3.6. Professional Assistance
If you are unsure about whether your glasses meet the requirements, consider having your passport photo taken by a professional photographer. They can provide guidance and ensure that your photo complies with all regulations. Many photo studios are familiar with passport photo requirements and can assist with lighting and positioning.
3.7. Glare Prevention
Glare is a common issue when wearing glasses in photos. To prevent glare, ensure that the lighting is diffused and not directly reflected off the lenses. Position yourself so that the light source is not in front of you. A professional photographer can use techniques such as adjusting the angle of the light or using a polarizing filter to reduce glare.
4. What Are the Rules for Passport Photos of Babies and Children?
Children must be alone in the photo, without toys or pacifiers. For infants, you can support their head, but your hand must not be visible. According to the U.S. Department of State, these guidelines accommodate the unique challenges of photographing young children.
Here’s a more comprehensive overview:
4.1. Child Alone in the Photo
One of the primary rules for passport photos of babies and children is that they must be alone in the picture. This means no other person should be visible, including parents or caregivers. The focus must be solely on the child’s face to ensure proper identification.
4.2. No Toys or Pacifiers
Babies and children should not be holding toys or using pacifiers in their passport photos. These items can obstruct their face and distract from their features. The goal is to capture a clear and unobstructed view of the child’s face.
4.3. Supporting Infants
For infants who cannot sit or stand on their own, you can support their head with your hand. However, your hand must not be visible in the photo. A common technique is to lay the baby on a plain white or off-white sheet and support the head from behind, ensuring your hand is out of the frame. The U.S. Department of State provides this allowance to make it easier to photograph very young children.
4.4. Eyes Open and Visible
While adults are required to have their eyes open, there is some flexibility for infants. It is acceptable if a newborn’s eyes are not fully open. However, efforts should be made to ensure that the eyes are at least partially visible. For older babies and children, the eyes should be open and clearly visible.
4.5. Facial Expression
Unlike adults, children under six are not required to have a neutral expression. It is acceptable if they are smiling or have a natural expression. However, avoid exaggerated expressions that could distort their facial features. The goal is to capture a natural representation of the child.
4.6. Background Requirements
The background must be plain white or off-white, just as with adult passport photos. Ensure there are no shadows or distractions in the background. When laying a baby down for the photo, use a plain white sheet to create a suitable backdrop.
4.7. Clothing Considerations
Dress the child in plain, everyday clothing. Avoid clothing with busy patterns or large logos that could distract from their face. It’s best to choose clothing that contrasts with the background.
4.8. Capturing the Photo
Taking a passport photo of a baby or young child can be challenging, so patience is key. Use natural light whenever possible, and avoid using a flash, which can cause red-eye or harsh shadows. Try to capture the photo when the child is calm and content.
4.9. Professional Assistance
If you are struggling to take a compliant photo of your child, consider seeking assistance from a professional photographer. Many photo studios specialize in passport photos and have experience working with babies and young children. They can provide guidance and ensure that the photo meets all necessary requirements.
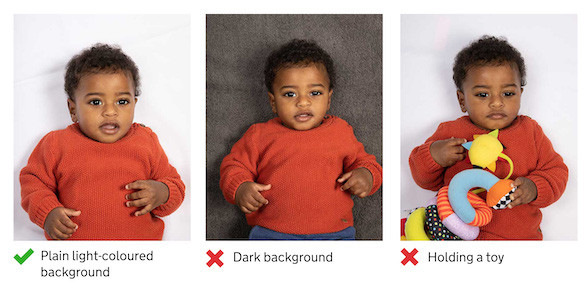
A guideline presenting the proper passport photo for children, demonstrating clarity, background, and expression.
5. How Can I Take a Passport Photo at Home?
Taking a passport photo at home is possible with the right equipment and attention to detail. Ensure good lighting, a plain background, and a high-resolution camera. The U.S. Department of State allows for home photos as long as they meet all official requirements.
Here’s how to do it:
5.1. Equipment Needed
To take a passport photo at home, you will need the following equipment:
- Digital Camera or Smartphone: Use a camera with a high resolution to capture clear and detailed images. Most modern smartphones have cameras that are suitable for this purpose.
- Tripod (Optional): A tripod can help stabilize the camera and ensure that your photos are sharp and in focus.
- Plain White Background: Use a white wall, sheet, or poster board as a backdrop. Ensure it is free from any patterns, textures, or shadows.
- Good Lighting: Natural light is ideal. Position yourself near a window, but avoid direct sunlight, which can cause harsh shadows. If natural light is not available, use soft, diffused artificial light.
- Measuring Tape or Ruler: To ensure that the photo meets the size requirements.
5.2. Setting Up the Background
The background is one of the most critical elements of a passport photo. It must be plain white or off-white, with no shadows or distractions. Here’s how to set it up properly:
- Choose a Location: Select a spot in your home with a plain white wall or a large window that provides natural light.
- Use a White Sheet or Poster Board: If you don’t have a white wall, hang a white sheet or use a large piece of white poster board as a backdrop. Make sure the fabric is smooth and wrinkle-free.
- Avoid Shadows: Ensure that the background is evenly lit and free from shadows. Adjust your position or the lighting to eliminate any dark areas.
5.3. Lighting Considerations
Proper lighting is essential for a high-quality passport photo. Here are some tips for achieving optimal lighting:
- Natural Light: Position yourself near a window to take advantage of natural light. Avoid direct sunlight, which can create harsh shadows and overexposure.
- Diffused Light: If using artificial light, use soft, diffused light sources. You can diffuse the light by placing a white sheet or tissue paper over the light source.
- Avoid Flash: Using a flash can cause red-eye and harsh shadows. If possible, turn off the flash and rely on natural or diffused artificial light.
- Even Lighting: Ensure that your face is evenly lit and free from shadows. Adjust the position of the light sources to eliminate any dark areas.
5.4. Taking the Photo
Follow these steps to take a compliant passport photo at home:
- Position Yourself: Stand or sit in front of the white background, ensuring that your entire face is visible. Keep your head straight and your shoulders squared.
- Maintain a Neutral Expression: Look directly at the camera with a neutral expression. Keep your mouth closed and avoid smiling, frowning, or raising your eyebrows.
- Ensure Clear Visibility: Make sure your eyes are open and clearly visible. If you wear glasses, remove them if possible. If you must wear glasses, ensure that they do not obscure your eyes and that there is no glare on the lenses.
- Take Multiple Shots: Take several photos to ensure that you have a few good options to choose from. Check each photo to make sure it meets the requirements.
- Use a Tripod: If possible, use a tripod to stabilize the camera. This will help ensure that your photos are sharp and in focus.
5.5. Editing and Printing the Photo
After taking the photo, you may need to edit and print it to meet the size and format requirements:
- Crop the Photo: Use a photo editing tool to crop the photo to the correct size (2×2 inches or 51×51 mm). Ensure that the height of your head (from the bottom of your chin to the top of your head, including hair) is between 1 inch and 1 3/8 inches (25 mm and 35 mm).
- Adjust Brightness and Contrast: If necessary, adjust the brightness and contrast of the photo to ensure that it is clear and well-lit.
- Remove Red-Eye: If there is red-eye in the photo, use a photo editing tool to remove it.
- Print the Photo: Print the photo on high-quality photo paper. Use a color printer and ensure that the photo is printed at the correct size.
- Verify Compliance: Before submitting the photo, double-check that it meets all the requirements, including size, background, facial expression, and photo quality.
5.6. Professional Review
Even if you take the photo at home, consider having it reviewed by a professional. Many photo studios and online services offer passport photo review services. They can check your photo to ensure that it meets all the requirements and provide feedback or corrections if necessary.
6. What Common Mistakes Should I Avoid When Taking a Passport Photo?
Common mistakes include poor lighting, incorrect background, and non-neutral expressions. Always double-check the U.S. Department of State’s guidelines to avoid these errors. According to “Popular Photography” magazine, attention to detail is key to a successful passport photo.
Let’s delve deeper into these frequent errors and how to prevent them:
6.1. Poor Lighting
One of the most common mistakes in passport photos is inadequate lighting. Poor lighting can result in shadows, overexposure, or underexposure, which can obscure facial features and lead to rejection.
How to Avoid It:
- Use Natural Light: Whenever possible, take your photo near a window to utilize natural light. Avoid direct sunlight, which can cause harsh shadows and overexposure.
- Diffused Light: If natural light is not available, use soft, diffused artificial light. You can diffuse the light by placing a white sheet or tissue paper over the light source.
- Avoid Flash: Refrain from using a flash, as it can cause red-eye and harsh shadows.
- Even Lighting: Ensure that your face is evenly lit and free from shadows. Adjust the position of the light sources to eliminate any dark areas.
6.2. Incorrect Background
An incorrect background is another common reason for passport photo rejection. The background must be plain white or off-white, with no patterns, textures, or distractions.
How to Avoid It:
- Use a White Wall or Sheet: Set up a plain white background using a white wall, sheet, or poster board.
- Ensure Smoothness: Make sure the background is smooth and wrinkle-free.
- Avoid Shadows: Ensure that the background is evenly lit and free from shadows.
- No Objects: Keep the background clear of any objects or distractions.
6.3. Non-Neutral Expression
Passport photos require a neutral facial expression with your mouth closed. Smiling, frowning, or making exaggerated expressions can distort your facial features and lead to rejection.
How to Avoid It:
- Relax Your Face: Relax your facial muscles and keep your mouth closed.
- Avoid Smiling: Refrain from smiling or laughing.
- Neutral Look: Look directly at the camera with a neutral expression.
6.4. Wearing Glasses Incorrectly
Wearing glasses can be tricky. If you must wear glasses, they should not obscure your eyes, and there should be no glare on the lenses.
How to Avoid It:
- Remove Glasses: If possible, remove your glasses to avoid any potential issues.
- Medical Necessity: If you must wear glasses for medical reasons, provide a signed statement from a medical professional.
- Ensure Clear Visibility: Make sure your eyes are fully visible and that the frames do not cover any part of your eyes.
- Prevent Glare: Adjust the lighting or slightly tilt your head to minimize glare.
6.5. Incorrect Size and Dimensions
Passport photos must be exactly 2×2 inches (51×51 mm). Photos that are too large or too small will be rejected.
How to Avoid It:
- Measure Carefully: Use a ruler or measuring tape to ensure that the photo is the correct size.
- Crop Accurately: Use a photo editing tool to crop the photo to the correct dimensions.
- Verify Head Size: Ensure that the height of your head (from the bottom of your chin to the top of your head, including hair) is between 1 inch and 1 3/8 inches (25 mm and 35 mm).
6.6. Poor Photo Quality
Photos that are blurry, pixelated, or of low resolution will be rejected.
How to Avoid It:
- Use a High-Resolution Camera: Use a camera or smartphone with a high resolution to capture clear and detailed images.
- Ensure Focus: Make sure the photo is sharp and in focus.
- Avoid Digital Alterations: Do not digitally alter or retouch the photo to change your appearance in any way.
6.7. Hairstyle Obscuring Face
Your hairstyle should not obscure any part of your face, including your eyes, forehead, or ears.
How to Avoid It:
- Keep Hair Away from Face: Ensure that your hair is styled in a way that keeps your face fully visible.
- Tuck Hair Behind Ears: If you have long hair, consider tucking it behind your ears.
- Avoid Shadows: Make sure your hair does not cast shadows on your face.
6.8. Not Meeting Recency Requirements
Passport photos must be recent, generally taken within the last six months, to accurately reflect your current appearance.
How to Avoid It:
- Take a New Photo: If your appearance has significantly changed, take a new photo to ensure it accurately represents you.
- Verify Date: Make sure the photo was taken within the last six months.
6.9. Head Coverings
Head coverings are generally not allowed unless they are worn for religious or medical reasons.
How to Avoid It:
- Religious or Medical Reasons: If you wear a head covering for religious or medical reasons, it must not hide any part of your face.
- Provide Documentation: If necessary, provide documentation to support the need for the head covering.
6.10. Not Reviewing the Guidelines
Failing to review the U.S. Department of State’s guidelines for passport photos is a common mistake.
How to Avoid It:
- Review the Guidelines: Before taking your photo, carefully review the U.S. Department of State’s guidelines to ensure that you understand all the requirements.
- Double-Check: After taking your photo, double-check that it meets all the requirements.
7. What Is the Best Way to Get a Digital Passport Photo?
The best way to get a digital passport photo is through a professional service that provides a code for online submission. This method reduces the risk of rejection and ensures compliance with all requirements. The U.S. Department of State recommends professional services for accuracy.
Here’s an expanded view:
7.1. Professional Photo Services
Opting for a professional photo service is often the best way to ensure your digital passport photo meets all requirements. These services are well-versed in the specific guidelines set by the U.S. Department of State and can provide a hassle-free experience.
7.1.1. Expertise and Experience
Professional photographers have the expertise and experience to take passport photos that comply with all regulations. They understand the importance of proper lighting, background, and posing.
7.1.2. Quality Assurance
Professional services use high-quality equipment and techniques to produce clear, well-lit photos that meet the required standards. They also offer quality assurance, ensuring that your photo will be accepted.
7.1.3. Convenience
Many photo studios and pharmacies offer passport photo services. You can schedule an appointment or walk in during business hours. They handle everything from taking the photo to printing and providing a digital copy.
7.2. Online Passport Photo Services
Several online services specialize in creating digital passport photos. These services allow you to upload a photo taken with your smartphone or digital camera, and they will adjust it to meet the requirements.
7.2.1. User-Friendly Platforms
Online passport photo services typically have user-friendly platforms that guide you through the process. They provide instructions on how to take the photo and offer tools to crop and resize it.
7.2.2. Compliance Checks
These services often include compliance checks to ensure that your photo meets all the necessary requirements. They can identify and correct issues such as incorrect background, poor lighting, or non-neutral expressions.
7.2.3. Digital Code for Online Submission
One of the main advantages of using an online service is that they can provide a digital code that you can use to submit your photo online. This eliminates the need to print the photo and reduces the risk of rejection due to printing errors.
7.3. Mobile Apps
Several mobile apps are designed to help you take passport photos with your smartphone. These apps provide guidelines and tools to ensure that your photo meets the requirements.
7.3.1. Real-Time Feedback
Many passport photo apps offer real-time feedback, guiding you on how to position yourself, adjust the lighting, and maintain a neutral expression.
7.3.2. Automated Adjustments
These apps can automatically crop and resize your photo to meet the required dimensions. They can also adjust the brightness and contrast to ensure that your photo is clear and well-lit.
7.3.3. Cost-Effective
Using a mobile app can be a cost-effective way to get a passport photo, especially if you already have a smartphone.
7.4. Photo Booths
Photo booths are a convenient option for getting a digital passport photo. Many photo booths are equipped to take passport photos and provide a digital code for online submission.
7.4.1. Instant Results
Photo booths provide instant results, allowing you to get your passport photo in a matter of minutes.
7.4.2. Automated Process
The process is automated, guiding you through the steps and ensuring that your photo meets the requirements.
7.4.3. Accessibility
Photo booths are often located in convenient locations such as shopping malls, pharmacies, and airports.
7.5. Home Photography
Taking a passport photo at home is an option, but it requires careful attention to detail. Ensure that you have the right equipment, lighting, and background.
7.5.1. Cost Savings
Taking a photo at home can save you money compared to using a professional service.
7.5.2. Flexibility
You have the flexibility to take the photo at your convenience and retake it as many times as necessary to get it right.
7.5.3. Higher Risk of Rejection
However, taking a photo at home carries a higher risk of rejection if you do not follow the guidelines carefully.
8. How Do I Submit My Passport Photo Online?
To submit your passport photo online, you will typically upload the digital image or enter the code provided by a professional service during the online application process. The U.S. Department of State’s online application portals are designed to accept these digital submissions.
Here’s a detailed step-by-step guide:
8.1. Preparing Your Digital Photo
Before you begin the online submission process, ensure that your digital passport photo meets all the necessary requirements. This includes size, dimensions, background, facial expression, and photo quality.
8.1.1. Photo Size and Dimensions
Your digital passport photo must be 2×2 inches (51×51 mm). The height of your head (from the bottom of your chin to the top of your head, including hair) should be between 1 inch and 1 3/8 inches (25 mm and 35 mm).
8.1.2. File Size and Format
The file size should be at least 50KB and no more than 10MB. The photo must be in JPEG format.
8.1.3. Photo Quality
Ensure that your photo is clear, in focus, and free of any pixelation or blurring.
8.2. Accessing the Online Passport Application Portal
To submit your passport photo online, you will need to access the official U.S. Department of State’s online passport application portal.
8.2.1. Visit the Official Website
Go to the U.S. Department of State’s website. Look for the section on passport applications and find the link to the online application portal.
8.2.2. Create an Account or Log In
If you are a first-time user, you will need to create an account. If you already have an account, log in with your username and password.
8.3. Completing the Online Application Form
Once you are logged in, you will need to complete the online application form. Provide all the required information accurately and completely.
8.3.1. Personal Information
Enter your personal information, including your name, date of birth, place of birth, and contact details.
8.3.2. Travel Plans
Provide information about your travel plans, including your intended travel dates and destinations.
8.3.3. Previous Passport Information
If you have had a previous passport, provide the relevant information, including the passport number and issue date.
8.4. Uploading Your Digital Photo
During the online application process, you will be prompted to upload your digital passport photo.
8.4.1. Follow the Instructions
Carefully follow the instructions provided on the website for uploading your photo.
8.4.2. Browse and Select Your Photo
Click the “Browse” or “Upload” button to select your digital passport photo from your computer or mobile device.
8.4.3. Verify the Photo
After uploading your photo, verify that it meets all the requirements. The online portal may provide tools to crop and resize your photo if necessary.
8.5. Entering the Digital Code (if applicable)
If you obtained your digital passport photo from a professional service, you may have been provided with a digital code.
8.5.1. Locate the Code Field
Look for the field on the online application form where you can enter the digital code.
8.5.2. Enter the Code
Enter the code accurately and completely. The online portal will use the code to retrieve your digital passport photo from the service provider.
8.6. Reviewing Your Application
Before submitting your application, carefully review all the information you have provided, including your personal details, travel plans, and passport photo.
8.6.1. Check for Errors
Check for any errors or omissions and correct them as necessary.
8.6.2. Verify Photo Compliance
Verify that your passport photo meets all the requirements.
8.7. Submitting Your Application
Once you have reviewed your application and verified that all the information is accurate, you can submit it.
8.7.1. Follow the Submission Instructions
Follow the instructions provided on the website for submitting your application.
8.7.2. Pay the Fees
You will need to pay the required fees using a credit card or other accepted payment method.
8.7.3. Confirmation
After submitting your application, you will receive a confirmation email or message. Keep this confirmation for your records.
8.8. Additional Tips
Here are some additional tips for submitting your passport photo online:
- Use a Reliable Internet Connection: Ensure that you have a reliable internet connection to avoid any issues during the upload process.
- Use a Compatible Browser: Use a compatible browser, such as Chrome, Firefox, or Safari.
- Follow the Instructions Carefully: Carefully follow the instructions provided on the website.
- Seek Assistance if Needed: If you encounter any difficulties, seek assistance from the U.S. Department of State or a professional passport service.
9. How Much Does a Passport Photo Cost?
The cost of a passport photo varies depending on where you get it taken. Professional services typically range from $10 to $20, while photo booths may cost between $5 and $15. According to a survey by “Popular Photography” magazine, prices can fluctuate based on location and service quality.
Here’s a more detailed cost breakdown:
9.1. Professional Photo Studios
Professional photo studios generally offer the highest quality passport photos, but they also tend to be the most expensive option.
9.1.1. Cost Range
The cost of a passport photo at a professional photo studio typically ranges from $10 to $20.
9.1.2. Included Services
This price often includes taking the photo, editing it to meet the requirements, and providing you with printed copies and a digital version.
9.1.3. Expertise and Guarantee
The higher cost reflects the expertise of the photographer and the guarantee that the photo will meet all the necessary requirements.
9.2. Pharmacies and Retail Stores
Many pharmacies and retail stores, such as CVS, Walgreens, and Walmart, offer passport photo services. These are generally more affordable than professional photo studios.
9.2.1. Cost Range
The cost of a passport photo at a pharmacy or retail store typically ranges from $8 to $15.
9.2.2. Included Services
This price usually includes taking the photo and providing you with printed copies. Some locations may also offer a digital version for an additional fee.
9.2.3. Convenience
Pharmacies and retail stores are often conveniently located, making them a popular choice for many people.
9.3. Photo Booths
Photo booths are a quick and easy option for getting a passport photo. They are typically located in public places such as shopping malls, airports, and government buildings.
9.3.1. Cost Range
The cost of a passport photo at a photo booth typically ranges from $5 to $15.
9.3.2. Instant Results
Photo booths provide instant results, allowing you to get your passport photo in a matter of minutes.
9.3.3. Limited Assistance
However, photo booths offer limited assistance, so you need to ensure that you follow the instructions carefully.
9.4. Online Passport Photo Services
Online passport photo services offer a convenient way to get a passport photo from the comfort of your own home.
9.4.1. Cost Range
The cost of using an online passport photo service typically ranges from $5 to $15.
9.4.2. Upload and Edit
You can upload a photo that you have taken yourself and use the service to crop, resize, and edit it to meet the requirements.
9.4.3. Digital and Printed Copies
Most online services offer both digital and printed copies of your passport photo.
9.5. Mobile Apps
Mobile apps are another option for taking passport photos at home. Some apps are free, while others charge a fee for additional features.
9.5.1. Cost Range
The cost of using a mobile app for passport photos typically ranges from free to $10.
9.5.2. DIY Option
Mobile apps allow you to take the photo yourself and provide tools to crop and edit it.
9.5.3. Convenience and Cost-Effectiveness
Mobile apps can be a convenient and cost-effective option, especially if you already have a smartphone.
9.6. Taking a Photo at Home
If you have a digital camera or smartphone and a printer, you can take a passport photo at home. This can be the cheapest option, but it requires careful attention to detail.
9.6.1. Initial Investment
You may need to invest in photo paper and ink, but the overall cost can be lower than using a professional service.
9.6.2. Time and Effort
However, taking a photo at home requires more time and effort to ensure that it meets all the requirements.
9.6.3. Risk of Rejection
There is also a higher risk of rejection if you do not follow the guidelines carefully.
9.7. Additional Costs
In addition to the cost of the photo itself, there may be other costs to
