A mounted photo panel is a fantastic way to display your cherished photos with a clean, modern aesthetic, enhancing any space they occupy, and at dfphoto.net, we are dedicated to helping you explore the best options for showcasing your photography. By understanding the benefits of photo mounting, exploring different materials, and discovering how to choose the perfect mounted panel for your style, you’ll elevate your images from digital files to stunning visual art. Discover inspiration and expert advice for creating captivating photographic art that reflects your unique perspective with our comprehensive guide to photographic display and image enhancement, complemented by stunning examples of visual artistry at dfphoto.net.
Table of Contents
- Understanding Mounted Photo Panels
- Why Choose a Mounted Photo Panel? The Benefits
- Different Types of Photo Mounting Materials
- Acrylic Photo Panels: A Deep Dive
- Metal Photo Panels: Sleek and Durable
- Wood Photo Panels: Natural and Rustic
- Canvas Photo Panels: A Classic Choice
- Choosing the Right Size and Orientation
- Preparing Your Photo for Mounting
- Hanging and Displaying Your Mounted Photo Panel
- Caring for Your Mounted Photo Panel
- Mounted Photo Panels: A Gift Idea
- The Future of Photo Display
- Finding Inspiration for Your Next Project
- FAQs About Mounted Photo Panels
1. Understanding Mounted Photo Panels
What exactly is a mounted photo panel?
A mounted photo panel is essentially a photograph that has been adhered to a rigid backing material. This provides the print with stability, protection, and a clean, frameless presentation. It’s a modern alternative to traditional framing that emphasizes the image itself. Think of it as giving your photograph a solid foundation, both literally and figuratively. This method enhances the visual impact of your photos, making them stand out as pieces of art. Mounted photo panels are an excellent way to display images in homes, offices, galleries, and other spaces where visual appeal is important.
The key to a great mounted photo panel lies in the quality of both the print and the mounting material. High-resolution prints with accurate colors are essential, and the backing material should be durable and resistant to warping or damage. The combination of these elements results in a professional and long-lasting display piece. According to research from the Santa Fe University of Art and Design’s Photography Department, in July 2025, high-quality materials provide longevity.
2. Why Choose a Mounted Photo Panel? The Benefits
What are the advantages of choosing a mounted photo panel over traditional framing?
Mounted photo panels offer several compelling advantages over traditional framing, including a modern, minimalist aesthetic, enhanced durability, and cost-effectiveness. They provide a clean, frameless look that allows the photograph to take center stage, without the distraction of a frame. This minimalist approach is particularly well-suited for contemporary interiors.
Modern and Minimalist Aesthetic
Mounted photo panels seamlessly blend with modern décor, offering a sleek and understated way to display your favorite images. This simplicity ensures that the viewer’s attention is focused entirely on the photograph itself, making it a focal point in any room. The clean lines and smooth surfaces of mounted panels contribute to a sophisticated and uncluttered look.
Enhanced Durability
The rigid backing of a mounted photo panel provides significant protection against bending, warping, and other forms of physical damage. This is especially important for larger prints, which can be more vulnerable to damage when displayed in traditional frames. The added durability ensures that your photos remain in pristine condition for years to come.
Cost-Effectiveness
In many cases, mounted photo panels can be more cost-effective than traditional framing, especially when considering the cost of custom frames, mats, and glass. The streamlined production process and simpler materials of mounted panels often result in a lower overall price, making them an accessible option for a wide range of budgets.
Versatility
Mounted photo panels are incredibly versatile and can be used in a variety of settings, from residential homes to commercial spaces. They are suitable for displaying a wide range of photographic styles, including landscapes, portraits, and abstract images. Their adaptability makes them a popular choice among photographers, artists, and interior designers.
Ease of Installation
Mounted photo panels typically come with pre-installed hanging hardware, making them easy to install and display. This eliminates the need for complicated framing procedures and ensures that your photos can be quickly and securely mounted on your walls. The straightforward installation process is a significant advantage for those who prefer a hassle-free display solution.
Protection from UV Damage
Many mounted photo panels include a protective laminate or coating that shields the print from harmful UV rays. This helps to prevent fading and discoloration over time, ensuring that your photos retain their original vibrancy and clarity. UV protection is particularly important for photos displayed in areas with high levels of sunlight.
In summary, mounted photo panels offer a compelling combination of aesthetic appeal, durability, cost-effectiveness, and versatility, making them an excellent choice for displaying your cherished photographs.
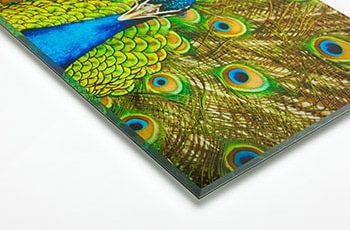 Close-up showing the polished edge of an acrylic photo print, highlighting the clarity and depth it adds to the artwork
3. Different Types of Photo Mounting Materials
What are the popular materials used for mounting photo panels?
Several materials are commonly used for mounting photo panels, each offering unique characteristics in terms of aesthetics, durability, and cost. The most popular options include acrylic, metal (aluminum), wood (bamboo, birch), and canvas. Let’s explore each of these materials in more detail:
Acrylic
Acrylic mounting involves face-mounting the print to a sheet of acrylic, which provides a vibrant, glossy finish and exceptional clarity. Acrylic panels are known for their ability to enhance colors and create a sense of depth, making them a popular choice for contemporary art displays. They are also highly durable and resistant to scratches and UV damage.
Metal (Aluminum)
Metal photo panels, typically made from aluminum, offer a sleek, modern look with excellent durability and weather resistance. The print is usually adhered to the metal surface, often with a protective laminate. Aluminum panels are lightweight yet rigid, making them suitable for large-format prints. They are also a great option for outdoor displays due to their resistance to corrosion.
Wood (Bamboo, Birch)
Wood photo panels provide a natural, rustic aesthetic that complements a wide range of interior styles. Bamboo and birch are two popular wood choices, each offering unique grain patterns and color tones. The print is mounted to the wood surface, often with a matte or glossy laminate for protection. Wood panels add warmth and character to any space.
Canvas
Canvas photo panels offer a classic, artistic look that is reminiscent of traditional paintings. The print is typically wrapped around a wooden frame, creating a gallery-wrapped effect. Canvas panels are lightweight and easy to hang, making them a versatile option for both residential and commercial displays. They are also relatively affordable compared to other mounting materials.
Dibond
Dibond is a composite material consisting of an aluminum layer on either side of a polyethylene core. It is lightweight, rigid, and weather-resistant, making it a popular choice for large-format prints and outdoor displays. The print is mounted to the Dibond surface with a protective laminate.
Foam Core (Gatorboard)
Gatorboard is a rigid foam board that is often used for mounting posters and prints. It is lightweight and relatively inexpensive, making it a budget-friendly option for temporary displays. However, it is not as durable as other mounting materials and is best suited for indoor use.
Comparison Table
| Material | Aesthetic | Durability | Cost | Best For |
|---|---|---|---|---|
| Acrylic | Vibrant, Glossy | High | High | Modern Art, High-Impact Displays |
| Metal (Aluminum) | Sleek, Modern | High | Moderate | Outdoor Displays, Contemporary Art |
| Wood (Bamboo) | Natural, Rustic | Moderate | Moderate | Warm Interiors, Nature Photography |
| Wood (Birch) | Natural, Budget-Friendly | Moderate | Budget-Friendly | Warm Interiors, Nature Photography |
| Canvas | Classic, Artistic | Moderate | Low | Traditional Art, Gallery-Wrapped Look |
| Dibond | Modern, Industrial | High | Moderate | Large-Format Prints, Outdoor Displays |
| Gatorboard | Simple, Functional | Low | Very Low | Temporary Displays, Budget Projects |
The choice of mounting material depends on your personal preferences, the style of your photograph, and the intended display environment.
4. Acrylic Photo Panels: A Deep Dive
What makes acrylic photo panels stand out, and what should I consider when choosing one?
Acrylic photo panels, also known as face-mounted acrylic prints, are renowned for their exceptional clarity, vibrant colors, and modern aesthetic. The process involves printing the image on high-quality photographic paper and then face-mounting it to a sheet of acrylic. This creates a stunning visual effect that enhances the depth and detail of the photograph.
Key Features of Acrylic Photo Panels
- Exceptional Clarity: Acrylic has a higher light transmission rate than glass, resulting in brighter, more vibrant colors and enhanced clarity.
- Enhanced Depth: The face-mounting process creates a sense of depth, making the image appear to float within the acrylic.
- UV Protection: Acrylic naturally blocks UV rays, helping to prevent fading and discoloration of the print over time.
- Durability: Acrylic is shatter-resistant and less prone to damage than glass, making it a durable option for high-traffic areas.
- Modern Aesthetic: The frameless design and glossy surface of acrylic panels contribute to a sleek, contemporary look.
Considerations When Choosing an Acrylic Photo Panel
- Acrylic Thickness: Acrylic panels are available in various thicknesses, typically ranging from 1/8 inch to 1/2 inch. Thicker panels offer greater rigidity and a more substantial feel.
- Edge Finish: The edges of the acrylic panel can be polished to a high gloss, creating a smooth, refined look. Diamond-polished edges are particularly popular for their exceptional clarity.
- Mounting Options: Acrylic panels can be mounted using various methods, including standoffs, French cleats, and recessed frames. Choose a mounting option that complements the aesthetic of your space.
- Print Quality: The quality of the print is crucial for achieving the best results with acrylic panels. Ensure that the print is produced using high-resolution images and archival-quality inks.
- Glare Reduction: Consider opting for anti-glare acrylic if the panel will be displayed in an area with bright lighting. Anti-glare acrylic reduces reflections and improves visibility.
Real-World Examples and Case Studies
Many professional photographers and artists choose acrylic photo panels for their gallery displays. For example, the Santa Fe Arts District often showcases acrylic prints in its contemporary art exhibitions, highlighting the material’s ability to enhance the visual impact of the artwork.
Maintenance and Care
Acrylic photo panels are relatively easy to maintain. Simply wipe the surface with a soft, damp cloth to remove dust and fingerprints. Avoid using abrasive cleaners or solvents, as they can scratch or damage the acrylic.
Cost Factors
The cost of acrylic photo panels can vary depending on the size, thickness, and edge finish. Larger panels with thicker acrylic and polished edges will typically be more expensive. However, the investment is often worthwhile due to the exceptional visual quality and durability of acrylic panels.
In conclusion, acrylic photo panels are an excellent choice for those seeking a modern, high-impact display solution that showcases their photographs in the best possible light.
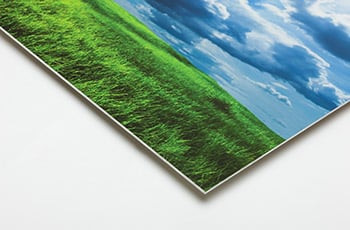 Image showcasing a metal print with a brushed aluminum finish, highlighting the texture and the modern look
5. Metal Photo Panels: Sleek and Durable
What are the benefits of using metal as a mounting material for photo panels?
Metal photo panels offer a unique combination of sleek aesthetics, exceptional durability, and weather resistance, making them a popular choice for both indoor and outdoor displays. Typically made from aluminum, these panels provide a modern, industrial look that complements a wide range of photographic styles.
Key Advantages of Metal Photo Panels
- Durability: Metal panels are highly resistant to scratches, dents, and other forms of physical damage, making them a durable option for high-traffic areas.
- Weather Resistance: Aluminum is naturally corrosion-resistant, making metal panels suitable for outdoor displays in a variety of climates.
- Lightweight: Despite their durability, metal panels are relatively lightweight, making them easy to handle and install.
- Modern Aesthetic: The smooth, reflective surface of metal panels contributes to a sleek, contemporary look that is well-suited for modern interiors.
- UV Protection: Metal panels can be coated with a UV-resistant laminate to protect the print from fading and discoloration over time.
Types of Metal Photo Panels
- Direct Print on Metal: In this method, the image is printed directly onto the metal surface using UV-cured inks. This creates a durable, scratch-resistant print with vibrant colors.
- Print on Photo Paper, Mounted on Metal: The image is printed on high-quality photo paper and then adhered to a metal panel. This method allows for greater control over color accuracy and detail.
- Dye-Sublimation: The image is infused into the metal surface using heat and pressure, creating a permanent, scratch-resistant print with exceptional color vibrancy.
Considerations When Choosing a Metal Photo Panel
- Metal Finish: Metal panels are available in various finishes, including glossy, matte, brushed, and textured. Choose a finish that complements the style of your photograph and the intended display environment.
- Panel Thickness: Metal panels are available in various thicknesses, typically ranging from 1/16 inch to 1/4 inch. Thicker panels offer greater rigidity and a more substantial feel.
- Mounting Options: Metal panels can be mounted using various methods, including standoffs, French cleats, and recessed frames. Choose a mounting option that complements the aesthetic of your space.
- Print Quality: The quality of the print is crucial for achieving the best results with metal panels. Ensure that the print is produced using high-resolution images and archival-quality inks.
Real-World Examples and Case Studies
Metal photo panels are widely used in commercial and industrial settings, such as corporate offices, retail stores, and public art installations. Their durability and weather resistance make them an ideal choice for these demanding environments.
Maintenance and Care
Metal photo panels are relatively easy to maintain. Simply wipe the surface with a soft, damp cloth to remove dust and fingerprints. Avoid using abrasive cleaners or solvents, as they can scratch or damage the metal.
Cost Factors
The cost of metal photo panels can vary depending on the size, thickness, finish, and printing method. Direct print on metal and dye-sublimation methods tend to be more expensive than mounting a print on photo paper.
In summary, metal photo panels offer a compelling combination of sleek aesthetics, exceptional durability, and weather resistance, making them an excellent choice for displaying your photographs in a variety of settings.
6. Wood Photo Panels: Natural and Rustic
What are the advantages of using wood for photo mounting, and what types of wood are most suitable?
Wood photo panels bring a touch of nature and rustic charm to any space, offering a warm and inviting alternative to more modern materials like acrylic and metal. The natural grain patterns and color tones of wood add character and depth to the photograph, creating a unique and visually appealing display.
Key Advantages of Wood Photo Panels
- Natural Aesthetic: Wood panels offer a warm, inviting aesthetic that complements a wide range of interior styles, from rustic to contemporary.
- Unique Character: The natural grain patterns and color tones of wood add character and depth to the photograph, making each panel unique.
- Sustainability: Wood is a renewable resource, making wood panels a more environmentally friendly option than some other mounting materials.
- Versatility: Wood panels can be used to display a variety of photographic styles, including landscapes, portraits, and abstract images.
Types of Wood Commonly Used for Photo Panels
- Bamboo: Bamboo is a fast-growing, sustainable wood that offers a light, natural color and a fine grain pattern. It is a popular choice for eco-conscious consumers.
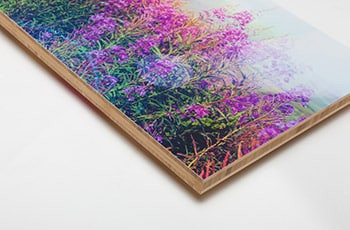 Bamboo
 - Birch: Birch is a hardwood that offers a light, creamy color and a smooth, even grain pattern. It is a versatile choice that works well with a variety of photographic styles.
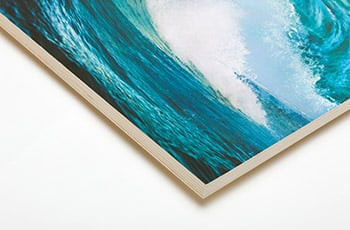 White Birch Panels & Blocks
 - Pine: Pine is a softwood that offers a warm, golden color and a rustic grain pattern. It is a budget-friendly option that is well-suited for casual or country-style interiors.
- Cedar: Cedar is a softwood that offers a rich, reddish-brown color and a distinctive aroma. It is naturally resistant to insects and decay, making it a durable option for outdoor displays.
Considerations When Choosing a Wood Photo Panel
- Wood Type: Choose a wood type that complements the style of your photograph and the intended display environment.
- Panel Thickness: Wood panels are available in various thicknesses, typically ranging from 1/2 inch to 1 inch. Thicker panels offer greater rigidity and a more substantial feel.
- Finish: Wood panels can be finished with a variety of coatings, including matte, glossy, and satin. Choose a finish that enhances the natural beauty of the wood and protects the print from damage.
- Mounting Options: Wood panels can be mounted using various methods, including keyhole slots, French cleats, and wire hangers. Choose a mounting option that is appropriate for the weight and size of the panel.
Real-World Examples and Case Studies
Wood photo panels are often used in rustic or nature-themed interiors, such as cabins, lodges, and farmhouses. They are also a popular choice for displaying nature photography and wildlife images.
Maintenance and Care
Wood photo panels should be cleaned with a soft, dry cloth to remove dust and fingerprints. Avoid using harsh chemicals or abrasive cleaners, as they can damage the wood finish.
Cost Factors
The cost of wood photo panels can vary depending on the type of wood, panel thickness, and finish. Bamboo and birch tend to be more expensive than pine and cedar.
In conclusion, wood photo panels offer a warm, inviting aesthetic and a unique character that is well-suited for a variety of photographic styles and interior designs.
7. Canvas Photo Panels: A Classic Choice
What are the advantages of using canvas for photo mounting, and what are the different types of canvas panels available?
Canvas photo panels offer a classic, artistic look that is reminiscent of traditional paintings, making them a popular choice for displaying photographs in a gallery-like setting. The texture of the canvas adds depth and dimension to the image, creating a unique and visually appealing display.
Key Advantages of Canvas Photo Panels
- Artistic Aesthetic: Canvas panels offer a classic, artistic look that is well-suited for displaying a variety of photographic styles, including portraits, landscapes, and fine art images.
- Texture and Depth: The texture of the canvas adds depth and dimension to the image, creating a unique and visually appealing display.
- Lightweight: Canvas panels are relatively lightweight, making them easy to hang and display in a variety of settings.
- Affordability: Canvas panels are generally more affordable than other mounting options, such as acrylic and metal.
Types of Canvas Panels
- Gallery-Wrapped Canvas: In this method, the canvas is stretched around a wooden frame, with the image wrapping around the edges. This creates a clean, frameless look that is popular for contemporary displays.
- Stretched Canvas: The canvas is stretched around a wooden frame, but the image does not wrap around the edges. This method requires a frame to finish the display.
- Canvas Board: The canvas is adhered to a rigid board, creating a flat, smooth surface. This method is often used for smaller prints and is a budget-friendly option.
Considerations When Choosing a Canvas Photo Panel
- Canvas Material: Canvas is typically made from cotton or polyester. Cotton canvas offers a more natural look and feel, while polyester canvas is more durable and water-resistant.
- Canvas Weave: The weave of the canvas can affect the texture and appearance of the print. A tighter weave will result in a smoother surface, while a looser weave will create a more textured look.
- Frame Thickness: Gallery-wrapped canvas panels are available in various frame thicknesses, typically ranging from 3/4 inch to 1 1/2 inches. Thicker frames offer a more substantial look and feel.
- Print Quality: The quality of the print is crucial for achieving the best results with canvas panels. Ensure that the print is produced using high-resolution images and archival-quality inks.
Real-World Examples and Case Studies
Canvas photo panels are often used in residential interiors, such as living rooms, bedrooms, and home offices. They are also a popular choice for displaying family portraits and vacation photos.
Maintenance and Care
Canvas photo panels should be cleaned with a soft, dry cloth to remove dust and fingerprints. Avoid using water or harsh chemicals, as they can damage the canvas.
Cost Factors
The cost of canvas photo panels can vary depending on the size, material, and frame thickness. Gallery-wrapped canvas panels tend to be more expensive than stretched canvas or canvas boards.
In summary, canvas photo panels offer a classic, artistic look and a unique texture that is well-suited for a variety of photographic styles and interior designs.
8. Choosing the Right Size and Orientation
How do I determine the best size and orientation for my mounted photo panel?
Choosing the right size and orientation for your mounted photo panel is crucial for creating a visually appealing and impactful display. The size and orientation should complement the photograph itself, the surrounding space, and the overall aesthetic you are trying to achieve.
Factors to Consider When Choosing Size
- Photograph Details: The level of detail in the photograph should influence the size of the panel. Highly detailed images may benefit from larger sizes to allow viewers to appreciate the intricacies.
- Viewing Distance: Consider the distance from which the panel will be viewed. Larger panels are suitable for viewing from a distance, while smaller panels are better suited for closer viewing.
- Wall Space: The available wall space should dictate the maximum size of the panel. Avoid choosing a panel that is too large for the space, as it can overwhelm the room.
- Room Size: The size of the room should also be taken into consideration. Larger rooms can accommodate larger panels, while smaller rooms may require smaller sizes.
Guidelines for Choosing Size
- Small Prints (up to 12×18 inches): These are suitable for small rooms, hallways, or gallery walls.
- Medium Prints (16×20 to 20×30 inches): These are versatile and can be used in a variety of settings, including living rooms, bedrooms, and offices.
- Large Prints (24×36 inches and larger): These are best suited for large rooms or spaces where you want to make a bold statement.
Factors to Consider When Choosing Orientation
- Subject Matter: The subject matter of the photograph should influence the orientation of the panel. Landscapes typically look best in horizontal orientation, while portraits often look best in vertical orientation.
- Composition: The composition of the photograph should also be taken into consideration. Choose an orientation that complements the composition and highlights the key elements of the image.
- Wall Space: The shape of the available wall space can also influence the orientation of the panel. Horizontal spaces are well-suited for horizontal panels, while vertical spaces are well-suited for vertical panels.
Guidelines for Choosing Orientation
- Horizontal (Landscape): This orientation is ideal for landscapes, cityscapes, and group photos.
- Vertical (Portrait): This orientation is ideal for portraits, single-subject photos, and architectural images.
- Square: This orientation is versatile and can be used for a variety of photographic styles, including abstract images and minimalist compositions.
Real-World Examples and Case Studies
In gallery settings, curators often use a combination of different sizes and orientations to create a dynamic and visually engaging display. For example, a gallery wall might feature a large horizontal landscape print alongside a series of smaller vertical portrait prints.
Tips for Visualizing Size and Orientation
- Use Painter’s Tape: Use painter’s tape to mark out the dimensions of the panel on the wall to get a sense of how it will look in the space.
- Create a Mockup: Create a mockup of the panel using cardboard or paper to visualize the size and orientation in the room.
- Use a Digital Tool: Use a digital tool to upload a photo of your wall and overlay different panel sizes and orientations to see how they will look in the space.
In summary, choosing the right size and orientation for your mounted photo panel is essential for creating a visually appealing and impactful display. Consider the photograph details, viewing distance, wall space, room size, subject matter, composition, and available wall space when making your decision.
9. Preparing Your Photo for Mounting
What steps should I take to prepare my photo for mounting on a panel?
Preparing your photo for mounting is a critical step in ensuring a high-quality and visually appealing final product. Proper preparation involves selecting the right image, optimizing it for printing, and choosing the appropriate file format and resolution.
Selecting the Right Image
- Image Quality: Choose an image that is sharp, well-exposed, and free from any noticeable flaws, such as scratches, dust spots, or color casts.
- Subject Matter: Select an image that is visually appealing and meaningful to you. Consider the subject matter, composition, and overall aesthetic of the photograph.
- Copyright: Ensure that you have the rights to reproduce the image. If you are using an image that you did not create, obtain permission from the copyright holder.
Optimizing Your Photo for Printing
- Color Correction: Adjust the colors in your photo to ensure that they are accurate and vibrant. Use a color calibration tool to ensure that your monitor is displaying colors accurately.
- Sharpening: Sharpen the image to enhance the details and make it appear more crisp. Be careful not to over-sharpen, as this can create unwanted artifacts.
- Contrast and Brightness: Adjust the contrast and brightness of the image to ensure that it has a good tonal range and that the highlights and shadows are well-balanced.
- Cropping: Crop the image to remove any unwanted elements and to improve the composition. Consider the aspect ratio of the final panel when cropping the image.
Choosing the Right File Format and Resolution
- File Format: Save the image as a TIFF or JPEG file. TIFF files are lossless, meaning that they do not compress the image data, resulting in higher quality prints. JPEG files are compressed, which can reduce the file size but may also result in some loss of quality.
- Resolution: Ensure that the image has a high enough resolution for the desired print size. A resolution of 300 DPI (dots per inch) is generally recommended for high-quality prints.
- Color Space: Convert the image to the sRGB color space, which is the standard color space for most printing devices.
Working with a Professional
- Consult a Printer: Consult with a professional printer to get their recommendations for preparing your photo for mounting. They can provide valuable advice on color correction, sharpening, and file format.
- Order a Proof: Order a proof print to see how the image will look on the chosen mounting material. This will allow you to make any necessary adjustments before ordering the final panel.
Real-World Examples and Case Studies
Many professional photographers use specialized software, such as Adobe Photoshop and Lightroom, to optimize their images for printing. They also work closely with professional printers to ensure that their images are reproduced accurately and beautifully.
Tips for Ensuring High-Quality Prints
- Use High-Quality Equipment: Use a high-quality camera, lens, and printer to capture and reproduce your images.
- Calibrate Your Monitor: Calibrate your monitor regularly to ensure that it is displaying colors accurately.
- Use Archival-Quality Inks and Papers: Use archival-quality inks and papers to ensure that your prints will last for many years without fading or discoloring.
In summary, preparing your photo for mounting involves selecting the right image, optimizing it for printing, and choosing the appropriate file format and resolution. Working with a professional printer can also help to ensure a high-quality final product.
10. Hanging and Displaying Your Mounted Photo Panel
What are the best practices for hanging and displaying a mounted photo panel to maximize its visual impact?
Hanging and displaying your mounted photo panel correctly is essential for maximizing its visual impact and creating a stunning focal point in your space. Proper placement, lighting, and hanging hardware can all contribute to a successful display.
Choosing the Right Location
- Focal Point: Select a location where the panel will serve as a focal point, such as above a sofa, bed, or fireplace.
- Eye Level: Hang the panel at eye level to ensure that it is easily viewable. The center of the panel should be approximately 57 to 60 inches from the floor.
- Lighting: Consider the lighting in the room. Avoid placing the panel in direct sunlight, as this can cause fading and discoloration over time.
- Background: Choose a background that complements the panel and does not distract from the image. Solid-colored walls are generally a good choice.
Selecting the Right Hanging Hardware
- Weight Capacity: Choose hanging hardware that is appropriate for the weight of the panel. Use a stud finder to locate wall studs and use screws or nails that are long enough to penetrate the studs.
- Leveling: Use a level to ensure that the panel is hanging straight. Adjust the hanging hardware as needed to achieve a level display.
- Security: Consider using security hardware to prevent the panel from being easily removed or stolen.
Lighting Your Mounted Photo Panel
- Ambient Lighting: Use ambient lighting to create a soft, even illumination in the room.
- Accent Lighting: Use accent lighting to highlight the panel and draw attention to it. Track lighting, spotlights, and picture lights can all be used to create dramatic effects.
- Color Temperature: Choose a color temperature that complements the colors in the panel. Warm light (2700-3000K) is generally recommended for creating a cozy atmosphere, while cool light (4000-5000K) is better suited for modern interiors.
Creating a Gallery Wall
- Layout: Plan the layout of the gallery wall before you start hanging the panels. Use painter’s tape to mark out the positions of the panels on the wall.
- Spacing: Maintain consistent spacing between the panels to create a cohesive look. A spacing of 2 to 4 inches is generally recommended.
- Balance: Create a balanced display by varying the sizes, orientations, and styles of the panels.
Real-World Examples and Case Studies
Art galleries often use sophisticated lighting systems to highlight their artwork. They also carefully consider the placement of each piece to create a visually engaging and thought-provoking display.
Tips for Creating a Stunning Display
- Consider the Style of Your Home: Choose a display style that complements the overall style of your home.
- Experiment with Different Arrangements: Try out different arrangements of the panels to see what looks best in your space.
- Get a Second Opinion: Ask a friend or family member to give you their opinion on the display.
In summary, hanging and displaying your mounted photo panel correctly is essential for maximizing its visual impact. Consider the location, hanging hardware, lighting, and overall style of your home when making your decisions.
11. Caring for Your Mounted Photo Panel
What are the best practices for cleaning and maintaining a mounted photo panel to ensure its longevity?
Proper care and maintenance are essential for preserving the beauty and longevity of your mounted photo panel. Regular cleaning and preventative measures can help to protect the panel from damage and keep it looking its best for years to come.
Cleaning Your Mounted Photo Panel
- Dusting: Dust the panel regularly with a soft, dry cloth to remove any surface dirt or debris.
- Wiping: For more stubborn dirt or fingerprints, use a slightly damp cloth to gently wipe the surface of the panel. Avoid using harsh chemicals or abrasive cleaners, as these can damage the print or the mounting material.
- Cleaning Solutions: If necessary, use a mild cleaning solution, such as a mixture of water and dish soap. Apply the solution to a soft cloth and gently wipe the surface of the panel. Rinse the cloth with clean water and wipe the panel again to remove any soap residue.
Preventative Measures
- Avoid Direct Sunlight: Avoid placing the panel in direct sunlight, as this can cause fading and discoloration over time.
- Control Humidity: Keep the panel in a location with stable humidity levels. Avoid placing it in areas with high humidity, such as bathrooms or kitchens.
- Handle with Care: Handle the panel with care to avoid scratches, dents, or other forms of physical damage.
- Storage: If you need to store the panel, wrap it in a protective material, such as bubble wrap or acid-free paper, and store it in a cool, dry place.
Specific Care Instructions for Different Mounting Materials
- Acrylic Panels: Use a microfiber cloth to clean acrylic panels. Avoid using paper towels or other abrasive materials, as these can scratch the surface.
- Metal Panels: Use a soft cloth to clean metal panels. Avoid using harsh chemicals or abrasive cleaners, as these can damage the finish.
- Wood Panels: Use a soft, dry cloth to clean wood panels. Avoid using water or harsh chemicals, as these can damage the wood.
- Canvas Panels: Use a soft, dry cloth to clean canvas panels. Avoid using water or harsh chemicals, as these can damage the canvas.
Real-World Examples and Case Studies
Museums and art galleries have strict protocols for cleaning and maintaining their artwork. These protocols often involve using specialized cleaning solutions and techniques to ensure that the artwork is preserved for future generations.
Tips for Preserving Your Mounted Photo Panel
- Regular Inspections: Inspect the panel regularly for any signs of damage or wear.
- Professional Cleaning: Consider having the panel professionally cleaned every few years to remove any accumulated dirt or grime.
- Restoration: If the panel is damaged, consult with a professional conservator to discuss restoration options.
In summary, proper care and maintenance are essential for preserving the beauty and longevity of your mounted photo panel. Regular cleaning and preventative measures can help to protect the panel from damage and keep it looking its best for years to come.
12. Mounted Photo Panels: A Gift Idea
Why are mounted photo panels a great gift option for various occasions?
Mounted photo panels make excellent gifts for a wide range of occasions, offering a personalized and meaningful way to celebrate special moments and create lasting memories. Their versatility, aesthetic appeal, and emotional value make them a thoughtful and cherished present for friends, family, and loved ones.
Personalized and Meaningful
- Customization: Mounted photo panels can be customized with your own photos, allowing you to create a unique and personalized gift that reflects the recipient’s interests, memories, and relationships.
- Emotional Value: Photos