Live Photos on iPhone bring your still images to life, capturing a moment in motion and sound. Instead of just freezing a single instant, Live Photos record a short video clip – 1.5 seconds before and after you press the shutter button. This feature adds a new dimension to your photography, turning static pictures into dynamic memories you can relive.
Understanding Live Photos on iPhone
At its core, a Live Photo is more than just a photograph; it’s a brief, silent video embedded within a still image. When viewed normally, it appears as a standard photo. However, with a simple press and hold, the photo animates, revealing the moments just before and after the shot was taken. This technology, exclusive to iPhones and iPads, allows you to capture the subtle nuances of a moment – a smile widening, a breeze rustling through hair, or the spark in someone’s eyes.
Why Use Live Photos?
Live Photos offer a richer, more immersive way to remember moments. They are perfect for:
- Capturing fleeting expressions: Get the genuine laugh after the posed smile.
- Remembering the atmosphere: Relive the sounds and motion of a birthday party or a concert.
- Adding fun effects: Transform your Live Photos into looping videos, bouncing animations, or striking long exposures.
- Creating unique memories: Share dynamic photos with friends and family that go beyond traditional still images.
How to Capture Live Photos on Your iPhone
Taking a Live Photo is as straightforward as taking a regular photo on your iPhone. Here’s how:
-
Open the Camera app: Locate and tap the Camera app icon on your iPhone’s home screen.
-
Ensure Photo Mode and Live Photos are Active: By default, the Camera app usually opens in Photo mode. Check for the Live Photos button at the top right of your screen. It looks like a series of concentric circles. If it’s yellow (or white in some iOS versions) and not crossed out, Live Photos is ON. If it has a slash through it, tap the button to activate Live Photos.
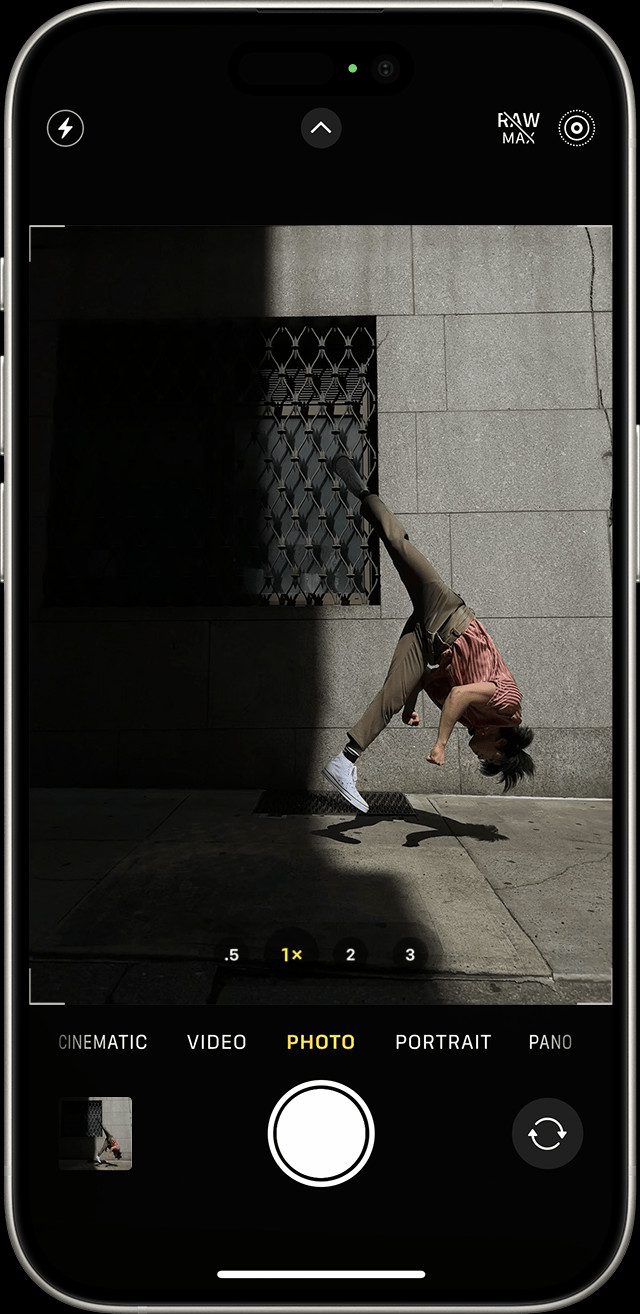 Live Photos button highlighted in the iPhone Camera app, indicating it is turned on.
 -
Hold Still: Keep your iPhone steady as you’re about to take the picture. This helps ensure the motion part of your Live Photo is clear and not blurry.
-
Tap the Shutter Button: Press the round shutter button at the bottom center of the screen to capture your Live Photo.
Live Photos is typically enabled as a default setting on iPhones, so you’re ready to capture dynamic memories right away.
Viewing and Managing Your Live Photos
Once you’ve captured Live Photos, accessing and viewing them is simple through the Photos app:
-
Open the Photos App: Find and open the Photos app on your iPhone.
-
Navigate to Live Photos Album: Scroll down in the Albums tab until you see the Media Types section. Tap on Live Photos. This album automatically collects all the Live Photos you’ve taken.
 Live Photos album location within the Photos app under Media Types.
 -
Play a Live Photo: Tap on any photo in the Live Photos album to open it.
-
Bring it to Life: Press and hold on the photo. After a moment, the Live Photo will animate, playing the short video clip with sound (if any was captured). Release your finger to stop the playback.
Editing and Enhancing Your Live Photos
Live Photos are not just about capturing motion; you can also edit and enhance them to create even more engaging results:
Changing the Key Photo
The “key photo” is the still image that represents your Live Photo when it’s not playing. You can choose a different frame from the Live Photo to be the key photo:
- Open and Edit: Open the Live Photo you want to adjust and tap Edit in the top right corner.
- Access Live Photo Controls: Tap the Live Photos button (concentric circles icon) at the bottom of the screen.
- Select a New Key Photo: A filmstrip of frames from your Live Photo will appear below. Slide your finger across the filmstrip to preview different frames.
- Make Key Photo: Once you find the perfect frame, release your finger and tap Make Key Photo. This frame will now be the still image for your Live Photo.
- Save Changes: Tap Done to save your new key photo.
Adding Fun Live Photo Effects
iPhone offers several built-in effects to transform your Live Photos creatively:
-
Open a Live Photo.
-
Access Effects Menu: Tap the Live Photos button (concentric circles icon) at the top left of the screen.
-
Choose an Effect: Select from three effects:
- Loop: Turns your Live Photo into a repeating video loop, endlessly playing the action.
- Bounce: Creates a back-and-forth animation, playing the Live Photo forward and then in reverse.
- Long Exposure: Simulates a long exposure effect, blurring motion like waterfalls or light trails, similar to what you’d achieve with a DSLR camera and slow shutter speed. This effect works best with Live Photos of moving water, light, or skies.
Basic Photo Editing for Live Photos
You can also apply standard photo edits to your Live Photos, just like regular photos. Tap Edit on a Live Photo to access tools for adjusting:
- Exposure, Brightness, Contrast
- Highlights and Shadows
- Color Saturation and Vibrance
- Filters
- Cropping and Straightening
Remember that editing in third-party apps might remove Live Photo effects, so it’s best to apply Live Photo effects within the Photos app first.
Sharing Your Live Photos
Sharing Live Photos allows others to experience the dynamic moments you’ve captured. Here’s how to share them:
- Select a Live Photo: Open the Live Photo you want to share.
- Tap the Share Button: Tap the Share button (the square with an upward arrow) in the bottom left corner.
- Choose Sharing Options: Select your preferred sharing method from the options that appear, such as:
- Messages: Sharing via iMessage will send the Live Photo as a playable animation to other Apple users.
- AirDrop: Share directly with nearby Apple devices, preserving the Live Photo effect.
- Social Media: Platforms like Facebook and Instagram may convert Live Photos to still images or GIFs. Check platform compatibility for Live Photo playback.
- Email: Sharing via email typically sends the Live Photo as a still image unless the recipient and email client support Live Photo formats.
Important Note: When sharing, be aware that recipients may only see a still photo if they are not using Apple devices or platforms that support Live Photos. You might need to share as a video or GIF for broader compatibility if the dynamic aspect is crucial.
Turning Live Photos Off and On
While Live Photos is a fantastic feature, there might be times when you want to disable it, perhaps to save storage space or when capturing static subjects.
Temporarily Turning Off Live Photos
To turn off Live Photos temporarily for your next shots:
- In the Camera App: Simply tap the Live Photos button in the Camera app. When it shows a slash through it, Live Photos is off for your current session. However, it will likely turn back on automatically the next time you open the Camera app.
Permanently Disabling Live Photos (Preserve Settings)
If you prefer to keep Live Photos off by default:
- Open Settings App: Go to the Settings app on your iPhone home screen.
- Navigate to Camera Settings: Scroll down and tap on Camera.
- Preserve Settings: Tap on Preserve Settings.
- Enable Live Photo Preservation: Toggle the switch next to Live Photo to the ON position (green).
With this setting enabled, your iPhone will remember whether you had Live Photos on or off the last time you used the Camera app and will maintain that setting for future use.
Live Photos on iPhone offer a unique and engaging way to capture and relive your memories. Experiment with capturing, editing, and sharing Live Photos to bring your photography to life!