A burst photo on iPhone is a sequence of photos taken rapidly, allowing you to capture the perfect moment, and dfphoto.net is here to help you master this technique. This mode is ideal for capturing action shots, ensuring you get the best possible image by providing multiple options to choose from. With the right knowledge, you can unlock the full potential of your iPhone’s camera. Learn how to use burst mode, manage your burst photos, and discover tips for amazing action photography to improve your photography skills.
1. Understanding Burst Mode on Your iPhone
Burst mode on your iPhone is a fantastic feature that lets you take a rapid sequence of photos. But what exactly does that mean, and when should you use it? Let’s dive into the details.
1.1. What is Burst Mode?
Burst mode is a shooting mode on your iPhone that captures multiple photos in quick succession. Instead of taking just one photo, your iPhone snaps a series of images, typically at a rate of 10 frames per second. This increases your chances of capturing the perfect shot, especially when photographing moving subjects.
1.2. Why Use Burst Mode?
Burst mode is incredibly useful in scenarios where timing is crucial. Here are a few situations where burst mode can be a lifesaver:
- Action Shots: When photographing sports, wildlife, or kids in motion, burst mode ensures you capture the peak moment.
- Candid Moments: Trying to capture a genuine smile or a spontaneous reaction? Burst mode helps you get the perfect, unposed shot.
- Unpredictable Subjects: Pets, for example, rarely stay still. Burst mode allows you to capture a series of images, increasing the likelihood of getting a clear, well-composed photo.
1.3. How Does Burst Mode Work on Different iPhones?
The way you activate burst mode has changed slightly over the years with different iPhone models. Here’s a quick rundown:
-
iPhone XS and Earlier: Press and hold the shutter button. The camera will continue to take photos until you release the button.
-
iPhone XR and Later (without QuickTake): Slide the shutter button to the left and hold it.
-
iPhone 11 and Later (with QuickTake):
- QuickTake Enabled: Press and hold the shutter button to record a video. To take burst photos, slide the shutter button to the left and hold.
- QuickTake Disabled (in Settings > Camera): Press and hold the shutter button to take burst photos.
-
iPhone 13 and Later: The functionality remains the same as with QuickTake enabled on iPhone 11 and later models. Slide the shutter button to the left and hold it to take burst photos.
Note: Apple may change this functionality with future iOS updates, so always refer to the latest iPhone user guide for the most accurate information.
1.4. Setting Up Burst Mode
While burst mode is a built-in feature, there are a few settings you might want to adjust to optimize your experience:
- Enable Grid: Go to Settings > Camera and enable Grid. This helps you compose your shots better, especially when dealing with moving subjects.
- Disable Auto HDR: In the same Camera settings menu, consider turning off Auto HDR for burst photos. HDR can sometimes slow down the capture rate.
- Live Photos: Be aware that Live Photos are disabled when using burst mode.
Understanding these basics will help you take full advantage of burst mode on your iPhone, ensuring you never miss that perfect moment.
2. Step-by-Step Guide to Taking Burst Photos
Now that you understand what burst mode is and why it’s useful, let’s walk through the process of actually taking burst photos on your iPhone. Here’s a step-by-step guide to get you started.
2.1. Open the Camera App
First things first, launch the Camera app on your iPhone. You can find it on your home screen or in the app library. Ensure you are in Photo mode, not Video or any other mode.
2.2. Frame Your Shot
Take a moment to compose your shot. Consider the lighting, background, and the subject you’re trying to capture. Use the gridlines (if enabled) to help you align your shot.
 Framing the shot for a burst photo, focusing on a skateboarder in mid-air, showcasing composition and subject placement
2.3. Activate Burst Mode
The method for activating burst mode depends on your iPhone model:
-
iPhone XS and Earlier: Simply press and hold the shutter button (the white circle at the bottom of the screen).
-
iPhone XR and Later (without QuickTake): Drag the shutter button to the left and hold it. You’ll see a counter appear, indicating how many photos you’ve taken.
-
iPhone 11 and Later (with QuickTake):
- QuickTake Enabled: Press and hold the shutter button to record a video. To take burst photos, slide the shutter button to the left quickly and hold.
- QuickTake Disabled (in Settings > Camera): Press and hold the shutter button to take burst photos.
2.4. Keep the Shutter Button Pressed
Continue holding the shutter button (or dragging it to the left and holding) for as long as you want to capture the burst. Remember, the longer you hold, the more photos you’ll take.
2.5. Release the Shutter Button
Once you’ve captured the action or moment you were aiming for, release the shutter button. Your iPhone will then process the burst of photos.
2.6. Review Your Burst Photos
After taking a burst, your iPhone groups the photos together in your Camera Roll. To review them, follow these steps:
- Open the Photos app.
- Go to Albums and find the Bursts album, or simply scroll through your main Recents album.
- Tap on the burst you just took.
- Tap Select at the bottom of the screen.
- Swipe through the photos and tap the checkmark on the ones you want to keep.
- Tap Done in the top right corner.
- Choose whether to Keep Everything or Keep Only Favorites. If you choose the latter, the other photos in the burst will be deleted.
2.7. Tips for Taking Great Burst Photos
- Stabilize Your iPhone: Use both hands or a tripod to keep your iPhone steady, reducing blur.
- Good Lighting: Ensure you have adequate lighting for sharper images.
- Focus: Tap on the screen to focus on your subject before taking the burst.
- Practice: Experiment with different subjects and settings to get a feel for how burst mode works best for you.
By following these steps and tips, you’ll be well on your way to capturing amazing burst photos with your iPhone.
3. Managing and Selecting the Best Shots from a Burst
After capturing a burst of photos, the next step is to sift through them and select the best ones. This process is crucial for saving storage space and ensuring you only keep the highest quality images. Here’s how to manage and select your best shots.
3.1. Accessing Your Burst Photos
First, you need to locate the burst photos you’ve taken. Here’s how:
- Open the Photos App: Launch the Photos app on your iPhone.
- Navigate to Albums: Tap the “Albums” tab at the bottom of the screen.
- Find the Bursts Album: Scroll down until you find the “Bursts” album. This album automatically collects all your burst photos. Alternatively, you can find your burst photos in the “Recents” album along with your other photos and videos.
3.2. Reviewing the Burst
Once you’ve found your burst photo, tap on it to open it. You’ll see a thumbnail representing the entire burst.
3.3. Selecting Your Favorite Photos
To select the best shots from the burst, follow these steps:
- Tap “Select”: At the bottom of the screen, tap the “Select” button.
- Swipe Through the Photos: Swipe left or right to view each photo in the burst.
- Choose Your Favorites: As you swipe, tap the small circle beneath each photo to select it as a favorite. A blue checkmark will appear on the selected photos.
- Compare Similar Shots: Pay close attention to details like focus, composition, and the subject’s expression. Select the photo where everything aligns perfectly.
- Consider Action Peaks: If you’re photographing action, choose the frame that captures the peak of the movement.
 Selecting favorite photos from a burst, showcasing the selection interface and comparing different frames
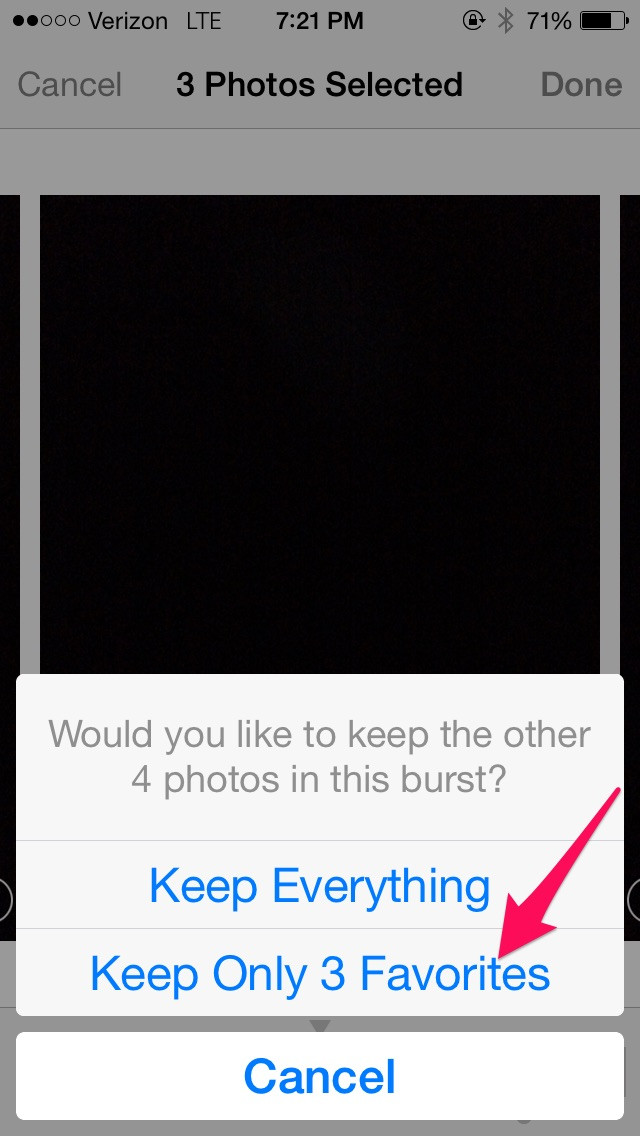
3.4. Completing the Selection Process
After you’ve selected all your favorite photos from the burst, it’s time to finalize your choices:
-
Tap “Done”: In the top right corner of the screen, tap the “Done” button.
-
Choose What to Keep: A pop-up menu will appear with two options:
- Keep Everything: This option saves all the photos in the burst, including the ones you didn’t select as favorites.
- Keep Only Favorites: This option saves only the photos you selected as favorites and deletes the rest.
-
Make Your Choice: Choose the option that best suits your needs. If you’re trying to save storage space, “Keep Only Favorites” is the way to go.
3.5. Post-Selection Management
After saving your selected photos, you might want to further manage them:
- Edit Your Photos: Use the Photos app’s built-in editing tools or a third-party app like Adobe Lightroom Mobile to enhance your selected photos.
- Organize Your Photos: Add your selected photos to albums to keep them organized.
- Share Your Photos: Share your best shots with friends and family via social media, email, or messaging apps.
3.6. Tips for Efficient Management
- Review Promptly: Review your burst photos soon after taking them. This helps you remember the context and make better decisions.
- Use a Large Screen: If possible, review your burst photos on a larger screen, like an iPad or computer, for a better view of the details.
- Backup Your Photos: Regularly back up your photos to iCloud, Google Photos, or another cloud service to prevent data loss.
By following these steps, you can efficiently manage and select the best shots from your burst photos, ensuring you keep only the most memorable and high-quality images.
4. Practical Examples: When to Use Burst Mode
Understanding the theory behind burst mode is one thing, but knowing when to apply it in real-world scenarios is where the magic happens. Here are several practical examples of when to use burst mode to capture stunning photos with your iPhone.
4.1. Capturing Action Sports
One of the most common and effective uses of burst mode is in action sports photography. Whether you’re shooting a skateboarder, a surfer, or a basketball player, burst mode ensures you capture the peak of the action.
- Scenario: A skateboarder is attempting a kickflip.
- How to Use Burst Mode: As the skateboarder approaches the ramp, activate burst mode. Hold the shutter button as they perform the kickflip, and release it once they land.
- Why It Works: The rapid sequence of photos increases your chances of capturing the exact moment the skateboarder is mid-air with the board perfectly positioned.
4.2. Photographing Wildlife
Wildlife photography often involves unpredictable subjects. Burst mode can help you capture those fleeting moments when animals are in motion.
- Scenario: A bird taking flight from a branch.
- How to Use Burst Mode: Focus on the bird perched on the branch. Anticipate the moment it will take off and activate burst mode just before it leaps into the air.
- Why It Works: Birds move quickly, and burst mode allows you to capture a series of images, ensuring you get a shot where the bird’s wings are perfectly spread.
4.3. Taking Photos of Pets
Pets are notoriously difficult to photograph because they rarely stay still. Burst mode is your best friend when trying to capture a clear shot of your furry companions.
- Scenario: Your dog is playing fetch in the park.
- How to Use Burst Mode: As your dog runs towards you with the ball, activate burst mode. Continue shooting as it jumps and catches the ball.
- Why It Works: Burst mode helps you capture a series of images, increasing the likelihood of getting a shot where your dog is in focus and has a joyful expression.
4.4. Capturing Candid Moments
Candid photos are all about capturing genuine emotions and spontaneous reactions. Burst mode can help you get those perfect, unposed shots.
- Scenario: A child is blowing out candles on their birthday cake.
- How to Use Burst Mode: Focus on the child’s face and activate burst mode just before they start blowing out the candles.
- Why It Works: The rapid sequence of photos ensures you capture the exact moment their face lights up with joy and surprise.
4.5. Photographing Water Splashes
Capturing water splashes can be tricky because of the speed and unpredictability of the water. Burst mode can help you freeze the action and create stunning images.
- Scenario: Someone is jumping into a pool.
- How to Use Burst Mode: Focus on the spot where the person will enter the water and activate burst mode just as they jump.
- Why It Works: The rapid sequence of photos captures the water as it splashes and sprays, allowing you to select the most dramatic and visually appealing shot.
4.6. Tips for Specific Scenarios
- Anticipate the Action: Try to predict when the most interesting part of the action will occur and start shooting just before that moment.
- Follow the Subject: Keep your iPhone pointed at the subject as they move to ensure they stay in the frame.
- Use Good Lighting: Ensure you have adequate lighting to capture sharp, clear images.
- Experiment: Don’t be afraid to try burst mode in different scenarios to discover new and creative ways to use it.
By understanding these practical examples, you can confidently use burst mode to capture stunning photos in a variety of situations, ensuring you never miss that perfect moment.
5. Enhancing Your Burst Photos with Editing Techniques
Once you’ve captured a great burst of photos and selected your favorites, the next step is to enhance them through editing. Whether you use the built-in tools on your iPhone or a third-party app, editing can take your burst photos to the next level. Here are some editing techniques to help you make the most of your shots.
5.1. Using the iPhone’s Built-In Editing Tools
The Photos app on your iPhone comes with a range of editing tools that are perfect for basic enhancements. Here’s how to use them:
- Open the Photo: Select the photo you want to edit from your Photos app.
- Tap “Edit”: Tap the “Edit” button in the top right corner of the screen.
- Adjust Brightness and Contrast: Use the “Light” tool to adjust the overall brightness and contrast of your photo. A slight increase in contrast can make your photo pop.
- Adjust Highlights and Shadows: Use the “Light” tool to fine-tune the highlights and shadows. Reducing highlights can bring out details in bright areas, while increasing shadows can reveal details in dark areas.
- Adjust Saturation and Vibrance: Use the “Color” tool to adjust the saturation and vibrance. Increasing vibrance can make the colors more vivid without making the image look unnatural.
- Adjust Warmth: Use the “Color” tool to adjust the warmth of your photo. A warmer tone can create a cozy feel, while a cooler tone can create a more dramatic effect.
- Apply Filters: Experiment with the built-in filters to find one that enhances your photo. Use filters sparingly and adjust their intensity to avoid an over-processed look.
- Adjust Sharpness: Use the “Definition” tool to adjust the sharpness of your photo. Increasing sharpness can make details more defined, but be careful not to over-sharpen, which can create unwanted artifacts.
- Crop and Straighten: Use the “Crop” tool to crop your photo and straighten the horizon. A well-cropped and straightened photo can significantly improve its composition.
- Save Your Edits: Once you’re happy with your edits, tap “Done” to save your changes.
5.2. Using Third-Party Editing Apps
For more advanced editing, consider using third-party apps like Adobe Lightroom Mobile, Snapseed, or VSCO. These apps offer a wider range of tools and features.
-
Adobe Lightroom Mobile:
- Highlights: Advanced color correction and tone adjustments.
- Benefits: Professional-level editing on your mobile device.
-
Snapseed:
- Highlights: Precise control over selective adjustments.
- Benefits: User-friendly interface and powerful editing tools.
-
VSCO:
- Highlights: Wide range of film-inspired filters and presets.
- Benefits: Creates a consistent and stylish look for your photos.
5.3. Specific Editing Techniques for Burst Photos
- Noise Reduction: Burst photos taken in low light may have more noise. Use noise reduction tools to smooth out the image while preserving details.
- Sharpening: Sharpening can enhance the details in your burst photos, especially those captured in motion.
- Color Correction: Adjust the colors to make them more vibrant and accurate. Pay attention to white balance to ensure the colors look natural.
- Selective Adjustments: Use selective adjustment tools to edit specific areas of your photo, such as brightening the subject’s face or darkening the background.
- Straightening and Cropping: Ensure your photos are straight and well-cropped to improve their composition.
 Editing a burst photo, showcasing adjustments to brightness, contrast, and color using a mobile editing app
5.4. Tips for Effective Editing
- Edit Non-Destructively: Use editing apps that allow you to make non-destructive edits, so you can always revert to the original photo if needed.
- Start with Small Adjustments: Make small, incremental adjustments to avoid over-editing your photos.
- Use Presets and Filters as a Starting Point: Presets and filters can be a great starting point, but always customize them to suit your specific photo.
- Pay Attention to Detail: Zoom in on your photo to check for any imperfections and make precise adjustments.
- Calibrate Your Screen: Ensure your screen is properly calibrated to accurately display colors and brightness.
By mastering these editing techniques, you can transform your burst photos into stunning images that capture the essence of the moment.
6. Burst Mode vs. Live Photos: Which Should You Use?
When it comes to capturing dynamic moments on your iPhone, you have two main options: Burst Mode and Live Photos. While both are designed to capture more than just a single static image, they work in different ways and are suited for different situations. Here’s a comparison to help you decide which one to use.
6.1. What are Live Photos?
Live Photos capture a short video clip (1.5 seconds before and after you press the shutter button) along with a still image. When you view a Live Photo, you can press and hold on the image to see it come to life with motion and sound.
6.2. Key Differences Between Burst Mode and Live Photos
| Feature | Burst Mode | Live Photos |
|---|---|---|
| Capture Method | Takes a rapid sequence of still photos | Captures a short video clip and a still image |
| Best For | Capturing action, sports, and unpredictable moments | Capturing memories with motion and sound |
| Storage Space | Uses less storage space than keeping all burst photos | Uses more storage space due to the video component |
| Editing Options | Limited to selecting the best still photo | Offers more editing options, including trimming and effects |
| Sharing | Easy to share as individual photos | Can be shared as Live Photos or converted to video/GIFs |
| Compatibility | Compatible with most devices and platforms | Requires iOS devices or specific platforms for full effect |
6.3. When to Use Burst Mode
- Action Shots: Use burst mode when photographing fast-moving subjects like athletes, pets, or vehicles.
- Candid Moments: Use burst mode to capture genuine expressions and reactions without missing the perfect frame.
- Unpredictable Subjects: If you’re photographing something that moves erratically, like a bird in flight, burst mode increases your chances of getting a clear shot.
- High-Quality Stills: If your primary goal is to get a high-quality still image, burst mode allows you to choose the sharpest and best-composed frame.
6.4. When to Use Live Photos
- Capturing Memories: Use Live Photos when you want to capture the atmosphere and emotion of a moment, complete with motion and sound.
- Adding Context: Live Photos can provide additional context to a scene, such as the sound of waves crashing or the laughter of friends.
- Creative Effects: Use Live Photo effects like Loop, Bounce, and Long Exposure to create fun and interesting visuals.
- Sharing with Apple Users: Live Photos are best shared with other Apple users who can fully appreciate the feature.
6.5. How to Choose Between Burst Mode and Live Photos
- Consider the Subject: If you’re photographing fast-moving subjects, burst mode is the better choice. If you want to capture the overall experience of a moment, Live Photos are more suitable.
- Think About Storage: If storage space is a concern, burst mode (with careful selection of the best shots) is more efficient.
- Evaluate Sharing Options: If you need to share your photos with a wide range of devices and platforms, burst mode is more versatile.
- Determine Editing Needs: If you want more editing options and creative effects, Live Photos offer more flexibility.
6.6. Real-World Examples
-
Scenario 1: Photographing a soccer game.
- Recommendation: Use burst mode to capture the action and select the best shot of a goal.
-
Scenario 2: Capturing a birthday party.
- Recommendation: Use Live Photos to capture the joy and excitement of the moment, complete with sound and motion.
-
Scenario 3: Photographing a scenic landscape.
- Recommendation: Use Live Photos to capture the subtle movements of nature, such as the wind blowing through the trees.
-
Scenario 4: Photographing a pet playing.
- Recommendation: Use burst mode to capture the perfect shot of your pet in action.
By understanding the strengths and weaknesses of both burst mode and Live Photos, you can make informed decisions about which feature to use in different situations, ensuring you capture the best possible images and memories.
7. Troubleshooting Common Burst Mode Issues
While burst mode is a fantastic feature on the iPhone, you might encounter some issues while using it. Here are some common problems and how to troubleshoot them.
7.1. Burst Mode Not Working
If burst mode isn’t working when you press and hold the shutter button, here are a few things to check:
- QuickTake Settings: On iPhone 11 and later, ensure that QuickTake is properly configured. If QuickTake is enabled, pressing and holding the shutter button will record a video. To use burst mode, you need to slide the shutter button to the left and hold.
- Camera App Glitches: Sometimes, simply closing and reopening the Camera app can resolve the issue.
- Restart Your iPhone: A restart can fix many software-related problems. Turn off your iPhone, wait a few seconds, and then turn it back on.
- Software Update: Make sure your iPhone is running the latest version of iOS. Go to Settings > General > Software Update to check for updates.
7.2. Slow Burst Capture Rate
If the burst capture rate seems slow, it could be due to several factors:
- Low Lighting: In low-light conditions, the iPhone may slow down the capture rate to gather more light for each photo. Try using burst mode in better lighting.
- HDR Mode: High Dynamic Range (HDR) mode can slow down the capture rate. Disable Auto HDR in Settings > Camera to see if it improves burst mode performance.
- Storage Space: If your iPhone is running low on storage space, it may affect the burst capture rate. Free up some space by deleting unnecessary photos, videos, and apps.
- iPhone Model: Older iPhone models may have slower burst capture rates compared to newer models.
7.3. iPhone Overheating
Using burst mode for extended periods can cause your iPhone to overheat, especially in warm environments. If this happens:
- Stop Using Burst Mode: Give your iPhone a break and allow it to cool down.
- Move to a Cooler Area: Avoid using burst mode in direct sunlight or hot environments.
- Close Background Apps: Close any unnecessary apps running in the background to reduce the load on your iPhone’s processor.
7.4. Photos Not Saving
If you’re taking burst photos but they’re not saving to your Camera Roll:
- Check Storage Space: Ensure you have enough storage space on your iPhone.
- iCloud Syncing: If iCloud Photos is enabled, make sure your photos are syncing properly. Go to Settings > [Your Name] > iCloud > Photos and check the status.
- Restart Photos App: Close and reopen the Photos app to see if the photos appear.
7.5. Difficulty Selecting Photos
Some users find it challenging to select the best photos from a burst, especially when there are many similar shots. Here are some tips:
- Use a Larger Screen: If possible, review your burst photos on a larger screen, like an iPad or computer, for a better view of the details.
- Zoom In: Zoom in on the photos to check for focus and sharpness.
- Compare Side-by-Side: Use the “Select” feature to compare similar shots side-by-side and choose the best one.
7.6. Battery Drain
Burst mode can drain your iPhone’s battery quickly. To conserve battery life:
- Limit Burst Duration: Avoid using burst mode for extended periods.
- Close Unnecessary Apps: Close any apps running in the background to reduce battery consumption.
- Lower Screen Brightness: Reduce your screen brightness to conserve battery life.
- Carry a Portable Charger: If you plan to use burst mode extensively, consider carrying a portable charger.
7.7. Contacting Apple Support
If you’ve tried these troubleshooting steps and are still experiencing issues, consider contacting Apple Support for further assistance. You can visit the Apple Support website or schedule an appointment at an Apple Store.
By addressing these common issues, you can ensure a smoother and more enjoyable experience using burst mode on your iPhone.
8. Creative Uses for Burst Photos
Beyond capturing action shots, burst mode can be used in various creative ways to produce unique and interesting images. Here are some ideas to spark your creativity.
8.1. Creating Stop Motion Animations
Burst photos can be used to create simple stop motion animations directly on your iPhone.
- How To:
- Set Up Your Scene: Position your subject and iPhone on a stable surface.
- Take a Series of Photos: Use burst mode to capture a series of photos, making small adjustments to your subject’s position between each burst.
- Create the Animation: Use a third-party app like iMovie or Stop Motion Studio to compile the photos into a stop motion animation.
- Example: Animate a flower blooming, a person walking, or objects moving across a table.
8.2. Simulating Long Exposure Effects
While the iPhone has a built-in long exposure mode for Live Photos, you can simulate this effect using burst photos and some editing.
- How To:
- Capture the Scene: Use burst mode to capture a series of photos of a moving subject, such as a waterfall or traffic at night.
- Import into Editing App: Import the burst photos into an editing app like Adobe Photoshop or a mobile app like Motionleap.
- Apply Motion Blur: Use the app’s tools to blend the photos together and create a motion blur effect.
- Example: Create a dreamy effect on a waterfall or capture the light trails of cars at night.
8.3. Creating a “Bullet Time” Effect
Inspired by the famous scene from “The Matrix,” you can create a “bullet time” effect using burst photos.
- How To:
- Set Up the Scene: Arrange multiple iPhones (or cameras) around your subject, all focused on the same point.
- Capture the Action: Simultaneously take burst photos with each iPhone as the subject performs an action, such as jumping or kicking.
- Combine the Photos: Use editing software to stitch the photos together, creating a rotating view of the action.
- Example: Capture a person jumping in mid-air from multiple angles.
8.4. Capturing Light Painting
Light painting involves using a light source to “paint” in the air while taking a long exposure photo. You can simulate this effect using burst photos.
- How To:
- Set Up the Scene: Find a dark environment and set your iPhone on a tripod.
- Use a Light Source: Use a flashlight, sparkler, or any other light source to create patterns in the air.
- Capture the Light: Use burst mode to capture a series of photos as you move the light source.
- Combine the Photos: Use editing software to blend the photos together, creating a light painting effect.
- Example: Create glowing patterns in the air or write words with light.
8.5. Creating Composites
Burst photos can be used to create composite images, where you combine elements from different photos into a single image.
- How To:
- Capture the Elements: Use burst mode to capture different elements of a scene, such as a person in various poses or different objects in a landscape.
- Import into Editing App: Import the photos into an editing app like Adobe Photoshop or a mobile app like PicsArt.
- Combine the Elements: Use the app’s tools to cut out and combine the elements from different photos into a single image.
- Example: Create a surreal landscape with multiple moons or capture a person in multiple poses in the same frame.
8.6. Capturing the Perfect Jump Shot
Jumping photos are a fun way to capture a sense of freedom and energy. Burst mode ensures you get the perfect mid-air shot.
- How To:
- Set Up the Scene: Find a scenic location and position your subject.
- Capture the Jump: Use burst mode to capture a series of photos as the subject jumps.
- Select the Best Shot: Choose the photo where the subject is at the peak of their jump, with a clear background and dynamic pose.
- Example: Capture a person jumping on a beach, in front of a mountain, or in an urban environment.
By exploring these creative uses for burst photos, you can unlock the full potential of your iPhone’s camera and create stunning images that stand out.
9. Advanced Tips for Burst Photography on iPhone
Ready to take your burst photography skills to the next level? Here are some advanced tips and techniques to help you capture even more stunning images with your iPhone.
9.1. Mastering Focus and Exposure
- Lock Focus: Tap and hold on the screen to lock the focus on your subject. This ensures that your subject remains in focus even if they move.
- Adjust Exposure: After locking focus, slide your finger up or down on the screen to adjust the exposure. This allows you to brighten or darken the scene to achieve the desired look.
- Use AE/AF Lock: The AE/AF Lock (Auto Exposure/Auto Focus Lock) feature ensures that the focus and exposure settings remain constant throughout the burst.
9.2. Using Third-Party Camera Apps
While the built-in Camera app is excellent, third-party camera apps offer more advanced control over your iPhone’s camera.
-
Halide:
- Highlights: Manual controls, RAW capture, and focus peaking.
- Benefits: Professional-level control over your iPhone’s camera settings.
-
ProCamera:
- Highlights: Advanced shooting modes, manual controls, and customizable interface.
- Benefits: Versatile camera app for both photo and video.
-
FiLMiC Pro:
- Highlights: Advanced video recording features, manual controls, and external microphone support.
- Benefits: Turns your iPhone into a professional video camera.
9.3. Shooting in RAW Format
Shooting in RAW format captures more data than JPEG, giving you more flexibility in post-processing.
- How To: Use a third-party camera app like Halide or ProCamera to enable RAW capture.
- Benefits: RAW files retain more detail, have a wider dynamic range, and allow for more extensive editing without losing quality.
9.4. Using External Lenses
External lenses can enhance your iPhone’s camera capabilities, allowing you to capture different perspectives and effects.
-
Moment Lenses:
- Highlights: High-quality lenses for wide-angle, telephoto, and macro photography.
- Benefits: Expands your iPhone’s creative possibilities.
-
Olloclip Lenses:
- Highlights: Compact and versatile lenses for wide-angle, macro, and fisheye photography.
- Benefits: Easy-to-use lenses for on-the-go photography.
9.5. Stabilizing Your iPhone
Keeping your iPhone stable is crucial for capturing sharp burst photos, especially in low light.
- Use a Tripod: A tripod provides the most stable platform for your iPhone.
- Use a Gimbal: A gimbal stabilizes your iPhone and allows for smooth panning and tilting movements.
- Lean Against a Solid Surface: If you don’t have a tripod or gimbal, lean against a solid surface to steady your iPhone.
9.6. Understanding Shutter Speed and ISO
- Shutter Speed: The shutter speed determines how long the camera’s sensor is exposed to light. A faster shutter speed freezes motion, while a slower shutter speed allows more light to enter the camera.
- ISO: ISO measures the sensitivity of the camera’s sensor to light. A lower ISO produces cleaner images, while a higher ISO is more sensitive to light but can introduce noise.
- Adjusting Settings: Use a third-party camera app to manually adjust the shutter speed and ISO settings for optimal results in different lighting conditions.
9.7. Capturing Unique Perspectives
- Shoot from Low Angles: Get down low to capture a unique perspective of your subject.
- Shoot from High Angles: Find a high vantage point to capture a bird’s-eye view of the scene.
- Use Reflections: Look for reflections in water, glass, or mirrors to add depth and interest to your photos.
By implementing these advanced tips, you can push the boundaries of burst photography on your iPhone and create truly exceptional images.
10. Exploring the Future of iPhone Photography
As technology continues to advance, the future of iPhone photography looks incredibly promising. Here are some trends and developments to watch out for.
10.1. Computational Photography Advancements
Computational photography uses software