What Happened To My Iphone Photos? If you’re asking yourself this question, you’re not alone. Many iPhone users experience the distress of missing photos. At dfphoto.net, we understand this frustration and provide solutions to help you recover your precious memories and learn how to manage your iPhone photo storage effectively, focusing on recovery methods and storage management strategies. This article explores potential causes and detailed steps to retrieve them, enhancing your digital photography experience through photo recovery techniques.
1. How Do I Check My Recently Deleted Album on My iPhone?
Yes, you can check your recently deleted album on your iPhone. Photos or videos are temporarily stored in the Recently Deleted album for 30 days before permanent deletion. Recovering them from here is straightforward.
Steps to Access and Recover Photos from the Recently Deleted Album:
- Open the Photos App: Launch the Photos application on your iPhone.
- Navigate to Albums: Scroll down to the “Utilities” section.
- Select Recently Deleted: Tap on “Recently Deleted” to view the album.
- Unlock if Necessary: Use Face ID, Touch ID, or your passcode to unlock the album if prompted.
- Recover Photos or Videos:
- To recover a single item: Tap on the photo or video, then tap “Recover.”
- To recover multiple items: Tap “Select,” choose the photos and videos you want to recover, tap “Recover,” and confirm your selection.
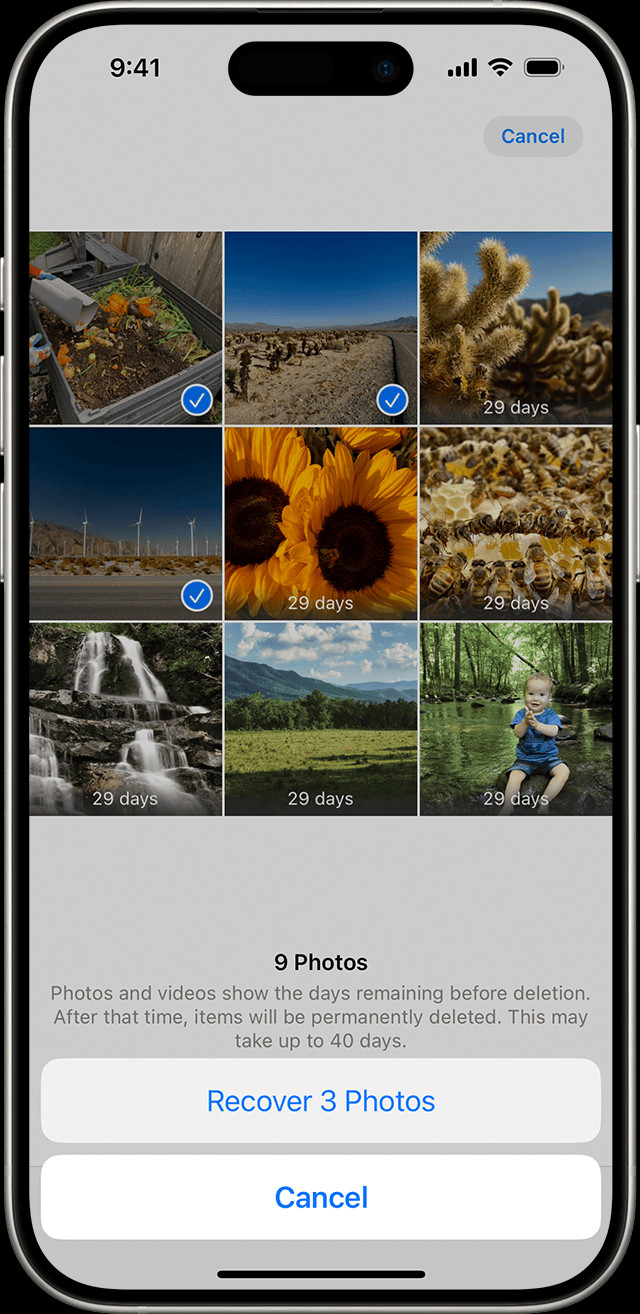 The Recently Deleted album in Photos on iPhone
Important Considerations:
- Anything in the Recently Deleted album stays there for 30 days. After 30 days, it’s permanently deleted and you can’t get it back.
- If you don’t see the Recently Deleted album, ensure that you are in the main “Albums” view.
2. How Can I Unhide Photos on My iPhone?
Yes, you can unhide photos on your iPhone. The Hidden album is a feature that allows you to keep certain photos and videos out of your main library view. Unhiding these items is simple and restores them to your regular photo stream.
Steps to Unhide Photos on Your iPhone:
- Open the Photos App: Launch the Photos application on your iPhone.
- Navigate to Albums: Scroll down to the “Utilities” section.
- Select Hidden: Tap on “Hidden” to view the album. With iOS 14 and later, you can hide the Hidden album so it doesn’t appear anywhere in the Photos app. So if you’re missing photos or videos, make sure the Hidden album is turned on so you can see it.
- Unlock if Necessary: Use Face ID, Touch ID, or your passcode to unlock the album if prompted.
- Unhide Photos or Videos:
- To unhide a single item: Tap on the photo or video, tap the “More” button (three dots), and then tap “Unhide.”
- To unhide multiple items: Tap “Select,” choose the photos and videos you want to unhide, tap the “More” button, and then tap “Unhide.”
Additional Information:
- If you use iCloud Photos, the photos that you hide on one device are hidden on your other devices too.
- If you do not see the Hidden album, go to Settings > Photos and make sure that “Hidden Album” is enabled.
3. Is iCloud Photos Turned On? How Do I Turn It On?
Yes, iCloud Photos needs to be turned on to securely store all of your photos and videos in iCloud. If iCloud Photos is turned on, you can access your media on all your devices.
How to Turn On iCloud Photos on Your iPhone or iPad:
- Open Settings: Go to the Settings app on your iPhone or iPad.
- Tap Your Name: Tap on your name at the top of the Settings menu.
- Select iCloud: Tap on “iCloud.”
- Tap Photos: In the iCloud settings, tap on “Photos.”
- Enable iCloud Photos: Turn on the “Sync this [Device]” option to enable iCloud Photos.
What to Expect After Enabling iCloud Photos:
- After you turn on iCloud Photos, you might need to connect to Wi-Fi and wait a few minutes. Then look for your photos again.
- Your photos and videos will begin to upload to iCloud. This process may take some time, depending on the size of your library and the speed of your internet connection.
Troubleshooting Tips:
- Ensure you have enough iCloud storage. If your iCloud storage is full, new photos and videos will not be synced.
- Connect to a stable Wi-Fi network to speed up the syncing process.
- Keep your device plugged in and connected to Wi-Fi for an extended period to allow all photos to upload.
4. How Do I Check My iCloud Shared Photo Library on My iPhone?
Yes, you can check your iCloud Shared Photo Library. In iOS 16.1, iPadOS 16.1, and later, you can start or join an iCloud Shared Photo Library with up to five contacts. Some photos might only appear in certain library views. This feature allows you to share photos and videos with up to five other people, making it essential to check if your missing photos are located there.
Steps to Switch Between Personal Library and Shared Library:
- Open the Photos App: Launch the Photos application on your iPhone.
- Tap the Profile Button: Look for and tap the profile button in the upper-right corner of the screen.
- Access Library View Options: In the menu that appears, you will see options to switch between different library views.
- Choose Your View:
- Both Libraries: This view shows all photos and videos from both your Personal Library and the Shared Library.
- Personal Library: This view shows only the photos and videos that are in your personal iCloud library.
- Shared Library: This view shows only the photos and videos that have been added to the Shared Library.
Identifying Photos in the Shared Library:
In Both Libraries or Shared Library view, photos that are in the Shared Library are marked with the Shared Library icon![]() the Personal Library icon.
the Personal Library icon.
Troubleshooting Tips:
- Ensure that you are signed in to iCloud with the same Apple ID on all your devices.
- Check that you have joined the Shared Library if you are expecting to see shared photos.
- If you are still missing photos, verify with the other members of the Shared Library that the photos were indeed shared.
5. Am I Signed in with the Same Apple ID on All Devices?
Yes, you need to sign in with the same Apple ID on all devices for your photos and videos to stay up to date. Photos and videos will sync correctly only if all your devices are logged into the same Apple ID account.
How to Check Your Apple ID on Your iPhone or iPad:
- Open Settings: Go to the Settings app on your iPhone or iPad.
- Tap Your Name: At the top of the Settings menu, you will see your name. Tap on it.
- View Apple ID: On the Apple ID screen, you will see your name, email address, and other account details. The email address listed is your Apple ID.
Why This Matters:
- Synchronization: iCloud uses your Apple ID to sync data across all your devices. If you are signed in with different Apple IDs, your photos and videos will not sync correctly.
- Access to Services: Your Apple ID provides access to all Apple services, including iCloud, the App Store, Apple Music, and more. Using the same Apple ID ensures a seamless experience across all platforms.
Troubleshooting Tips:
- Verify Apple ID: Double-check that the Apple ID listed in Settings is the same on all your devices.
- Sign Out and Back In: If you suspect there is an issue, try signing out of iCloud and then signing back in. This can often resolve sync issues.
- Check iCloud Storage: Ensure that you have enough iCloud storage available. If your storage is full, new photos and videos will not sync.
6. Using Third-Party Recovery Software on My iPhone?
Yes, using third-party recovery software on your iPhone can be a viable solution, but approach with caution. These tools can sometimes recover photos that have been permanently deleted from the Recently Deleted album or lost due to other issues.
Popular Third-Party Recovery Software Options:
- Dr.Fone – Data Recovery (iOS):
- Features: Recovers photos, videos, contacts, messages, and more directly from your iPhone or iPad. Supports various data loss scenarios, including accidental deletion, system crashes, and water damage.
- Pros: High success rate, user-friendly interface, supports multiple data types.
- Cons: Paid software, free trial has limited functionality.
- iMobie PhoneRescue for iOS:
- Features: Retrieves lost data from your iPhone, iPad, and iPod touch. Offers three recovery modes: from the device, from iCloud backup, and from iTunes backup.
- Pros: Recovers a wide range of data, easy to use, provides preview before recovery.
- Cons: Paid software, can be expensive.
- EaseUS MobiSaver:
- Features: Recovers lost photos, videos, contacts, messages, and more from iOS devices. Supports recovery from iCloud and iTunes backups.
- Pros: Simple interface, supports multiple devices, offers free and paid versions.
- Cons: Free version has limited recovery capabilities, paid version required for full functionality.
General Information:
| Software | Features | Pros | Cons |
|---|---|---|---|
| Dr.Fone – Data Recovery (iOS) | Direct recovery, supports various data loss scenarios | High success rate, user-friendly interface, supports multiple data types | Paid software, free trial limited |
| iMobie PhoneRescue for iOS | Three recovery modes, retrieves data from device, iCloud, and iTunes backups | Recovers a wide range of data, easy to use, provides preview before recovery | Paid software, can be expensive |
| EaseUS MobiSaver | Supports recovery from iCloud and iTunes backups, recovers various data types | Simple interface, supports multiple devices, offers free and paid versions | Free version limited, paid version needed for full functionality |
Important Considerations:
- Data Overwriting: The longer you use your iPhone after data loss, the higher the chance that new data will overwrite the lost files, making recovery more difficult. Stop using your device immediately after realizing data is missing.
- Backup First: Before using any recovery software, back up your iPhone to prevent further data loss.
- Software Reputation: Research and choose reputable software to avoid malware and protect your personal information.
7. Can a Professional Data Recovery Service Help Me?
Yes, a professional data recovery service can help. These services specialize in recovering data from damaged or inaccessible devices, including iPhones.
Situations Where Professional Services Are Needed:
- Physical Damage: If your iPhone has suffered physical damage (e.g., water damage, severe impact), professional services have the tools and expertise to disassemble the device and attempt data recovery.
- Complex Data Loss Scenarios: In cases of severe data corruption or failed recovery attempts with software, professionals can employ advanced techniques to retrieve lost data.
- Device Not Recognized: If your computer does not recognize your iPhone, preventing you from using recovery software, professionals can diagnose and address the hardware or software issues causing the problem.
What to Expect from a Professional Data Recovery Service:
- Evaluation: The service will typically start with an evaluation of your device to determine the extent of the damage and the feasibility of data recovery.
- Quotation: Based on the evaluation, you will receive a quotation for the recovery service.
- Recovery Process: If you approve the quotation, the service will proceed with the data recovery process, which may involve repairing the device, accessing the storage media, and extracting the lost data.
- Data Delivery: Once the data is recovered, it will be provided to you on an external storage device, such as a USB drive or external hard drive.
Factors to Consider When Choosing a Data Recovery Service:
- Reputation: Look for a service with a strong reputation and positive reviews.
- Expertise: Ensure the service has experience with iPhone data recovery and employs skilled technicians.
- Data Security: Verify that the service has strict data security and confidentiality policies.
- Cost: Compare quotations from multiple services to ensure you are getting a fair price.
8. Have I Checked My iTunes or Finder Backups?
Yes, you should check your iTunes or Finder backups. If you regularly back up your iPhone to your computer using iTunes (or Finder in macOS Catalina and later), your missing photos may be stored in these backups.
How to Restore Your iPhone from an iTunes or Finder Backup:
- Connect Your iPhone to Your Computer: Use a USB cable to connect your iPhone to the computer you use for backups.
- Open iTunes or Finder:
- iTunes: If you are using macOS Mojave or earlier, or a Windows PC, open iTunes.
- Finder: If you are using macOS Catalina or later, open Finder.
- Select Your iPhone:
- iTunes: In iTunes, click on the iPhone icon near the top left of the window.
- Finder: In Finder, select your iPhone from the Locations section in the sidebar.
- Restore from Backup:
- iTunes: Click on “Restore Backup.”
- Finder: Click on “Restore Backup.”
- Choose a Backup: Select the most relevant backup from the list. Make sure to choose a backup that was created before you noticed the photos were missing.
- Click Restore: Click on “Restore” and wait for the process to complete. Your iPhone will restart, and the data from the backup will be restored.
Important Considerations:
- Backup Password: If your backup is encrypted, you will need to enter the password to restore from it.
- Data Overwrite: Restoring from a backup will overwrite the current data on your iPhone. Make sure to back up your current data before restoring from an older backup.
General Information:
| Step | Description |
|---|---|
| Connect iPhone | Use a USB cable to connect your iPhone to the computer you use for backups |
| Open iTunes or Finder | Open the appropriate application based on your macOS version |
| Select Your iPhone | Choose your iPhone from the iTunes interface or Finder sidebar |
| Restore from Backup | Click the “Restore Backup” option |
| Choose a Backup | Select the most relevant backup from the list |
| Click Restore | Start the restoration process and wait for completion |
9. Is There an Issue With My iPhone’s Camera Roll?
Yes, there might be an issue with your iPhone’s camera roll, such as software glitches or corruption, that can cause photos to disappear or become inaccessible.
Common Camera Roll Issues:
- Software Glitches: Temporary software glitches can sometimes cause photos to disappear from the camera roll.
- Corrupted Files: Photos can become corrupted due to various reasons, such as incomplete transfers, software bugs, or hardware issues.
- iOS Updates: Occasionally, iOS updates can cause issues with the camera roll, leading to missing or inaccessible photos.
Troubleshooting Steps for Camera Roll Issues:
- Restart Your iPhone: A simple restart can often resolve temporary software glitches.
- Check for iOS Updates: Make sure your iPhone is running the latest version of iOS. Go to Settings > General > Software Update to check for and install any available updates.
- Reset Your iPhone: If you’re still experiencing issues, you can try resetting your iPhone. Go to Settings > General > Transfer or Reset iPhone > Reset.
- Reset All Settings: This will reset all your settings to their default values but will not delete your data.
- Erase All Content and Settings: This will completely erase your iPhone and restore it to its factory settings. Make sure to back up your data before performing this step.
- Free Up Storage Space: Insufficient storage space can sometimes cause issues with the camera roll. Delete unnecessary apps, photos, and videos to free up space.
- Use Third-Party Repair Software: There are third-party software tools designed to fix iOS system issues, including camera roll problems.
Additional Tips:
- Regularly back up your iPhone to iCloud or your computer to prevent data loss.
- Avoid using beta versions of iOS, as they can be unstable and may cause issues with your device.
10. Have I Accidentally Moved Photos to a Different Folder?
Yes, you might have accidentally moved photos to a different folder. It’s common for users to inadvertently move photos when organizing their albums or using file management apps.
How to Check for Misplaced Photos:
- Check Other Albums: Open the Photos app and navigate through your albums to see if the missing photos are located in a different album.
- Use the Search Function: Use the search function in the Photos app to search for specific photos by date, location, or keywords.
- Check Third-Party Apps: If you use third-party photo management apps, check those apps to see if the photos have been moved there.
- Look in the Files App: If you have moved photos to the Files app, check the various folders and locations within the app.
Tips for Preventing Accidental Photo Movement:
- Be Careful When Organizing: When organizing your photos, be careful not to accidentally drag and drop photos into the wrong folders.
- Use Descriptive Album Names: Use descriptive names for your albums to make it easier to find photos.
- Review Your Albums Regularly: Periodically review your albums to ensure that your photos are organized correctly and that no photos are missing.
- Use the “Recently Added” Album: The “Recently Added” album can help you quickly locate photos that you have recently taken or imported.
11. Checking for Software Updates
Yes, checking for software updates is crucial. Ensuring your iPhone is running the latest version of iOS can resolve bugs and compatibility issues that might cause photos to disappear.
How to Check and Install Software Updates:
- Open the Settings App: Launch the Settings app on your iPhone.
- Navigate to General: Scroll down and tap on “General.”
- Select Software Update: Tap on “Software Update.” Your iPhone will check for available updates.
- Download and Install: If an update is available, tap “Download and Install.” You may need to enter your passcode to proceed.
- Agree to Terms: After the download is complete, tap “Install Now” and agree to any terms and conditions.
- Wait for Installation: Your iPhone will restart during the installation process. Ensure your device is connected to a power source and a stable Wi-Fi network.
Benefits of Keeping Your Software Updated:
- Bug Fixes: Software updates often include fixes for known bugs and issues that can cause photos to disappear or become inaccessible.
- Compatibility: Updates ensure that your iPhone is compatible with the latest apps and services, reducing the risk of conflicts.
- Security Enhancements: Software updates include security patches that protect your device from malware and other threats.
- New Features: Updates often introduce new features and improvements that can enhance your overall experience.
12. Resetting Your iPhone
Yes, resetting your iPhone can resolve persistent issues. If you’ve tried other troubleshooting steps and your photos are still missing, resetting your iPhone might help.
Types of Resets You Can Perform:
- Reset All Settings: This option resets all your settings to their default values but does not delete your data. It can resolve issues caused by incorrect settings.
- Go to Settings > General > Transfer or Reset iPhone > Reset > Reset All Settings.
- Erase All Content and Settings: This option completely erases your iPhone and restores it to its factory settings. It should only be used as a last resort and requires a backup of your data.
- Go to Settings > General > Transfer or Reset iPhone > Erase All Content and Settings.
- Hard Reset (Force Restart): This option forces your iPhone to restart and can resolve temporary glitches.
- iPhone 8 or later: Press and quickly release the volume up button, press and quickly release the volume down button, then press and hold the side button until you see the Apple logo.
- iPhone 7 and 7 Plus: Press and hold both the side button and the volume down button until you see the Apple logo.
- iPhone 6s or earlier: Press and hold both the home button and the side button until you see the Apple logo.
Precautions Before Resetting:
- Back Up Your Data: Before performing any type of reset, back up your iPhone to iCloud or your computer to prevent data loss.
- Understand the Impact: Be aware of the impact of each type of reset and choose the option that is most appropriate for your situation.
- Keep Your Device Charged: Ensure your iPhone is adequately charged or connected to a power source during the reset process.
13. Checking Third-Party Apps and Their Settings
Yes, checking third-party apps and their settings is essential. Some apps might have settings that affect how your photos are stored or accessed.
Examples of Apps That Can Affect Your Photos:
- Photo Editing Apps: Apps like Adobe Lightroom, VSCO, and Snapseed might have settings that move or hide your original photos after editing.
- Cloud Storage Apps: Apps like Google Photos, Dropbox, and OneDrive might be set to automatically back up and then delete photos from your iPhone.
- Social Media Apps: Apps like Instagram, Facebook, and Twitter might save copies of photos you upload, potentially creating duplicates or confusion.
How to Check App Settings:
- Open the Settings App: Launch the Settings app on your iPhone.
- Scroll Down to the App: Scroll down and tap on the app you want to check.
- Review Permissions: Check the app’s permissions to see if it has access to your photos. If an app has unnecessary access, you can revoke it.
- Check Storage Settings: Look for settings related to storage, backup, or synchronization. Make sure these settings are configured correctly.
- Check Sync Settings: Some apps have their own sync settings. Ensure these settings are properly configured.
Tips for Managing Third-Party App Settings:
- Review App Permissions Regularly: Periodically review the permissions granted to your apps to ensure they are still necessary.
- Read App Documentation: Consult the app’s documentation or help resources to understand its features and settings.
- Be Cautious with New Apps: Be cautious when installing new apps and pay attention to the permissions they request.
14. Contacting Apple Support
Yes, contacting Apple Support is a reliable option. If you’ve exhausted all other troubleshooting steps and your photos are still missing, contacting Apple Support can provide further assistance.
Ways to Contact Apple Support:
- Online Chat: Visit the Apple Support website and initiate a chat session with a support representative.
- Phone Support: Call Apple Support’s phone number for your region. You can find the number on the Apple Support website.
- Apple Store: Visit an Apple Store and speak with a Genius Bar technician.
- Apple Support App: Use the Apple Support app on your iPhone to schedule a call, chat, or appointment.
Information to Have Ready When Contacting Support:
- iPhone Model: Know the model of your iPhone (e.g., iPhone 13, iPhone 14 Pro).
- iOS Version: Know the version of iOS your iPhone is running.
- Apple ID: Have your Apple ID and password ready.
- Description of the Issue: Be prepared to describe the issue in detail, including when the photos went missing and what troubleshooting steps you have already tried.
- Purchase Date: If possible, have your purchase date and proof of purchase handy.
What to Expect From Apple Support:
- Expert Advice: Apple Support representatives are trained to diagnose and resolve a wide range of issues.
- Step-by-Step Guidance: They can provide step-by-step guidance on troubleshooting steps.
- Hardware Repair: If your iPhone has a hardware issue, they can arrange for repair or replacement.
- Software Assistance: They can assist with software-related issues, such as restoring your iPhone from a backup.
15. Future Preventive Measures
Yes, taking future preventive measures is essential to safeguard your photos and prevent future data loss.
Key Preventive Measures:
- Regular Backups:
- iCloud Backup: Enable iCloud Backup to automatically back up your iPhone data to iCloud.
- Go to Settings > [Your Name] > iCloud > iCloud Backup > Turn on iCloud Backup.
- iTunes/Finder Backup: Regularly back up your iPhone to your computer using iTunes (or Finder in macOS Catalina and later).
- Connect your iPhone to your computer, open iTunes or Finder, select your device, and click “Back Up Now.”
- iCloud Backup: Enable iCloud Backup to automatically back up your iPhone data to iCloud.
- Enable iCloud Photos:
- Turn on iCloud Photos to automatically sync your photos and videos across all your devices.
- Go to Settings > [Your Name] > iCloud > Photos > Turn on iCloud Photos.
- Turn on iCloud Photos to automatically sync your photos and videos across all your devices.
- Use a Strong Passcode:
- Set a strong passcode for your iPhone to protect your data from unauthorized access.
- Go to Settings > Face ID & Passcode (or Touch ID & Passcode) > Turn Passcode On.
- Set a strong passcode for your iPhone to protect your data from unauthorized access.
- Keep Your Software Updated:
- Regularly update your iPhone’s software to ensure you have the latest bug fixes and security enhancements.
- Go to Settings > General > Software Update.
- Regularly update your iPhone’s software to ensure you have the latest bug fixes and security enhancements.
- Be Careful with Third-Party Apps:
- Only install apps from trusted sources and be cautious about the permissions they request.
- Manage Storage Space:
- Regularly check and manage your iPhone’s storage space to prevent issues caused by insufficient storage.
- Go to Settings > General > iPhone Storage.
- Regularly check and manage your iPhone’s storage space to prevent issues caused by insufficient storage.
- Physical Protection:
- Use a protective case and screen protector to safeguard your iPhone from physical damage.
- Water Resistance:
- Be mindful of your iPhone’s water resistance rating and take precautions to avoid water damage.
Why Preventive Measures Are Important:
- Data Protection: Preventive measures protect your photos and other data from loss due to accidental deletion, hardware failure, or software issues.
- Peace of Mind: Knowing that your data is backed up and protected provides peace of mind.
- Time Savings: Taking preventive measures can save you time and effort in the long run by preventing data loss and the need for data recovery.
Losing precious photos from your iPhone can be disheartening, but by systematically following the steps outlined in this guide, you can increase your chances of recovering them. From checking the Recently Deleted album to considering professional data recovery services, each method offers a potential solution. Remember to enable iCloud Photos, regularly back up your device, and manage your storage efficiently to prevent future data loss.
For more detailed guides, tips, and inspiration, visit dfphoto.net, where you can explore a wealth of photography resources. Whether you’re looking to master new techniques, discover stunning visuals, or connect with a vibrant community of photographers in the USA, dfphoto.net is your go-to source. Enhance your skills, find inspiration, and ensure your precious memories are always within reach.
Ready to elevate your photography experience? Visit dfphoto.net today to explore our extensive collection of tutorials, tips, and stunning photo galleries! Address: 1600 St Michael’s Dr, Santa Fe, NM 87505, United States. Phone: +1 (505) 471-6001. Website: dfphoto.net.
Frequently Asked Questions (FAQ)
1. What should I do first if my iPhone photos are missing?
First, check your Recently Deleted album in the Photos app. Photos and videos stay there for 30 days before being permanently deleted.
2. How do I unhide photos on my iPhone?
Go to Photos > Albums > Utilities > Hidden. Use Face ID or Touch ID to unlock, then select the photos and tap Unhide.
3. Why are my photos not syncing to iCloud?
Ensure iCloud Photos is turned on in Settings > [Your Name] > iCloud > Photos. Also, check your iCloud storage and Wi-Fi connection.
4. How can I check if my photos are in the Shared Library?
In the Photos app, tap the profile button in the upper-right corner and choose Both Libraries or Shared Library to view shared content.
5. Can third-party software help recover permanently deleted photos?
Yes, software like Dr.Fone and iMobie PhoneRescue can sometimes recover permanently deleted photos. Use reputable software to avoid malware.
6. Is it possible that an iOS update caused my photos to disappear?
Yes, occasionally iOS updates can cause issues. Ensure your iPhone is running the latest version, and consider restoring from a backup if problems persist.
7. How do I check if I accidentally moved photos to a different folder?
Browse your albums in the Photos app or use the search function to look for specific photos by date or keyword.
8. When should I contact Apple Support for missing photos?
Contact Apple Support if you’ve tried all other troubleshooting steps and your photos are still missing. They can provide expert advice and assistance.
9. How often should I back up my iPhone to prevent data loss?
Regularly back up your iPhone, ideally weekly, to iCloud or your computer to prevent data loss from accidental deletion or hardware issues.
10. What preventive measures can I take to avoid losing photos in the future?
Enable iCloud Photos, use a strong passcode, keep your software updated, and be cautious with third-party apps to safeguard your photos.