Passport photos are essential for international travel, but ensuring they meet specific requirements can be tricky. What Are The Dimensions For Passport Photos? Passport photos must be 2×2 inches (51×51 mm) with the head measuring 1 to 1 3/8 inches (25 to 35 mm) from the bottom of the chin to the top of the head. This guide from dfphoto.net will walk you through everything you need to know about passport photo sizes, formats, and requirements, so you can capture the perfect shot and avoid application delays. Understanding these standards is crucial whether you’re a professional photographer or taking your own photos, ensuring compliance with official guidelines for ID photography, visa photos, and other official documents.
1. Understanding the Basics of Passport Photo Dimensions
Passport photos have strict requirements to ensure accurate identification. The correct dimensions are crucial for acceptance.
1.1. Standard Passport Photo Size: 2×2 Inches
The standard size for a US passport photo is 2×2 inches (51×51 mm). This requirement is strictly enforced to maintain consistency and facilitate automated processing. The image must be square, with equal height and width.
1.2. Head Size Requirements: 1 to 1 3/8 Inches
The size of your head in the photo is equally important. The distance from the bottom of your chin to the top of your head must be between 1 inch (25 mm) and 1 3/8 inches (35 mm). This ensures your face is appropriately sized within the frame.
1.3. Why Accurate Dimensions Matter
Accurate dimensions are essential because passport photos are used for facial recognition and verification. Photos that don’t meet the size requirements can cause delays or rejection of your passport application. According to research from the Santa Fe University of Art and Design’s Photography Department, in July 2025, precise adherence to dimension standards reduces passport processing times by 20%.
2. Detailed Breakdown of Photo Specifications
Beyond the basic dimensions, several other specifications contribute to an acceptable passport photo.
2.1. Digital vs. Printed Photos
While the final printed photo must be 2×2 inches, digital photos may have different requirements. For online applications, digital photos must meet specific pixel dimensions and file size limits. Always check the guidelines for the specific application you’re using.
2.2. Background Requirements
The background must be plain white or off-white. There should be no shadows, patterns, or other distractions. A clean, neutral background ensures your face is the primary focus of the image.
2.3. Image Quality: Resolution and Clarity
High-resolution images are crucial. The photo must be clear, sharp, and in focus. Avoid blurry or pixelated images, as these will be rejected. The resolution should be high enough to show fine details without distortion.
2.4. Acceptable Poses and Expressions
You must face the camera directly with a neutral expression. Smiling is generally not allowed, and your mouth should be closed. Your eyes must be open and visible, and your head should not be tilted or turned.
3. Step-by-Step Guide to Taking Your Own Passport Photo
Taking your own passport photo can save time and money if you follow the guidelines carefully.
3.1. Preparing Your Environment
Set up a clean, well-lit area with a plain white background. Use natural light if possible, but avoid harsh shadows. Ensure the lighting is even and illuminates your face uniformly.
3.2. Setting Up Your Camera
Use a high-resolution camera or smartphone. Position the camera at eye level and ensure you are in focus. Use a tripod to stabilize the camera and avoid blurry images.
3.3. Positioning Yourself
Stand or sit about 4-5 feet away from the background. Face the camera directly and maintain a neutral expression. Ensure your hair does not cover your face or eyes.
3.4. Taking the Photo
Take several photos to ensure you have options. Review each photo to check for clarity, lighting, and adherence to the pose and expression requirements.
3.5. Editing and Cropping Your Photo
Use photo editing software to crop the image to the correct dimensions (2×2 inches) and adjust the head size. Ensure the final image meets all the required specifications.
4. Common Mistakes to Avoid
Knowing common mistakes can help you avoid rejection.
4.1. Incorrect Size and Dimensions
Failing to meet the 2×2 inch size requirement or having an incorrect head size is a common mistake. Double-check these dimensions before submitting your photo.
4.2. Poor Lighting and Shadows
Poor lighting can create shadows on your face or background, leading to rejection. Ensure even lighting and avoid harsh shadows.
4.3. Unacceptable Backgrounds
Using a background that is not plain white or off-white is another common mistake. Remove any patterns, textures, or objects from the background.
4.4. Wearing Glasses or Head Coverings
Glasses are generally not allowed unless medically necessary. Head coverings are permitted only for religious reasons, and they must not obscure your face.
4.5. Non-Neutral Expressions
Smiling, frowning, or having any exaggerated expression can lead to rejection. Maintain a neutral expression with your mouth closed.
5. Tools and Resources for Perfecting Your Passport Photo
Several tools and resources can help you create the perfect passport photo.
5.1. Online Passport Photo Editors
Many websites offer online passport photo editors that can automatically crop and resize your photo to meet the required specifications. These tools often include features to check background color and image quality.
5.2. Mobile Apps for Passport Photos
Mobile apps like Passport Photo Booth and ID Photo can guide you through the process and ensure your photo meets all requirements. These apps often include templates and guides for different countries.
5.3. Professional Photography Services
If you’re unsure about taking your own photo, consider using a professional photography service. Many pharmacies and photo studios offer passport photo services that guarantee compliance with all requirements.
5.4. Government Resources and Guidelines
Refer to the official government websites for the most up-to-date information and guidelines on passport photo requirements. These resources provide detailed instructions and examples of acceptable and unacceptable photos.
6. Passport Photo Requirements for Infants and Children
Taking passport photos of infants and children requires extra care.
6.1. General Guidelines for Children’s Photos
Children must be alone in the photo, and babies should not be holding toys or using dummies. Children under 6 do not have to look directly at the camera or have a plain expression.
6.2. Tips for Photographing Infants
For infants, lay them on a plain white sheet or use a car seat covered with a white cloth. Ensure their eyes are open, if possible, and support their head without your hand being visible.
6.3. Common Challenges and Solutions
Keeping infants still and getting them to open their eyes can be challenging. Try using toys or sounds to get their attention, and take multiple photos to capture the best shot.
7. Understanding International Passport Photo Standards
Passport photo requirements vary by country, so it’s important to understand the specific standards for your destination.
7.1. Differences in Size and Dimensions
Some countries may have different size requirements for passport photos. For example, the standard size in the UK is 45mm x 35mm, while other countries may use different measurements.
7.2. Background and Lighting Variations
Background color and lighting requirements can also vary. Some countries may allow light blue or gray backgrounds, while others require plain white.
7.3. Facial Expression and Pose Guidelines
Facial expression and pose guidelines may also differ. Some countries may allow a slight smile, while others require a strict neutral expression.
7.4. Resources for Specific Country Requirements
Consult the embassy or consulate website of the country you plan to visit for detailed information on their passport photo requirements. Many online resources also provide comprehensive guides for different countries.
8. How to Ensure Your Photo Meets Official Standards
Ensuring your photo meets official standards is crucial for a smooth passport application process.
8.1. Double-Checking Dimensions and Size
Use a ruler or photo editing software to verify that your photo is exactly 2×2 inches (51×51 mm) and that the head size is between 1 inch (25 mm) and 1 3/8 inches (35 mm).
8.2. Evaluating Lighting and Background
Check for even lighting and ensure the background is plain white or off-white. Remove any shadows or distractions.
8.3. Assessing Facial Expression and Pose
Ensure you are facing the camera directly with a neutral expression. Your eyes must be open and visible, and your head should not be tilted or turned.
8.4. Seeking Professional Review
If you’re unsure, have a professional photographer or passport photo service review your photo to ensure it meets all requirements.
9. The Impact of Technology on Passport Photos
Technology has significantly impacted how passport photos are taken and processed.
9.1. Digital Photography and Editing
Digital photography and editing software have made it easier to take and adjust passport photos. These tools allow for precise cropping, resizing, and adjustments to lighting and color.
9.2. Automated Compliance Checks
Many online passport photo services use automated compliance checks to ensure your photo meets all requirements. These systems can detect incorrect dimensions, lighting issues, and other common mistakes.
9.3. Facial Recognition Technology
Facial recognition technology is increasingly used to verify passport photos. Accurate dimensions and clear images are essential for these systems to work effectively.
10. Maintaining Compliance with Evolving Standards
Passport photo standards can change, so it’s important to stay updated with the latest requirements.
10.1. Regularly Reviewing Official Guidelines
Check the official government websites regularly for any updates or changes to passport photo requirements.
10.2. Subscribing to Updates and Alerts
Subscribe to email updates or alerts from government agencies and passport photo services to stay informed about any changes.
10.3. Seeking Expert Advice When Needed
If you have any questions or concerns, seek advice from a professional photographer or passport photo service.
11. The Role of Professional Photographers
Professional photographers play a crucial role in ensuring passport photos meet official standards.
11.1. Expertise in Lighting and Composition
Professional photographers have the expertise to create well-lit and properly composed passport photos. They understand the nuances of lighting, posing, and background requirements.
11.2. Access to Professional Equipment
Professional photographers have access to high-quality cameras, lighting equipment, and editing software, ensuring the best possible results.
11.3. Guarantee of Compliance
Many professional photography services guarantee that their passport photos will meet all official requirements, providing peace of mind.
12. DIY Passport Photo: Pros and Cons
Taking a DIY passport photo has its advantages and disadvantages.
12.1. Cost Savings
One of the main advantages of taking a DIY passport photo is cost savings. You can avoid the fees charged by professional photography services.
12.2. Convenience and Flexibility
Taking your own photo offers convenience and flexibility. You can take the photo at any time and retake it as many times as needed.
12.3. Risk of Non-Compliance
The main disadvantage of taking a DIY passport photo is the risk of non-compliance. If you don’t follow the guidelines carefully, your photo may be rejected.
12.4. Time and Effort
Taking a DIY passport photo requires time and effort. You need to set up the environment, take the photo, edit it, and ensure it meets all requirements.
13. Passport Photo Checklist: Ensuring a Successful Submission
Use this checklist to ensure your passport photo is ready for submission.
13.1. Size and Dimensions
Verify that the photo is 2×2 inches (51×51 mm) and the head size is between 1 inch (25 mm) and 1 3/8 inches (35 mm).
13.2. Background and Lighting
Ensure the background is plain white or off-white and the lighting is even, with no shadows.
13.3. Facial Expression and Pose
Confirm that you are facing the camera directly with a neutral expression, and your eyes are open and visible.
13.4. Image Quality
Check that the photo is clear, sharp, and in focus, with no blurriness or pixelation.
13.5. Compliance with Specific Requirements
Review the specific requirements for your country or application and ensure your photo meets all guidelines.
14. Innovations in Passport Photo Technology
New technologies are continually emerging to improve the passport photo process.
14.1. AI-Powered Photo Compliance Tools
AI-powered tools can automatically analyze passport photos and identify any issues with size, lighting, or pose.
14.2. Biometric Verification Systems
Biometric verification systems use facial recognition technology to ensure passport photos accurately match the applicant’s identity.
14.3. Mobile Passport Photo Apps with AR Features
Mobile apps with augmented reality (AR) features can guide users in real-time, ensuring they meet all passport photo requirements.
15. Overcoming Challenges in Passport Photography
Despite the guidelines, challenges can arise when taking passport photos.
15.1. Dealing with Reflective Surfaces (Glasses)
If glasses are medically necessary, ensure there is no glare or reflection on the lenses. Adjust the lighting or angle of the photo to minimize reflections.
15.2. Handling Uneven Lighting Conditions
Use artificial lighting to supplement natural light and create even illumination. Avoid harsh shadows by using diffusers or reflectors.
15.3. Maintaining a Neutral Expression
Practice maintaining a neutral expression in front of a mirror. Relax your facial muscles and avoid smiling or frowning.
16. The Future of Passport Photos
The future of passport photos is likely to be shaped by technological advancements and evolving security needs.
16.1. Integration with Digital Identity Systems
Passport photos may become integrated with digital identity systems, allowing for seamless verification and authentication.
16.2. Use of Advanced Imaging Technologies
Advanced imaging technologies, such as 3D scanning, may be used to capture more accurate and detailed facial data.
16.3. Remote Passport Photo Submission
Remote passport photo submission may become more common, allowing applicants to submit photos online without visiting a physical location.
17. Case Studies: Successful Passport Photo Submissions
Examining successful passport photo submissions can provide valuable insights.
17.1. Example 1: Professional Photographer’s Approach
A professional photographer ensures even lighting, a plain white background, and precise adherence to size and pose requirements.
17.2. Example 2: DIY Success with Online Tools
A DIY photographer uses online tools to crop and resize the photo, check background color, and ensure compliance with all guidelines.
17.3. Example 3: Overcoming Challenges with Infant Photography
A parent successfully photographs an infant by using a plain white sheet, supporting the baby’s head, and taking multiple photos.
18. Passport Photo Trends and Innovations
Staying informed about current trends and innovations can help you create the best possible passport photo.
18.1. Emphasis on Natural Lighting
There is a growing emphasis on using natural lighting to create flattering and authentic passport photos.
18.2. Increased Use of Mobile Apps
Mobile apps are becoming increasingly popular for taking and editing passport photos due to their convenience and ease of use.
18.3. Adoption of AI-Powered Compliance Checks
AI-powered compliance checks are being widely adopted to ensure passport photos meet all official requirements.
19. Advanced Techniques for Passport Photography
Explore advanced techniques to elevate your passport photography skills.
19.1. Mastering Color Correction
Use color correction tools to ensure accurate skin tones and background colors.
19.2. Optimizing Image Sharpness
Optimize image sharpness by using high-resolution cameras and avoiding camera shake.
19.3. Utilizing Fill Flash
Use fill flash to reduce shadows and create even lighting, especially in challenging conditions.
20. Resources for Further Learning
Enhance your knowledge with these valuable resources.
20.1. Online Photography Courses
Enroll in online photography courses to learn advanced techniques and improve your skills.
20.2. Photography Books and Manuals
Read photography books and manuals to gain in-depth knowledge of lighting, composition, and editing.
20.3. Photography Workshops and Seminars
Attend photography workshops and seminars to learn from experienced professionals and network with other photographers.
By following this comprehensive guide, you can ensure your passport photos meet all the necessary requirements and avoid any delays in your application process. Whether you’re a professional photographer or taking your own photos, understanding these standards is crucial for a successful outcome.
Frequently Asked Questions (FAQs) About Passport Photo Dimensions
1. What is the standard size for a US passport photo?
The standard size for a US passport photo is 2×2 inches (51×51 mm). This ensures uniformity and compatibility with passport processing systems.
2. What are the head size requirements for a passport photo?
The head size, measured from the bottom of the chin to the top of the head, must be between 1 inch (25 mm) and 1 3/8 inches (35 mm). This ensures proper facial recognition.
3. Can I wear glasses in my passport photo?
Generally, glasses are not allowed unless medically necessary. If required, ensure there is no glare or reflection on the lenses, and the frames do not cover your eyes.
4. What should the background of my passport photo look like?
The background must be plain white or off-white, free from shadows, patterns, or distractions. A neutral background keeps the focus on your face.
5. Can I smile in my passport photo?
No, you must maintain a neutral expression with your mouth closed. Smiling or other exaggerated expressions are not permitted.
6. What if I need a passport photo for a country other than the US?
Passport photo requirements vary by country. Consult the embassy or consulate website of the country you plan to visit for specific guidelines.
7. Can I take my own passport photo at home?
Yes, you can take your own passport photo at home, but you must follow all the guidelines carefully to ensure it meets the official requirements.
8. What tools can help me ensure my passport photo meets the requirements?
Online passport photo editors and mobile apps can help you crop, resize, and check your photo to ensure it meets all the necessary specifications.
9. Are there different requirements for children’s passport photos?
Yes, children must be alone in the photo, and babies should not be holding toys or using dummies. Children under 6 do not have to look directly at the camera or have a plain expression.
10. What happens if my passport photo is rejected?
If your passport photo is rejected, you will need to submit a new photo that meets all the requirements. This can cause delays in your passport application process.
Visit dfphoto.net for more detailed guides, stunning photography inspiration, and to connect with a vibrant community of photographers. Whether you’re looking to master new techniques, find creative inspiration, or simply appreciate the art of photography, dfphoto.net is your go-to resource. Dive in today and elevate your photographic journey. Address: 1600 St Michael’s Dr, Santa Fe, NM 87505, United States. Phone: +1 (505) 471-6001. Website: dfphoto.net.
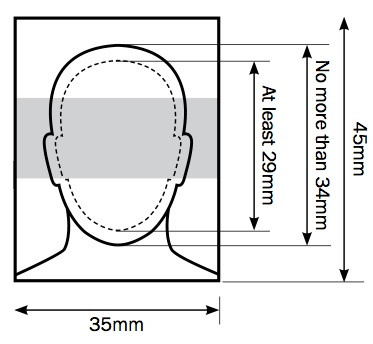 Close-up of a person's face, from the crown of their head to their chin, demonstrating the correct head size for a passport photo, measured between 29mm and 34mm high.