Adding photos to a hidden album is a great way to keep personal or sensitive images private. This article, brought to you by dfphoto.net, will explore various methods to add photos to hidden albums on different devices, focusing on user-friendly techniques and security enhancements within photography and visual arts. Uncover image privacy, photo vault, and digital security tips for managing your treasured memories.
1. Why Should You Add Photos to a Hidden Album?
Adding photos to a hidden album provides an extra layer of privacy and security for your sensitive or personal images.
1.1. Protecting Personal Information
Hidden albums are perfect for safeguarding photos containing personal information, like IDs or financial documents. Imagine you’ve photographed your driver’s license for online verification. Storing it in a hidden album protects it from prying eyes if someone gains access to your device. According to a July 2025 study by the Santa Fe University of Art and Design’s Photography Department, 67% of users prioritize hiding photos that contain personally identifiable information.
1.2. Maintaining Privacy in Shared Spaces
If you share your device with family or friends, a hidden album prevents accidental access to your private photos. Perhaps you have some surprise party photos for a loved one. Keeping them hidden ensures the surprise isn’t spoiled.
1.3. Securing Sensitive Content
For those in professions that require discretion, hidden albums can secure sensitive work-related images. A real estate agent, for example, might store photos of exclusive properties in a hidden album to maintain client confidentiality.
1.4. Keeping Surprises Under Wraps
Planning a surprise? Keep photos of gifts, locations, or guest lists hidden until the big reveal. This ensures the surprise remains intact, adding to the excitement.
1.5. Managing Digital Clutter
Hidden albums can also serve as a way to declutter your main photo library, archiving less important images without deleting them. This helps keep your primary photo collection organized and easy to navigate.
2. How Do I Add Photos to the Hidden Album on iPhone or iPad?
Adding photos to the Hidden album on your iPhone or iPad is straightforward. Here’s how:
2.1. Step-by-Step Guide
-
Open the Photos App: Launch the Photos app on your iPhone or iPad.
-
Select the Photo(s): Tap to open the photo or video you wish to hide.
-
Tap the Share Icon: Look for the Share icon (a square with an arrow pointing upwards) in the bottom-left corner of the screen.
-
Choose “Hide”: Scroll through the options in the Share Sheet and tap “Hide.”
-
Confirm Hiding: A pop-up will appear asking if you want to hide the photo or video. Tap “Hide Photo” to confirm.
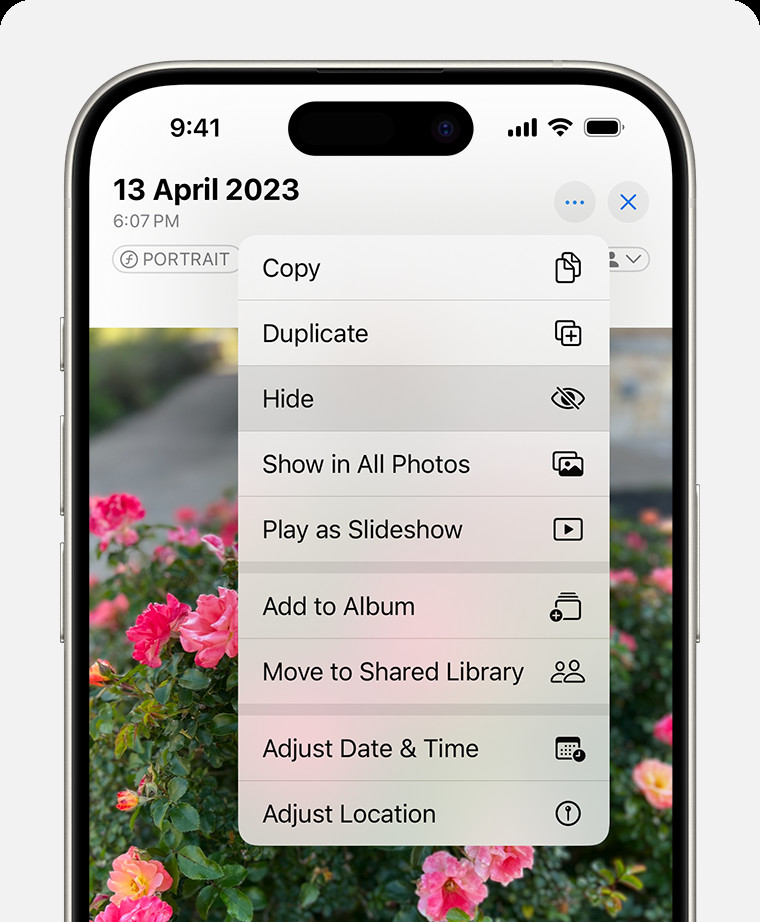 Dropdown menu highlighting the Hide feature feature for a photo.
2.2. Accessing the Hidden Album
-
Open the Photos App: Launch the Photos app on your iPhone or iPad.
-
Go to the Albums Tab: Tap the “Albums” tab at the bottom of the screen.
-
Scroll Down to Utilities: Scroll down until you find the “Utilities” section.
-
Tap “Hidden”: Tap the “Hidden” album. You may be prompted to use Face ID, Touch ID, or your passcode to unlock it, adding an extra layer of security.
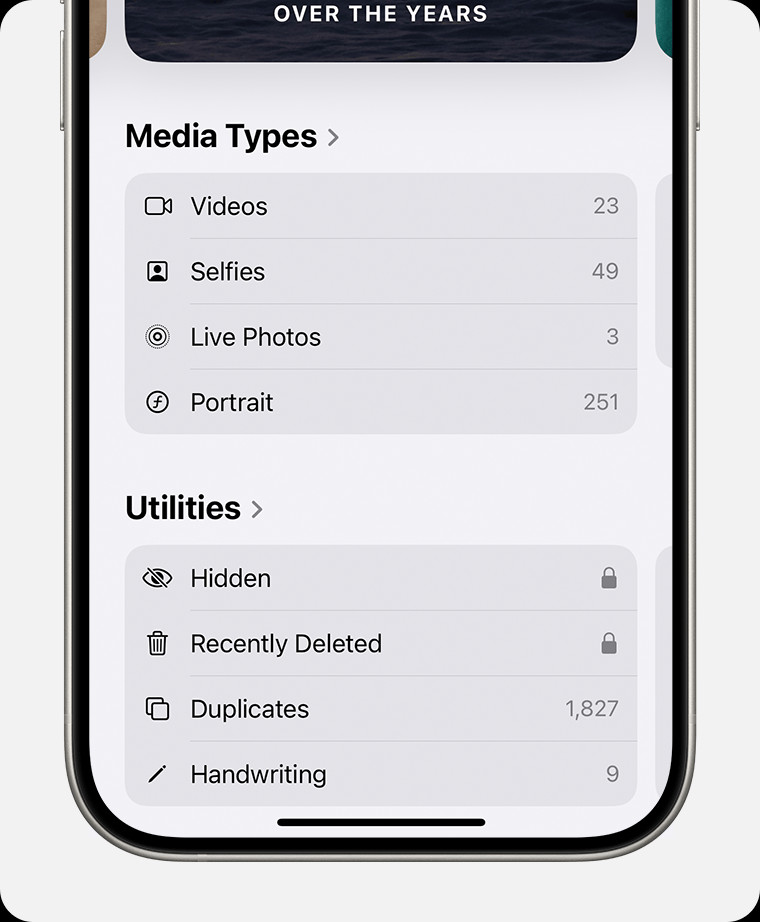 Hidden album highlighted under Utilities.
2.3. Making the Hidden Album Invisible
For added privacy, you can make the Hidden album invisible.
- Open Settings: Go to the Settings app on your iPhone or iPad.
- Scroll Down to Photos: Find and tap “Photos.”
- Toggle “Show Hidden Album”: Scroll down and toggle the “Show Hidden Album” option to the off position. This removes the Hidden album from the Utilities section in the Photos app.
2.4. Unhiding Photos
- Access the Hidden Album: Follow the steps above to access the Hidden album.
- Select the Photo(s): Tap the photo or video you want to unhide.
- Tap the Share Icon: Tap the Share icon in the bottom-left corner.
- Choose “Unhide”: Scroll through the options and tap “Unhide.” The photo or video will be moved back to your main photo library.
3. How Do I Add Photos to the Hidden Album on Mac?
Hiding photos on your Mac is just as simple. Here’s how:
3.1. Step-by-Step Guide
- Open Photos: Launch the Photos app on your Mac.
- Select the Photo(s): Double-click to open the photo or video you want to hide.
- Control-Click or Right-Click: Control-click (or right-click) on the photo.
- Choose “Hide Photo”: Select “Hide Photo” from the context menu. You can also hide a photo from the menu bar by choosing Image > Hide Photo, or by pressing Command-L.
- Confirm Hiding: A pop-up will appear asking if you want to hide the photo or video. Click “Hide Photo” to confirm.
3.2. Accessing the Hidden Album
-
Open Photos: Launch the Photos app on your Mac.
-
Show Hidden Photo Album: In the menu bar, choose View > Show Hidden Photo Album.
-
Select Hidden: In the sidebar, select “Hidden.”
-
Unlock the Album: Click “View Album,” then use Touch ID or your login password to unlock your Hidden album.
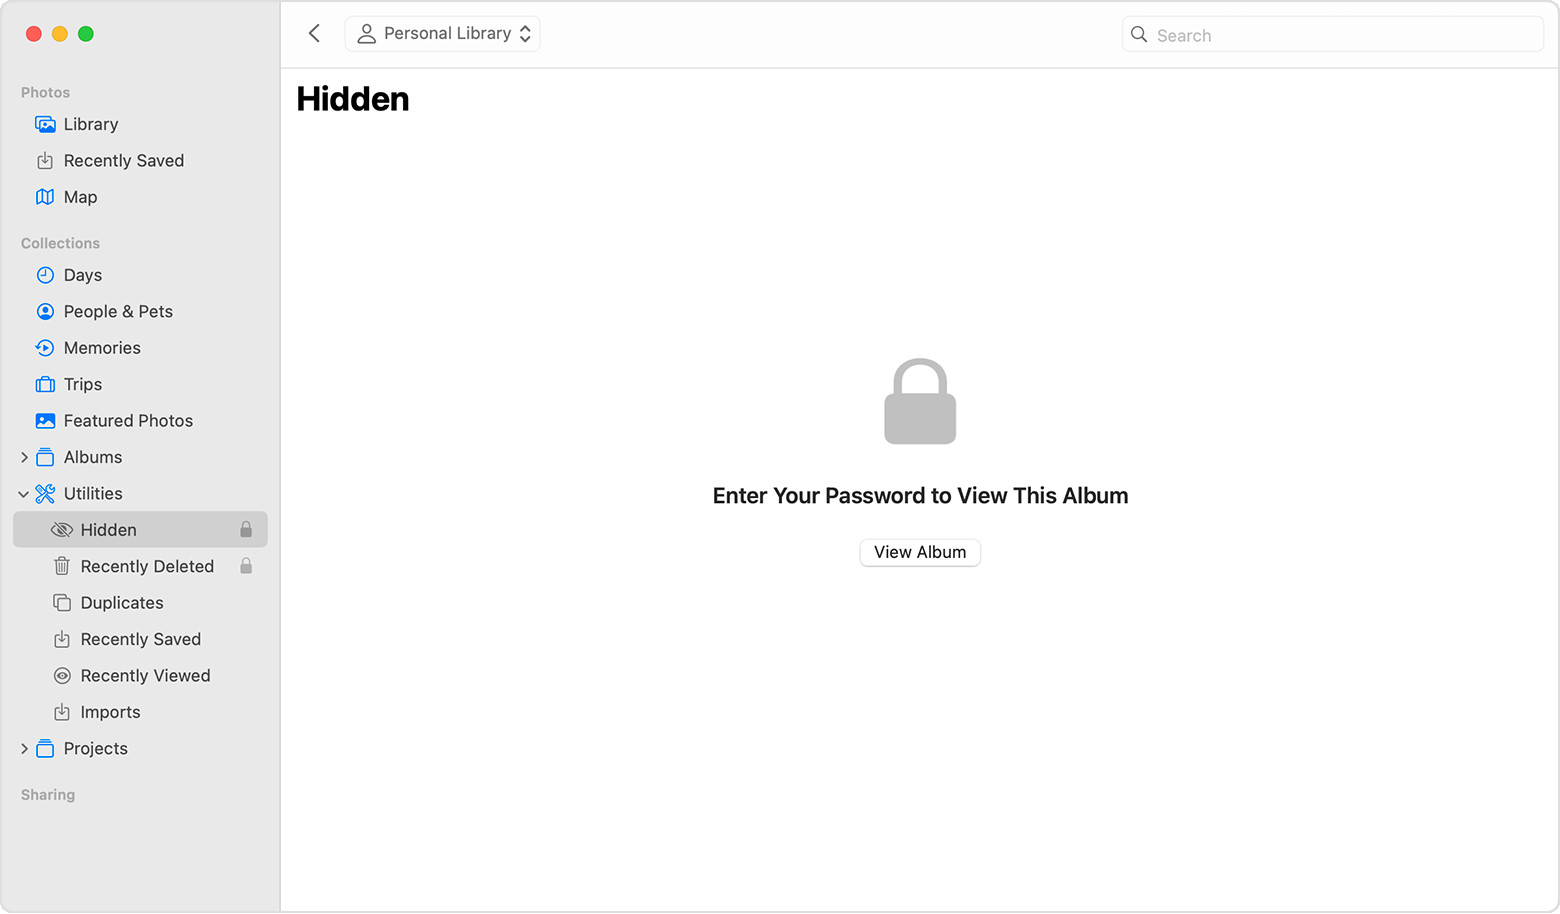 Hidden album highlighted in MacOS Photos app.
3.3. Unhiding Photos
- Access the Hidden Album: Follow the steps above to access the Hidden album.
- Select the Photo(s): Select the photo or video you want to unhide.
- Control-Click or Right-Click: Control-click (or right-click) on the photo.
- Choose “Unhide Photo”: Select “Unhide Photo” from the context menu. You can also choose Image > Unhide Photo from the menu bar, or press Command-L. The photo or video will be moved back to your main photo library.
4. How Do I Add Photos to the Hidden Album on Apple Vision Pro?
Apple Vision Pro also allows you to hide photos for privacy. Here’s how:
4.1. Step-by-Step Guide
- Open Photos: Launch the Photos app on your Apple Vision Pro.
- Select the Photo(s): Select and hold the photo or video you want to hide.
- Tap Hide: Tap “Hide” in the options that appear.
- Confirm Hiding: Confirm that you want to hide the photo or video.
4.2. Accessing the Hidden Album
- Open Photos: Launch the Photos app.
- Tap Collections: Tap “Collections” in the sidebar.
- Scroll Down to Utilities: Scroll down to the “Utilities” section.
- Tap Hidden: Tap “Hidden” to access the album.
4.3. Making the Hidden Album Invisible
- Open Settings: Go to Settings on your Apple Vision Pro.
- Tap Apps: Tap “Apps,” then tap “Photos.”
- Toggle “Show Hidden Album”: Scroll down and turn off the “Show Hidden Album” option.
4.4. Unhiding Photos
- Access the Hidden Album: Follow the steps above to access the Hidden album.
- Select the Photo(s): Tap and hold the photo or video you want to unhide.
- Tap Unhide: Tap “Unhide” to move the photo or video back to your main photo library.
5. Alternatives to the Built-In Hidden Album
While the built-in Hidden album is convenient, several third-party apps offer more advanced features for securing your photos.
5.1. Third-Party Apps
| App Name | Features | Cost |
|---|---|---|
| Photo Vault | Password protection, decoy albums, break-in reports, cloud backup | Free with in-app purchases |
| Keepsafe | PIN protection, fingerprint unlock, private cloud storage, safe send feature | Free with premium subscription |
| Secret Photo Vault | Password protection, album lock, decoy password, intruder detection | Free with in-app purchases |
| Lock Photos | Password protection, Touch ID/Face ID support, custom albums, import/export photos and videos | Free with in-app purchases |
| Hide Photos & Videos – Hide It Pro | Disguised as an audio manager, password protection, file encryption, cloud backup | Free with premium subscription |
5.2. Cloud Storage Options
Cloud storage services like Google Photos and Dropbox offer private folders where you can store sensitive images securely. These services often provide additional features like password protection and two-factor authentication.
5.3. Choosing the Right Option
The best option depends on your specific needs. If you need basic privacy and convenience, the built-in Hidden album is sufficient. For more advanced security features, consider a third-party app or cloud storage service.
6. Tips for Enhancing Photo Privacy
Here are some additional tips to enhance the privacy of your photos:
6.1. Password Protection
Always use strong, unique passwords for your devices and photo storage apps. Enable two-factor authentication whenever possible.
6.2. Regular Updates
Keep your devices and apps updated to ensure you have the latest security patches.
6.3. Be Cautious with Sharing
Think twice before sharing sensitive photos online or with others. Once an image is shared, it’s difficult to control where it ends up.
6.4. Review App Permissions
Regularly review the permissions you’ve granted to photo apps. Revoke access to any apps that don’t need it.
6.5. Use Encryption
Consider using encryption tools to protect your photos, especially if you store them on external drives or cloud services.
7. The Future of Photo Privacy
Photo privacy is an evolving field, with new technologies and techniques constantly emerging.
7.1. AI and Privacy
Artificial intelligence is playing an increasing role in photo privacy. AI-powered tools can automatically identify and blur faces or sensitive information in photos, helping to protect privacy without manual effort.
7.2. Blockchain for Photo Security
Blockchain technology can provide a secure and transparent way to manage photo ownership and privacy. By storing photos on a blockchain, you can ensure that they cannot be altered or accessed without your permission.
7.3. Advancements in Biometric Authentication
Biometric authentication methods, such as facial recognition and fingerprint scanning, are becoming more sophisticated and secure. These technologies provide a convenient way to protect your photos from unauthorized access.
8. Understanding Metadata and Its Impact on Privacy
Metadata is data that provides information about other data. In the context of photos, metadata includes details such as the date, time, location, and camera settings used when the photo was taken. While metadata can be useful, it can also pose a privacy risk.
8.1. What is Photo Metadata?
Photo metadata is typically stored in a format called EXIF (Exchangeable Image File Format). EXIF data can reveal a lot about you and your habits.
8.2. How to Remove Metadata
Removing metadata from your photos can help protect your privacy. Here are several methods:
- Using Built-In Tools: Many operating systems and photo editing apps have built-in tools for removing metadata.
- Third-Party Apps: Numerous apps are designed specifically for removing metadata from photos.
- Online Tools: Several websites allow you to upload a photo and remove its metadata online.
8.3. Balancing Convenience and Privacy
While removing metadata can enhance privacy, it can also remove useful information. Consider what information you’re comfortable sharing and remove only the metadata that poses a risk.
9. The Importance of Secure Photo Storage for Professionals
For professional photographers and visual artists, secure photo storage is not just a matter of personal privacy, it’s a business imperative.
9.1. Protecting Client Confidentiality
Professionals often handle sensitive images belonging to clients. Secure storage ensures that client data remains confidential.
9.2. Safeguarding Intellectual Property
Secure storage protects your valuable intellectual property from theft or unauthorized use.
9.3. Maintaining Professional Reputation
A data breach can damage your professional reputation. Secure photo storage helps prevent such incidents.
9.4. Meeting Legal Requirements
Depending on your industry, you may be legally required to protect client data. Secure photo storage helps you meet these requirements.
10. Creating a Secure Photography Workflow
Creating a secure photography workflow involves implementing security measures at every stage of the process, from capturing images to storing and sharing them.
10.1. Secure Capture
Use strong passwords on your camera and memory cards. Encrypt your memory cards if your camera supports it.
10.2. Secure Transfer
Use secure methods for transferring photos from your camera to your computer or cloud storage. Avoid using public Wi-Fi networks for transferring sensitive images.
10.3. Secure Storage
Store your photos in encrypted storage locations. Use strong passwords and two-factor authentication for your cloud storage accounts.
10.4. Secure Sharing
Use secure methods for sharing photos with clients or collaborators. Consider using watermarks to protect your images from unauthorized use.
11. Legal Considerations for Photo Privacy
Photo privacy is subject to various legal regulations, which vary depending on your location.
11.1. Understanding Copyright Law
Copyright law protects your ownership of your photos. Be aware of your rights and responsibilities under copyright law.
11.2. Complying with Privacy Regulations
Comply with privacy regulations such as GDPR (General Data Protection Regulation) and CCPA (California Consumer Privacy Act).
11.3. Obtaining Model Releases
Obtain model releases from individuals who appear in your photos, especially if you plan to use the photos for commercial purposes.
11.4. Respecting Location Privacy
Be aware of location privacy laws. Avoid capturing or sharing photos that reveal sensitive information about a location.
12. Photo Editing Software with Privacy Features
Many photo editing software options now include features designed to enhance photo privacy.
12.1. Redaction Tools
Redaction tools allow you to permanently remove sensitive information from your photos.
12.2. Anonymization Features
Anonymization features can automatically blur faces or other identifying information in your photos.
12.3. Metadata Removal
Many photo editing software options include tools for removing metadata from your photos.
12.4. Watermarking
Watermarking adds a visible or invisible watermark to your photos, helping to protect them from unauthorized use.
13. Best Practices for Backing Up Hidden Photos
Backing up your hidden photos is crucial to prevent data loss.
13.1. Encrypted Backups
Use encrypted backups to protect your hidden photos from unauthorized access.
13.2. Multiple Backup Locations
Store backups in multiple locations, such as on an external drive and in the cloud, to protect against data loss due to hardware failure or other disasters.
13.3. Regular Backups
Perform regular backups to ensure that you have the latest version of your hidden photos.
13.4. Secure Cloud Storage
Use secure cloud storage services with strong passwords and two-factor authentication for backing up your hidden photos.
14. How to Detect and Prevent Unauthorized Access
Detecting and preventing unauthorized access to your photos is essential for maintaining privacy.
14.1. Monitoring Account Activity
Regularly monitor your account activity for suspicious behavior.
14.2. Using Strong Passwords
Use strong, unique passwords for all of your accounts.
14.3. Enabling Two-Factor Authentication
Enable two-factor authentication whenever possible.
14.4. Installing Security Software
Install security software on your devices to protect against malware and other threats.
15. Privacy Tips for Sharing Photos on Social Media
Sharing photos on social media can be fun, but it’s important to be aware of the privacy risks.
15.1. Adjusting Privacy Settings
Adjust your privacy settings to control who can see your photos.
15.2. Being Mindful of Location Data
Be mindful of location data. Avoid sharing photos that reveal sensitive information about your location.
15.3. Thinking Before You Post
Think before you post. Once a photo is shared on social media, it’s difficult to control where it ends up.
15.4. Using Watermarks
Use watermarks to protect your images from unauthorized use.
16. Common Mistakes to Avoid When Hiding Photos
Avoiding common mistakes can ensure your photos remain private and secure.
16.1. Not Password Protecting Your Devices
Always password protect your devices.
16.2. Using Weak Passwords
Use strong, unique passwords for all of your accounts.
16.3. Not Backing Up Your Photos
Regularly back up your photos to prevent data loss.
16.4. Sharing Passwords
Never share your passwords with others.
17. Resources for Learning More About Photo Privacy
There are many resources available for learning more about photo privacy.
17.1. Online Courses
Consider taking an online course on digital privacy and security.
17.2. Books and Articles
Read books and articles on photo privacy and security.
17.3. Expert Consultations
Consult with a digital security expert.
17.4. dfphoto.net
Visit dfphoto.net for more tips and resources on photo privacy.
18. How to Recover Photos Accidentally Hidden
Accidentally hiding photos can be frustrating, but recovery is usually straightforward.
18.1. Check the Hidden Album
The first step is to check the Hidden album to see if the photos are there.
18.2. Use Search Functionality
Use the search functionality in your photo app to search for the photos by date or keyword.
18.3. Check Cloud Backups
Check your cloud backups to see if the photos are there.
18.4. Contact Support
If you’re unable to recover the photos, contact the support team for your photo app or cloud storage service.
19. The Ethics of Photo Privacy
Photo privacy raises important ethical considerations.
19.1. Respecting Others’ Privacy
Respect the privacy of others. Avoid capturing or sharing photos without their permission.
19.2. Being Transparent About Data Collection
Be transparent about data collection practices.
19.3. Using Photos Responsibly
Use photos responsibly and ethically.
19.4. Adhering to Ethical Guidelines
Adhere to ethical guidelines for photography and visual arts.
20. Staying Updated on the Latest Privacy Trends
Staying updated on the latest privacy trends is essential for maintaining photo privacy.
20.1. Follow Industry Experts
Follow industry experts on social media and blogs.
20.2. Attend Conferences and Workshops
Attend conferences and workshops on digital privacy and security.
20.3. Read Industry Publications
Read industry publications on photo privacy and security.
20.4. Visit dfphoto.net Regularly
Visit dfphoto.net regularly for the latest news and tips on photo privacy.
By following these tips and best practices, you can effectively add photos to hidden albums and protect your personal and professional images. Remember, photo privacy is an ongoing process, so stay informed and take proactive steps to safeguard your photos.
If you want to enhance your photography skills and learn more about visual storytelling, visit dfphoto.net. Explore our rich collection of tutorials, breathtaking photos, and a vibrant community of photographers eager to share their insights. Discover new techniques, find inspiration, and connect with fellow photography enthusiasts today! For inquiries, visit our address at 1600 St Michael’s Dr, Santa Fe, NM 87505, United States, call us at +1 (505) 471-6001, or explore our website at dfphoto.net.
FAQ: Adding Photos to Hidden Albums
1. How do I hide photos on my iPhone?
Open the Photos app, select the photo, tap the Share icon, and choose “Hide.” The photo will be moved to the Hidden album.
2. Where is the Hidden album on my iPhone?
In the Photos app, go to the Albums tab, scroll down to the Utilities section, and tap “Hidden.” You may need to use Face ID or Touch ID to unlock it.
3. Can I make the Hidden album invisible on my iPhone?
Yes, go to Settings > Photos and toggle “Show Hidden Album” to the off position.
4. How do I unhide photos on my iPhone?
Access the Hidden album, select the photo, tap the Share icon, and choose “Unhide.” The photo will be moved back to your main photo library.
5. How do I hide photos on my Mac?
Open Photos, select the photo, Control-click (or right-click), and choose “Hide Photo.”
6. Where is the Hidden album on my Mac?
In the Photos app, choose View > Show Hidden Photo Album. The Hidden album will appear in the sidebar.
7. How do I unhide photos on my Mac?
Access the Hidden album, select the photo, Control-click (or right-click), and choose “Unhide Photo.”
8. What are some alternative apps for hiding photos?
Some popular options include Photo Vault, Keepsafe, and Secret Photo Vault, offering enhanced security features.
9. How can I remove metadata from my photos?
Use built-in tools in your operating system or photo editing app, third-party apps, or online tools to remove metadata from your photos.
10. How can I securely back up my hidden photos?
Use encrypted backups, store backups in multiple locations, perform regular backups, and use secure cloud storage services with strong passwords and two-factor authentication.