Writing on iPhone photos is a fantastic way to personalize your memories, add context, or create eye-catching visuals for social media. This guide from dfphoto.net will walk you through various methods to add text to your photos directly on your iPhone, enhancing your photographic artistry and visual communication skills. Unlock your iPhone’s potential and express yourself through annotated imagery. Learn about photo markup techniques and photo editing tips to take full advantage of these features.
1. Understanding The Power Of Text On Photos
Adding text to photos isn’t just about labeling; it’s about storytelling, conveying emotions, and enhancing the impact of your visual content. By creatively integrating text, you can turn simple snapshots into compelling narratives or striking visual messages. It also opens up new creative avenues for photographic expression.
1.1. What Are The Benefits Of Adding Text To Your Photos?
Adding text to your photos offers numerous benefits that go beyond mere aesthetics. It’s a powerful tool that enhances communication and creativity.
- Enhanced Storytelling: Text provides context, clarifies meaning, and adds layers to your visual narratives.
- Personalization: Adding names, dates, or inside jokes makes photos more meaningful for personal use and sharing.
- Brand Building: For businesses, text overlays can include logos, slogans, or promotional messages, reinforcing brand identity.
- Call to Action: Text can direct viewers to take specific actions, such as visiting a website or attending an event.
- Accessibility: Text descriptions improve accessibility for individuals with visual impairments by providing alternative descriptions.
- Engagement Boost: Captions and annotations often capture attention, encouraging likes, comments, and shares on social media.
1.2. What Are The Different Use Cases For Text On Photos?
The versatility of adding text to photos makes it useful in a wide array of contexts, from personal to professional.
- Social Media Marketing: Creating promotional images with sales announcements or event details.
- Educational Content: Annotating diagrams, maps, or scientific images for clarity.
- Event Invitations: Designing custom invites with dates, times, and themes overlaid on captivating visuals.
- Personalized Gifts: Producing custom photo albums or cards with heartfelt messages.
- Memes and Humor: Generating viral content by pairing funny images with witty text.
- Travel Journals: Adding locations, dates, and personal reflections to travel photos.
- Real Estate Listings: Highlighting property features with descriptive text on photographs.
1.3. What Are The Key Considerations Before Adding Text?
Before you start adding text to your photos, consider these essential factors to ensure a polished and effective outcome:
- Clarity: Choose fonts and colors that are easy to read against the backdrop of your photo.
- Placement: Position text strategically so it doesn’t obscure important elements or distract from the main subject.
- Relevance: Ensure the text adds value, providing context or enhancing the viewer’s understanding of the image.
- Tone: Maintain a consistent tone that aligns with the photo’s mood and the message you want to convey.
- Legality: Respect copyright laws and usage rights, especially when using fonts or images from external sources.
- Target Audience: Tailor your message to resonate with your intended audience, considering cultural and linguistic factors.
- Resolution: Use high-resolution images to avoid pixelation, which can diminish the impact of your text overlay.
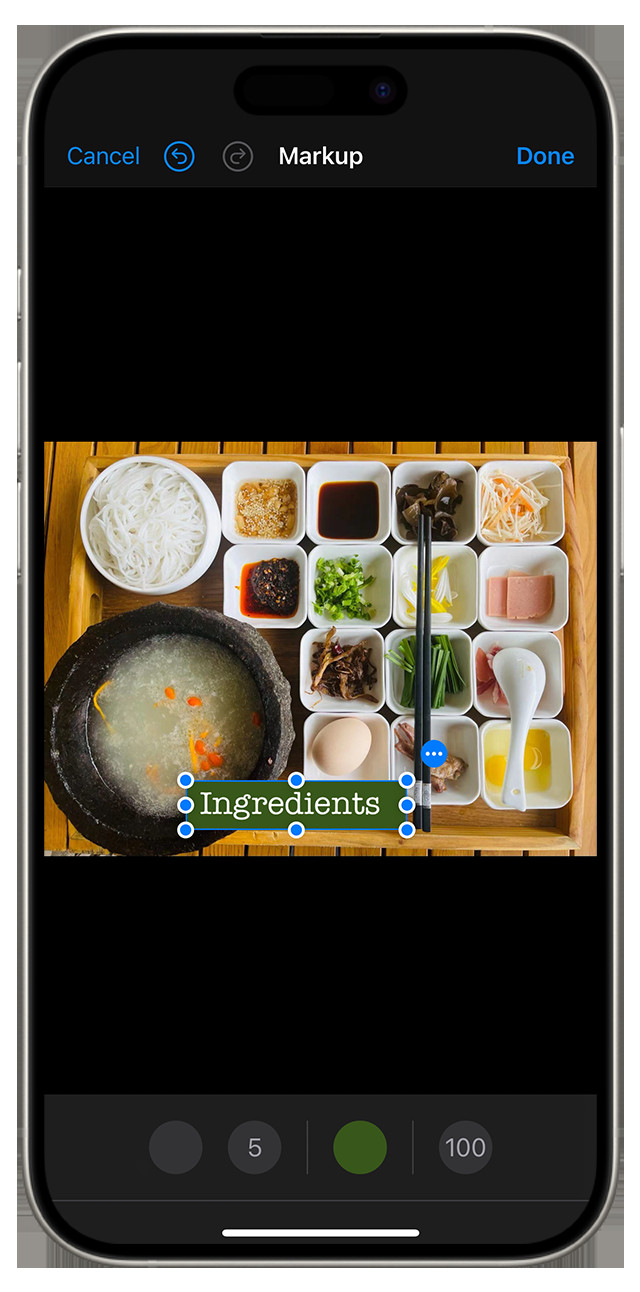 Adding text to a photo on iPhone to highlight a specific detail, using the Markup tool in the Photos app
2. Using The Built-In Markup Tool On iPhone
The iPhone’s built-in Markup tool is a quick and easy way to add simple text to your photos directly from the Photos app. It’s perfect for adding quick annotations or captions.
2.1. How Do I Access The Markup Tool In The Photos App?
Accessing the Markup tool on your iPhone is straightforward, enabling you to quickly annotate photos and screenshots:
- Open Photos App: Launch the Photos app from your home screen.
- Select Photo: Choose the photo you wish to edit.
- Tap Edit: Press the “Edit” button located in the upper-right corner of the screen.
- Markup Icon: Look for the Markup icon (a pen inside a circle) and tap it. This will open the Markup interface.
2.2. What Are The Text Options Available In The Markup Tool?
The Markup tool in the Photos app offers basic yet useful text options for quick annotations:
- Adding Text: Tap the “+” button, then select “Text.” A text box will appear on your photo. Double-tap the box to start typing.
- Font Adjustment: While the Markup tool doesn’t offer a wide variety of fonts, you can adjust the font size by tapping the “Aa” icon.
- Color Options: Change the text color by selecting from the color palette at the bottom of the screen.
- Placement and Size: Drag the text box to position it where you want, and use the blue dots to resize it.
2.3. How Can I Customize The Text Appearance?
Customizing text appearance in the Markup tool is limited but sufficient for basic needs:
- Color Selection: Choose from a range of colors to make your text stand out against the photo.
- Font Size Adjustment: Resize the text to fit your annotation needs. Use the “Aa” button to increase or decrease the size.
- Text Alignment: Align the text left, center, or right within the text box for better presentation.
- Opacity: Modify the text’s transparency to blend it subtly with the background, enhancing visual harmony.
2.4. What Are The Limitations Of Using The Markup Tool For Text?
Despite its convenience, the Markup tool has limitations:
- Limited Fonts: The tool offers only a handful of font options, restricting creative flexibility.
- No Advanced Formatting: Features such as bold, italics, or shadows are unavailable.
- Basic Interface: The interface is quite rudimentary compared to dedicated photo editing apps, making complex designs challenging.
3. Exploring Third-Party Photo Editing Apps
For more advanced text options and creative control, third-party photo editing apps offer a wide range of features and customization options.
3.1. What Are Some Popular Photo Editing Apps For Adding Text?
Several apps excel at adding text to photos, each offering unique features and capabilities:
- Phonto: Known for its extensive font library and simple interface.
- Canva: Provides pre-designed templates and graphics for creating professional-looking designs.
- Adobe Photoshop Express: Offers robust editing tools along with text options, ideal for more complex projects.
- Over: Specializes in graphic design elements and text overlays, perfect for marketing materials.
- PicsArt: Combines photo editing with drawing tools and a vast collection of stickers and fonts.
3.2. What Features Should I Look For In A Photo Editing App?
When choosing a photo editing app, consider these key features to ensure it meets your needs:
- Font Variety: A wide selection of fonts to match different styles and themes.
- Customization Options: Ability to adjust font size, color, spacing, and alignment.
- Text Effects: Features like shadows, outlines, and glows to make text stand out.
- Layer Support: Allows you to add multiple text layers and edit them independently.
- Ease of Use: An intuitive interface that makes it easy to navigate and use the app’s features.
- Integration: Compatibility with social media platforms for quick sharing.
- Additional Editing Tools: Comprehensive photo editing features like filters, adjustments, and retouching tools.
3.3. How Do I Add Text To Photos Using These Apps?
The process of adding text varies slightly between apps, but here are the general steps:
- Open the App: Launch the photo editing app on your iPhone.
- Import Photo: Select the photo you want to edit from your photo library.
- Text Tool: Look for a text tool icon (usually labeled “Text” or represented by a “T”).
- Add Text: Tap the text tool to add a text box to your photo.
- Type Your Text: Enter the text you want to display.
- Customize: Use the app’s tools to adjust the font, size, color, and position of the text.
- Save and Share: Once you’re satisfied, save the edited photo to your device or share it directly to social media.
3.4. What Are Some Tips For Choosing The Right Font And Style?
Selecting the right font and style can greatly impact the visual appeal of your photo. Consider these tips:
- Match the Mood: Choose a font that aligns with the photo’s mood and theme. A playful photo might suit a whimsical font, while a formal image calls for a classic typeface.
- Readability: Ensure the font is easy to read, even at smaller sizes. Avoid overly decorative fonts for body text.
- Contrast: Select a font color that contrasts well with the background to ensure the text stands out.
- Hierarchy: Use different font sizes and styles to create a visual hierarchy, highlighting the most important information.
- Consistency: Use a limited number of fonts (usually two or three) to maintain a cohesive and professional look.
- Kerning and Leading: Adjust the spacing between letters (kerning) and lines (leading) for improved readability.
- Test on Different Devices: Check how the text looks on various screens to ensure it remains legible and visually appealing.
4. Mastering Text Placement And Design
Effective text placement and design are crucial for ensuring your message is clear, visually appealing, and complements the photo.
4.1. How Do I Choose The Best Position For Text On My Photo?
Selecting the right position for your text can significantly enhance the overall impact of your photo. Here are some guidelines:
- Consider the Composition: Analyze the photo’s composition and place text in areas with minimal detail or negative space.
- Avoid Obscuring Key Elements: Ensure the text doesn’t cover important subjects or focal points.
- Use the Rule of Thirds: Position text along the lines or intersections of the rule of thirds grid to create a balanced and visually pleasing layout.
- Follow the Visual Flow: Place text where the viewer’s eye naturally goes, guiding them through the image.
- Experiment with Different Positions: Try various placements to see which works best, using temporary adjustments before finalizing your design.
4.2. What Are Some Design Principles To Keep In Mind?
Keeping fundamental design principles in mind can transform your text from an afterthought into an integral part of your photo:
- Balance: Achieve visual equilibrium by distributing text and other elements evenly across the image.
- Contrast: Create visual interest by using contrasting colors, fonts, and sizes to highlight key information.
- Hierarchy: Establish a clear order of importance by varying the size and prominence of text elements.
- Proximity: Group related text elements together to create cohesive units and improve readability.
- Alignment: Align text consistently to create a clean and organized look, enhancing visual harmony.
- White Space: Use empty space around text to give it room to breathe and prevent overcrowding.
4.3. How Can I Create A Visually Appealing Text Overlay?
Creating an appealing text overlay involves combining creativity with technical skill. Consider these tips:
- Use Transparency: Adjust the text’s opacity to blend it seamlessly with the background.
- Add Shadows or Outlines: Create depth and separation by adding subtle shadows or outlines to the text.
- Incorporate Shapes: Use shapes like rectangles or circles behind the text to make it stand out.
- Apply Filters: Use filters or color adjustments to unify the text and photo, creating a cohesive look.
- Use Gradients: Add a gradient to the text for a dynamic and eye-catching effect.
- Experiment with Blend Modes: Explore different blend modes to achieve unique visual effects, blending text with the photo in creative ways.
4.4. What Are Common Mistakes To Avoid?
Avoiding common pitfalls can ensure your text overlay enhances rather than detracts from your photo:
- Overcrowding: Avoid adding too much text, which can make the image look cluttered and overwhelming.
- Poor Readability: Ensure the text is easy to read by choosing appropriate fonts, colors, and sizes.
- Ignoring Composition: Placing text haphazardly without considering the photo’s composition can disrupt the visual flow.
- Inconsistent Styling: Using too many different fonts, colors, and styles can create a disjointed and unprofessional look.
- Neglecting White Space: Failing to provide adequate space around the text can make it feel cramped and difficult to read.
- Using Low-Resolution Images: Starting with low-quality photos can result in pixelated or blurry text, diminishing the overall impact.
5. Advanced Techniques And Creative Ideas
Take your text-on-photo skills to the next level with these advanced techniques and creative ideas, pushing the boundaries of visual expression.
5.1. How Can I Use Text To Tell A Story With My Photos?
Using text to tell a story involves crafting narratives that complement your visuals, enhancing the emotional connection with viewers. Here’s how:
- Provide Context: Add captions that describe the scene, characters, or events depicted in the photo.
- Share Personal Anecdotes: Include personal stories or reflections that relate to the image, adding depth and authenticity.
- Create Dialogue: Add speech bubbles or quotes to convey conversations or internal thoughts of the subjects.
- Use Descriptive Language: Employ vivid and descriptive language to paint a picture with words, enriching the visual experience.
- Incorporate Humor: Use witty or humorous text to lighten the mood and engage viewers.
- Structure a Narrative: Create a series of photos with sequential text to tell a complete story, building anticipation and emotional investment.
5.2. What Are Some Creative Ideas For Text Overlays?
Explore these creative ideas to make your text overlays stand out and capture attention:
- Typography Art: Create intricate designs using text, transforming words into visual art.
- Quote Overlays: Add inspiring or thought-provoking quotes to motivate and engage viewers.
- Location Tags: Overlay the name of the location on travel photos, adding a sense of place.
- Event Details: Create promotional images with event dates, times, and locations overlaid on captivating visuals.
- Product Highlights: Showcase product features with descriptive text on product photos.
- Step-by-Step Instructions: Provide visual guides with numbered steps overlaid on relevant images, aiding comprehension.
5.3. How Do I Create A Consistent Style Across Multiple Photos?
Maintaining a consistent style across multiple photos creates a cohesive visual identity, enhancing brand recognition and aesthetic appeal. Follow these steps:
- Choose a Consistent Font: Select a font that aligns with your brand or personal style and use it consistently across all images.
- Use a Limited Color Palette: Stick to a limited color palette that complements your photos, ensuring visual harmony.
- Maintain Consistent Text Placement: Place text in the same location on each photo, creating a predictable and organized look.
- Apply Uniform Effects: Use the same shadows, outlines, or filters on all text overlays, ensuring a unified visual style.
- Create Templates: Develop templates with pre-set text styles and layouts for quick and easy editing.
- Document Your Style Guide: Create a style guide that outlines your font choices, color palette, and text placement rules for future reference.
5.4. What Are The Ethical Considerations When Adding Text To Photos?
Consider these ethical factors to ensure responsible and respectful use of text on photos:
- Accuracy: Ensure the text is factual and doesn’t misrepresent the content of the photo.
- Respect: Avoid using text that is offensive, discriminatory, or harmful to others.
- Transparency: Disclose any modifications or enhancements made to the photo that alter its original appearance.
- Consent: Obtain consent from individuals featured in the photo before adding text that could be considered personal or sensitive.
- Copyright: Respect copyright laws and usage rights, especially when using fonts or images from external sources.
- Attribution: Provide proper attribution when using quotes or text created by others, giving credit where it’s due.
6. Optimizing Photos With Text For Social Media
Optimizing photos with text for social media ensures they capture attention, convey your message effectively, and align with platform-specific guidelines.
6.1. How Do I Adapt My Text And Design For Different Platforms?
Adapting your text and design for various social media platforms involves tailoring your content to suit each platform’s unique audience, format, and style. Consider these tips:
- Image Size and Dimensions: Adjust the image size and dimensions to fit each platform’s recommended specifications, ensuring optimal display quality.
- Text Length: Keep text concise and to the point, as attention spans are shorter on social media.
- Font Choice: Select fonts that are easy to read on mobile devices, as most users access social media on their phones.
- Color Palette: Use colors that align with each platform’s branding and appeal to its audience.
- Call to Action: Include clear and concise calls to action, guiding users to take specific steps.
- Platform-Specific Trends: Stay updated on current trends and tailor your content to align with popular themes and formats.
6.2. What Are The Best Practices For Using Text On Instagram?
Instagram, being a visually driven platform, requires careful consideration of text usage to maximize engagement. Follow these best practices:
- Use High-Quality Images: Start with high-resolution photos to ensure your text looks sharp and clear.
- Keep It Minimal: Use text sparingly, focusing on the visual appeal of the photo.
- Use Brand Fonts: Select fonts that align with your brand identity to maintain consistency.
- Add Text to Stories: Utilize Instagram Stories to add text overlays with interactive elements like polls or quizzes.
- Optimize for Mobile: Ensure your text is easily readable on mobile devices, adjusting font sizes and spacing accordingly.
- Use Hashtags: Incorporate relevant hashtags in your captions to increase visibility and reach.
6.3. How Can I Make My Photos Stand Out In A Crowded Feed?
Making your photos stand out in a crowded social media feed requires creativity, strategy, and attention to detail. Try these tactics:
- Use Eye-Catching Visuals: Start with visually compelling photos that capture attention.
- Add Contrasting Text: Use text colors that contrast with the background to ensure readability.
- Incorporate Unique Design Elements: Use shapes, icons, or graphics to make your text overlays stand out.
- Tell a Story: Craft captions that tell a story or convey a message, engaging viewers emotionally.
- Use Motion Graphics: Add subtle animations or motion graphics to your text to create a dynamic effect.
- Follow Current Trends: Stay updated on current trends and incorporate them into your visuals to stay relevant.
6.4. What Are The Legal Considerations For Using Text And Images On Social Media?
Navigating the legal landscape of social media requires vigilance to avoid copyright infringement and other legal issues. Consider these factors:
- Copyright Laws: Respect copyright laws and usage rights when using images, fonts, or text created by others.
- Fair Use: Understand the concept of fair use, which allows limited use of copyrighted material for purposes such as criticism, commentary, or education.
- Creative Commons Licenses: Use images and fonts licensed under Creative Commons, which allow certain types of use with proper attribution.
- Model Releases: Obtain model releases from individuals featured in your photos, especially if you plan to use them for commercial purposes.
- Trademark Laws: Avoid using trademarks or logos without permission, which could result in legal action.
- Privacy Laws: Respect privacy laws and avoid sharing personal information without consent, protecting individuals’ privacy rights.
7. Troubleshooting Common Issues
Even with careful planning, you may encounter issues when adding text to photos. Here are some common problems and how to resolve them.
7.1. What Do I Do If My Text Is Blurry Or Pixelated?
Blurry or pixelated text can detract from the overall quality of your photo. Here’s how to address this issue:
- Use High-Resolution Images: Start with high-resolution photos to ensure your text looks sharp and clear.
- Adjust Text Size: Avoid using excessively large or small text sizes, which can cause distortion.
- Check Font Quality: Use high-quality fonts that are designed to scale well without losing detail.
- Save in High Quality: Save your edited photo in a high-quality format (e.g., JPEG with high settings or PNG) to preserve detail.
- Avoid Over-Compression: Avoid excessive compression when saving or sharing your photo, which can introduce artifacts.
7.2. How Can I Improve The Readability Of My Text?
Improving text readability is crucial for ensuring your message is clear and accessible. Consider these strategies:
- Choose a Clear Font: Select fonts that are easy to read, avoiding overly decorative or stylized options.
- Adjust Font Size: Ensure the font size is large enough to be easily read on different devices.
- Use Contrasting Colors: Select text colors that contrast with the background to improve visibility.
- Add a Background or Border: Place a solid background or border behind the text to make it stand out.
- Adjust Line Spacing: Increase line spacing (leading) to prevent lines of text from overlapping.
- Use Proper Kerning: Adjust the spacing between letters (kerning) to improve readability and visual appeal.
7.3. What If The App I’m Using Keeps Crashing?
If your photo editing app crashes frequently, it can disrupt your workflow and cause frustration. Here’s how to troubleshoot this issue:
- Update the App: Ensure you’re using the latest version of the app, which may include bug fixes and performance improvements.
- Close Other Apps: Close other apps running in the background to free up memory and processing power.
- Restart Your Device: Restart your iPhone to clear temporary files and refresh the system.
- Clear App Cache: Clear the app’s cache to remove temporary files that may be causing issues.
- Reinstall the App: Uninstall and reinstall the app to ensure a clean installation without corrupted files.
- Contact Support: Contact the app developer’s support team for assistance, providing details about the crashes and your device.
7.4. How Do I Revert To The Original Photo After Adding Text?
If you’re not satisfied with your edits, reverting to the original photo is essential. Here’s how to do it:
- Use the “Revert” Option: Look for a “Revert” or “Undo” option in the app, which allows you to undo your changes.
- Save a Copy: Always save a copy of the edited photo rather than overwriting the original, ensuring you have a backup.
- Check Version History: Some apps offer version history, allowing you to revert to previous versions of your edits.
- Use Cloud Backup: Utilize cloud storage services like iCloud or Google Photos to back up your original photos automatically.
8. Inspiration And Resources
Find inspiration and resources to fuel your creativity and enhance your text-on-photo skills, pushing the boundaries of visual expression.
8.1. Where Can I Find Inspiration For Text And Photo Combinations?
Finding inspiration involves exploring various sources to spark creativity and refine your artistic vision. Consider these avenues:
- Social Media Platforms: Explore platforms like Instagram, Pinterest, and Behance for visually stunning examples of text and photo combinations.
- Design Blogs: Follow design blogs and websites that showcase innovative typography and graphic design.
- Photography Communities: Join online photography communities and forums to share ideas and receive feedback.
- Art Galleries: Visit local art galleries and exhibitions to see how artists integrate text and images in their work.
- Magazines and Books: Browse magazines and books on photography, design, and visual communication.
- Design Contests: Participate in design contests to challenge your creativity and gain exposure.
8.2. What Are Some Useful Websites And Tools For Photo Editing?
Enhance your photo editing capabilities with these useful websites and tools:
- Adobe Photoshop Express: A mobile version of Photoshop with essential editing features and text tools.
- Canva: A user-friendly design platform with templates and graphics for creating professional-looking visuals.
- Phonto: An app specifically designed for adding text to photos, with a vast library of fonts.
- PicsArt: A versatile photo editing app with drawing tools, stickers, and text options.
- Unsplash: A website offering high-quality, royalty-free images for use in your projects.
- Google Fonts: A library of free and open-source fonts for various design applications.
8.3. Are There Any Online Courses Or Tutorials I Can Take?
Enhance your skills with online courses and tutorials that provide structured learning and expert guidance. Consider these options:
- Skillshare: Offers a variety of courses on photography, design, and typography.
- Udemy: Provides courses on photo editing, graphic design, and social media marketing.
- CreativeLive: Offers live and on-demand workshops on photography, design, and business.
- YouTube: Provides a wealth of free tutorials on photo editing, text overlays, and design techniques.
- LinkedIn Learning: Offers courses on design software, photography, and marketing.
- Coursera: Provides courses from top universities on graphic design and visual communication.
8.4. How Can I Stay Updated On The Latest Trends And Techniques?
Staying updated on the latest trends and techniques is crucial for maintaining a competitive edge and pushing the boundaries of your creativity. Follow these strategies:
- Follow Industry Leaders: Follow influential photographers, designers, and artists on social media.
- Read Industry Publications: Subscribe to magazines and blogs that cover photography, design, and technology.
- Attend Conferences and Workshops: Participate in industry events to network, learn, and stay informed about new trends.
- Join Online Communities: Join online communities and forums to share ideas and learn from peers.
- Experiment with New Tools: Try out new apps, software, and techniques to expand your skill set.
- Analyze Successful Campaigns: Study successful marketing campaigns and design projects to identify emerging trends and effective strategies.
Adding text to your iPhone photos is more than just a simple annotation; it’s a powerful tool for creative expression, storytelling, and visual communication. Whether you’re using the built-in Markup tool or exploring third-party apps, the possibilities are endless. Remember to consider the purpose of your text, choose the right fonts and styles, and pay attention to placement and design principles. By mastering these techniques, you can create visually stunning and impactful photos that capture attention and convey your message effectively. So grab your iPhone and start experimenting with text on your photos today. Unleash your creativity and transform your memories into works of art.
Looking to further enhance your photography skills? Visit dfphoto.net to discover a wealth of resources, including detailed tutorials, stunning photo collections, and a vibrant community of photographers. Dive in and elevate your visual storytelling today. Explore dfphoto.net for tips on digital artistry, smartphone photography and mobile editing.