In today’s digital age, safeguarding your visual content is crucial. Whether you’re a professional photographer, a budding artist, or simply someone who loves sharing photos online, watermarking your images on your iPhone is a smart move. It’s a straightforward yet effective way to protect your intellectual property and enhance your brand identity.
This guide will walk you through the best methods and tools to watermark your photos directly on your iPhone. We’ll explore both built-in features and powerful third-party apps, ensuring you have the knowledge to choose the perfect solution for your needs. Let’s dive in and learn how to add watermarks to your iPhone photos seamlessly.
Methods for Watermarking Photos on Your iPhone
Gone are the days when watermarking required complex desktop software. Now, your iPhone offers multiple avenues for adding watermarks, ranging from quick, simple solutions to more advanced, customizable options. You can broadly categorize these into two main approaches: utilizing the built-in Markup tool and leveraging the capabilities of dedicated third-party applications. Let’s explore each of these in detail.
Using Markup in the Photos App: A Quick and Easy Built-in Solution
For users seeking a basic and readily available watermarking method, the Markup feature within the iPhone’s native Photos app is an excellent starting point. It’s incredibly convenient for adding simple text-based watermarks like social media handles or website addresses, especially when you need to watermark just a few images quickly.
Here’s a step-by-step guide on how to watermark using the Markup tool:
- Open the Photos app: Launch the Photos app on your iPhone and navigate to the image you wish to watermark.
- Enter Edit mode and access Markup: Tap “Edit” in the top right corner, then tap the ellipsis icon (three dots) to reveal more options. Select “Markup” from the menu.
- Choose your watermark type: At the bottom of the screen, you’ll see Markup tools. You can either use the pen or pencil tools to hand-draw your watermark, or tap the “+” icon and select “Text” to add a text-based watermark. You can also use “Signature” if you have one saved.
- Customize your text watermark (optional): If you chose the text option, a text box will appear. Double-tap on it to type your watermark text. A formatting menu will appear, allowing you to:
- Change the font: Select from a limited range of fonts available within Markup.
- Adjust the size: Use the slider to increase or decrease the text size.
- Choose the color: Pick a color for your text watermark from the color palette.
- Adjust opacity and positioning: While Markup offers limited opacity control through color selection (lighter colors appear more transparent), you can manually adjust the size and drag the text box to position your watermark where you want it on the image. Ensure it’s visible but doesn’t obscure important parts of your photo.
- Save your watermarked photo: Once you’re satisfied with your watermark, tap “Done” and then “Done” again to save the watermarked image to your photo library. The original image remains untouched.
While Markup is fantastic for its simplicity and accessibility, it does have limitations. It’s best suited for basic text watermarks and lacks advanced features like batch processing, image overlay watermarks, or fine-grained control over watermark design and opacity. For users needing more robust watermarking capabilities, third-party apps offer a more comprehensive solution.
Photoroom: A Versatile Third-Party App for Advanced Watermarking
For iPhone users seeking more advanced watermarking features and photo editing capabilities, Photoroom emerges as a powerful third-party application. Photoroom is known for its user-friendly interface and AI-driven tools, making it an excellent choice for both beginners and experienced users who want to add professional-looking watermarks and enhance their photos.
Here’s how to watermark photos using Photoroom:
- Download and Install Photoroom: Get the Photoroom iOS app from the App Store and launch it on your iPhone.
- Upload Your Photo(s): Tap the “+” button to start a new project. You can select a photo from your iPhone’s photo library or take a new photo directly within the app. Photoroom also supports batch editing, allowing you to watermark multiple photos at once (depending on the subscription level).
- Access Watermark Options: Once your photo is loaded in the editor, look for the “Add” or “Insert” option (often represented by a “+” icon). This will open up a range of options for adding elements to your image, including text, shapes, stickers, and image overlays, which are all relevant for watermarking.
- Add a Text Watermark:
- Select “Text” from the Add menu.
- Type your watermark text into the text field.
- Customize the text: Photoroom offers extensive text customization options:
- Fonts: Choose from a wide variety of fonts to match your brand or style.
- Size and Color: Adjust the size and color of your text.
- Style and Alignment: Explore options like bold, italics, underline, text alignment, spacing, and even text curvature.
- Opacity: Precisely control the transparency of your text watermark using an opacity slider.
- Transform: Rotate, scale, and position your text watermark freely on the image.
- Add an Image or Logo Watermark:
- Select “Insert” or “Image” from the Add menu.
- Choose “Gallery” or “Files” to import your logo or image watermark from your iPhone.
- Background Removal (Automatic): A standout feature of Photoroom is its automatic background removal. If your logo has a background, Photoroom can intelligently remove it, leaving you with just the logo to overlay as a watermark.
- Customize Image Watermark: Just like text, you can adjust the size, position, rotation, and opacity of your image watermark using the “Adjust,” “Transform,” and “Color” tools.
- Finalize and Export: Once you’re happy with your watermark, tap “Done” to apply the changes. Then, tap “Export” to save your watermarked photo to your iPhone’s camera roll or share it directly to social media or other platforms.
Photoroom’s strength lies in its comprehensive features and ease of use. It provides a significant upgrade from the built-in Markup tool, offering greater flexibility and professional results, especially when working with logo watermarks and requiring more refined control.
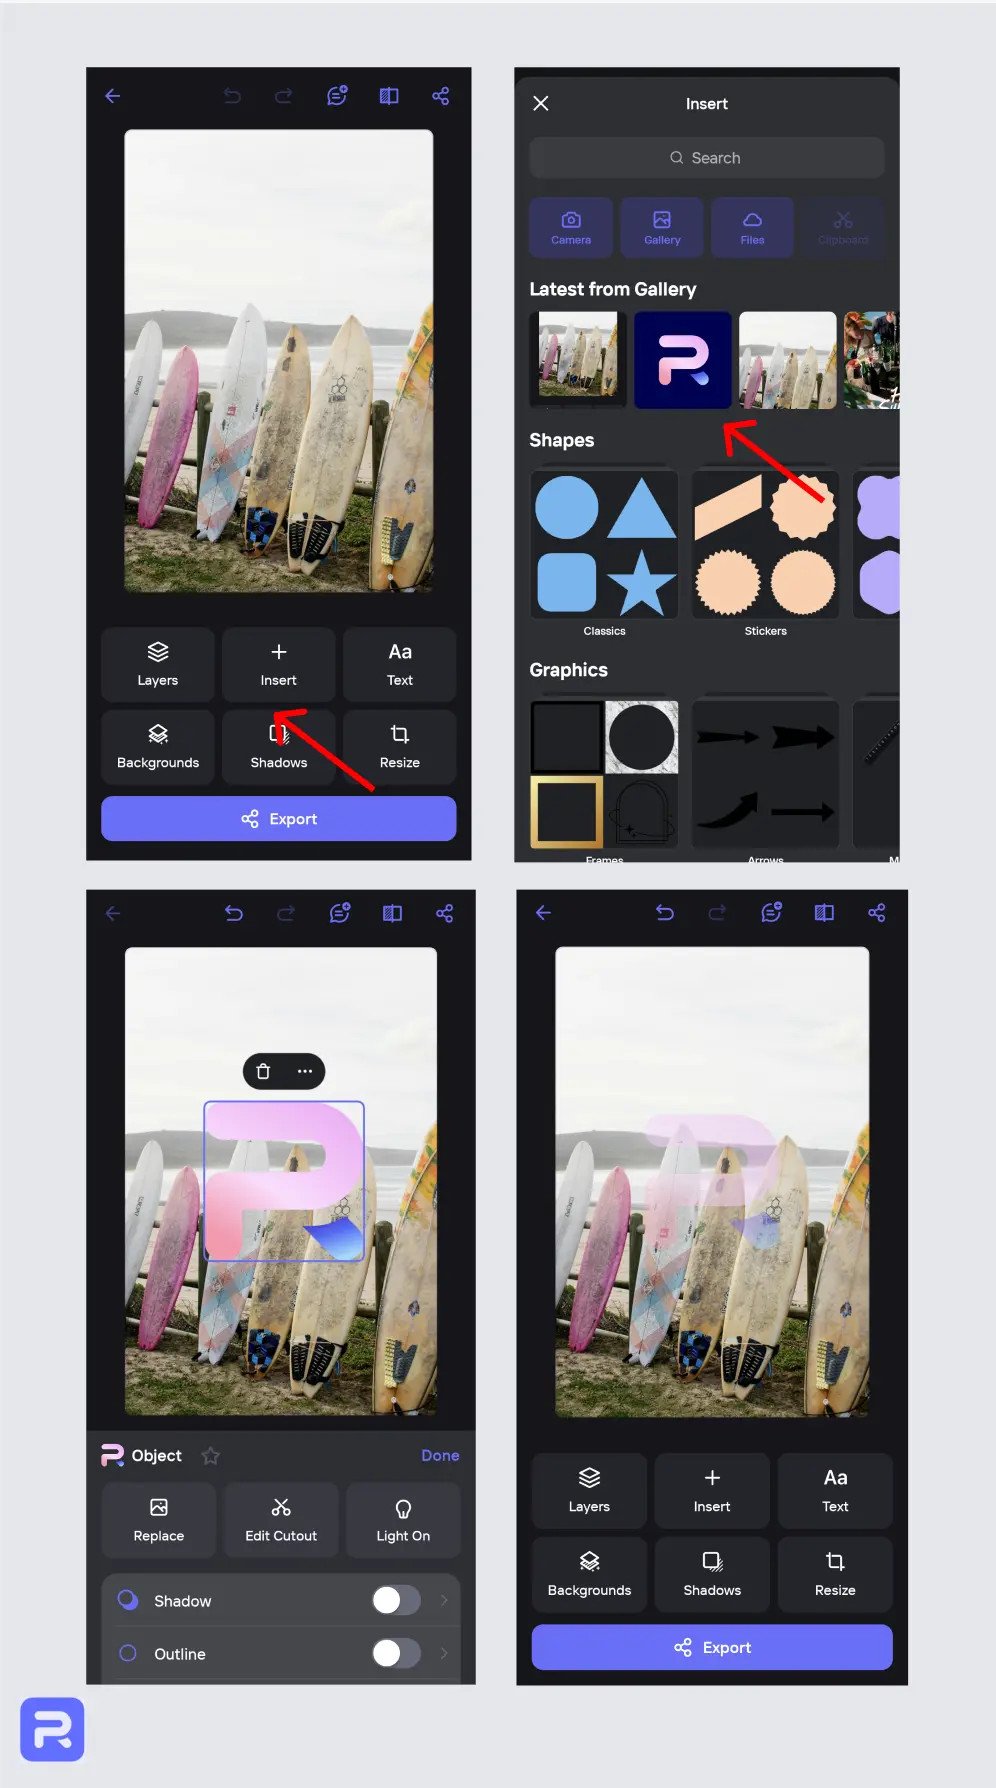 Photoroom App Interface Showing Watermark Options on an iPhone Screen
 Final Watermarked Photo Example Created with Photoroom on iPhone
eZy Watermark Photos Lite: A Dedicated Watermarking App
eZy Watermark Photos Lite is another popular third-party app specifically designed for watermarking photos on iPhones and iPads. It focuses primarily on watermarking, offering a range of features tailored to this task, including batch processing and template creation.
Here’s how to use eZy Watermark Photos Lite:
- Download and Open eZy Watermark Photos Lite: Install the app from the App Store and launch it.
- Select Image Source: From the main menu, choose your image source. You can select “Single Image” for one photo, “Multiple Images” for batch watermarking, or “Templates” to use a pre-saved watermark template.
- Choose Your Photo(s): Select the photo(s) you want to watermark from your iPhone’s photo library, social media accounts, or cloud storage services like Google Drive.
- Add Watermark Element: Once your image is loaded, you’ll see options to add different types of watermarks:
- Add Image/Logo: Import a logo or image watermark from your gallery.
- Add Text: Create a text-based watermark.
- Add QR Code: Generate and insert a QR code as a watermark.
- Add Signature: Use a saved signature as a watermark.
- Customize Your Watermark: eZy Watermark Photos Lite provides sidebar controls to customize your watermark:
- Size: Adjust the size of your watermark.
- Angle: Rotate the watermark.
- Opacity: Control the transparency.
- Font and Color (for text watermarks): Choose fonts and colors for text-based watermarks.
- Apply and Export: Tap the checkmark to apply your watermark. Then, tap “Export” in the bottom right corner to save your watermarked image. You can save to your iPhone, share on social media, send via email, or upload to cloud services.
eZy Watermark Photos Lite is a solid choice if your primary need is watermarking and you appreciate a dedicated app focused on this feature. It’s particularly useful for batch watermarking and creating reusable templates. However, unlike Photoroom, it doesn’t automatically remove backgrounds from imported logo images, which might require an extra step if your logo isn’t already on a transparent background.
Key Features to Look For in an iOS Watermarking App
With numerous watermarking apps available for iPhone, knowing what features to prioritize is essential. The best app for you will depend on your specific needs and workflow. Here are some crucial features to consider when choosing an iOS watermarking app:
- User-Friendliness: The app should have an intuitive interface that’s easy to navigate, allowing you to quickly apply watermarks without a steep learning curve.
- Customization Options: Extensive customization is key. Look for apps that allow you to adjust watermark size, opacity, position, and rotation. The ability to use text, image logos, and even signature watermarks is highly desirable.
- Logo and Custom Image Support: For branding purposes, the app must support uploading and using your own logos or custom graphics as watermarks.
- Batch Processing: If you frequently watermark multiple photos, batch processing capabilities will save you significant time and effort.
- Template Creation: The ability to create and save watermark templates ensures consistency and speeds up your workflow for recurring watermarking tasks.
- Advanced Features: Features like layering, blending modes, and tiling (repeating the watermark across the image) can offer more creative and professional watermarking results.
- Export Options: Ensure the app provides flexible export options, allowing you to save watermarked photos in various formats and resolutions suitable for different platforms (social media, website, print).
Photoroom, eZy Watermark Photos Lite, and even apps like Canva, iWatermark, and Over offer varying combinations of these features. Evaluate your needs against these criteria to choose the best watermarking app for your iPhone.
Why Should You Watermark Your Photos?
Watermarking your photos might seem like an extra step, but it provides significant benefits, whether you’re a professional or simply sharing photos online. Here are compelling reasons to watermark your images:
1. Protect Against Unauthorized Use and Copyright Infringement
The primary reason for watermarking is copyright protection. A watermark acts as a clear visual deterrent against image theft and unauthorized use. It signals that the image is your intellectual property and not free for anyone to use without permission. While not foolproof, a watermark makes it more difficult for someone to claim your image as their own and reduces the likelihood of casual copyright infringement. People seeking readily usable images online are more likely to move on to non-watermarked alternatives, respecting your copyright.
2. Enhance Brand Recognition and Promotion
Watermarks are not just about protection; they are also powerful branding tools. By embedding your logo, website address, or social media handle as a watermark, you subtly promote your brand every time your image is viewed or shared. This consistent brand visibility helps build brand awareness, recognition, and can drive traffic back to your website or social media profiles. For businesses and creators, this passive marketing can be invaluable.
3. Establish Professionalism and Credibility
A well-designed watermark adds a touch of professionalism to your photos. It communicates attention to detail and pride in your work. This professional presentation can enhance the perceived value of your images and elevate your status as a serious photographer, artist, or business. For example, a wedding photographer using elegant watermarks on their portfolio images conveys a sense of sophistication and quality, reassuring potential clients.
5 Essential Tips for Effective Watermarking
Simply adding any watermark isn’t enough. To maximize the benefits and avoid detracting from your photos, follow these best practices for effective watermarking:
1. Aim for Subtlety and Visibility Balance
Your watermark should be noticeable enough to deter misuse but subtle enough not to overpower the image or distract viewers from the content itself. The goal is a watermark that integrates seamlessly with the photo while remaining clearly recognizable upon closer inspection. Avoid overly large, intrusive watermarks that ruin the viewing experience.
2. Maintain Consistent Branding Style
Consistency in your watermark’s style – font, logo, color scheme, and placement – is vital for brand recognition. Using a consistent style across all your images reinforces your brand identity and helps viewers quickly associate the watermark with you or your business. Uniformity builds brand recall and strengthens your visual identity.
3. Strategically Place Watermarks to Prevent Easy Removal
While no watermark is completely tamper-proof, strategic placement can make removal more difficult and less appealing to image thieves. Avoid placing watermarks near the edges of the photo, where they can be easily cropped out. Instead, position them over a crucial part of the image’s composition, making removal more disruptive and damaging to the photo’s integrity. Consider placing it in a non-uniform area of the image, making cloning or patching more challenging.
4. Avoid Common Watermarking Mistakes
Be mindful of common pitfalls that can make watermarks ineffective or visually unappealing. Avoid:
- Overly large watermarks: Don’t let the watermark dominate the image.
- Too opaque or distracting colors: Choose colors that complement the image rather than clash. Consider using transparency (around 50% opacity is often a good starting point).
- Intricate or cluttered watermarks: Keep it clean and legible. Simple is often more effective.
- Inconsistent placement or style: Stick to your chosen style across all images.
5. Test Watermark Appearance and Placement
Before finalizing your watermark design and application process, test it on a variety of photos with different lighting conditions and backgrounds. This ensures your watermark remains effective and legible across your entire portfolio. Check how it looks on both bright and dark images, and images with varying levels of detail and texture.
Always retain original, unwatermarked copies of your photos. This gives you flexibility for different uses, potential edits, and providing clean images to clients if needed.
Watermark Your iPhone Photos in Minutes
Watermarking photos on your iPhone is no longer a cumbersome task requiring specialized software. Thanks to user-friendly apps like Photoroom and eZy Watermark Photos Lite, protecting and branding your images is now quick and accessible directly from your mobile device.
By choosing the right app and following best practices, you can effectively watermark your iPhone photos, safeguarding your copyright, enhancing your brand, and adding a professional touch to your visual content. Take control of your visual assets and start watermarking your photos today!
Ready to get started? Download Photoroom from the App Store and explore its powerful watermarking and photo editing features.