In today’s digital age, safeguarding your visual content is paramount. Sharing images online is incredibly easy, but so is unauthorized use. Without proper protection, your photos can be copied and distributed without your consent or credit. This is where watermarking comes in as a crucial tool for creators. Adding a watermark to your photos directly from your iPhone is a simple yet effective way to protect your intellectual property and build your brand.
This comprehensive guide will walk you through the best methods for How To Watermark A Photo On Iphone. We’ll explore both built-in iPhone features and powerful third-party apps that offer a range of watermarking options to suit your needs, ensuring your images are protected and professionally branded.
Simple Built-in Method: Using Markup in Photos App
For quick and basic watermarking, your iPhone’s native Photos app offers a handy tool called Markup. This feature is ideal for adding simple text-based watermarks, like your social media handle or website URL, directly to your images. It’s perfect for when you need to watermark a few photos quickly without installing any additional apps.
Here’s a step-by-step guide on how to add a watermark using the Markup tool in your Photos app:
-
Open the Photos App and Select Your Image: Launch the Photos app on your iPhone or iPad and navigate to the photo you wish to watermark from your photo library.
-
Enter Edit Mode and Access Markup: Tap “Edit” located in the top right corner of the screen. Then, tap the ellipsis icon (three dots) typically found in the top right or bottom right corner, depending on your iOS version. From the options that appear, select “Markup.”
-
Choose Your Watermark Tool: Once you’re in the Markup interface, you’ll see a toolbar at the bottom of your screen. Here, you can choose how you want to create your watermark. You have a few options:
- Drawing Tools (Pen, Pencil, Marker): You can hand-draw your watermark using these tools. This is suitable for signatures or very stylized text, but might be less precise for standard text watermarks.
- Text Tool: Tap the “+” icon on the toolbar, and then select “Text.” A text box will appear on your image, ready for you to type your watermark.
-
Customize Your Text Watermark: If you chose the Text tool, a text box will appear. Double-tap inside the text box to bring up the keyboard and type your desired watermark text (e.g., your Instagram handle, website address, or copyright symbol).
-
Adjust Font, Color, and Size: With the text box selected, look for formatting options in the toolbar (often appearing below or above the text box). You should be able to adjust:
- Font Style: Choose from a limited selection of fonts.
- Font Size: Resize the text by dragging the handles around the text box or using size adjustment controls.
- Text Color: Select a color for your watermark text from the available color palette.
-
Set Opacity (Optional): While Markup doesn’t offer direct opacity control for text, you can choose lighter colors to make the watermark more subtle.
-
Position Your Watermark: Drag the text box to position your watermark where you want it on your photo. Consider placing it strategically to protect key parts of the image but avoid being too intrusive.
-
Save Your Watermarked Photo: Once you are satisfied with your watermark, tap “Done” in the Markup interface. Then, tap “Done” again in the main Edit interface to save the watermarked photo to your camera roll. The original, unwatermarked photo will also be preserved.
While Markup is incredibly convenient for basic text watermarks, it has limitations. It lacks advanced customization options like font variety, precise opacity control, and image overlay capabilities. For more sophisticated watermarks and batch processing, you’ll need to explore third-party apps.
Advanced Watermarking with Third-Party Apps
For users who need more robust watermarking features, a variety of third-party apps are available for iPhone. These apps offer advanced customization, allowing you to create more professional and effective watermarks. They often include features like image overlays, custom fonts, precise opacity control, batch processing, and more. Let’s delve into two excellent examples: Photoroom and eZy Watermark Photos Lite.
Photoroom: Feature-Rich Watermarking App
Photoroom is a powerful photo editing app that excels in various areas, including watermarking. It provides a user-friendly interface and a wide array of tools, making it suitable for both beginners and experienced users. Photoroom stands out with its AI-powered background removal and extensive editing options, alongside its watermarking capabilities.
Here’s how to watermark your photos using the Photoroom iOS app:
-
Download and Open Photoroom: Download the Photoroom app for iOS from the App Store and open it on your iPhone or iPad.
-
Upload Your Photo(s): Tap the “+” button within the app to start a new project. You can choose to upload a photo from your Gallery or take a Photo directly. Select the image you want to watermark. Photoroom also supports batch editing, allowing you to watermark multiple photos at once, depending on the chosen workflow within the app.
-
Add a Text Watermark:
- Once your image is loaded in the editor, look for the “Text” option in the bottom menu. Tap on “Add Text.”
- Type in your watermark text.
- Customize Text Appearance: Use the tools provided to change the Font, Size, Color, Opacity, Shadow, Outline, and more. Photoroom offers a wide range of fonts and detailed customization options to make your text watermark look exactly as you want.
- Adjust Text Layout: Explore options like “Spacing,” “Curvature,” and “Alignment” to further refine the look of your text watermark.
- Transform and Position: Use the “Transform” tools to rotate, resize, and position your text watermark precisely on your image.
-
Add an Image/Logo Watermark:
- To use your logo or a graphic as a watermark, tap the “Insert” icon (+ icon) in the bottom menu.
- Select “Image” and choose “From Gallery” or “Files” to upload your logo or watermark image from your iPhone’s storage.
- Background Removal (Automatic): Photoroom is known for its automatic background removal. If your logo has a background, Photoroom can intelligently remove it, leaving you with just the logo to overlay as a watermark.
- Customize Image Watermark: Once inserted, you can adjust the Size, Position, Opacity, and Rotation of your image watermark using the intuitive controls.
-
Finalize and Export:
- After positioning and customizing your watermark, tap the “Done” button (check mark icon, typically in the top right corner).
- Tap “Export” to save your watermarked photo. Photoroom offers various export options, allowing you to save to your camera roll, share directly to social media, or save in different file formats and resolutions.
Photoroom’s extensive features, combined with its ease of use, make it an excellent choice for users seeking advanced watermarking capabilities on their iPhones.
Here’s an example of adding the Photoroom logo as a watermark:
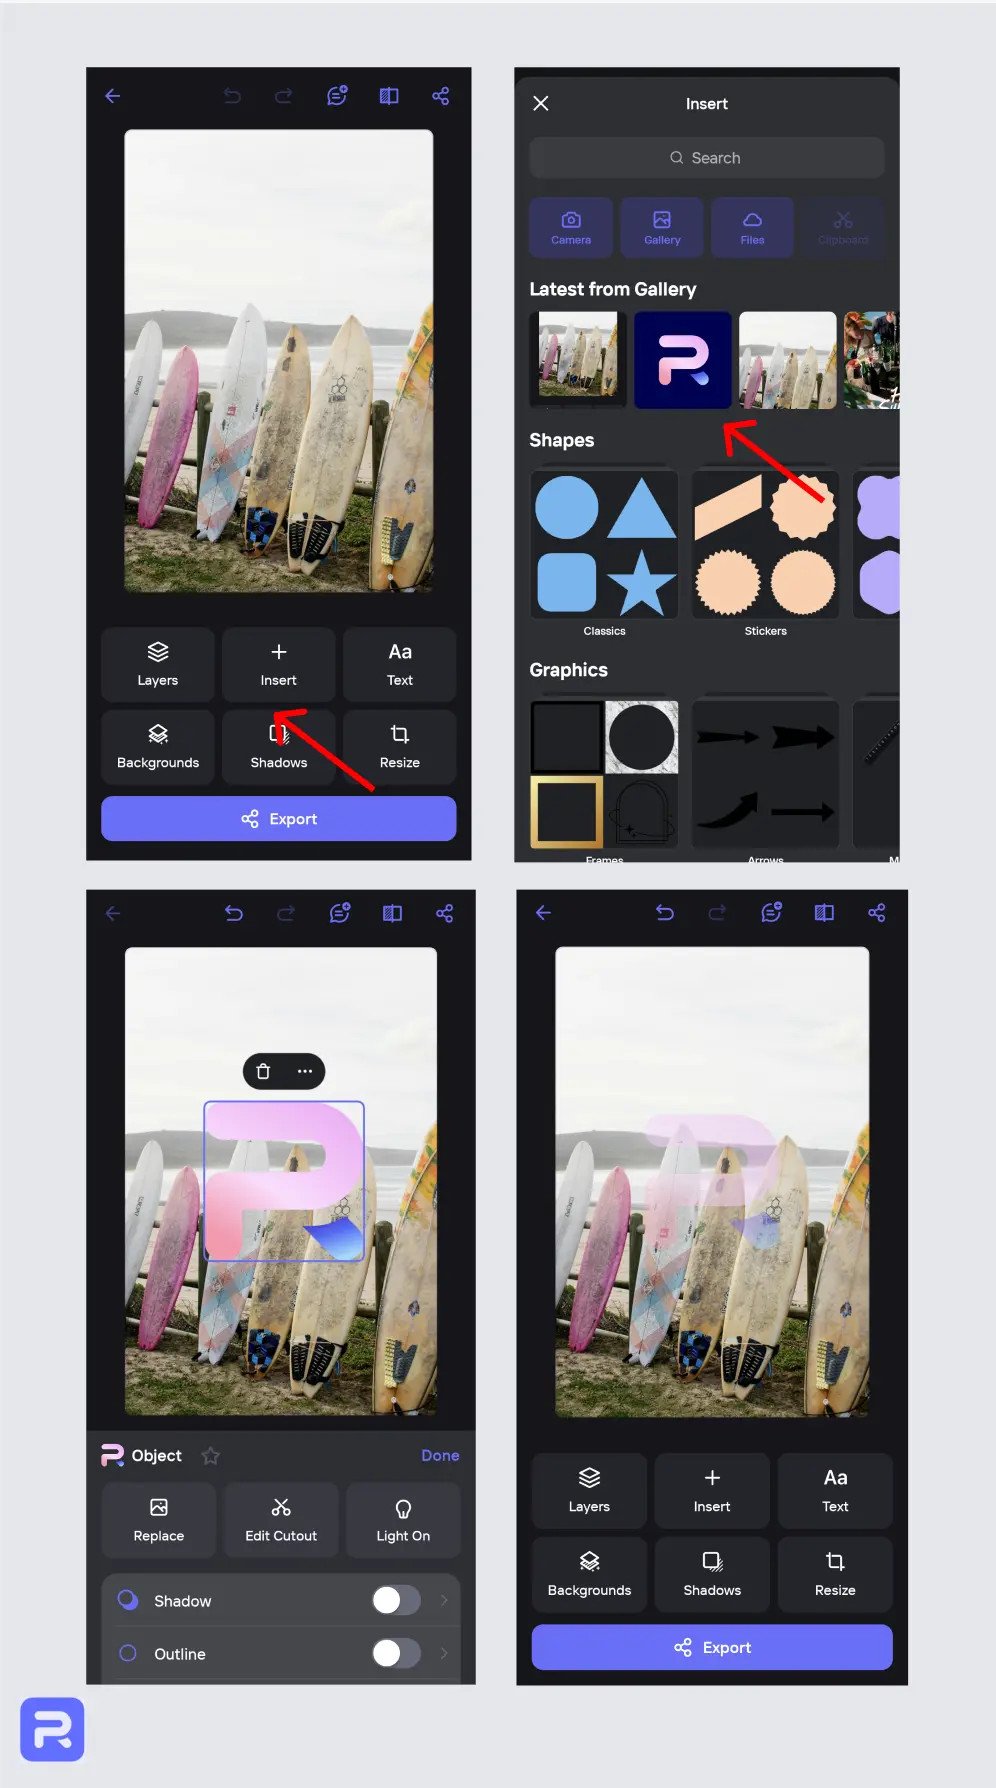 Photoroom Watermarking Process
And the resulting watermarked image:
 Final Watermarked Photo with Photoroom
eZy Watermark Photos Lite: Dedicated Watermarking App
eZy Watermark Photos Lite is specifically designed for watermarking photos on iOS devices. This app focuses solely on watermarking, providing a range of dedicated tools for adding text, logos, QR codes, and signatures as watermarks. It’s a streamlined solution for users who primarily need watermarking functionality without extra photo editing features.
Here’s how to watermark photos using eZy Watermark Photos Lite:
-
Download and Open eZy Watermark Photos Lite: Download the eZy Watermark Photos Lite app from the App Store and launch it on your iPhone or iPad.
-
Select Source and Image(s): On the main screen, you’ll see options like “Single Image,” “Multiple Images,” and “Templates.”
- Tap “Single Image” to watermark one photo at a time.
- Tap “Multiple Images” for batch watermarking (available in the paid version, but the Lite version may offer limited batch processing).
- Choose the source of your image – Camera Roll, Social Media, or Google Drive. Select the photo(s) you want to watermark.
-
Choose Watermark Type: After selecting your image, you’ll be presented with watermark type options at the bottom of the screen:
- “Text”: Add a text-based watermark.
- “Image”: Add a logo or image as a watermark.
- “QR Code”: Embed a QR code as a watermark.
- “Signature”: Create or import a signature watermark.
-
Customize Your Watermark:
- Text Watermark: If you choose “Text,” type your text and use the sidebar controls to adjust Font, Size, Color, Opacity, Angle, and Position.
- Image Watermark: If you choose “Image,” select your logo or image from your gallery. Adjust the Size, Angle, Opacity, and Position using the sidebar controls. Note that, unlike Photoroom, eZy Watermark Photos Lite does not automatically remove backgrounds from uploaded image watermarks in the Lite version. You’ll need to ensure your logo already has a transparent background or use a separate background removal tool beforehand.
-
Apply and Export:
- Tap the checkmark icon when you’re satisfied with your watermark design and placement.
- Tap “Export” in the bottom right corner.
- Choose your export destination: Phone, Social Media, Email, or Google Drive.
eZy Watermark Photos Lite provides a focused and efficient watermarking experience. Its dedicated watermarking tools make it a solid choice for users who need a straightforward app specifically for protecting their images with watermarks.
Key Features to Look for in an iOS Watermarking App
Choosing the right watermarking app for your iPhone depends on your specific needs and workflow. Here are essential features to consider when selecting a watermarking app:
-
User-Friendliness: The app should have an intuitive and easy-to-navigate interface. You should be able to quickly add watermarks without needing extensive technical skills or spending too much time learning the app. A streamlined workflow is crucial for efficient watermarking, especially if you process many images.
-
Extensive Customization Options: The best apps offer a wide range of customization to create watermarks that match your brand and image style. Look for features such as:
- Font Selection: A variety of fonts to choose from for text watermarks.
- Color Control: Ability to select watermark colors, including transparency/opacity adjustments.
- Size and Position Control: Precise control over the size and placement of your watermark.
- Rotation and Angle Adjustments: Options to rotate or angle your watermark for creative placement.
-
Support for Logos and Custom Images: For branding purposes, it’s essential that the app allows you to upload and use your own logos or custom graphics as watermarks. This ensures brand consistency and professional-looking watermarks. The ability to handle transparent backgrounds in logos (like automatic background removal or support for PNG files) is a significant advantage.
-
Layering and Blending Options: Advanced watermarking apps may offer layering and blending modes. These features allow you to create more sophisticated and less intrusive watermarks that integrate seamlessly with your photos without overpowering the image itself. Blending modes can help watermarks interact more naturally with the colors and tones of the underlying image.
-
Batch Processing Capabilities: If you frequently need to watermark multiple photos, batch processing is a huge time-saver. This feature allows you to apply the same watermark settings to a group of images simultaneously, significantly speeding up your workflow. Check if the app offers batch watermarking and if it’s available in the free or paid version.
-
Variety of Export Options: The app should provide flexible export options to save and share your watermarked photos. Essential export features include:
- Saving to Camera Roll: Saving watermarked images back to your iPhone’s photo library.
- Social Media Sharing: Direct sharing to platforms like Instagram, Facebook, etc.
- File Format and Resolution Control: Options to save in different image formats (JPEG, PNG, etc.) and adjust the resolution or quality of the exported image, depending on your intended use (web, print, etc.).
Photoroom and eZy Watermark Photos Lite, along with other apps like Canva, iWatermark, and Over, offer many of these features. Evaluating your needs against these criteria will help you choose the best watermarking app for your iPhone.
Why You Should Watermark Your Photos on iPhone
Watermarking your photos is more than just adding a logo; it’s a strategic move to protect your work and enhance your brand. Here are key reasons why watermarking your photos on iPhone is a worthwhile practice:
1. Protect Against Unauthorized Use and Copyright Infringement
The primary reason for watermarking is copyright protection. A watermark acts as a visual deterrent against image theft and unauthorized use. When someone encounters a watermarked image, it’s immediately clear that the image is protected and not free for general use.
- Discourages Casual Theft: Many instances of online image theft are simply due to convenience – people grab images they find online without considering copyright. A watermark makes it less convenient to use your image without permission, as it requires cropping or editing to remove the watermark.
- Asserts Ownership: A watermark clearly states your claim to the image. It’s a visual declaration of ownership and reminds viewers that the image is your intellectual property.
- Legal Protection: While a watermark itself isn’t a legal registration of copyright, it strengthens your position in case of copyright infringement. It provides clear evidence that you intended to protect your work and made it publicly known.
2. Boost Brand Awareness and Recognition
Watermarks are powerful branding tools. By consistently adding your logo, website URL, or social media handle as a watermark, you turn every image into a subtle advertisement for your brand.
- Increased Visibility: Every time your watermarked image is shared online, your brand gets exposure. This broadens your reach and helps potential clients or customers discover you.
- Brand Recall: Consistent watermarking helps viewers associate your watermark with your brand over time. This builds brand recognition and makes your work instantly identifiable.
- Marketing Tool: Watermarks can drive traffic to your website or social media profiles. If your watermark includes your website address or social handle, viewers interested in your work can easily find and follow you.
3. Establish and Enhance Professionalism
A well-designed watermark can significantly enhance your professional image. It signals attention to detail, pride in your work, and a serious approach to your craft.
- Perception of Value: Watermarking can increase the perceived value of your images. It suggests that your work is valuable enough to protect, enhancing your status as a professional.
- Credibility and Trust: A professional watermark can build credibility and trust with potential clients or customers. It shows that you are serious about your work and intellectual property rights.
- Consistent Brand Identity: Using a consistent watermark style across all your images contributes to a cohesive and professional brand identity. This is especially important for photographers, designers, and businesses building a strong online presence.
4. Track Image Usage (To Some Extent)
While not foolproof, watermarks can sometimes help you track where your images are being used online.
- Reverse Image Search: You can use reverse image search engines (like Google Images or TinEye) to look for instances of your watermarked images online. This can help you discover unauthorized uses.
- Client Proofing and Tracking: For photographers or designers sharing proofs with clients, watermarks can help track which images have been shared and prevent unauthorized final use before payment.
While watermarking is not a complete solution to online image theft, it is a crucial first step in protecting your visual content, building your brand, and establishing your professional presence.
Best Practices for Effective Watermarking on iPhone
Simply adding any watermark isn’t enough; effective watermarking requires thoughtful consideration of design and placement. Here are key best practices to ensure your watermarks are both protective and aesthetically pleasing:
1. Keep it Subtle, Yet Visibly Present
The goal is a watermark that deters theft without overpowering or ruining the visual appeal of your photo. Balance is key:
- Subtlety: Avoid watermarks that are too large, too bold, or too distracting. Overly aggressive watermarks can detract from the viewer’s experience and make your images less appealing.
- Visibility: The watermark must be noticeable enough to serve its purpose. It should be easily identifiable as your mark, even at a glance.
- Opacity: Use transparency or opacity controls to blend the watermark into the image. A semi-transparent watermark is often more effective than a fully opaque one. Aim for a level of opacity that makes the watermark visible but not dominant.
2. Maintain a Consistent Branding Style
Consistency is vital for brand recognition. Your watermark should be an extension of your overall brand identity:
- Consistent Logo: Use the same logo or brand mark consistently across all your watermarked images.
- Font Consistency: If using text watermarks, stick to a specific font or font family that aligns with your brand’s typography.
- Color Palette: Use colors that are part of your brand’s color scheme. Consider using a monochrome version of your logo or a color that complements your images without clashing.
- Style Uniformity: Maintain a consistent style in terms of watermark size, placement, and opacity across your portfolio. This creates a cohesive and professional brand image.
3. Strategic Watermark Placement to Deter Removal
Clever placement can make your watermark significantly harder to remove without damaging the photo:
- Avoid Edges and Corners: Do not place watermarks too close to the edges of the image. Cropping the image edges is a simple way to remove watermarks placed there.
- Overlay Key Areas: Position your watermark over important parts of the image, but not directly obscuring the main subject entirely. Placing it on textured areas or areas with detail makes removal more challenging.
- Central Placement (with Subtlety): Consider placing a semi-transparent watermark near the center of the image. This makes it very difficult to remove without significantly altering the photo.
- Tiled Watermarks (Use Sparingly): In extreme cases where image theft is a major concern, consider a subtle tiled watermark pattern across the entire image. However, use this sparingly as it can be very visually intrusive.
4. Avoid Common Watermarking Mistakes
Certain watermarking practices can be counterproductive or aesthetically unappealing. Avoid these common mistakes:
- Overly Large Watermarks: Watermarks that are too big and dominate the image are distracting and unprofessional.
- Obtrusive Colors: Bright, clashing colors can make your watermark stand out for the wrong reasons. Choose colors that complement your image or use monochrome watermarks.
- Too Intricate or Busy Designs: Keep watermarks simple and clean. Overly complex designs can be distracting and hard to read, especially at smaller sizes.
- Inconsistent Placement: Random or inconsistent watermark placement looks unprofessional. Establish a consistent placement strategy for your images.
- Using Watermarks on Everything: Consider if every single image needs a watermark. For very personal or low-value images, watermarking might be unnecessary.
5. Test Watermark Appearance Across Different Photos
Before finalizing your watermark style, test it on a variety of images:
- Varying Lighting Conditions: Check how your watermark looks on photos taken in different lighting conditions (bright sunlight, low light, indoor, outdoor).
- Diverse Backgrounds: Test your watermark on images with different backgrounds (light, dark, busy, plain).
- Color Variations: See how your watermark appears on photos with different color palettes (warm, cool, muted, vibrant).
- Different Image Styles: If you shoot different types of photos (portraits, landscapes, products, etc.), ensure your watermark works well with each style.
Testing ensures your watermark is versatile and effective across your entire portfolio, maintaining both protection and visual appeal.
Add Watermark on Your iPhone in Seconds
Watermarking your photos on your iPhone is now easier and faster than ever, thanks to user-friendly apps like Photoroom and eZy Watermark Photos Lite. Protecting your visual content and building your brand no longer requires complex software or time-consuming processes.
With the right app and by following best practices, you can efficiently watermark your images directly on your iPhone, ensuring your work is protected and professionally presented wherever it’s shared online. Take control of your visual content today and start watermarking your photos on your iPhone to safeguard your creativity and enhance your brand presence. Download a watermarking app and begin protecting your images now.

![You can choose Optimize [device] storage or Download and Keep Originals.](https://dfphoto.net/wp-content/uploads/2025/02/ios-18-iphone-15-pro-settings-apple-account-icloud-photos-optimize-iphone-storage-150x150.jpg)