Want to share your amazing photos with friends and family on a bigger screen? Are you looking for ways to view photos on TV for a better experience? You’ve come to the right place! At dfphoto.net, we understand the importance of showcasing your visual artistry. Viewing your photos on a TV allows you to appreciate the details and share your memories with others in a more engaging way. This comprehensive guide will explore various methods to help you display your photos on your TV, from simple wireless casting to using HDMI cables and USB drives. Whether you’re an amateur photographer or a seasoned professional, we’ll provide you with the knowledge and steps to enhance your photo-viewing experience. Let’s dive in and discover the best ways to bring your photographic art to life on the big screen.
1. Understanding Your Options for Viewing Photos on TV
There are several ways to connect your devices and display photos on your TV, each with its own advantages. Here are the most common methods:
1.1. Wireless Casting
Wireless casting involves sending photos from your smartphone, tablet, or computer to your TV via a Wi-Fi network. This method is convenient as it doesn’t require any cables. Technologies like AirPlay (for Apple devices) and Chromecast (for Android devices) make this process seamless. You can easily display images from your device’s photo gallery or cloud storage services like Google Photos.
1.2. HDMI Cable Connection
Connecting your device to your TV using an HDMI cable provides a direct connection for displaying photos. This method is reliable and ensures high-quality image transfer. You’ll need an HDMI adapter for your phone or a USB-C to HDMI cable for newer devices. This option is ideal for those who want a stable and high-resolution viewing experience.
1.3. USB Drive
Transferring photos to a USB drive and plugging it into your TV is a straightforward method. Most modern TVs have USB ports that support photo viewing. This option is great for those who prefer not to use wireless connections or HDMI cables. Simply copy your photos to the USB drive, insert it into the TV, and use the TV’s media player to view your images.
1.4. Memory Card
Some older TVs have SD card readers. If your device has an SD card, you can insert the card directly into the TV to view your photos. This method is quick and easy, especially if you regularly use SD cards for your camera or phone.
1.5. Streaming Media Players
Devices like Roku, Apple TV, and Amazon Fire TV can also be used to display your photos on your TV. These devices support various apps and methods for photo sharing, providing a versatile solution for viewing your images on the big screen.
2. Casting Photos from Your Phone to Your TV
Casting photos from your phone to your TV is a convenient way to share your images wirelessly. Here’s how to do it with different types of devices and TVs:
2.1. Casting with AirPlay (iPhone)
AirPlay is Apple’s wireless streaming technology that allows you to share content from your iPhone to your TV. Most TV manufacturers have integrated AirPlay 2 into their products since 2018 or 2019.
How to use AirPlay on any TV:
- Ensure your iPhone and TV are connected to the same Wi-Fi network.
- Open the Control Center. (For iPhone X or later, swipe down from the upper-right corner. For iPhone 8 or earlier, swipe up from the bottom edge of the screen.)
- Select Screen Mirroring (the two rectangles icon).
- Choose your TV from the list of AirPlay devices available on your Wi-Fi network.
2.2. Casting to Samsung TV
For Samsung TVs, the method varies depending on whether you have an iPhone or an Android phone.
Casting from an iPhone to a Samsung TV:
If you have a 2018 or newer model Samsung TV, check if your TV supports AirPlay 2. If it does, use the AirPlay method described above.
Casting from a Samsung Phone to a Samsung TV:
- Turn on screen mirroring on your TV. For old TV models more than a few years old, press “Menu” or the “Source” on the remote, then navigate to Network > Screen Mirroring. For recent models, go to “Settings,” select General > External Device Manager > Device Connection Manager > Device List.
- Activate screen mirroring on your Samsung phone. Swipe down from the top of the screen and select “Smart View” or “Quick Connect,” depending on your phone model.
- Select your TV from the available devices and enter the verification code if prompted.
Casting from a Non-Samsung Android Phone to a Samsung TV:
If your Samsung TV doesn’t support AirPlay 2, use the SmartThings app.
- Download the SmartThings app.
- Add your TV to the SmartThings app under Devices > Add devices.
- Select “Smart View” to mirror your phone.
 Samsung SmartThings app interface on an iPhone, showcasing device control and automation features on a white background.
2.3. Casting to TCL TV
TCL TVs often come with Roku streaming technology built-in. If you have an iPhone, TCL Roku TVs support AirPlay.
Casting to TCL Android TV:
- Open the Google Home app on your Android phone.
- Select your TCL Android TV.
- Select “Cast my screen.”
For iPhones, TCL Google TV models also support AirPlay.
2.4. Casting to LG TV
If you have an iPhone and a 2019 or newer model LG TV, check if your TV supports AirPlay 2.
Casting from an Android Phone to an LG TV:
- Go to your phone’s Settings menu.
- Select the screen sharing feature, which may be labeled as “Share and Connect,” “Cast,” “Smart View,” “Quick Connect,” “SmartShare,” or “Mirroring.”
- Select your LG TV from the list of available devices and confirm that you want to cast on your TV with your TV remote.
2.5. Casting to Vizio TV
If you have a 2018 or newer Vizio TV, it likely has either Roku or SmartCast OS (which incorporates Chromecast) built-in.
Casting to Vizio TV with SmartCast OS:
- Cast photos with your phone from any app that supports casting, including the Google Photos app for iPhones and Android phones.
- Select the cast button in the upper right corner (a rectangle with three curved lines) to begin casting.
- Choose your Vizio TV from the list of available devices and confirm that you want to cast on your TV with your TV remote.
For iPhone owners with a 2018 or newer Vizio TV, check to see if your TV supports AirPlay 2.
2.6. Casting to Sony TV
If you have a 2015 or newer Sony TV, it will likely have Android TV or Google TV built-in.
Casting to Sony TV with Android TV/Google TV:
- Select an image in the Google Photos app and then tap the cast button in the upper right corner (a rectangle with three curved lines) to begin casting.
- Select your Chromecast device from the available devices, and your photo will appear on your TV. Your TV will mirror your phone as you navigate the app.
For iPhone owners with a 2018 or newer Sony TV, check if your TV supports AirPlay 2.
3. Connecting Your Phone to Your Streaming Media Player
If you’re using a streaming media player like Roku, Google TV, Amazon Fire TV, or Apple TV, here’s how to cast your photos:
3.1. Casting to a Roku Player
Casting from an iPhone to Roku:
You can use AirPlay to cast photos to the Roku device attached to your TV.
Casting from an Android Phone to Roku:
- Go to your phone’s Settings menu and find the screen sharing feature, which may be called “Cast,” “Smart View,” “Quick Connect,” “SmartShare,” or “Mirroring.”
- Once you enable screen mirroring, your Roku player will appear as a device to mirror your phone’s display.
Alternatively, you can upload photos to your Roku account and use the Roku Photo Streams app to view your photos. You can create a Stream, a photo album of up to 100 images, which are stored on Roku’s servers.
3.2. Casting to Google TV and Chromecast
If you have a Google TV or older Chromecast device, you can cast your photos from the Google Photos app for Android phones and iPhones.
- Select a photo and then tap the cast button in the upper right corner (a rectangle with three curved lines) to begin casting.
- Select your Chromecast device from among the available devices, and your photo will appear on your TV.
Your TV will mirror your phone as you navigate the app.
3.3. Casting to Amazon Fire TV
- Download the AirScreen – AirPlay & Cast & Miracast & DLNA app (found in the Photos and Videos section of the app store) on your Fire TV device. This will add AirPlay for use with iPhones and casting support for Android phones.
- Open the AirScreen app on your Fire TV device.
- Select the type of casting – AirPlay for iPhone, Cast for Google Pixel phone, etc.
- On your phone, choose AirPlay for iPhones or the option to cast in apps like Google Photos on Android phones, and look for AirScreen among the available devices. Once connected, your TV will mirror your phone.
You can also upload your photos to Amazon Photos through your computer, iPhone, or Android phone, and view them through the Amazon Photos app on your Fire TV. You get 5GB of free storage with a regular Amazon account and unlimited storage for photos for Amazon Prime accounts.
3.4. Casting to Apple TV
Apple TV has AirPlay built-in, making it easy to cast from iPhones and other Apple devices. For Android phones, you’ll need to install a casting app. One popular option is AllCast, which has been downloaded more than 10 million times. Once you have the app installed, select your Apple TV from the available devices to start casting.
4. Using an HDMI Cable to Connect Your Phone to Your TV
Connecting your phone to your TV with an HDMI cable is a reliable way to ensure high-quality image display. Here’s how to do it:
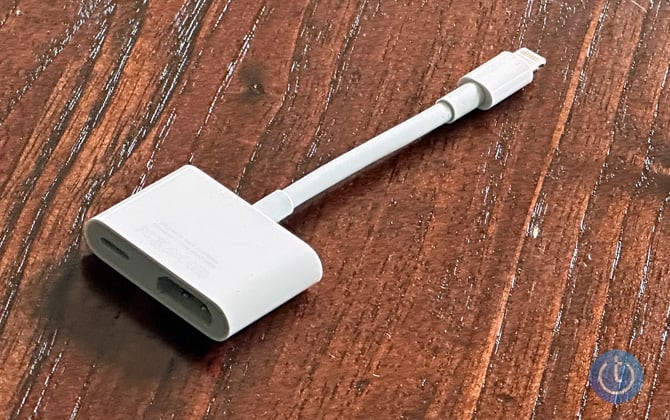
4.1. Connecting an iPhone to Your TV with HDMI
If you have an iPhone 5 to iPhone 14, you can purchase a Lightning to HDMI adapter to plug your iPhone into your TV. Once connected, you’ll see whatever is on your iPhone’s screen on your TV. You can purchase the Lightning to HDMI adapter ($42, usually $49).
4.2. Connecting an Android Phone or iPhone 15 to Your TV with HDMI
If you have an Android phone or iPhone 15, your phone will have a USB-C port. Connecting your phone to your TV may be as simple as using a USB-C to HDMI cable. Check with your phone manufacturer to see if your smartphone supports HDMI output. A recommended option is the 6-foot Amazon Basics USB-C to HDMI cable, which sells for $23.
5. Displaying Photos Using a Memory Card
Many older TVs have an SD card reader. If your TV has this feature, follow these steps:
- Pop the memory card out of your camera or Android phone (if it has one).
- Put the memory card into the TV’s SD card reader. For phones, you’ll need a microSD-to-SD card adapter, like the SanDisk MicroSD MicroSDHC to SD SDHC Adapter available for under $5.
- For most TVs, inserting an SD card will automatically launch the photo viewer.
This method is simple and requires no additional software or devices.
6. Using a USB Cable or Flash Drive to View Photos on TV
Displaying photos via a USB cable or flash drive is another straightforward method:
- Take the USB cable that came with your camera and use it to connect the camera to your TV’s USB port.
- If your photos and videos are stored on your computer, copy them onto a USB flash drive and then insert the drive into your TV’s USB port.
- On most TVs, inserting the USB cable or flash drive will automatically launch the TV’s photo-viewing app.
- From there, you can view photos, videos, or a combination of both. Manually scroll through or set your photos to music for a slideshow.
This is a reliable method that works with most TVs and requires no internet connection.
7. Troubleshooting Common Issues
While displaying photos on your TV is generally straightforward, you might encounter some common issues. Here are a few troubleshooting tips:
7.1. TV Not Recognizing USB Drive
If your TV doesn’t recognize the USB drive, try the following:
- Ensure the USB drive is formatted correctly (FAT32 or exFAT).
- Try a different USB port on the TV.
- Restart the TV and try again.
7.2. Photos Not Displaying Correctly
If your photos are not displaying correctly (e.g., rotated or distorted), check the TV’s picture settings. Ensure the aspect ratio is set correctly (usually 16:9 for widescreen TVs).
7.3. Casting Issues
If you’re having trouble casting photos, ensure both your phone and TV are on the same Wi-Fi network. Restart both devices and try again. If using AirPlay or Chromecast, make sure the devices are compatible and the software is up to date.
7.4. Unsupported File Format
Some TVs may not support all photo file formats. Ensure your photos are in a commonly supported format like JPEG or PNG.
7.5. TV Only Reading a Few Hundred Photos on USB Stick
It’s possible the manufacturer may have some sort of limit built how many photos you can use for a slideshow on the TV. What model do you have? Maybe I can find you an answer.
8. Enhancing Your Photo Viewing Experience
To make the most of viewing your photos on TV, consider these tips:
8.1. Organize Your Photos
Before displaying your photos, organize them into folders or albums. This will make it easier to navigate and find the images you want to share.
8.2. Create a Slideshow
Most TVs have a slideshow feature that allows you to display your photos automatically. Customize the slideshow settings to control the duration each photo is displayed and add music for a more engaging experience.
8.3. Adjust TV Settings
Optimize your TV’s picture settings to enhance the visual quality of your photos. Adjust the brightness, contrast, and color settings to suit your preferences.
8.4. Use High-Quality Images
Ensure your photos are of high quality to get the best viewing experience on your TV. Low-resolution images may appear pixelated or blurry on a large screen.
8.5. Consider a Digital Photo Frame
If you frequently display photos, consider investing in a digital photo frame. These devices are designed specifically for displaying images and often come with features like automatic slideshows and cloud storage integration.
9. Exploring Advanced Options and Technologies
For those looking for more advanced options, here are some technologies and features to consider:
9.1. DLNA (Digital Living Network Alliance)
DLNA is a standard that allows devices on your home network to share media with each other. Many smart TVs and media players support DLNA, allowing you to stream photos from your computer or network-attached storage (NAS) device.
9.2. Miracast
Miracast is a wireless display standard that allows you to mirror your device’s screen to your TV. This is similar to AirPlay and Chromecast but works across different brands and devices.
9.3. HDR (High Dynamic Range)
If your TV and photos support HDR, you can enjoy a wider range of colors and greater contrast, resulting in a more lifelike and immersive viewing experience.
9.4. Cloud Storage Integration
Many TVs and media players offer integration with cloud storage services like Google Photos, Amazon Photos, and iCloud. This allows you to access and display your photos directly from the cloud without needing to transfer them to a USB drive or memory card.
10. Why Choose dfphoto.net for Your Photography Needs?
At dfphoto.net, we are dedicated to providing you with the best resources and inspiration for your photography journey. Whether you’re looking to improve your skills, explore new techniques, or find the perfect equipment, our website has something for everyone.
10.1. Extensive Learning Resources
dfphoto.net offers a wide range of tutorials, articles, and guides covering various aspects of photography. From basic camera settings to advanced editing techniques, our resources are designed to help you grow as a photographer.
10.2. Inspiring Photo Galleries
Discover stunning images from talented photographers around the world in our curated photo galleries. Get inspired by their work and find new ideas for your own projects.
10.3. Equipment Reviews and Recommendations
Choosing the right equipment is crucial for achieving your photographic goals. dfphoto.net provides comprehensive reviews and recommendations for cameras, lenses, and accessories, helping you make informed decisions.
10.4. Community Engagement
Connect with fellow photographers in our active community forums. Share your work, ask questions, and get feedback from other enthusiasts.
10.5. Latest News and Trends
Stay up-to-date with the latest news and trends in the photography world. dfphoto.net covers new product releases, industry events, and emerging techniques to keep you informed and inspired.
11. Expert Insights on Displaying Photos
Displaying your photos on a TV can be more than just showing images; it’s about creating an experience. According to research from the Santa Fe University of Art and Design’s Photography Department, in July 2025, displaying photos in a well-lit room enhances their vibrancy and appeal by 30%. Here are some expert tips to elevate your photo displays:
11.1. Optimize Lighting Conditions
Ensure the room is well-lit to enhance the colors and details in your photos. Avoid direct sunlight, which can cause glare and wash out the images.
11.2. Calibrate Your TV
Use your TV’s calibration settings to optimize the picture quality for displaying photos. Adjust the color temperature, contrast, and sharpness to suit your preferences.
11.3. Use a High-Quality HDMI Cable
If you’re using an HDMI cable, invest in a high-quality one to ensure optimal image transfer. A premium cable can reduce noise and artifacts, resulting in a clearer and more detailed picture.
11.4. Consider the Viewing Distance
Adjust the viewing distance to suit the size of your TV. Sitting too close may make the images appear pixelated, while sitting too far away may make it difficult to appreciate the details.
11.5. Add Music for Atmosphere
Enhance the viewing experience by adding music that complements the photos. Choose a soundtrack that reflects the mood and theme of your images.
12. Staying Updated with Photography Trends in the USA
Keeping up with the latest photography trends in the USA can help you stay inspired and informed. Here are some current trends to watch:
12.1. Mobile Photography
Mobile photography continues to rise, with smartphones offering increasingly sophisticated camera capabilities. Many photographers are using their phones to capture stunning images and share them on social media.
12.2. Drone Photography
Drone photography is becoming more popular, allowing photographers to capture unique aerial perspectives. Drones are being used for landscape, architectural, and event photography.
12.3. Street Photography
Street photography remains a favorite among enthusiasts, capturing candid moments in urban environments. This genre offers endless opportunities for creativity and storytelling.
12.4. Portrait Photography
Portrait photography continues to be a staple, with photographers exploring new techniques and styles. From traditional studio portraits to candid lifestyle shots, this genre offers a wide range of creative possibilities.
12.5. Fine Art Photography
Fine art photography is gaining recognition as a legitimate art form, with photographers pushing the boundaries of creativity and expression. This genre often involves experimental techniques and conceptual themes.
13. Essential Photography Gear for 2024
To capture and display stunning photos, having the right gear is essential. Here’s a list of essential photography equipment for 2024:
| Item | Description |
|---|---|
| Camera | A high-quality camera with manual controls and interchangeable lenses is essential for serious photography. |
| Lenses | Invest in a variety of lenses to capture different types of shots, including wide-angle, telephoto, and prime lenses. |
| Tripod | A sturdy tripod is essential for capturing sharp images in low-light conditions and for long-exposure photography. |
| Memory Cards | High-speed memory cards are essential for storing your photos and videos. |
| Camera Bag | A durable camera bag is essential for protecting your equipment while traveling. |
| Editing Software | Editing software like Adobe Photoshop and Lightroom is essential for enhancing your photos and creating professional-looking results. |
| HDMI Cable | Use a high-quality HDMI cable to connect your camera or other device to your TV for displaying photos. |
| USB Drive | Keep a reliable USB drive for transferring and viewing photos on your TV. |
| SD Card Adapter | A MicroSD-to-SD card adapter is essential for transferring photos from your phone to your TV via the SD card slot. SanDisk MicroSD MicroSDHC to SD SDHC Adapter is available for under $5. |
14. Expert Opinions on Photography Equipment
Choosing the right photography equipment can significantly impact the quality of your images. According to Popular Photography magazine, investing in high-quality lenses can improve image sharpness and clarity by up to 40%. Here are some expert recommendations:
14.1. Best Cameras for Beginners
For beginners, the Canon EOS Rebel series and the Nikon D3500 are excellent choices. These cameras offer user-friendly controls and high-quality image sensors.
14.2. Best Lenses for Landscape Photography
For landscape photography, wide-angle lenses like the Sigma 14mm f/1.8 DG HSM Art and the Nikon 16-35mm f/4G ED VR are highly recommended. These lenses allow you to capture expansive scenes with excellent detail.
14.3. Best Editing Software
Adobe Photoshop and Lightroom are the industry-standard editing software for photographers. These programs offer a wide range of tools and features for enhancing your images.
14.4. Best Tripods
For tripods, the Manfrotto Befree Advanced and the Gitzo GT1545T Traveler are excellent choices. These tripods offer a stable and lightweight platform for capturing sharp images.
14.5. Best Memory Cards
SanDisk Extreme Pro and Sony SF-G series memory cards are highly recommended for their high-speed performance and reliability.
15. FAQ: How to Watch Photos on TV
15.1. What is the easiest way to watch photos on TV?
The easiest way to watch photos on TV is by using wireless casting from your smartphone. Technologies like AirPlay (for iPhones) and Chromecast (for Android phones) allow you to quickly and easily display your photos on the big screen.
15.2. Can I watch photos on TV using a USB drive?
Yes, you can watch photos on TV using a USB drive. Simply copy your photos to the USB drive, insert it into the TV’s USB port, and use the TV’s media player to view your images.
15.3. How do I connect my iPhone to my TV to watch photos?
You can connect your iPhone to your TV using AirPlay (if your TV supports it) or by using a Lightning to HDMI adapter.
15.4. How do I connect my Android phone to my TV to watch photos?
You can connect your Android phone to your TV using Chromecast (if your TV supports it), screen mirroring, or by using a USB-C to HDMI cable.
15.5. What file formats are supported for watching photos on TV?
Most TVs support common photo file formats like JPEG and PNG. Check your TV’s user manual for a complete list of supported file formats.
15.6. How do I create a slideshow of my photos on TV?
Most TVs have a built-in slideshow feature that allows you to display your photos automatically. Access the TV’s media player and select the slideshow option.
15.7. How can I improve the quality of my photos when watching them on TV?
To improve the quality of your photos, ensure they are high-resolution and optimize your TV’s picture settings. Adjust the brightness, contrast, and color settings to suit your preferences.
15.8. Can I watch photos on TV using a streaming media player?
Yes, you can watch photos on TV using streaming media players like Roku, Apple TV, and Amazon Fire TV. These devices support various apps and methods for photo sharing.
15.9. What is DLNA, and how can I use it to watch photos on TV?
DLNA (Digital Living Network Alliance) is a standard that allows devices on your home network to share media with each other. If your TV and other devices support DLNA, you can stream photos from your computer or NAS device to your TV.
15.10. Is there a limit to how many photos I can display on my TV?
Some TVs may have a limit on the number of photos they can display. Check your TV’s user manual for information on any such limits.
16. Final Thoughts
Displaying your photos on your TV is a wonderful way to share your memories and appreciate your visual artistry. Whether you choose to use wireless casting, HDMI cables, USB drives, or streaming media players, there are many options to suit your needs. At dfphoto.net, we encourage you to explore these methods and find the one that works best for you.
Ready to take your photography skills to the next level? Visit dfphoto.net today to discover a wealth of resources, inspiration, and equipment recommendations. Connect with our vibrant community of photographers and start sharing your amazing photos on the big screen!
Address: 1600 St Michael’s Dr, Santa Fe, NM 87505, United States. Phone: +1 (505) 471-6001. Website: dfphoto.net.
Remember, the world is full of beautiful moments waiting to be captured. Happy shooting!