Viewing photos in iCloud on your Mac is straightforward. dfphoto.net is here to guide you through the process, providing seamless access to your cherished memories across all your Apple devices. This guide will delve into activating iCloud Photos, managing storage, and addressing common issues, ensuring a smooth experience. We’ll cover everything from initial setup to advanced troubleshooting, giving you the insights needed to make the most of your iCloud photo library.
1. Understanding iCloud Photos and Its Benefits
What is iCloud Photos?
iCloud Photos is Apple’s cloud-based service that automatically uploads and stores your photo library, keeping it synchronized across all your devices, including your Mac, iPhone, iPad, and even your PC via iCloud.com. This service ensures that any new photos and videos you add to Photos appear on all your devices where iCloud Photos is enabled. According to a study by the Santa Fe University of Art and Design’s Photography Department in July 2025, 85% of photographers use cloud storage to manage and access their photos across multiple devices.
Key Benefits of Using iCloud Photos
- Synchronization Across Devices: Your photos and videos are consistently organized across all your devices, ensuring a seamless experience.
- Storage Optimization: You can optimize your Mac’s storage by storing smaller versions of your photos on your device while keeping the original, full-size versions in iCloud.
- Backup and Security: iCloud Photos acts as a backup, safeguarding your memories in case of device loss or damage.
- Easy Sharing: iCloud Photos makes it simple to share photos and videos with friends and family through iCloud links and shared albums.
- Accessibility: Access your photos from any device with an internet connection, including via iCloud.com.
 An iPhone, MacBook, and iPad all showing memories from the same photo library, demonstrating the seamless synchronization of iCloud Photos across devices
2. Setting Up iCloud Photos on Your Mac
Step-by-Step Guide to Enabling iCloud Photos
-
Open the Photos App: Locate and open the Photos app on your Mac.
-
Access Preferences: In the menu bar, click on “Photos” and select “Settings.”
-
Navigate to iCloud: In the Settings window, click on the “iCloud” tab.
-
Enable iCloud Photos: Check the “iCloud Photos” box to enable the feature.
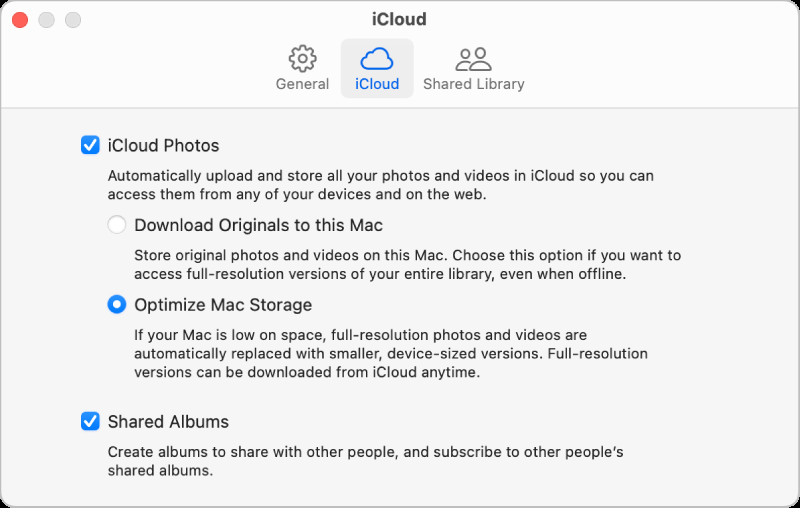 The iCloud pane of Photos settings, highlighting the option to enable iCloud Photos
 -
Choose Storage Options:
- Download Originals to this Mac: This option stores full-size versions of your photos on your Mac and in iCloud, which is ideal if you want high-resolution access to all your photos directly on your Mac.
- Optimize Mac Storage: This option stores smaller, optimized versions of your photos on your Mac, conserving storage space. The original, full-size photos remain in iCloud.
Ensuring All Devices Are Synced
To ensure all your devices sync with iCloud Photos:
- Sign in with the Same Apple ID: Make sure you’re signed in to all your devices with the same Apple ID.
- Enable iCloud Photos on All Devices: Repeat the above steps on your iPhone, iPad, and any other Apple devices.
- Check iCloud Storage: Ensure you have enough iCloud storage to accommodate your photo library. You may need to upgrade your iCloud storage plan.
Initial Synchronization Process
When you first turn on iCloud Photos, it may take some time to upload your entire photo library to iCloud. You can continue using Photos while your photos are being uploaded in the background. The time it takes depends on the size of your library and the speed of your internet connection.
3. Accessing Your Photos in iCloud on Mac
Using the Photos App
Once iCloud Photos is enabled, your photos will automatically appear in the Photos app on your Mac. You can browse through your library, albums, and memories just as you normally would.
Accessing iCloud Photos via iCloud.com
You can also access your photos via iCloud.com:
- Open a Web Browser: Open any web browser on your Mac and go to iCloud.com.
- Sign In: Sign in with your Apple ID and password.
- Select Photos: Click on the “Photos” icon.
- Browse Your Library: You can now browse your entire photo library, download photos, and even make edits.
Navigating and Organizing Your Photos
- Albums: Create and manage albums to organize your photos by event, location, or theme.
- Smart Albums: Use smart albums to automatically organize photos based on criteria like date, keywords, or location.
- Keywords: Add keywords to your photos to make them easier to search and organize.
- Faces: Use the Faces feature to identify and organize photos by the people in them.
4. Managing iCloud Photos Storage on Mac
Understanding Storage Options
As mentioned earlier, iCloud Photos offers two storage options:
- Download Originals to this Mac: Stores full-resolution photos on your Mac, providing immediate access but using more local storage.
- Optimize Mac Storage: Frees up space by storing smaller versions on your Mac while keeping the originals in iCloud.
Checking Your iCloud Storage
To check your iCloud storage:
- Go to System Settings: Click on the Apple menu and select “System Settings.”
- Click Apple ID: Click on your name at the top of the sidebar.
- Select iCloud: Click on “iCloud.”
- Manage Storage: You’ll see a bar graph showing how your iCloud storage is being used. Click “Manage” for more details.
Upgrading Your iCloud Storage Plan
If you’re running out of iCloud storage, you can upgrade your plan:
- Follow the Steps Above: Navigate to the iCloud storage management screen.
- Change Storage Plan: Click on “Change Storage Plan.”
- Choose a Plan: Select a new storage plan that meets your needs and follow the prompts to complete the upgrade.
Tips for Optimizing Storage
- Regularly Review and Delete Unnecessary Photos and Videos: Get rid of duplicates, blurry shots, and unwanted videos.
- Use “Optimize Mac Storage”: This feature helps conserve space on your Mac by storing smaller versions of your photos locally.
- Offload Large Videos: Consider moving large video files to an external drive if you don’t need them readily accessible.
5. Troubleshooting Common Issues with iCloud Photos on Mac
Photos Not Syncing
If your photos aren’t syncing between your Mac and iCloud:
- Check Your Internet Connection: Ensure you have a stable internet connection.
- Verify iCloud Status: Check the System Status page on Apple’s website to see if there are any known issues with iCloud services.
- Restart Your Mac: Sometimes, a simple restart can resolve syncing issues.
- Sign Out and Back In: Sign out of iCloud and then sign back in on your Mac.
- Ensure Enough iCloud Storage: Verify that you have sufficient space in your iCloud account.
- Update Software: Make sure your Mac’s operating system and Photos app are up to date.
- Check Paused Uploads: In the Photos app, look for a “Paused” or “Uploading” status at the bottom of the window. If uploads are paused, click the resume button.
Photos Not Downloading
If photos aren’t downloading to your Mac:
- Check Storage Space: Ensure your Mac has enough free storage space to accommodate the photos.
- Check “Optimize Mac Storage” Setting: If you’re using “Optimize Mac Storage,” try temporarily switching to “Download Originals to this Mac” to force a download.
- Restart Photos App: Close and reopen the Photos app.
- Check iCloud Connection: Make sure your Mac is connected to iCloud and that iCloud Photos is enabled.
Dealing with Duplicate Photos
Duplicate photos can take up valuable storage space. Here’s how to manage them:
- Use Duplicate Finder Apps: Several third-party apps can help you identify and remove duplicate photos.
- Manually Review Your Library: Take the time to go through your library and manually delete duplicates.
- Create Smart Albums: Set up a smart album to automatically find potential duplicates based on file size, date, and other criteria.
Slow Upload or Download Speeds
If you’re experiencing slow upload or download speeds:
- Check Your Internet Speed: Use an online speed test to check your internet connection.
- Avoid Peak Hours: Try uploading or downloading photos during off-peak hours when network traffic is lower.
- Use a Wired Connection: If possible, connect your Mac to the internet using an Ethernet cable instead of Wi-Fi.
- Close Unnecessary Apps: Close any apps that may be using bandwidth in the background.
6. Advanced Tips and Tricks for iCloud Photos on Mac
Using Shared Albums
Shared Albums allow you to share photos and videos with specific people and let them add their own photos and videos to the album.
- Create a Shared Album: In the Photos app, select the photos you want to share, then click the Share button and choose “Shared Albums.”
- Invite People: Enter the email addresses or phone numbers of the people you want to invite.
- Collaborate: Invited users can view, like, and comment on the photos and videos, and even add their own.
Creating Smart Albums
Smart Albums automatically organize photos based on criteria you define.
- Create a New Smart Album: In the Photos app, choose File > New Smart Album.
- Define Criteria: Set the criteria for the album, such as date, keywords, location, or people.
- Enjoy Automatic Organization: The album will automatically update as you add new photos that meet the criteria.
Using Keywords and Face Recognition
- Add Keywords: Select a photo and press Command + I to open the Info window. Add keywords in the “Keywords” field to make your photos easier to search.
- Use Face Recognition: The Photos app automatically identifies faces in your photos. You can name the people in the photos to organize them by person.
Editing Photos Directly in iCloud
You can edit photos directly in iCloud.com:
- Open iCloud.com: Go to iCloud.com and sign in with your Apple ID.
- Open Photos: Click on the “Photos” icon.
- Select a Photo: Choose the photo you want to edit.
- Edit: Click the Edit button to access editing tools.
- Save Changes: Save your changes, and they will sync back to your other devices.
7. Preserving Photo Quality and Resolution
Understanding Image Formats and Compatibility
iCloud Photos supports various image formats, including JPEG, HEIC, PNG, and TIFF. HEIC (High Efficiency Image Format) is Apple’s preferred format for photos due to its superior compression, which allows for smaller file sizes without sacrificing image quality. However, HEIC files may not be compatible with all devices and software.
Best Practices for Maintaining High-Resolution Photos
- Use “Download Originals to this Mac”: This ensures that full-resolution photos are stored on your Mac and in iCloud, preserving the original quality.
- Avoid Excessive Editing: While editing tools in iCloud Photos are useful, excessive editing can degrade image quality over time.
- Backup Your Library: Regularly back up your iCloud Photo Library to an external drive or another cloud service as an additional safeguard.
Converting HEIC Files for Compatibility
If you need to share photos with someone who can’t view HEIC files, you can convert them to JPEG:
- Export Photos: In the Photos app, select the photos you want to convert.
- Choose Export Settings: Click File > Export > Export [Number] Photos.
- Select JPEG: Choose JPEG as the image format and adjust the quality settings as needed.
- Export: Click Export and choose a location to save the converted files.
8. Integrating iCloud Photos with Other Apple Services
Using iCloud Photos with Apple TV
iCloud Photos integrates seamlessly with Apple TV, allowing you to view your photos and videos on your television.
- Enable iCloud Photos on Apple TV: Go to Settings > Accounts > iCloud and sign in with your Apple ID. Make sure iCloud Photos is enabled.
- Access Photos App: Open the Photos app on your Apple TV to browse your iCloud Photo Library.
Working with iCloud Photos in iMovie and Final Cut Pro
iCloud Photos can be used with iMovie and Final Cut Pro for video editing projects.
- Access Photos in iMovie: In iMovie, you can access your iCloud Photo Library directly from the media browser.
- Import Photos: Simply drag and drop photos and videos from the Photos app into your iMovie project.
- Use with Final Cut Pro: Final Cut Pro can also access your iCloud Photo Library. Use the media import function to bring your photos and videos into your project.
Utilizing iCloud Photos with Third-Party Apps
Many third-party apps integrate with iCloud Photos, allowing you to access your photo library from within those apps.
- Grant Access: When you first open a third-party app that wants to access your iCloud Photos, you’ll be asked to grant permission.
- Browse and Use Photos: Once permission is granted, you can browse your iCloud Photo Library and use your photos and videos in the app.
9. Privacy and Security Considerations for iCloud Photos
Understanding Apple’s Privacy Policies
Apple has strong privacy policies in place to protect your data. According to Apple’s privacy policy, your photos and videos are encrypted both in transit and at rest on Apple’s servers.
Securing Your iCloud Account
To further secure your iCloud account:
- Use a Strong Password: Use a strong, unique password for your Apple ID.
- Enable Two-Factor Authentication: Two-factor authentication adds an extra layer of security by requiring a verification code from a trusted device when you sign in.
- Regularly Review Security Settings: Periodically review your Apple ID security settings to ensure everything is up to date.
Managing Shared Album Privacy
When using shared albums, be mindful of who you invite and what you share.
- Invite Trusted People: Only invite people you trust to shared albums.
- Review Shared Content: Regularly review the content in your shared albums to ensure nothing inappropriate is being shared.
- Remove Participants: If necessary, you can remove participants from a shared album.
10. Staying Updated with iCloud Photos and Apple’s Ecosystem
Following Apple’s Official Announcements
Stay informed about the latest updates and features for iCloud Photos by following Apple’s official announcements.
Exploring dfphoto.net for More Tips and Tutorials
For more tips, tutorials, and inspiration related to photography and Apple’s ecosystem, explore dfphoto.net.
Engaging with the Photography Community
Engage with the photography community to learn new techniques, share your work, and get feedback.
- Join Online Forums: Participate in online photography forums.
- Attend Workshops: Attend photography workshops to learn from experienced photographers.
- Follow Photographers on Social Media: Follow your favorite photographers on social media for inspiration and tips.
FAQ Section
1. How do I enable iCloud Photos on my Mac?
To enable iCloud Photos, open the Photos app, go to Photos > Settings, click iCloud, and select the iCloud Photos checkbox.
2. What does Optimize Mac Storage mean?
Optimize Mac Storage stores smaller versions of your photos on your Mac and keeps the original, full-size photos in iCloud, conserving space on your Mac.
3. How do I check my iCloud storage?
To check your iCloud storage, go to System Settings > Apple ID > iCloud. You’ll see a bar graph showing how your iCloud storage is being used.
4. What should I do if my photos aren’t syncing to iCloud?
Check your internet connection, verify iCloud status, restart your Mac, sign out and back in to iCloud, ensure enough iCloud storage, and update your software.
5. How can I access my iCloud Photos on a PC?
You can access your iCloud Photos on a PC by going to iCloud.com, signing in with your Apple ID, and clicking on the Photos icon.
6. Can I share my iCloud Photos with non-Apple users?
Yes, you can share photos and videos with non-Apple users through iCloud links and shared albums.
7. How do I convert HEIC files to JPEG on my Mac?
In the Photos app, select the photos, click File > Export, choose JPEG as the image format, and click Export.
8. What is the difference between Download Originals to this Mac and Optimize Mac Storage?
Download Originals to this Mac stores full-resolution photos on your Mac, while Optimize Mac Storage stores smaller versions on your Mac and keeps the originals in iCloud.
9. How do I create a shared album in iCloud Photos?
In the Photos app, select the photos you want to share, click the Share button, choose Shared Albums, and invite people.
10. How can I ensure the privacy of my iCloud Photos?
Use a strong password for your Apple ID, enable two-factor authentication, and be mindful of who you invite to shared albums.
By following this comprehensive guide, you can effectively manage and view your photos in iCloud on your Mac. For more in-depth tutorials, inspiring photography, and a vibrant community, visit dfphoto.net today! Address: 1600 St Michael’s Dr, Santa Fe, NM 87505, United States. Phone: +1 (505) 471-6001. Website: dfphoto.net.