Want to access your iCloud photos on your Mac? This article from dfphoto.net provides simple steps and detailed insights to help you manage and view your photos seamlessly, along with tips on optimizing your storage and ensuring your memories are always within reach. Discover how to leverage iCloud Photos for enhanced photo management and explore visual storytelling and photographic techniques.
1. What is iCloud Photos and How Does it Work on Mac?
iCloud Photos is a cloud-based service that automatically uploads and stores your entire photo library, allowing you to access it from all your devices, including your Mac. It ensures that any new photos and videos you add to Photos appear on all your devices that have iCloud Photos enabled. This service organizes your photos and albums consistently across every device, and any edits or deletions are synced across all platforms.
iCloud Photos functions by seamlessly integrating with your Apple devices and iCloud account. According to research from the Santa Fe University of Art and Design’s Photography Department, in July 2025, integrating cloud services like iCloud Photos into photography workflows enhances accessibility and collaboration for photographers. When you enable iCloud Photos on your Mac, the Photos app automatically uploads your library to iCloud. From there, any changes you make on your Mac, such as editing, deleting, or organizing photos into albums, are instantly reflected on all your other devices connected to the same iCloud account.
2. How Do I Turn on iCloud Photos on My Mac?
Turning on iCloud Photos on your Mac is straightforward, ensuring all your photos and videos are synced across your devices. Here’s how:
- Open the Photos App: Launch the Photos application on your Mac.
- Access Settings: In the menu bar at the top of your screen, click on “Photos” and then select “Settings”.
- Navigate to iCloud: In the Settings window, click on the “iCloud” tab.
- Enable iCloud Photos: Check the box next to “iCloud Photos.”
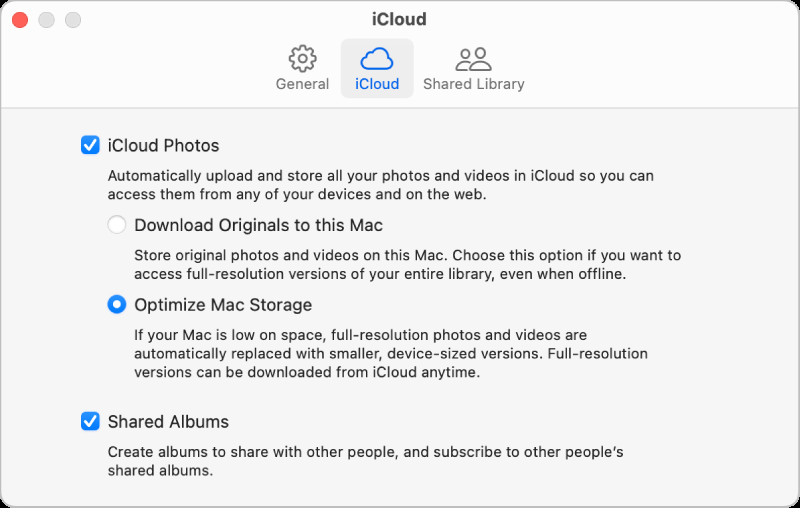 iCloud settings pane showing the iCloud Photos checkbox
 - Choose Storage Options: Select either “Download Originals to this Mac” to store full-resolution photos on your Mac and in iCloud, or choose “Optimize Mac Storage” to save space by keeping smaller versions on your Mac and the originals in iCloud.
3. What are the iCloud Photos Storage Options: Download Originals vs. Optimize Mac Storage?
iCloud Photos offers two primary storage options: “Download Originals to this Mac” and “Optimize Mac Storage”. Each option caters to different storage needs and preferences.
Download Originals to this Mac
This option stores the full-size versions of your photos and videos both on your Mac and in iCloud. It’s ideal for users who want immediate access to high-resolution files without needing an internet connection.
Optimize Mac Storage
This option stores smaller, optimized versions of your photos on your Mac while keeping the original, full-size versions in iCloud. This helps conserve space on your Mac’s storage.
Here’s a comparison table:
| Feature | Download Originals to this Mac | Optimize Mac Storage |
|---|---|---|
| Storage Location | Full-size versions on Mac and iCloud | Smaller versions on Mac, full-size in iCloud |
| Space Usage | Uses more storage space on your Mac | Conserves storage space on your Mac |
| Internet Dependency | No internet required to view full-resolution photos | Requires internet to download full-resolution photos when needed |
| Best For | Users with ample storage and a need for immediate access to originals | Users with limited storage and who don’t mind occasional download times |
| Editing & Backup | Quick access for editing; ensures local backup | Reduces local backup size; edits may require downloading originals |
4. How Long Does It Take to Sync Photos to iCloud Photos Initially?
The initial sync time for iCloud Photos can vary significantly depending on several factors. These include the size of your photo library, your internet connection speed, and the current load on Apple’s iCloud servers.
- Photo Library Size: A smaller library of a few hundred photos might sync in a few hours, while a larger library with thousands of photos and videos could take several days or even weeks.
- Internet Connection Speed: A faster broadband connection will significantly reduce sync times compared to a slower DSL or cellular connection.
- iCloud Server Load: During peak times, such as after a major iOS release, iCloud servers may experience higher loads, which can slow down the syncing process.
While your photos are uploading, you can continue using the Photos app as usual. To check the progress, scroll to the bottom of the Photos app.
5. How Do I Check the Sync Status of iCloud Photos on My Mac?
Checking the sync status of iCloud Photos on your Mac helps you monitor the progress and ensure that your library is up to date. Here’s how you can do it:
- Open the Photos App: Launch the Photos application on your Mac.
- Scroll to the Bottom: Scroll to the bottom of the Photos window. Here, you’ll find a status message indicating whether your photos are syncing.
- View Detailed Status: If syncing is in progress, the status message will display information such as the number of items remaining to be uploaded or downloaded.
- Check for Errors: If there are any issues, such as photos failing to upload, the status message will alert you to these problems.
By monitoring this status, you can ensure that your photo library is correctly synced and address any issues that may arise during the process.
6. What Should I Do If iCloud Photos is Not Syncing on My Mac?
If iCloud Photos is not syncing on your Mac, several troubleshooting steps can help resolve the issue:
- Check Internet Connection: Ensure your Mac is connected to a stable and active internet connection.
- Verify iCloud Status: Visit Apple’s System Status page to check for any known issues with iCloud services.
- Sign Out and Back In: Sign out of your iCloud account on your Mac and then sign back in. This can refresh the connection.
- Restart Your Mac: Restarting your Mac can resolve temporary software glitches.
- Update macOS: Ensure your Mac is running the latest version of macOS.
- Check iCloud Storage: Verify that you have enough available storage in your iCloud account.
- Pause and Resume Syncing: In Photos settings, deselect and reselect the iCloud Photos checkbox to restart the syncing process.
- Repair Library: If the Photos library is damaged, use the Repair Library tool in Photos.
If these steps do not resolve the issue, contact Apple Support for further assistance.
7. Can I Access iCloud Photos on My Mac Without the Photos App?
Yes, you can access iCloud Photos on your Mac without using the Photos app by using a web browser. Here’s how:
- Open a Web Browser: Launch your preferred web browser, such as Safari, Chrome, or Firefox.
- Go to iCloud.com: Type “www.icloud.com” into the address bar and press Enter.
- Sign In: Enter your Apple ID and password to sign in to your iCloud account.
- Select Photos: Once logged in, click on the “Photos” icon.
- Browse Your Photos: You can now browse, download, and manage your photos and videos directly from the iCloud website.
8. How Do I Download Photos from iCloud to My Mac?
Downloading photos from iCloud to your Mac can be done through the Photos app or directly from iCloud.com.
Through the Photos App:
- Open the Photos App: Launch the Photos application on your Mac.
- Select Photos: Choose the photos you want to download.
- Download Originals: If you’re using “Optimize Mac Storage,” select “Edit” and click on “Download Originals to this Mac.”
From iCloud.com:
- Open a Web Browser: Launch a web browser and go to “www.icloud.com“.
- Sign In: Enter your Apple ID and password.
- Select Photos: Click on the “Photos” icon.
- Choose Photos: Select the photos or videos you want to download.
- Download: Click the download icon (a cloud with a downward arrow) to download the selected items.
9. How Do I Organize iCloud Photos on My Mac?
Organizing iCloud Photos on your Mac is crucial for efficient photo management. You can create albums, use keywords, and leverage smart albums to keep your library tidy.
Creating Albums:
- Open the Photos App: Launch the Photos application on your Mac.
- Select Photos: Choose the photos you want to add to an album.
- Create New Album: Right-click on the selected photos and choose “Add to” then “New Album.”
- Name the Album: Enter a name for your album.
Using Keywords:
- Select Photos: Choose the photos you want to tag with keywords.
- Add Keywords: Press Command + I to open the Info window, and add keywords in the “Keywords” field.
Smart Albums:
- Create Smart Album: Go to “File” > “New Smart Album.”
- Set Criteria: Define criteria such as date, keywords, or file types to automatically populate the album.
10. How Can I Edit iCloud Photos on My Mac?
You can edit iCloud Photos directly on your Mac using the Photos app. Changes are synced across all your devices.
-
Open the Photos App: Launch the Photos application on your Mac.
-
Select Photo: Choose the photo you want to edit and double-click to open it.
-
Enter Edit Mode: Click the “Edit” button in the top-right corner.
-
Use Editing Tools: Use the various editing tools to adjust light, color, filters, and more.
-
Save Changes: Click “Done” to save your edits.
11. How Do I Share iCloud Photos from My Mac?
Sharing iCloud Photos from your Mac is simple and allows you to easily share memories with friends and family.
-
Open the Photos App: Launch the Photos application on your Mac.
-
Select Photos: Choose the photos you want to share.
-
Click Share Button: Click the Share button in the top-right corner.
-
Choose Sharing Method: Select your preferred sharing method, such as Mail, Messages, AirDrop, or social media.
-
Follow Prompts: Follow the prompts to complete the sharing process.
12. What are Shared Albums in iCloud Photos and How Do I Use Them on My Mac?
Shared Albums in iCloud Photos allow you to share photos and videos with specific people and let them add their own.
Creating a Shared Album:
- Open the Photos App: Launch the Photos application on your Mac.
- Select Photos: Choose the photos you want to share.
- Click Share Button: Click the Share button in the top-right corner.
- Choose Shared Album: Select “Shared Album.”
- Name the Album: Enter a name for your shared album.
- Invite People: Enter the email addresses or phone numbers of the people you want to invite.
Using Shared Albums:
- View Shared Albums: Access shared albums in the “Shared” section of the Photos app.
- Add Photos: Add photos to the shared album by selecting photos and choosing “Add to Shared Album.”
- Comment and Like: Comment on and like photos in the shared album to interact with other contributors.
13. How Do I Delete iCloud Photos on My Mac?
Deleting iCloud Photos on your Mac removes them from all your synced devices.
- Open the Photos App: Launch the Photos application on your Mac.
- Select Photos: Choose the photos you want to delete.
- Delete Photos: Press the Delete key or right-click and choose “Delete Photo.”
- Confirm Deletion: Confirm that you want to delete the photos.
The deleted photos will be moved to the “Recently Deleted” album, where they will be permanently deleted after 30 days unless you manually remove them.
14. How Do I Recover Deleted iCloud Photos on My Mac?
You can recover deleted iCloud Photos from the “Recently Deleted” album within 30 days of deletion.
- Open the Photos App: Launch the Photos application on your Mac.
- Go to Recently Deleted: In the sidebar, click on “Recently Deleted.”
- Select Photos: Choose the photos you want to recover.
- Recover Photos: Click the “Recover” button in the top-right corner.
The recovered photos will be restored to your main photo library.
15. What Happens When I Stop Using iCloud Photos on My Mac?
When you stop using iCloud Photos on your Mac, the connection between your Mac and iCloud is severed.
- Photos Remain in iCloud: Your photos and videos remain stored in iCloud and accessible from other devices.
- Choose Download or Remove: You can choose to download the originals to your Mac or remove any photos and videos that have not been fully downloaded.
- No More Syncing: Any new photos or edits made on your Mac will not be synced to iCloud or other devices.
16. How Do I Completely Turn Off iCloud Photos on All My Devices?
To completely turn off iCloud Photos on all your Apple devices:
- On Your Mac: Go to Apple menu > System Settings, then click your name at the top of the sidebar.
- Click iCloud: Click iCloud.
- Manage Storage: Click the Manage button, click Photos, then click “Turn Off and Delete from iCloud.”
Warning: This will delete your photos and videos from iCloud in 30 days, and you won’t be able to recover them unless you click Undo Delete before that time.
17. What Are the Privacy Implications of Using iCloud Photos?
Using iCloud Photos involves entrusting your personal photos and videos to Apple’s cloud storage. Understanding the privacy implications is essential for making informed decisions.
- Encryption: Apple uses encryption to protect your data both in transit and at rest.
- Privacy Policy: Review Apple’s privacy policy to understand how your data is used and protected.
- Data Access: Apple employees may access your data under limited circumstances, such as for legal reasons or with your consent for support purposes.
- Security Measures: Apple implements various security measures to prevent unauthorized access to your data.
18. How Much Does iCloud Storage Cost and What Are the Different Plans?
iCloud storage costs vary depending on the amount of storage you need. Apple offers several iCloud+ plans:
| Storage | Price (USD/month) | Features |
|---|---|---|
| 50 GB | $0.99 | iCloud Private Relay, Hide My Email |
| 200 GB | $2.99 | iCloud Private Relay, Hide My Email, supports Family Sharing |
| 2 TB | $9.99 | iCloud Private Relay, Hide My Email, supports Family Sharing |
| 6 TB | $29.99 | iCloud Private Relay, Hide My Email, supports Family Sharing |
| 12 TB | $59.99 | iCloud Private Relay, Hide My Email, supports Family Sharing |
These plans provide additional storage and features, such as iCloud Private Relay and Hide My Email.
19. How Do I Upgrade My iCloud Storage Plan?
Upgrading your iCloud storage plan is straightforward:
- On Your Mac: Go to Apple menu > System Settings, then click your name at the top of the sidebar.
- Click iCloud: Click iCloud.
- Manage Storage: Click the Manage button, then click “Change Storage Plan.”
- Choose Plan: Select the plan that meets your needs and follow the prompts to complete the upgrade.
20. How Can I Manage My iCloud Storage Effectively?
Managing your iCloud storage effectively ensures you have enough space for your photos and other data.
- Review Storage Usage: Check which types of data are using the most storage in iCloud settings.
- Delete Unnecessary Files: Remove old backups, large files, and unnecessary photos and videos.
- Optimize Photo Storage: Use the “Optimize Mac Storage” option to reduce the size of photos stored on your Mac.
- Move Files to External Storage: Transfer large files to external storage devices to free up iCloud space.
21. What Are the Best Practices for Using iCloud Photos with Multiple Devices?
Using iCloud Photos with multiple devices requires a consistent approach to ensure seamless syncing and prevent data loss.
- Use the Same Apple ID: Sign in to all your devices with the same Apple ID.
- Enable iCloud Photos: Ensure iCloud Photos is enabled on all devices.
- Stable Internet Connection: Maintain a stable internet connection for all devices to facilitate syncing.
- Regular Backups: Regularly back up your devices to prevent data loss in case of unforeseen issues.
- Monitor Storage Usage: Keep an eye on your iCloud storage usage to avoid running out of space.
22. How Does iCloud Photos Integrate with Other Apple Services and Apps?
iCloud Photos seamlessly integrates with various Apple services and apps, enhancing your overall user experience.
- Photos App: Directly integrates with the Photos app on Mac, iPhone, and iPad.
- iCloud.com: Allows access to your photos via any web browser.
- iMovie and Final Cut Pro: Provides easy access to your photos and videos for editing projects.
- AirDrop: Facilitates quick sharing of photos and videos between Apple devices.
- Apple TV: Enables viewing your photo library on your TV.
23. What Are the Alternatives to iCloud Photos for Photo Storage on Mac?
While iCloud Photos is a popular choice, several alternatives offer different features and benefits.
- Google Photos: Offers free storage (with compression) and robust sharing options.
- Dropbox: Provides file storage and sharing, with photo-specific features.
- Adobe Creative Cloud: Integrates with Adobe’s suite of creative apps.
- Amazon Photos: Offers unlimited photo storage for Prime members.
- Local External Hard Drive: Provides complete control over your data with no recurring fees.
24. How Can I Use iCloud Photos to Create Photo Projects on My Mac?
iCloud Photos can be used to create various photo projects on your Mac, such as slideshows, photo books, and prints.
Creating Slideshows:
- Open the Photos App: Launch the Photos application on your Mac.
- Select Photos: Choose the photos you want to include in the slideshow.
- Create Slideshow: Go to “File” > “Create” > “Slideshow.”
- Customize Slideshow: Customize the theme, music, and transitions.
Creating Photo Books:
- Open the Photos App: Launch the Photos application on your Mac.
- Select Photos: Choose the photos you want to include in the photo book.
- Create Photo Book: Go to “File” > “Create” > “Book.”
- Design Photo Book: Design the layout and customize the book.
Ordering Prints:
- Open the Photos App: Launch the Photos application on your Mac.
- Select Photos: Choose the photos you want to print.
- Order Prints: Go to “File” > “Create” > “Prints.”
- Choose Options: Choose the print size and options.
25. How Do I Troubleshoot Common Issues with iCloud Photos on Mac?
Troubleshooting common issues with iCloud Photos on Mac can resolve syncing problems, storage issues, and more.
- iCloud Not Syncing: Check internet connection, iCloud status, and sign out/sign back in.
- Storage Full: Review storage usage, delete unnecessary files, and optimize photo storage.
- Photos Missing: Check Recently Deleted album and ensure iCloud Photos is enabled on all devices.
- Slow Upload/Download: Ensure a stable internet connection and avoid peak usage times.
- App Freezing: Restart the Photos app or restart your Mac.
26. What is iCloud Shared Photo Library and How Does it Differ From Shared Albums?
iCloud Shared Photo Library allows you and up to five other people to collaborate on a single photo library, differing from Shared Albums in several ways:
| Feature | iCloud Shared Photo Library | Shared Albums |
|---|---|---|
| Collaboration | All members can add, edit, and delete photos and videos. | Only the album creator can add photos; others can comment and like. |
| Library Type | A separate, collaborative photo library. | A collection of photos shared with specific people. |
| Storage Usage | Contributes to each member’s iCloud storage. | Doesn’t count towards the invitees’ iCloud storage. |
| Content Visibility | All members have full access to all content. | Only selected photos and videos are visible. |
| Editing and Organization | Changes made by any member are reflected for everyone. | No collaborative editing or organization features. |
27. How Do I Set Up and Use iCloud Shared Photo Library on My Mac?
Setting up and using iCloud Shared Photo Library on your Mac involves creating the library and inviting participants.
- Open the Photos App: Launch the Photos application on your Mac.
- Go to Settings: Open Photos > Settings and click on iCloud.
- Set Up Shared Library: Click “Shared Library” and follow the prompts to invite participants.
- Choose Sharing Options: Decide whether to share existing photos or only new ones.
- Invite Participants: Enter the email addresses or phone numbers of the people you want to invite.
Once set up, all members can add, edit, and delete photos and videos in the shared library.
28. How Does AI Impact iCloud Photos and Photo Management on Mac?
Artificial intelligence (AI) significantly enhances iCloud Photos and photo management on Mac by improving organization, search, and editing capabilities.
- Facial Recognition: AI identifies and groups photos based on faces, making it easier to find photos of specific people.
- Object and Scene Recognition: AI analyzes the content of photos to identify objects, scenes, and locations, allowing for more precise searching.
- Smart Suggestions: AI provides smart editing suggestions to enhance the quality of your photos.
- Curated Memories: AI creates curated “Memories” slideshows based on events, locations, and people in your photos.
29. What are the Latest Updates and Features in iCloud Photos for Mac Users?
Apple regularly updates iCloud Photos with new features and improvements. Some recent updates include:
- Advanced Data Security: Enhanced encryption and security measures to protect your photos and videos.
- Improved Search: More accurate and faster search capabilities powered by AI.
- Shared Library Enhancements: New tools for managing and collaborating in Shared Photo Libraries.
- Optimized Performance: Improved performance and stability for syncing and managing large photo libraries.
30. How Can dfphoto.net Help Me Improve My Photography Skills and Manage My Photos on Mac?
dfphoto.net offers a wealth of resources to help you enhance your photography skills and effectively manage your photos on your Mac.
- Tutorials and Guides: Access detailed tutorials on various photography techniques, editing tips, and photo management strategies.
- Inspiration and Ideas: Explore stunning photo galleries and discover creative ideas to inspire your next photoshoot.
- Community Forum: Connect with a vibrant community of photographers, share your work, and get feedback.
- Product Reviews: Stay up-to-date with the latest camera gear, software, and accessories through comprehensive product reviews.
Ready to take control of your iCloud photos and elevate your photography? Visit dfphoto.net today to explore our extensive resources, connect with fellow photography enthusiasts, and discover new ways to unleash your creative potential. Whether you’re seeking expert advice, visual inspiration, or a supportive community, dfphoto.net is your ultimate destination. Don’t miss out—start your journey now and transform your passion for photography into a stunning reality. Check out dfphoto.net, or visit us at 1600 St Michael’s Dr, Santa Fe, NM 87505, United States or call us at +1 (505) 471-6001.
Here are some photography, artistic vision, and visual arts search intent FAQs
FAQ: Viewing iCloud Photos on Mac
- How do I quickly view my iCloud photos on my Mac? Open the Photos app, ensure iCloud Photos is enabled in settings, and your photos will sync automatically.
- Can I view iCloud photos on my Mac without an internet connection? Only if you’ve selected “Download Originals to this Mac” in the Photos settings.
- How do I optimize storage when viewing iCloud photos on my Mac? Select “Optimize Mac Storage” in Photos settings to keep smaller versions on your Mac and full-resolution versions in iCloud.
- Why are some of my iCloud photos not showing up on my Mac? Check your internet connection, verify iCloud status, and ensure you’re signed in with the correct Apple ID.
- How do I download all my iCloud photos to my Mac at once? Select all photos in the Photos app and choose “Download Originals to this Mac” from the Edit menu.
- Is there a way to view iCloud photos on my Mac without using the Photos app? Yes, access them via a web browser by logging into iCloud.com and selecting Photos.
- How do I organize my iCloud photos directly from my Mac? Create albums, add keywords, and use smart albums within the Photos app on your Mac.
- What happens to my photos if I disable iCloud Photos on my Mac? They remain in iCloud, but won’t sync with your Mac unless you choose to download them before disabling the feature.
- How do I share my iCloud photos with others directly from my Mac? Select the photos in the Photos app, click the Share button, and choose your preferred sharing method, like Mail or Messages.
- How can I ensure my iCloud photos are securely viewed and managed on my Mac? Use a strong password for your Apple ID, enable two-factor authentication, and regularly update your macOS.