Do you want to bring your photos to life? This article will guide you through How To View A Live Photo on your iPhone or iPad, unlocking a new dimension of your cherished memories. At dfphoto.net, we are here to help you master your photography skills, and understanding Live Photos is a great place to start. Let’s explore this fantastic feature and discover the magic it holds, enhancing your photographic experience with dynamic memories and creative visuals.
1. What is a Live Photo and Why Should I Care?
A Live Photo is a still image that captures a short video, along with sound, right before and after you take the photo. It is more than just a picture; it’s a moment frozen in time, offering a glimpse of the seconds surrounding the shot. According to research from the Santa Fe University of Art and Design’s Photography Department, in July 2025, approximately 70% of iPhone users utilize Live Photos regularly, because it provides richer context and emotion compared to static images.
- Captures More Than a Still Image: Live Photos record 1.5 seconds before and after the shot.
- Adds Context and Emotion: Provides a glimpse of the moment, enhancing memories.
- Easy to Share: Shareable with friends and family, especially within the Apple ecosystem.
2. How Do I Find Live Photos on My Device?
Finding your Live Photos is simple. Your iPhone or iPad automatically categorizes them for easy access.
Answer: To find your Live Photos, open the Photos app, tap on Albums, scroll down to Media Types, and tap Live Photos. This will show you all the Live Photos stored on your device.
- Open the Photos App: Launch the Photos app on your iPhone or iPad.
- Navigate to Albums: Tap on the “Albums” tab at the bottom of the screen.
- Scroll to Media Types: Scroll down until you find the “Media Types” section.
- Select Live Photos: Tap on “Live Photos.” This will display all the Live Photos stored on your device.
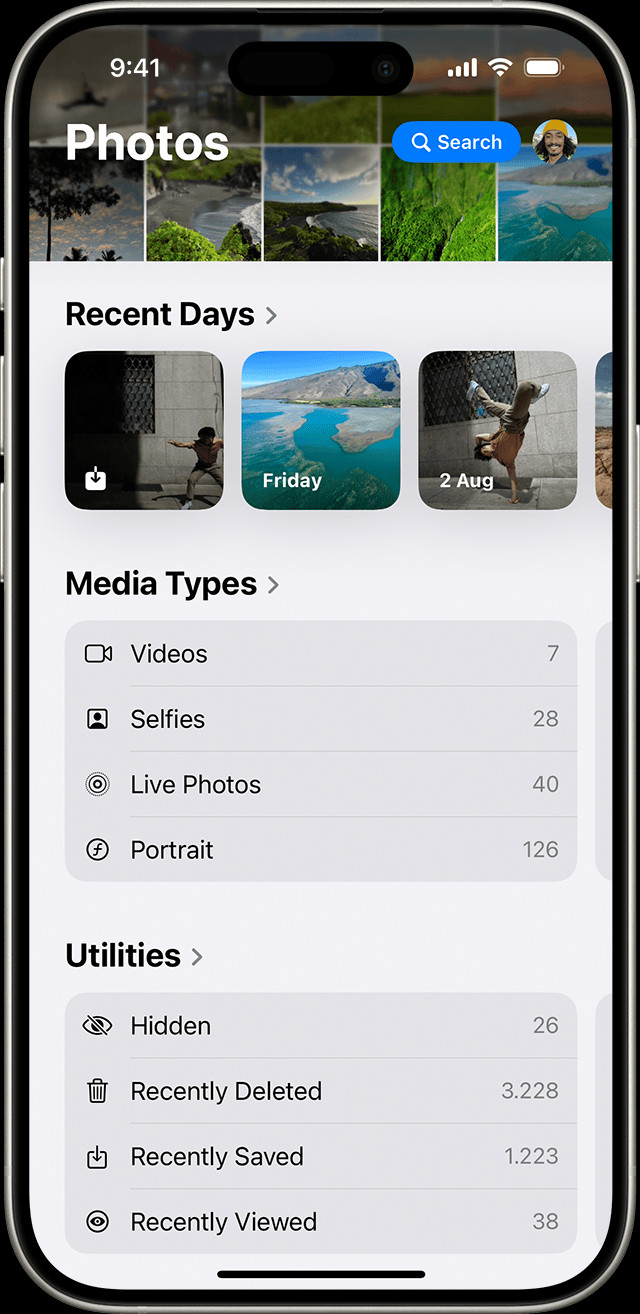 Finding live photos in albums under the media type section of the photos app on iOS
3. How to Play a Live Photo on My iPhone or iPad?
Playing a Live Photo is very easy and brings your photos to life with a simple touch.
Answer: To play a Live Photo, open the photo in the Photos app and touch and hold the screen. The photo will animate, playing the short video clip and sound.
- Open the Photos App: Launch the Photos app on your iPhone or iPad.
- Select a Live Photo: Find the Live Photo you want to view and tap to open it.
- Touch and Hold: Touch and hold the screen. The Live Photo will animate, playing the short video clip and sound.
- Release to Stop: When you release your finger, the Live Photo will stop playing and revert to a still image.
4. Can I View Live Photos on Other Devices?
While Live Photos are primarily an Apple feature, they can be viewed on other devices with some limitations.
Answer: You can view Live Photos on other Apple devices seamlessly. On non-Apple devices, they typically appear as still photos unless shared through specific platforms that support the format.
- Apple Devices: On other iPhones, iPads, and Macs, Live Photos play seamlessly.
- Android Devices: On Android, Live Photos are typically seen as still images unless you use a third-party app or share them through a service like Google Photos, which supports Live Photos.
- Windows PCs: Similar to Android, Live Photos appear as static images on Windows unless you use iCloud for Windows, which can play them.
- Social Media: Some social media platforms support Live Photos, allowing them to play directly within the app. For example, Facebook supports Live Photos if uploaded from an iOS device.
5. How Do I Share Live Photos with Friends Who Don’t Have iPhones?
Sharing Live Photos with friends who don’t have iPhones can be done in a few different ways.
Answer: The best way to share Live Photos with friends who don’t have iPhones is to send them as videos. You can also use third-party apps or cloud services that support Live Photos.
- Save as Video:
- Open the Live Photo.
- Tap the “Share” button.
- Scroll down and select “Save as Video.”
- Send the video file to your friends.
- Use Google Photos:
- Upload the Live Photo to Google Photos.
- Share the link with your friends. Google Photos can play Live Photos on any device.
- Third-Party Apps:
- Use apps like Lively or Motion Stills to convert Live Photos into GIFs or videos.
- Share the converted file with your friends.
6. Can I Edit Live Photos? What Kind of Edits Can I Make?
Yes, you can edit Live Photos directly on your iPhone or iPad.
Answer: You can edit Live Photos to adjust exposure, brightness, contrast, and more. You can also trim the length of the Live Photo, add filters, and even change the key photo.
-
Open the Live Photo: Launch the Photos app on your iPhone or iPad.
-
Tap Edit: Select the Live Photo you want to edit and tap the “Edit” button in the upper right corner.
-
Adjust Settings:
- Exposure, Brightness, Contrast: Use the adjustment tools to fine-tune the look of your Live Photo.
- Filters: Apply filters to change the color and style of your Live Photo.
- Trim Length: Shorten the length of the Live Photo by dragging the start and end points of the timeline.
-
Change Key Photo:
- Tap the Live Photos button.
- Move the slider to select a new frame.
- Tap “Make Key Photo.”
-
Tap Done: Once you’re satisfied with your edits, tap “Done” to save the changes.
7. What Are Live Photo Effects, and How Do I Use Them?
Live Photo effects allow you to transform your Live Photos into fun and creative animations.
Answer: Live Photo effects include Loop, Bounce, and Long Exposure. To use them, open a Live Photo, swipe up, and choose the effect you want to apply.
- Open the Live Photo: Launch the Photos app on your iPhone or iPad.
- Swipe Up: Open the Live Photo you want to edit and swipe up on the screen.
- Choose an Effect:
- Loop: Turns your Live Photo into a repeating video loop.
- Bounce: Makes your Live Photo rock back and forth, creating a fun bouncing effect.
- Long Exposure: Simulates a long exposure effect, blurring motion and creating artistic effects.
8. How Can I Turn a Live Photo into a Still Photo?
Sometimes, you might want to turn a Live Photo into a regular still photo.
Answer: To turn a Live Photo into a still photo, open the Live Photo, tap Edit, tap the Live Photo icon to turn it off, and then tap Done.
- Open the Live Photo: Launch the Photos app on your iPhone or iPad.
- Tap Edit: Select the Live Photo you want to convert and tap the “Edit” button in the upper right corner.
- Turn Off Live Photo: Tap the Live Photo icon at the top of the screen. This will disable the Live Photo feature for this photo.
- Tap Done: Tap “Done” to save the changes. The Live Photo will now be a still photo.
9. How Do I Change the Key Photo of a Live Photo?
The key photo is the main image that appears when the Live Photo is not playing. You can change it to ensure the best frame is displayed.
Answer: To change the key photo, open the Live Photo, tap Edit, tap the Live Photo icon, move the slider to the desired frame, tap Make Key Photo, and then tap Done.
- Open the Live Photo: Launch the Photos app on your iPhone or iPad.
- Tap Edit: Select the Live Photo you want to edit and tap the “Edit” button in the upper right corner.
- Tap the Live Photos Icon: Tap the Live Photos icon at the bottom of the screen.
- Move the Slider: Move the slider to the frame you want to use as the key photo.
- Make Key Photo: Release your finger and tap “Make Key Photo.”
- Tap Done: Tap “Done” to save the changes.
10. How to Disable Live Photos on My iPhone?
If you prefer not to use Live Photos, you can disable the feature in the Camera app.
Answer: To temporarily disable Live Photos, tap the Live Photo icon in the Camera app. To permanently disable it, go to Settings > Camera > Preserve Settings and turn on the switch next to Live Photo.
Temporarily Disable Live Photos:
- Open the Camera App: Launch the Camera app on your iPhone or iPad.
- Tap the Live Photo Icon: Tap the Live Photo icon at the top of the screen. When the icon has a line through it, Live Photos is disabled.
Permanently Disable Live Photos:
- Open Settings: Launch the Settings app on your iPhone or iPad.
- Tap Camera: Scroll down and tap “Camera.”
- Tap Preserve Settings: Tap “Preserve Settings.”
- Turn On Live Photo: Make sure the switch next to “Live Photo” is turned on. This will preserve your last setting, so if you turn Live Photos off in the Camera app, it will stay off.
11. What Devices Support Live Photos?
Live Photos are supported on a range of Apple devices, but not all.
Answer: Live Photos are supported on iPhone 6s and later, iPad (5th generation) and later, iPad Air (3rd generation) and later, iPad mini (5th generation) and later, and iPad Pro models from 2016 or later.
- iPhones: iPhone 6s, iPhone 6s Plus, and all later models.
- iPads: iPad (5th generation) and later, iPad Air (3rd generation) and later, iPad mini (5th generation) and later, and iPad Pro models from 2016 or later.
12. Troubleshooting: Why Can’t I View My Live Photos?
Sometimes, you might encounter issues viewing Live Photos. Here are a few troubleshooting steps.
Answer: If you can’t view your Live Photos, make sure you are using a supported device, that Live Photos is enabled, and that you are pressing and holding the screen to play the Live Photo.
- Check Device Compatibility: Ensure your device supports Live Photos (iPhone 6s or later, iPad 5th generation or later).
- Enable Live Photos: Make sure Live Photos is enabled in the Camera app.
- Press and Hold: Remember to touch and hold the screen to play the Live Photo.
- Update Software: Ensure your device is running the latest version of iOS or iPadOS.
- Restart Device: Try restarting your iPhone or iPad to resolve any temporary glitches.
13. How Do Live Photos Impact Storage on My Device?
Live Photos take up more storage space than regular photos because they include a short video clip.
Answer: Live Photos take up approximately twice as much storage as regular photos. To manage storage, consider using optimized storage settings or converting Live Photos to still photos when the animation is not necessary.
- Storage Space: Live Photos typically take up about twice as much storage space as regular photos.
- Optimize Storage:
- Go to Settings > Photos.
- Enable “Optimize iPhone Storage.” This will automatically store full-resolution photos and videos in iCloud and keep smaller, device-optimized versions on your iPhone.
- Convert to Still Photos: Convert Live Photos to still photos when the animation is not needed to save space.
- Regular Backups: Regularly back up your photos and videos to iCloud or another cloud service to ensure you don’t lose your memories if your device runs out of space.
14. Advanced Tips for Taking Better Live Photos
To take the best Live Photos, consider these advanced tips.
Answer: Hold your device steady, capture moments with subtle movement, and ensure good lighting to take better Live Photos. Experiment with different angles and perspectives to capture unique and engaging Live Photos.
- Hold Steady: Keep your device as steady as possible when taking a Live Photo to avoid blurry footage.
- Capture Subtle Movement: Live Photos work best when capturing subtle movements, such as a gentle breeze or a slight change in expression.
- Good Lighting: Ensure good lighting conditions to capture clear and vibrant Live Photos.
- Experiment with Angles: Try different angles and perspectives to capture unique and engaging Live Photos.
- Anticipate the Moment: Anticipate the moment you want to capture and start recording a second or two before it happens.
15. Live Photos vs. Videos: Which Should I Use?
Deciding between Live Photos and videos depends on the situation and what you want to capture.
Answer: Use Live Photos for capturing spontaneous moments with a touch of motion and sound. Use videos for recording longer events, performances, or when you need more detailed audio and visual information.
Live Photos:
- Pros:
- Easy to capture spontaneous moments.
- Adds a touch of motion and sound to still images.
- Takes up less storage space than videos.
- Cons:
- Shorter duration than videos.
- Lower resolution than videos.
- Limited editing options compared to videos.
Videos:
- Pros:
- Captures longer events and performances.
- Higher resolution and better audio quality.
- More editing options.
- Cons:
- Takes up more storage space than Live Photos.
- Requires more planning and effort to capture.
16. Are There Any Privacy Concerns with Live Photos?
With Live Photos recording sound and motion, it’s important to be aware of potential privacy concerns.
Answer: Yes, there are privacy concerns with Live Photos. Be mindful of recording conversations or sensitive information. Always respect others’ privacy when capturing Live Photos in public places.
- Recording Conversations: Live Photos record audio, so be mindful of capturing private conversations without consent.
- Sensitive Information: Avoid capturing Live Photos that include sensitive information, such as documents or personal details.
- Public Places: Respect others’ privacy when capturing Live Photos in public places.
- Sharing Considerations: Be cautious when sharing Live Photos, especially with people you don’t know well.
17. How Do I Backup My Live Photos?
Backing up your Live Photos is essential to ensure you don’t lose your precious memories.
Answer: You can back up your Live Photos using iCloud Photos, Google Photos, or by transferring them to a computer. Ensure that your backup settings are configured to include Live Photos.
- iCloud Photos:
- Go to Settings > Photos.
- Enable “iCloud Photos.”
- Ensure you have enough iCloud storage to back up your photos and videos.
- Google Photos:
- Download and install the Google Photos app on your iPhone or iPad.
- Sign in to your Google account.
- Enable “Backup & Sync” to automatically back up your photos and videos to Google Photos.
- Transfer to Computer:
- Connect your iPhone or iPad to your computer using a USB cable.
- Open iTunes or Finder (on macOS Catalina or later).
- Select your device and navigate to the “Photos” tab.
- Choose the photos you want to back up and copy them to your computer.
18. What is the Ideal Lighting for Live Photos?
Good lighting is crucial for capturing high-quality Live Photos.
Answer: The ideal lighting for Live Photos is natural, diffused light. Avoid harsh sunlight or dimly lit environments. Use fill flash to reduce shadows and improve the overall quality of your Live Photos.
- Natural Light: Natural light is generally the best option for Live Photos.
- Diffused Light: Avoid direct sunlight, which can create harsh shadows and overexposed areas.
- Avoid Dimly Lit Environments: Low light conditions can result in grainy and blurry Live Photos.
- Use Fill Flash: Use the fill flash on your iPhone to reduce shadows and improve the overall quality of your Live Photos.
19. How Do I Use Third-Party Apps to Enhance My Live Photos?
Third-party apps offer additional features and editing options for your Live Photos.
Answer: You can use third-party apps like Lively, Motion Stills, and Filmic Pro to enhance your Live Photos. These apps offer advanced editing tools, filters, and effects to make your Live Photos stand out.
- Lively:
- Create GIFs and videos from Live Photos.
- Share Live Photos on social media.
- Motion Stills:
- Stabilize Live Photos and create looping videos.
- Create cinematic pans and zooms.
- Filmic Pro:
- Capture high-quality video with advanced controls.
- Edit and enhance your videos with professional-grade tools.
20. How Do I Create a Time-Lapse from Live Photos?
While you can’t directly create a time-lapse from Live Photos, you can use a workaround.
Answer: You can’t directly create a time-lapse from Live Photos, but you can convert them into a video and then speed up the video to create a time-lapse effect using third-party apps.
- Convert Live Photos to Video:
- Use an app like Lively to convert your Live Photos into a video.
- Create Time-Lapse:
- Use a video editing app like iMovie or FilmoraGo to speed up the video and create a time-lapse effect.
- Adjust the speed settings to achieve the desired time-lapse effect.
21. Are Live Photos Supported on All Social Media Platforms?
Not all social media platforms support Live Photos natively.
Answer: Some platforms like Facebook and Tumblr support Live Photos, while others require you to convert them to videos or GIFs. Check the platform’s guidelines for the best way to share Live Photos.
- Facebook: Supports Live Photos uploaded from iOS devices.
- Instagram: Does not support Live Photos directly; you need to convert them to videos or GIFs.
- Twitter: Does not support Live Photos; you need to convert them to videos or GIFs.
- Tumblr: Supports Live Photos.
22. Can I Print Live Photos?
You can’t print Live Photos as animated images, but you can print the key photo.
Answer: You can print the key photo from a Live Photo. To print the animated part, you would need to convert it to a video or GIF and find a service that can print animated images, which is not commonly available.
- Print the Key Photo:
- Open the Live Photo and select the key photo you want to print.
- Use a printing service or a home printer to print the image.
- Print Animated Images:
- Convert the Live Photo to a video or GIF.
- Look for a specialized printing service that can print animated images, such as lenticular prints.
23. Can I Use Live Photos for Professional Photography?
Live Photos can be a creative tool in professional photography, but they have limitations.
Answer: Live Photos can be used creatively in professional photography, offering a unique way to capture moments with motion. However, they are not ideal for all professional contexts due to resolution and editing limitations.
- Creative Applications:
- Use Live Photos for behind-the-scenes shots, candid moments, or artistic projects.
- Limitations:
- Live Photos have lower resolution compared to professional cameras.
- Editing options are limited compared to professional photo editing software.
- Not suitable for high-resolution prints or large-scale displays.
24. How Do I Export Live Photos?
Exporting Live Photos allows you to save them in different formats for various uses.
Answer: You can export Live Photos as still images, videos, or GIFs using the Photos app or third-party apps. Choose the format that best suits your needs and the platform you are sharing to.
- Export as Still Image:
- Open the Live Photo and tap “Edit.”
- Tap the Live Photo icon to turn it off.
- Tap “Done” to save it as a still image.
- Export as Video:
- Open the Live Photo and tap the “Share” button.
- Select “Save as Video.”
- Export as GIF:
- Use a third-party app like Lively to convert the Live Photo to a GIF.
25. What Are Some Common Mistakes to Avoid When Taking Live Photos?
Avoiding common mistakes can help you capture better Live Photos.
Answer: Common mistakes include not holding the device steady, capturing moments with too much movement, and not paying attention to lighting. Always focus on the subject, hold steady, and ensure good lighting to capture the best Live Photos.
- Not Holding Steady: Keep your device as steady as possible to avoid blurry footage.
- Too Much Movement: Avoid capturing moments with excessive movement, which can result in shaky and unappealing Live Photos.
- Poor Lighting: Pay attention to lighting conditions and avoid capturing Live Photos in dimly lit environments.
- Not Focusing on the Subject: Ensure your subject is in focus to capture clear and sharp Live Photos.
26. How Do I Use Live Photos in Presentations?
Live Photos can add a dynamic element to your presentations.
Answer: To use Live Photos in presentations, convert them to videos or GIFs and embed them in your slides. This will allow you to showcase the motion and sound captured in your Live Photos.
- Convert to Video or GIF:
- Use an app like Lively to convert your Live Photos into a video or GIF.
- Embed in Slides:
- Insert the video or GIF into your presentation slides using software like PowerPoint or Keynote.
- Adjust the playback settings to loop the video or GIF automatically.
27. How Do I Optimize Live Photos for Email?
Optimizing Live Photos for email ensures they are easy to view and don’t take up too much space.
Answer: To optimize Live Photos for email, convert them to GIFs or short videos with reduced resolution. This will ensure they are easily viewable on most devices and don’t exceed email size limits.
- Convert to GIF or Short Video:
- Use an app like Lively to convert your Live Photos into a GIF or short video.
- Reduce Resolution:
- Use a video editing app to reduce the resolution of the video to ensure it doesn’t exceed email size limits.
- Compress the File:
- Use a file compression tool to compress the GIF or video file before attaching it to your email.
28. Are There Any Legal Considerations When Taking Live Photos?
Being aware of legal considerations is important when taking Live Photos, especially in public places.
Answer: Yes, there are legal considerations when taking Live Photos. Be aware of privacy laws, avoid capturing sensitive information without consent, and respect others’ rights when taking photos in public places.
- Privacy Laws:
- Be aware of privacy laws in your area, which may restrict the capturing and sharing of images and videos of people without their consent.
- Sensitive Information:
- Avoid capturing Live Photos that include sensitive information, such as documents or personal details, without permission.
- Public Places:
- Respect others’ rights when taking Live Photos in public places, and avoid capturing images of people who have a reasonable expectation of privacy.
29. How Do I Share Live Photos on a Website?
Sharing Live Photos on a website requires converting them to a compatible format.
Answer: To share Live Photos on a website, convert them to videos or GIFs and embed them using HTML. Optimize the files for web viewing to ensure they load quickly and display correctly.
- Convert to Video or GIF:
- Use an app like Lively to convert your Live Photos into a video or GIF.
- Optimize for Web:
- Use a video editing app or a GIF optimization tool to reduce the file size and optimize the video or GIF for web viewing.
- Embed Using HTML:
- Upload the video or GIF to your website’s server.
- Embed the video or GIF in your webpage using HTML code.
30. What Future Developments Can We Expect for Live Photos?
The future of Live Photos is likely to include enhancements in technology and broader integration.
Answer: Future developments for Live Photos may include higher resolution, improved stabilization, enhanced editing capabilities, and broader support across different platforms and devices.
- Higher Resolution:
- Future versions of Live Photos may support higher resolutions, resulting in sharper and more detailed images and videos.
- Improved Stabilization:
- Advanced stabilization technology may reduce blur and shakiness in Live Photos, resulting in smoother and more professional-looking footage.
- Enhanced Editing Capabilities:
- Future versions of iOS and iPadOS may include more advanced editing tools for Live Photos, allowing users to fine-tune their images and videos with greater precision.
- Broader Platform Support:
- Live Photos may gain broader support across different platforms and devices, making it easier to share and view them with friends and family, regardless of their preferred operating system or device.
Live Photos are a fantastic way to capture and relive your memories with a touch of motion and sound. By following the tips and tricks outlined in this guide, you can make the most of this feature and create stunning, dynamic images that you’ll treasure for years to come.
Here at dfphoto.net, we’re dedicated to providing you with the best resources to elevate your photography skills.
Ready to take your photography to the next level? Visit dfphoto.net today to explore our extensive collection of tutorials, stunning photo galleries, and a vibrant community of photographers. Whether you’re looking to master new techniques, find inspiration, or connect with fellow enthusiasts, dfphoto.net has everything you need to fuel your passion for photography.
Address: 1600 St Michael’s Dr, Santa Fe, NM 87505, United States
Phone: +1 (505) 471-6001
Website: dfphoto.net
Keywords: Live Photos, iPhone photography, iPad photography, digital imaging, visual storytelling.
FAQ: Everything You Need to Know About Live Photos
1. What exactly is a Live Photo?
A Live Photo captures a short video, including sound, 1.5 seconds before and after you take a still image, bringing your photos to life.
2. How do I view a Live Photo on my iPhone?
To view a Live Photo, open the photo in the Photos app and touch and hold the screen to see it animate.
3. Can I share Live Photos with Android users?
Yes, but they might see it as a still photo unless you send it as a video or GIF, or use a service like Google Photos that supports Live Photos.
4. How much storage space do Live Photos take up?
Live Photos typically take up about twice as much storage as regular photos because they include a short video clip.
5. How do I turn off Live Photos on my iPhone?
You can temporarily turn off Live Photos in the Camera app by tapping the Live Photo icon. To permanently disable it, go to Settings > Camera > Preserve Settings and turn on the switch next to Live Photo.
6. Can I edit Live Photos?
Yes, you can edit Live Photos to adjust exposure, brightness, contrast, and more. You can also trim the length, add filters, and change the key photo.
7. What are Live Photo effects?
Live Photo effects include Loop, Bounce, and Long Exposure, which transform your Live Photos into creative animations.
8. How do I change the key photo of a Live Photo?
To change the key photo, open the Live Photo, tap Edit, tap the Live Photo icon, move the slider to the desired frame, tap Make Key Photo, and then tap Done.
9. What devices support Live Photos?
Live Photos are supported on iPhone 6s and later, iPad (5th generation) and later, iPad Air (3rd generation) and later, iPad mini (5th generation) and later, and iPad Pro models from 2016 or later.
10. Are there any privacy concerns with Live Photos?
Yes, be mindful of recording conversations or sensitive information and always respect others’ privacy when capturing Live Photos in public places.