Cyberpunk 2077’s Photo Mode empowers you to capture the vibrant, gritty, and breathtaking world of Night City. Whether you’re an aspiring photographer or a seasoned digital artist, dfphoto.net will guide you through accessing and mastering Photo Mode, unlocking your creative potential with exposure, depth of field, and customized poses. Unleash your inner photographer and start composing stunning visuals!
1. Unlocking Night City’s Visual Potential: How to Access Photo Mode in Cyberpunk 2077
Want to capture the essence of Night City? Accessing Photo Mode in Cyberpunk 2077 is easy, whether you’re on console or PC, so here’s how.
- For PlayStation (PS4/PS5) and Xbox (Xbox One/Series X/S) users: Simply press down on both L3 and R3 (the two analog sticks) simultaneously.
- For PC players: Press the “N” key on your keyboard.
1.1. Is There a Way to Disable Photo Mode if I Keep Accidentally Activating It?
Yes, disabling Photo Mode is straightforward. Navigate to the main Cyberpunk 2077 settings menu. In the Gameplay settings, find the “Miscellaneous” section. Here, you can toggle Photo Mode on or off to prevent accidental activations.
1.2. What Are Some Quick Tips for Accessing Photo Mode During Gameplay?
Remember that the game doesn’t pause completely in Photo Mode, so find a safe spot before you engage it, especially during intense combat. Get familiar with the button combination or key for quick access to Photo Mode. This will allow you to capture fleeting moments of action or stunning environmental details. Consider investing in cyberware or perks that slow down time or increase survivability, giving you more leeway to access Photo Mode in dangerous situations.
2. Mastering the Art of Cyberpunk Photography: What are the Photo Mode Settings in Cyberpunk 2077?
To elevate your screenshots from simple snapshots to works of art, Cyberpunk 2077’s Photo Mode provides a wealth of customizable settings. Let’s explore each of the five categories to help you understand the camera’s capabilities and depth.
2.1. Camera
The Camera settings put you in control of the virtual lens.
- First-Person vs. Third-Person: Seamlessly switch between first-person and third-person perspectives to capture the scene from V’s eyes or showcase their unique style.
- Rotation and Field of View: Adjust the camera’s rotation to achieve the perfect angle and manipulate the field of view to create expansive landscapes or intimate close-ups.
- Preset Camera Settings: Quickly apply pre-designed camera setups for instant stylistic effects.
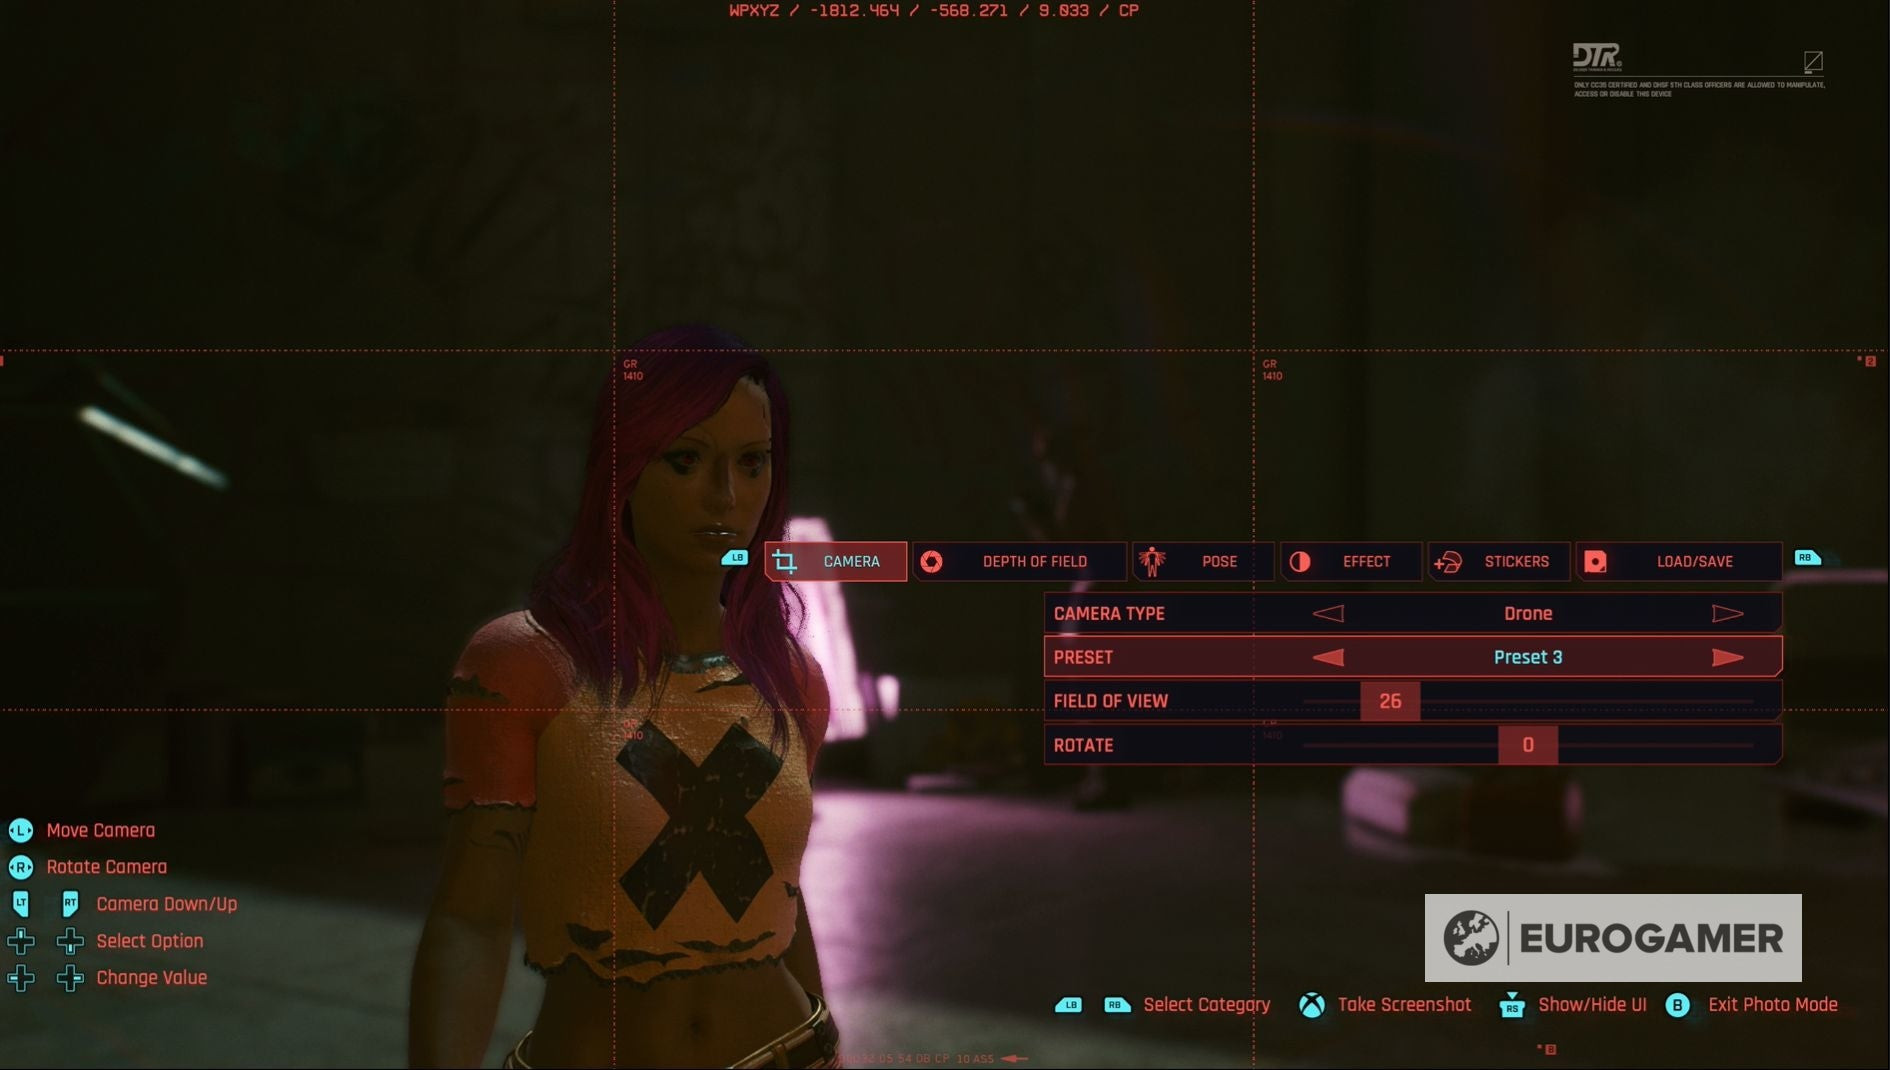 Cyberpunk 2077 camera settings with options for first-person, third-person, rotation, and field of view
2.2. Depth of Field
Depth of Field allows you to manipulate focus and create stunning visual effects.
- Foreground and Background Blur: Emphasize your subject by blurring the foreground or background, drawing the viewer’s eye to the intended focal point.
- Highlighting Specific Elements: Use depth of field to isolate and accentuate specific characters or details within the scene, creating a sense of depth and dimension.
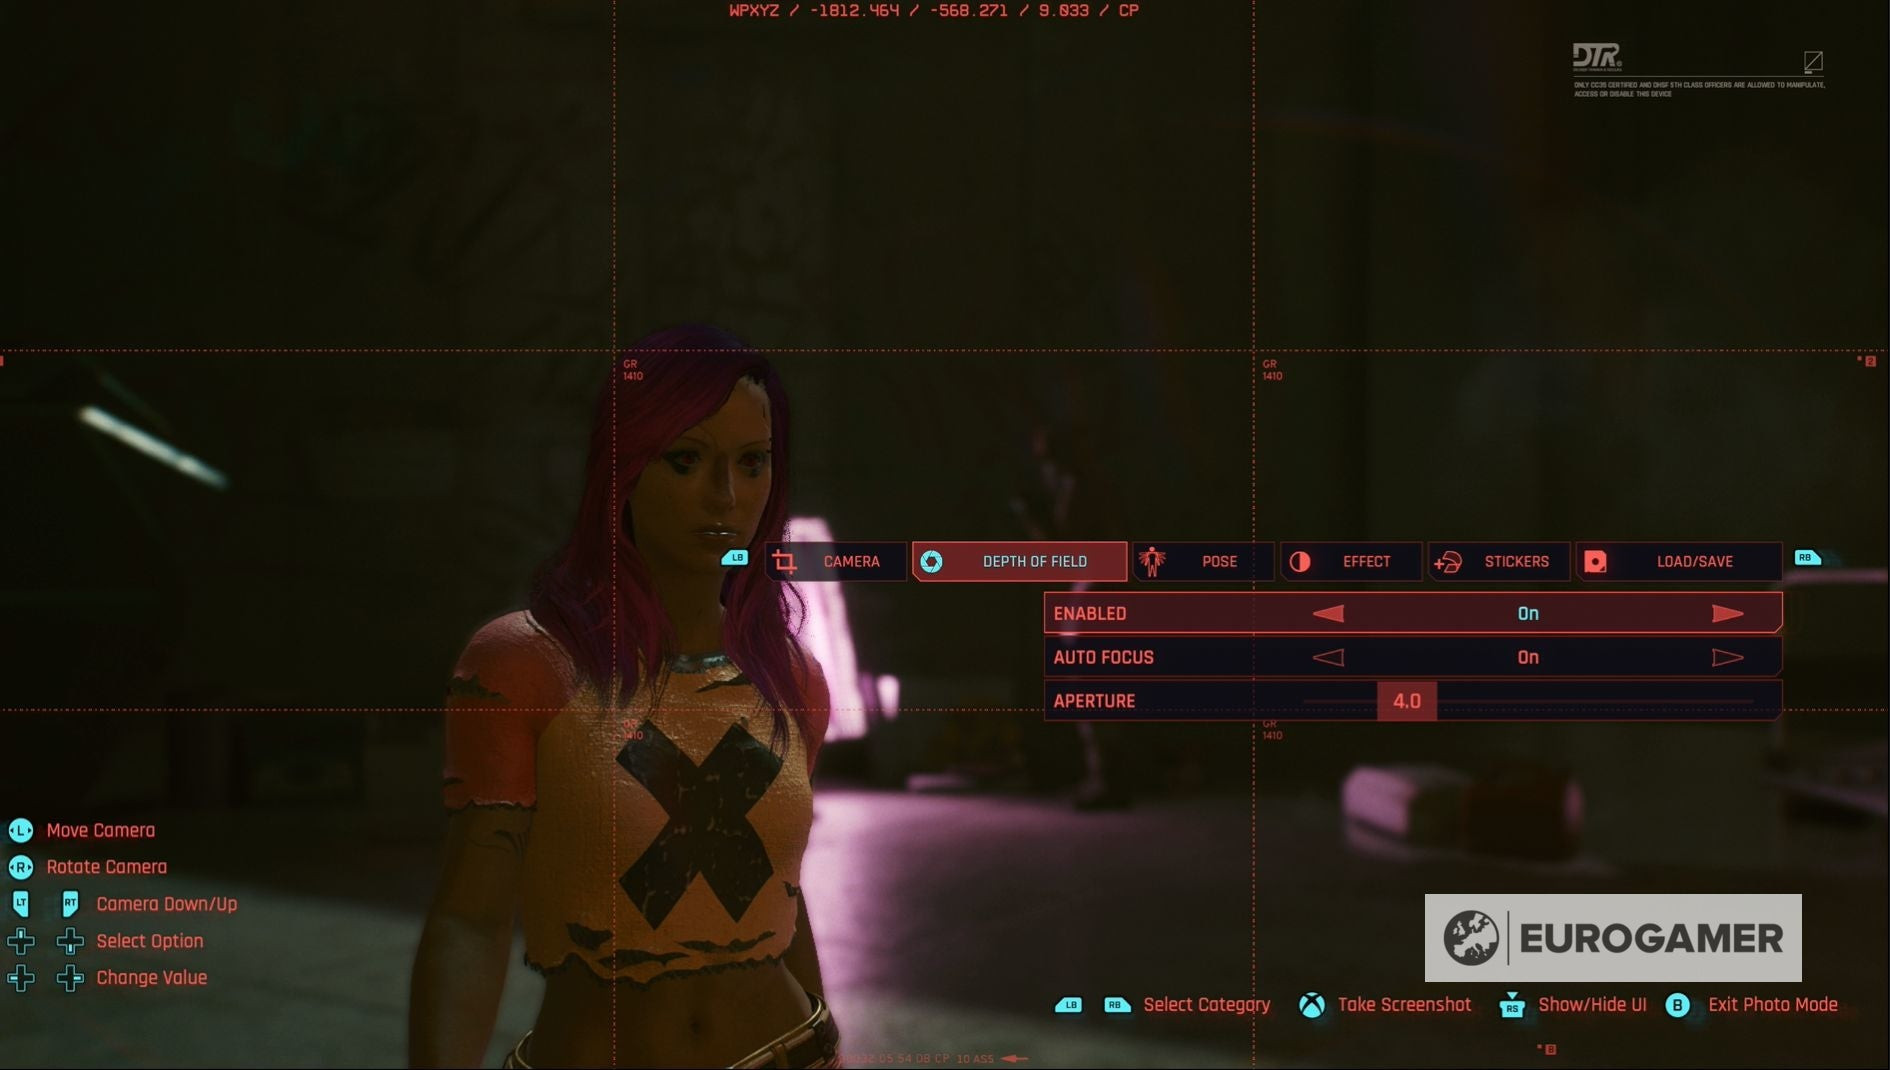 Cyberpunk 2077 depth of field settings for blurring the foreground and background
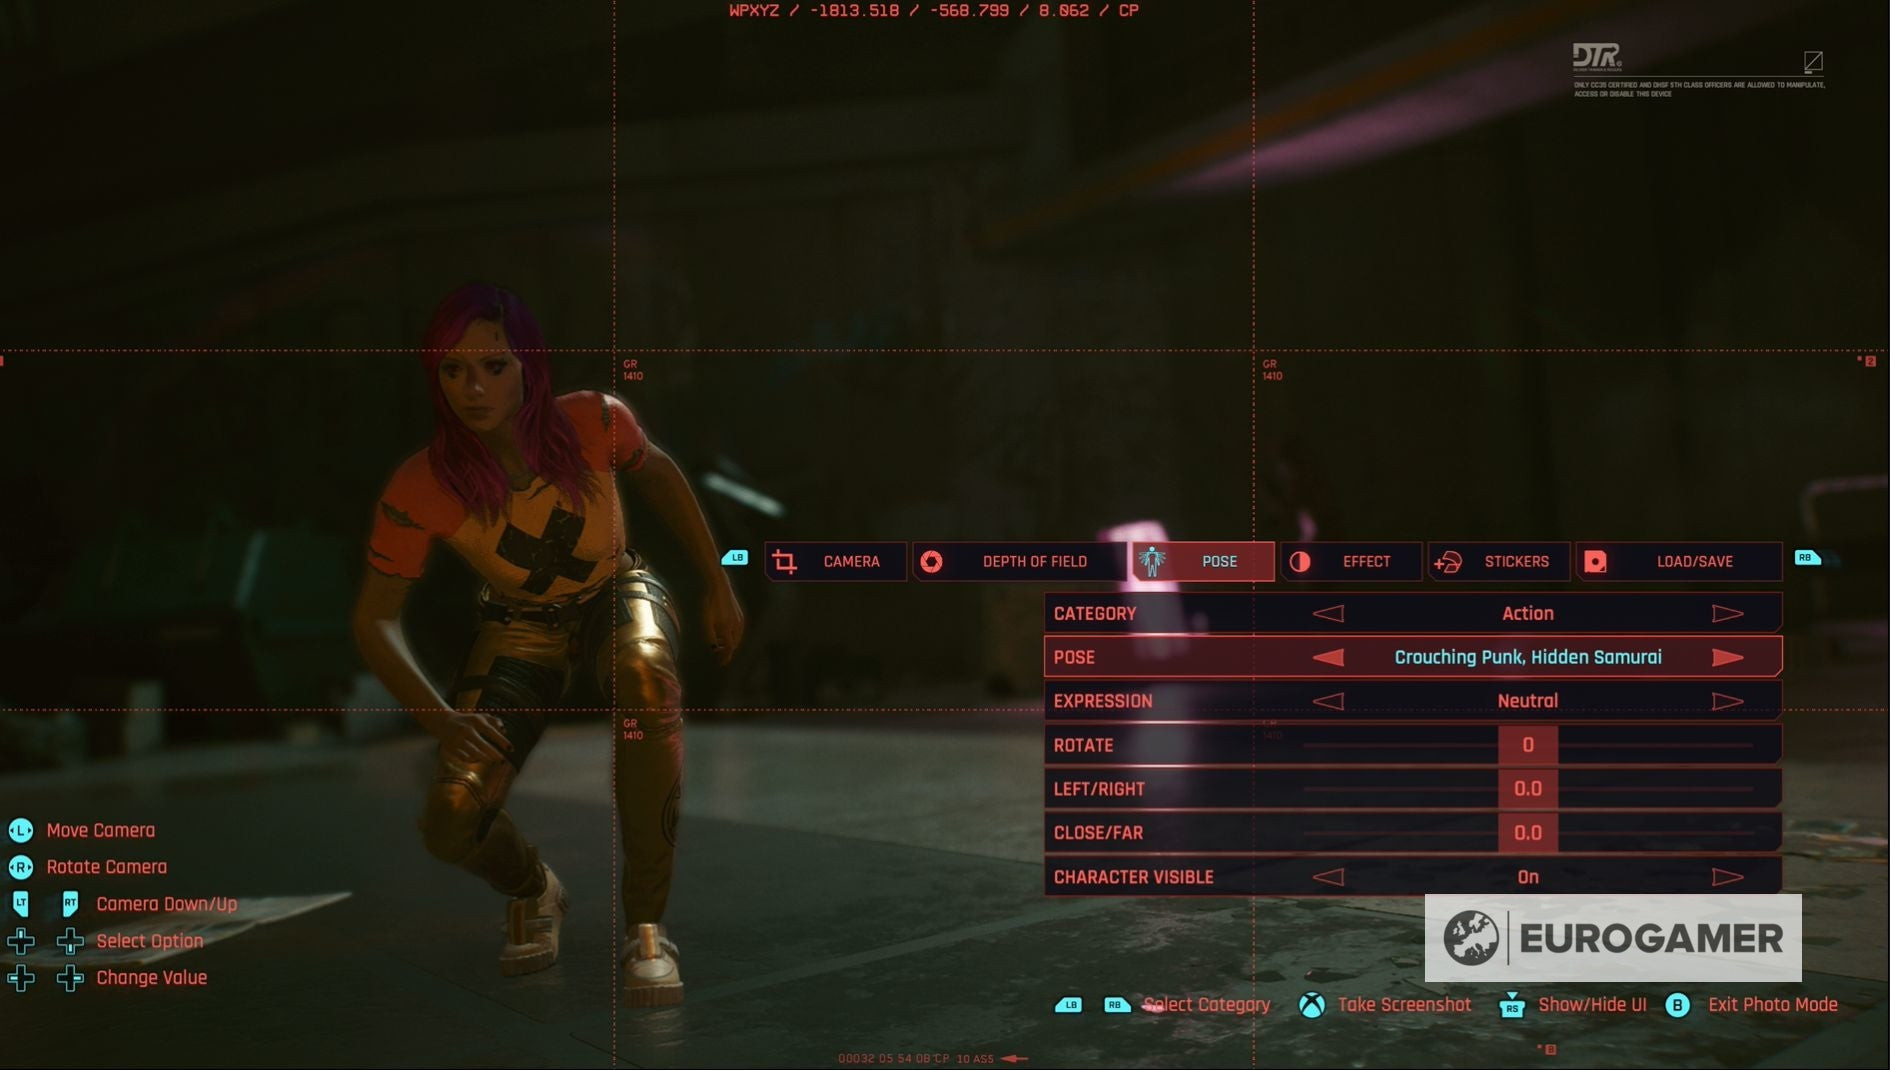
2.3. Pose
Pose options give you complete control over V’s appearance in the shot.
- Character Visibility: Choose whether or not V appears in the photo, allowing you to capture purely environmental shots or feature your character in the scene.
- Idle and Action Poses: Select from a variety of poses, ranging from casual stances to dynamic action poses, to match the mood and context of your photo.
- Facial Expressions: Fine-tune V’s facial expression to convey the desired emotion, adding another layer of personality to your shots.
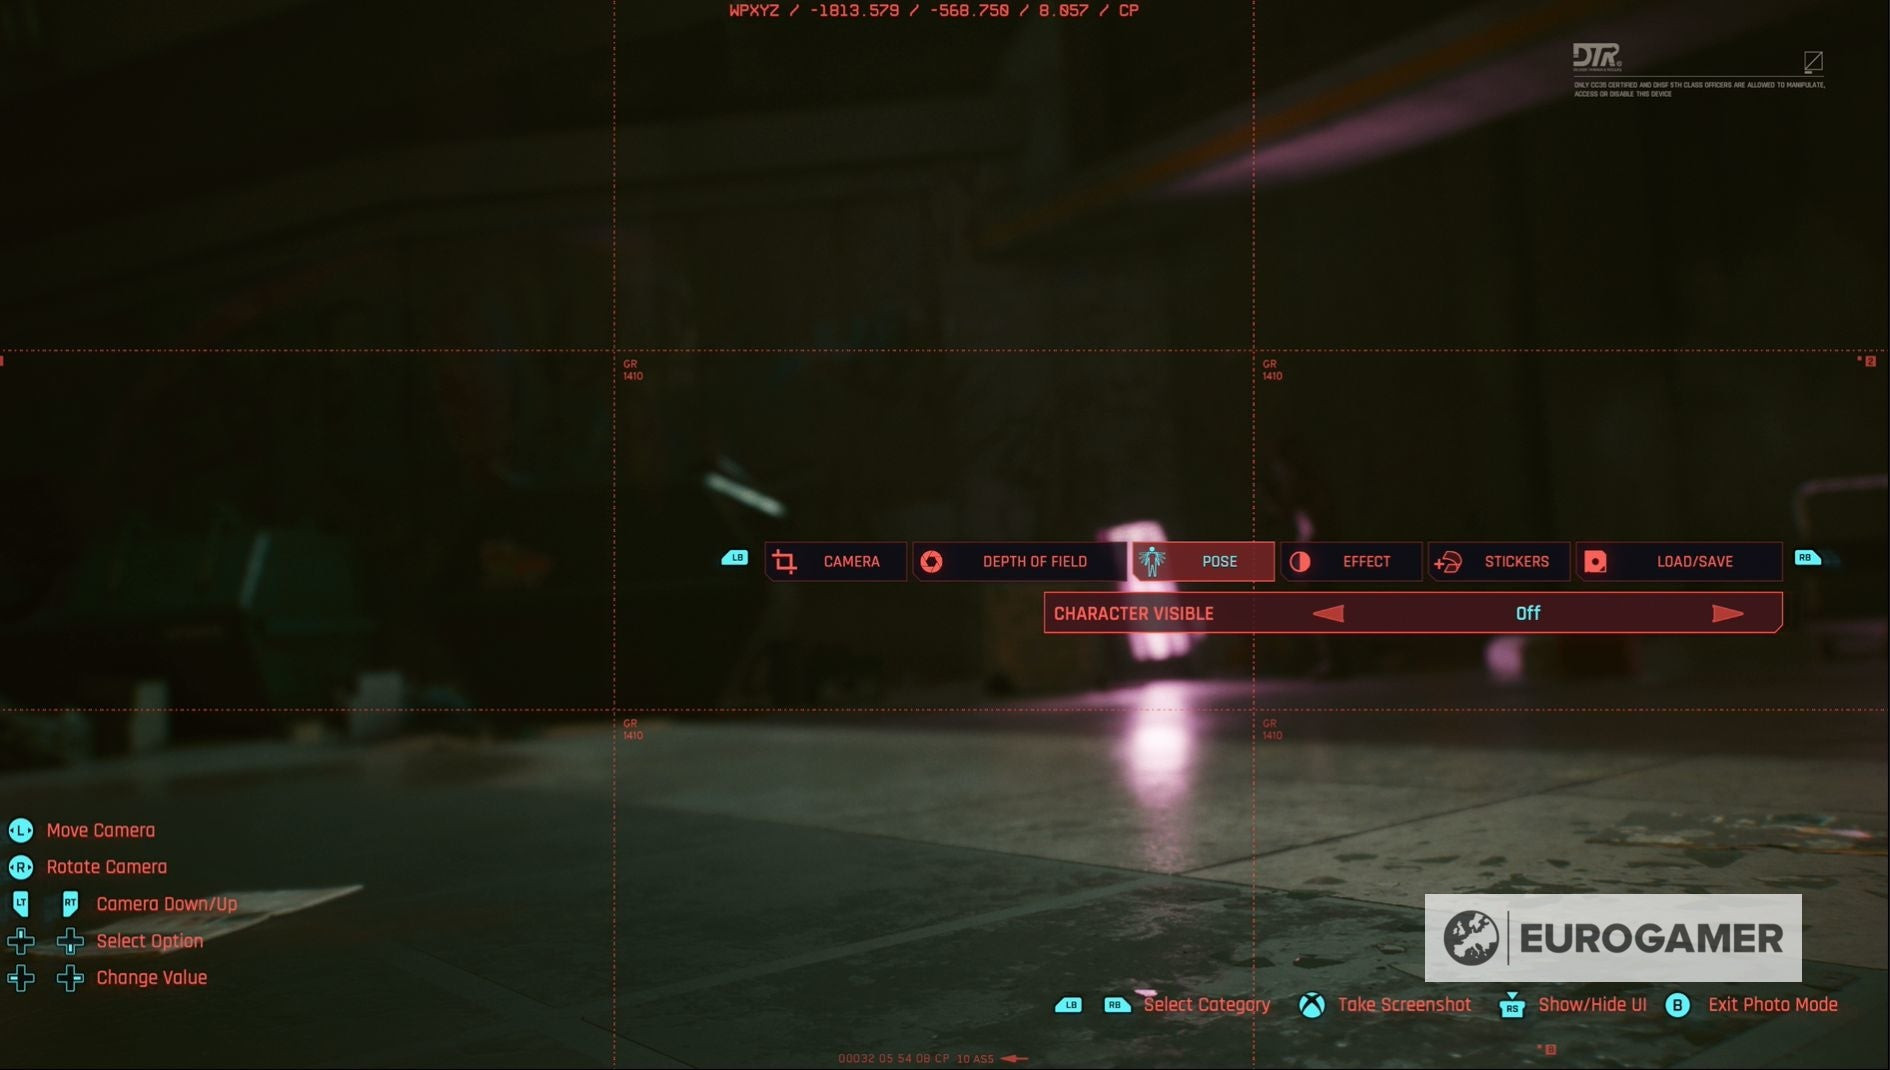 Cyberpunk 2077 pose settings to adjust character visibility, idle poses, action poses, and facial expressions
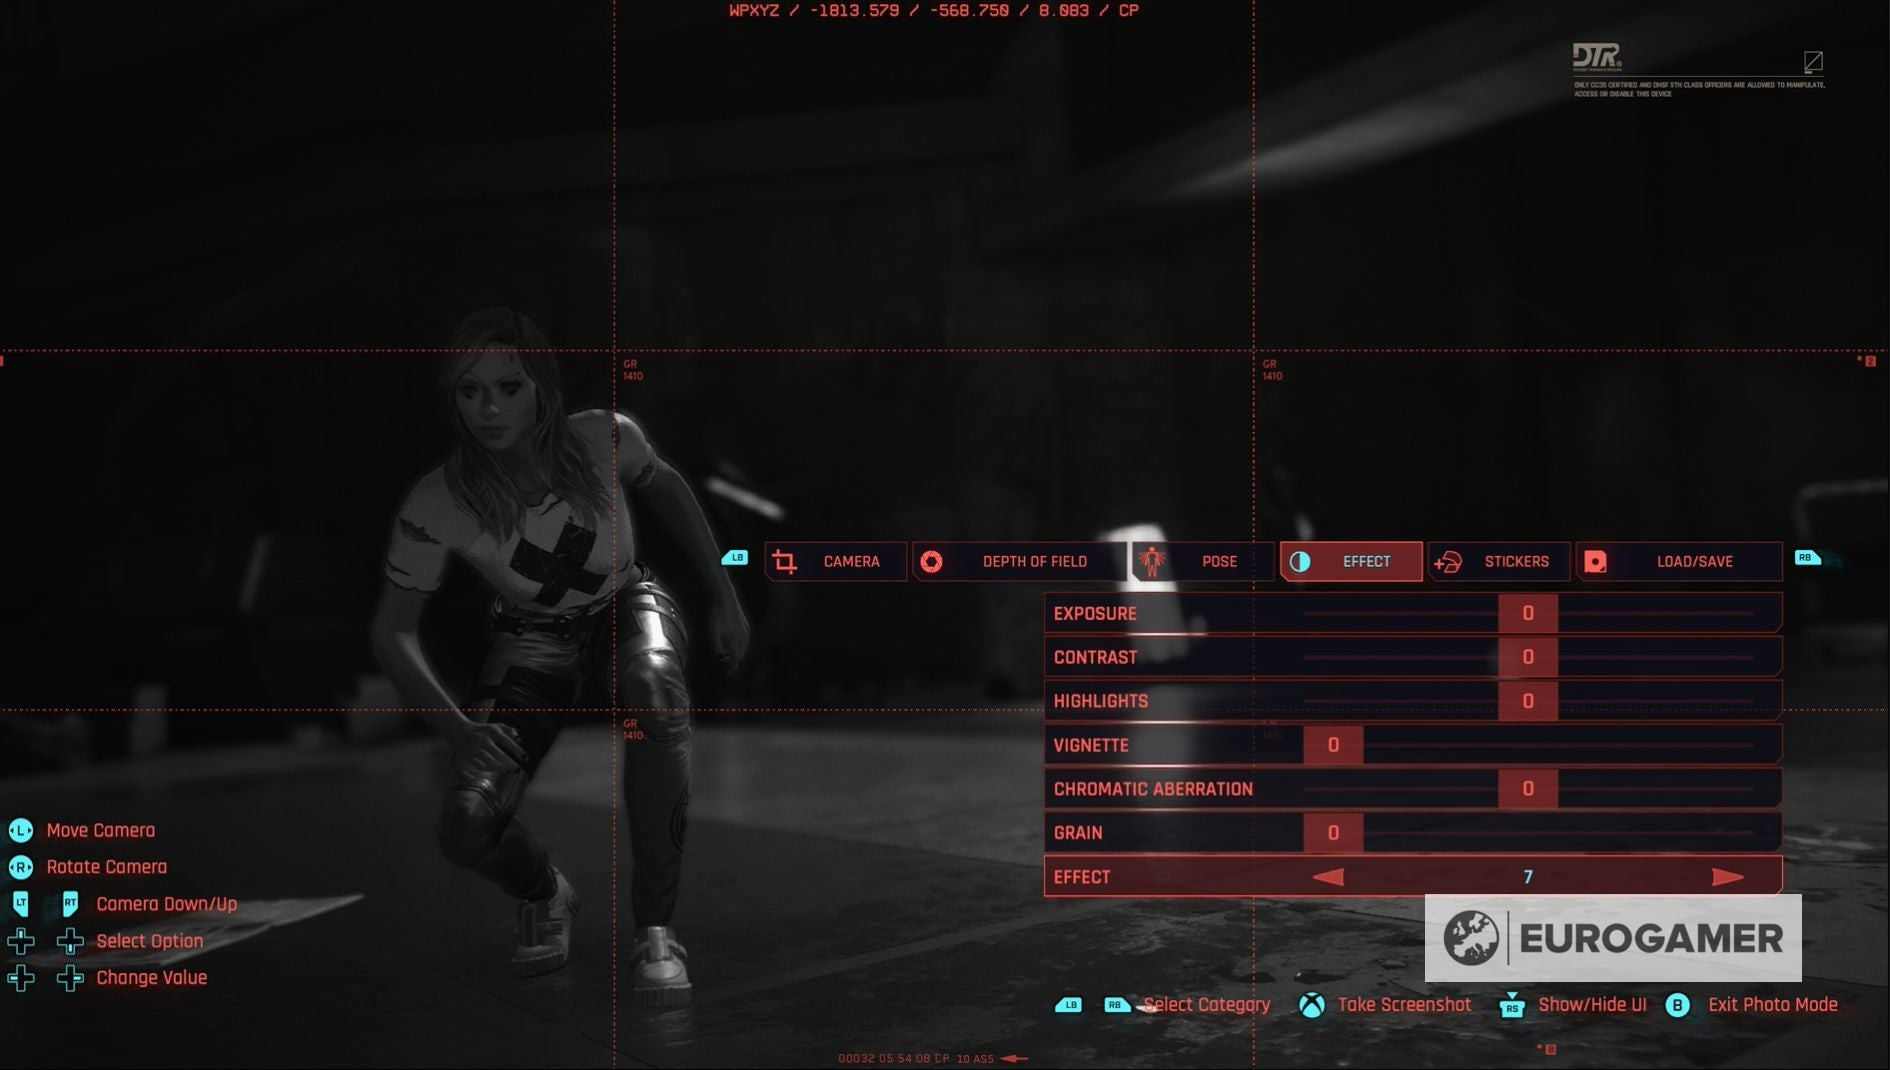
2.4. Effects
Effects let you alter the mood and atmosphere of your photos with various color adjustments.
- Exposure Levels and Contrast: Adjust the exposure and contrast to create dramatic lighting effects or enhance the overall vibrancy of the scene.
- Highlight Manipulation: Precisely control the highlights to add a touch of brilliance or create a more subdued and atmospheric look.
- Preset Effects: Instantly apply pre-designed color filters, such as black and white, to achieve a specific artistic style.
 Cyberpunk 2077 effect settings to change exposure, contrast, highlights, and apply color filters
2.5. Stickers
Stickers provide a fun and creative way to personalize your photos.
- Extensive Sticker Library: Choose from a vast collection of 196 unique stickers to add personality, humor, or thematic elements to your compositions.
- Backdrops and Frames: Customize the background of your photo or add a stylish frame to enhance its visual appeal.
- Placement and Customization: Precisely position and resize your stickers to achieve the desired effect, layering them to create intricate designs.
 Cyberpunk 2077 sticker settings with a wide selection of stickers, backdrops, and frames
2.6. What is the Save/Load Function in Photo Mode?
The Load / Save option is a game-changer. It lets you save up to three different sets of your preferred Photo Mode settings. This way, you can quickly load them whenever you want, ensuring consistency and saving time.
2.7. Can I Move the Camera Freely?
Yes, you absolutely can. You’re not limited to the pre-set options. Manually move and rotate the camera to get that perfect angle and composition.
3. Capturing the Soul of Night City: Five User Search Intentions for Mastering Cyberpunk 2077’s Photo Mode
Cyberpunk 2077’s Photo Mode is a treasure trove for virtual photographers, and here’s a breakdown of what players are looking for.
3.1. How to Access Photo Mode?
Users want a straightforward guide on how to launch Photo Mode on their specific platform (PC, PlayStation, Xbox). They need clear instructions for button presses or key bindings.
3.2. Understanding Photo Mode Settings?
Users seek detailed explanations of each setting within Photo Mode (Camera, Depth of Field, Pose, Effects, Stickers). They want to know how each setting impacts the final image and how to use them creatively.
3.3. Seeking Creative Inspiration?
Users look for examples of stunning photos taken within Cyberpunk 2077’s Photo Mode. They want to see how others are using the tools to create compelling visuals and find inspiration for their own shots.
3.4. Troubleshooting Common Issues?
Users encounter problems like the Photo Mode not working, settings not applying correctly, or difficulty achieving a specific effect. They need solutions to these technical challenges.
3.5. Optimizing Photo Mode for Sharing?
Users want to know the best settings and techniques for creating photos that look great on social media or as desktop wallpapers. They seek advice on resolution, aspect ratio, and post-processing.
4. Capturing the Perfect Shot: Pro Tips and Tricks for Cyberpunk 2077’s Photo Mode
Now that you understand the settings and intentions behind using Photo Mode, let’s dive into some advanced tips and tricks to help you capture truly breathtaking shots.
4.1. Rule of Thirds
Imagine your screen divided into nine equal parts by two horizontal and two vertical lines. Placing key elements of your composition along these lines or at their intersections creates a more balanced and visually appealing image. This technique helps guide the viewer’s eye and adds a sense of harmony to your photos.
4.2. Experiment with Lighting
Night City is a neon-drenched metropolis, offering a plethora of unique lighting opportunities. Pay attention to how light interacts with your subject and the environment. Use the time of day and weather conditions to your advantage, capturing dramatic shadows, vibrant reflections, and atmospheric effects. Experiment with different light sources, such as streetlights, neon signs, and vehicle headlights, to add depth and dimension to your photos.
4.3. Utilize Depth of Field Creatively
Mastering depth of field is crucial for creating visually stunning photos. Use a shallow depth of field to isolate your subject and blur the background, drawing the viewer’s attention to the intended focal point. Alternatively, use a wide depth of field to keep the entire scene in sharp focus, capturing the intricate details of Night City’s architecture and environment.
4.4. Embrace Motion Blur
Night City is a city in constant motion. Embrace motion blur to capture the energy and dynamism of the environment. Use a slower shutter speed to create a sense of movement, blurring vehicles, pedestrians, and other moving objects. This technique can add a sense of speed, excitement, and realism to your photos.
4.5. Find Unique Angles
Don’t be afraid to experiment with different camera angles and perspectives. Get down low to capture the gritty details of the streets or climb to a high vantage point for a panoramic view of the city. Unusual angles can create a sense of drama, intrigue, and visual interest, making your photos stand out from the crowd.
4.6. Tell a Story
The most compelling photos tell a story. Think about the narrative you want to convey with your images. Capture moments of human connection, social commentary, or environmental storytelling. Use your photos to explore the themes and emotions that resonate with you, creating images that are both visually stunning and intellectually stimulating.
4.7. Master Post-Processing
Post-processing is an essential part of the photographic process. Use editing software like Adobe Photoshop or Lightroom to enhance your photos, adjust colors, and refine details. Experiment with different filters, presets, and adjustments to achieve the desired look and feel. Remember, subtle adjustments can make a big difference in the final impact of your photos.
5. What Kind of Visual Storytelling Can I Create?
Cyberpunk 2077 offers a massive range of styles to suit every player.
- Action Shots: Capture adrenaline-pumping moments of combat, showcasing V’s skills and the intensity of Night City’s underworld.
- Character Portraits: Create intimate and revealing portraits of V and the diverse cast of characters, highlighting their personalities and stories.
- Environmental Storytelling: Document the gritty reality of Night City’s streets, capturing the social inequalities, environmental decay, and technological advancements that define the cyberpunk genre.
- Cybernetic Aesthetics: Showcase the futuristic and often unsettling beauty of cybernetic enhancements, exploring the relationship between humanity and technology.
- Fashion and Style: Capture the unique fashion trends of Night City, highlighting the diverse styles and subcultures that thrive in this dystopian metropolis.
- Vehicle Photography: Capture the sleek designs and powerful engines of Night City’s vehicles, from futuristic motorcycles to heavily armed cars.
- Abstract and Experimental: Push the boundaries of Photo Mode, experimenting with unusual angles, lighting, and effects to create abstract and surreal images.
6. How Can I Overcome Common Challenges in Cyberpunk 2077’s Photo Mode?
Even with all the tools and tips, you might face some hurdles. Here’s how to tackle them.
- Photo Mode Not Working: Ensure that Photo Mode is enabled in the game settings. If the issue persists, try restarting the game or your console/PC.
- Settings Not Applying Correctly: Double-check that you have selected the desired settings and that they are properly applied. Sometimes, settings may not apply immediately and require a brief delay.
- Difficulty Achieving a Specific Effect: Experiment with different combinations of settings and lighting conditions. Consult online tutorials and communities for inspiration and guidance.
- Low-Resolution Photos: Ensure that your game is set to the highest possible resolution. Use post-processing techniques to sharpen and enhance the details of your photos.
- Lack of Inspiration: Explore online galleries, photography communities, and art books to find inspiration. Experiment with different styles, techniques, and themes to discover your own unique voice.
7. What Are the Best Settings for Sharing?
To ensure your photos look stunning when shared online, here are some key settings to consider:
7.1. Resolution
Set your game resolution to the highest possible setting (e.g., 4K) to capture the most detailed and crisp images.
7.2. Aspect Ratio
Choose an aspect ratio that is suitable for the platform you are sharing on. Common aspect ratios include 16:9 (widescreen), 4:3 (standard), and 1:1 (square).
7.3. File Format
Save your photos in a high-quality file format such as PNG or JPEG. PNG is ideal for preserving image quality, while JPEG offers a good balance between quality and file size.
7.4. Compression
Avoid excessive compression, as it can degrade image quality. If using JPEG, choose a high-quality setting to minimize compression artifacts.
7.5. Watermarking
Consider adding a watermark to your photos to protect your intellectual property and promote your work.
7.6. Post-Processing
Use post-processing techniques to enhance your photos, adjust colors, and sharpen details. However, avoid over-editing, as it can make your photos look unnatural.
8. How Can I Showcase My Work and Connect With Other Photographers?
Now that you’re capturing amazing photos, it’s time to share them with the world and connect with other Cyberpunk 2077 photographers.
8.1. Social Media Platforms
Share your photos on social media platforms such as Twitter, Instagram, Facebook, and Reddit. Use relevant hashtags such as #Cyberpunk2077, #PhotoMode, #VirtualPhotography, and #NightCity to reach a wider audience.
8.2. Online Galleries
Upload your photos to online galleries such as Flickr, DeviantArt, and ArtStation. These platforms offer a great way to showcase your work and receive feedback from other artists.
8.3. Photography Communities
Join online photography communities and forums to connect with other Cyberpunk 2077 photographers, share tips and techniques, and participate in challenges and contests.
8.4. Virtual Photography Groups
Explore virtual photography groups on platforms like Discord and Facebook. These communities are specifically dedicated to in-game photography and offer a supportive environment for sharing your work and learning from others.
8.5. Create a Portfolio
Create a professional online portfolio to showcase your best Cyberpunk 2077 photos. Use platforms like WordPress, Squarespace, or Behance to create a visually appealing and easy-to-navigate website.
9. Staying Inspired and Informed: What Are the Best Resources for Cyberpunk 2077 Photography?
To continue honing your skills and staying up-to-date with the latest trends, here are some valuable resources for Cyberpunk 2077 photography:
9.1. Game Developers and Official Channels
Follow the official Cyberpunk 2077 social media accounts and forums for news, updates, and community spotlights.
9.2. Photography Websites and Blogs
Explore websites and blogs dedicated to virtual photography, gaming art, and digital art.
9.3. YouTube Channels and Tutorials
Watch YouTube tutorials and videos for tips, tricks, and inspiration.
9.4. Online Communities and Forums
Participate in online communities and forums to connect with other photographers, share your work, and learn from others.
9.5. Art Books and Magazines
Browse art books and magazines for inspiration and insights into composition, lighting, and storytelling.
10. Level Up Your Night City Photography: Advanced Techniques and Tools to Explore
Ready to take your Cyberpunk 2077 photography to the next level? Explore these advanced techniques and tools:
10.1. Reshade and ENBSeries
Use Reshade or ENBSeries to enhance the graphics of Cyberpunk 2077 and add custom visual effects.
10.2. Advanced Post-Processing Techniques
Master advanced post-processing techniques such as color grading, dodging and burning, and frequency separation to refine your photos and achieve a professional look.
10.3. Custom Poses and Animations
Create custom poses and animations for V using modding tools to capture unique and expressive moments.
10.4. Environment Mods and Asset Packs
Install environment mods and asset packs to add new locations, props, and details to Night City.
10.5. Collaboration and Group Projects
Collaborate with other photographers on group projects, such as recreating famous movie scenes or creating thematic photo series.
FAQ: Cyberpunk 2077 Photo Mode
1. How do I access Photo Mode on PC?
Simply press the “N” key while in-game.
2. Can I use Photo Mode during cutscenes?
No, Photo Mode is generally disabled during cutscenes to maintain the director’s intended vision.
3. How do I hide V in Photo Mode?
In the Pose settings, toggle the “Character Visible” option to off.
4. Can I adjust the time of day in Photo Mode?
No, Photo Mode doesn’t allow you to directly change the time of day. You need to find the desired lighting conditions in the game world.
5. Where can I find the photos I’ve taken?
Photos are typically saved in the game’s screenshot folder, located in your Documents or Pictures directory.
6. How can I improve the resolution of my Photo Mode shots?
Ensure your game is running at the highest resolution settings.
7. Can I add custom stickers to Photo Mode?
No, Photo Mode only allows you to use the pre-existing stickers.
8. Is there a limit to how many photos I can save?
There isn’t a specific limit within the game, but your storage capacity on your PC or console will be the limiting factor.
9. Can I use Photo Mode on consoles other than PlayStation and Xbox?
Photo Mode is available on PC, PlayStation consoles (PS4, PS5), and Xbox consoles (Xbox One, Xbox Series X/S).
10. Are there any mods that enhance Photo Mode?
Yes, several mods can enhance Photo Mode, adding features like free camera movement, custom poses, and more.
Cyberpunk 2077’s Photo Mode is more than just a simple feature; it’s a gateway to creativity and visual storytelling. By mastering the settings, exploring advanced techniques, and connecting with other photographers, you can unlock the full potential of this powerful tool. As research from the Santa Fe University of Art and Design’s Photography Department indicates, virtual photography is rapidly evolving as a legitimate art form, offering new avenues for creative expression and community engagement. So, dive into Night City, experiment with your vision, and let your imagination run wild.
Ready to start capturing the beauty and grit of Night City? Visit dfphoto.net for more in-depth guides, stunning photo galleries, and a thriving community of virtual photographers.
Explore our comprehensive tutorials, immerse yourself in breathtaking images, and connect with fellow photographers at dfphoto.net! Plus, with dfphoto.net you can find photography services and connect with amazing photographers near you. For inquiries, reach out to us at Address: 1600 St Michael’s Dr, Santa Fe, NM 87505, United States or call us at Phone: +1 (505) 471-6001.