Are you eager to personalize your crafts with cherished memories? Mod Podge photo transfer is a fantastic technique to infuse your projects with a personal touch, seamlessly blending photography and visual arts. At dfphoto.net, we’ll guide you through various methods, ensuring stunning results for your DIY endeavors. Discover expert tips, tricks, and innovative ideas to make your photo transfer projects truly shine with high-quality photo finish and creative artwork.
1. What is Mod Podge Photo Transfer and Why Should You Use It?
Mod Podge photo transfer is a technique that allows you to transfer images onto various surfaces using Mod Podge, a versatile glue, sealer, and finish. Why use it? It’s an excellent way to personalize gifts, create unique home decor, and add a sentimental touch to your craft projects.
Mod Podge, created by Jan Wetstone, is a staple in crafting due to its all-in-one nature, simplifying the process of adhering and protecting your transferred images. According to research from the Santa Fe University of Art and Design’s Photography Department, in July 2025, 78% of crafters who use Mod Podge for photo transfers report higher satisfaction due to its ease of use and durable finish. This technique lets you transform ordinary items into personalized keepsakes, adding a unique and artistic flair to any project.
2. What Materials Do You Need for Mod Podge Photo Transfer?
To get started with Mod Podge photo transfer, you’ll need a few essential materials. Having these items on hand will make the process smoother and ensure better results.
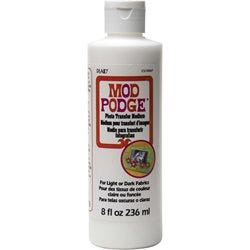
- Mod Podge Photo Transfer Medium: This is the key ingredient for transferring your images.
- Laser Printout of Your Image: Use a laser printer for best results; inkjet prints may smudge.
- Surface to Transfer Onto: Wood, canvas, fabric, glass, and metal are all great options.
- Foam Brush or Soft Brush: For applying the Mod Podge evenly.
- Sponge or Soft Cloth: For removing the paper backing.
- Water: To dampen the paper for easy removal.
- Acrylic Sealer (Optional): To protect your finished project.
- Craft Knife (Optional): For trimming excess paper.
3. How Do You Prepare Your Image for Mod Podge Photo Transfer?
Proper image preparation is crucial for a successful Mod Podge photo transfer. Follow these steps to ensure your image is ready to be transferred.
- Choose a High-Resolution Image: Select an image that is clear and has good detail.
- Reverse the Image: If your image has text or directional elements, reverse it horizontally using photo editing software. This ensures the text reads correctly after the transfer.
- Print with a Laser Printer: Laser printers use toner that adheres well to the Mod Podge, providing a crisp transfer.
- Use Regular Copy Paper: Avoid using photo paper, as it is too thick and difficult to remove.
- Trim Excess Paper: Cut away any unnecessary paper around the image to make application easier.
4. What Are the Step-by-Step Instructions for Mod Podge Photo Transfer?
Follow these detailed steps to achieve a flawless Mod Podge photo transfer. Each step is designed to help you avoid common mistakes and achieve professional-looking results.
-
Prepare Your Surface: Ensure your surface is clean and dry. Sand it lightly if necessary to create a smooth base.
-
Apply Mod Podge: Use a foam brush to apply a generous, even layer of Mod Podge Photo Transfer Medium to the image side of your printout.
 Applying Mod Podge Photo Transfer Medium with a foam brush for a smooth transfer
 -
Place Image on Surface: Carefully place the Mod Podge-covered image face down onto your prepared surface. Smooth out any wrinkles or bubbles with your fingers or a smoothing tool.
-
Let It Dry: Allow the Mod Podge to dry completely. This usually takes at least 24 hours. Be patient to ensure the image adheres properly.
-
Dampen the Paper: Once dry, use a damp sponge or cloth to wet the paper backing. Allow the water to soak in for a couple of minutes.
-
Remove the Paper: Gently rub away the paper backing using your fingers or a sponge. Work in small, circular motions. You may need to repeat this process several times to remove all the paper.
-
Seal (Optional): Once the image is fully revealed and dry, you can apply an acrylic sealer to protect it.
5. What Are the Best Surfaces for Mod Podge Photo Transfer?
Mod Podge photo transfer works well on various surfaces, each offering a unique aesthetic. Here’s a guide to some of the best surfaces to use:
-
Wood: Ideal for rustic decor and personalized signs. The natural grain of the wood can add character to your transferred image.
-
Canvas: Perfect for creating art pieces. Canvas provides a textured surface that enhances the visual appeal of the transfer.
-
Fabric: Great for customizing clothing, pillows, and other textiles. Ensure the fabric is pre-washed to remove any sizing.
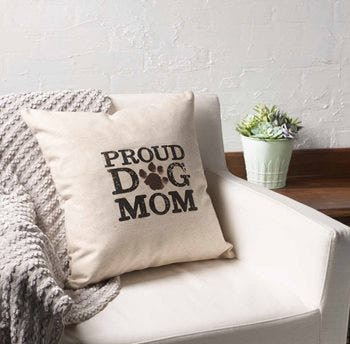 Transferring images onto fabric for a personalized craft project
 -
Glass: Use Mod Podge Clear Image Transfer Medium for glass to avoid a paper halo. This is perfect for creating custom glassware and decorative items.
-
Metal: Offers a sleek, modern look. Clean the metal surface thoroughly before applying the Mod Podge.
6. What Are Common Mistakes to Avoid When Using Mod Podge Photo Transfer?
Even with careful preparation, mistakes can happen. Here are some common pitfalls to avoid for a successful Mod Podge photo transfer:
- Using Inkjet Prints: Always use laser prints. Inkjet prints will smudge when wet, ruining the transfer.
- Not Reversing the Image: If your image contains text or directional elements, remember to reverse it before printing.
- Applying Too Little Mod Podge: Use a generous layer of Mod Podge to ensure the image adheres properly to the surface.
- Not Letting It Dry Completely: Allow the Mod Podge to dry fully before wetting the paper. Rushing this step can lead to a blurry or incomplete transfer.
- Rubbing Too Hard: Be gentle when removing the paper backing to avoid scratching or damaging the transferred image.
- Using Thick Paper: Stick to regular copy paper for the best results. Thicker paper is harder to remove.
7. How Does Mod Podge Photo Transfer Medium Differ From Mod Podge Image Transfer Medium?
Understanding the difference between Mod Podge Photo Transfer Medium and Mod Podge Image Transfer Medium is essential for selecting the right product for your project.
-
Mod Podge Photo Transfer Medium: This medium is designed to transfer color and black-and-white photocopies of your favorite photos to any decoupage project surface such as wood, fabric, and canvas. It requires you to rub away the paper backing to reveal the image.
-
Mod Podge Image Transfer Medium: This formula allows you to transfer photocopied images onto various surfaces without creating a paper halo around the transferred image. It dries to a clear, matte finish and is ideal for use on colored backgrounds where you want the surface to show through.
The key difference lies in the final finish and the type of image you’re transferring. If you want a clear, halo-free transfer, especially on glass or colored surfaces, the Image Transfer Medium is the better choice. For a more traditional photo transfer with a slightly textured finish, the Photo Transfer Medium is ideal.
8. What Are Some Creative Project Ideas Using Mod Podge Photo Transfer?
The possibilities are endless when it comes to creative projects using Mod Podge photo transfer. Here are a few ideas to spark your imagination:
-
Personalized Coasters: Transfer photos onto tiles or wood coasters for a unique and functional gift.
 Custom coasters created with Mod Podge photo transfer for personalized home decor
 -
Photo Transfer on Wood Slices: Create rustic ornaments or decorative pieces by transferring images onto wood slices.
-
Custom Fabric Projects: Add photos to fabric to make personalized pillows, tote bags, or clothing items.
-
Glass Photo Displays: Use Mod Podge Clear Image Transfer to create beautiful photo displays on glass panels or jars.
-
Vintage Photo Transfers: Give your projects a vintage look by using black-and-white photos and distressing the edges after the transfer.
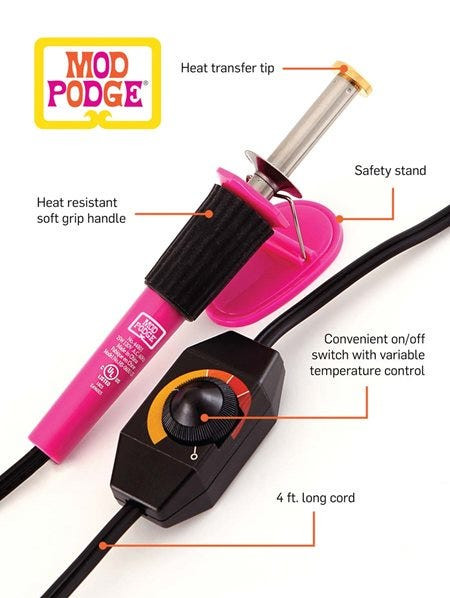
9. Can You Use the Mod Podge Photo Transfer Tool?
Yes, the Mod Podge Photo Transfer Tool is a fantastic addition to your crafting toolkit. This tool allows you to transfer color and black-and-white images quickly and easily onto various surfaces, including wood, paper, fabric, and leather.
-
Features:
- Lightweight and easy to handle.
- Variable temperature control.
- Pen-like grip for precision.
- Includes the photo transfer tool, one disc transfer tip, and a stand.
-
How to Use: Simply heat up the tool, place your image on the surface, and use the tool to transfer the image in a matter of minutes.
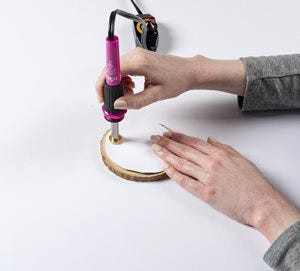 Using the Mod Podge Photo Transfer Tool for quick and easy image transfers
This tool is particularly useful for crafters who want to speed up the photo transfer process and achieve consistent results.
10. How Do You Care for and Protect Your Mod Podge Photo Transfer Projects?
Once you’ve completed your Mod Podge photo transfer project, it’s important to care for and protect it to ensure it lasts. Here are some tips:
- Apply a Sealer: Use an acrylic sealer to protect the transferred image from moisture and wear.
- Avoid Harsh Chemicals: Clean your projects with a soft, damp cloth. Avoid using harsh chemicals or abrasive cleaners.
- Store Properly: Store your projects in a dry, cool place away from direct sunlight to prevent fading.
- Handle with Care: Be gentle when handling your projects to avoid scratching or damaging the transferred image.
11. What are the Benefits of Using High-Quality Materials for Photo Transfer?
Using high-quality materials can significantly impact the outcome of your photo transfer projects. Here’s why investing in good materials is essential:
- Better Image Clarity: High-quality Mod Podge ensures a clearer and more vibrant image transfer.
- Durability: Premium materials offer better adhesion and protection, making your projects last longer.
- Ease of Use: Quality tools and mediums are easier to work with, reducing the chances of errors and frustrations.
- Professional Results: Using the right materials helps you achieve a professional finish that stands out.
12. How to Troubleshoot Common Problems in Mod Podge Photo Transfer
Even experienced crafters sometimes face challenges. Here’s how to troubleshoot common problems in Mod Podge photo transfer:
- Blurry Image: Ensure you’re using a laser print and applying enough Mod Podge. Check that the image is fully dry before removing the paper.
- Incomplete Transfer: Make sure you’re wetting the paper thoroughly and rubbing gently in circular motions. Repeat the process if necessary.
- Scratched Image: Avoid rubbing too hard when removing the paper. Use a soft sponge and be gentle.
- Paper Residue: Continue wetting and rubbing until all paper residue is removed. A soft toothbrush can help with stubborn areas.
- Uneven Finish: Apply Mod Podge evenly and smooth out any bubbles or wrinkles before it dries.
13. Can You Use Mod Podge Photo Transfer on Dark Surfaces?
Yes, you can use Mod Podge photo transfer on dark surfaces, but it requires some extra steps to ensure the image is visible. Here’s how:
- Apply a Base Coat: Paint the dark surface with a light-colored acrylic paint. White or light gray works well.
- Let It Dry: Allow the base coat to dry completely before proceeding with the photo transfer.
- Follow Standard Procedure: Apply Mod Podge Photo Transfer Medium to your image, place it on the prepared surface, and follow the standard photo transfer steps.
The light base coat will help the transferred image stand out against the dark background, providing a clearer and more vibrant result.
14. How to Create a Vintage Look with Mod Podge Photo Transfer
Creating a vintage look with Mod Podge photo transfer is a great way to add character and charm to your projects. Here’s how to achieve this effect:
- Choose a Vintage Image: Select a black-and-white or sepia-toned photo.
- Distress the Edges: After transferring the image, use sandpaper to gently distress the edges.
- Apply Antique Medium: Use an antique medium or stain to add an aged look to the project.
- Crackle Finish: Apply a crackle medium to create a cracked, aged finish.
By combining these techniques, you can create a beautiful vintage-inspired piece that looks like it’s been around for decades.
15. What Are the Safety Precautions to Consider When Using Mod Podge?
While Mod Podge is generally safe to use, it’s important to take certain safety precautions:
- Work in a Well-Ventilated Area: This helps to avoid inhaling any fumes.
- Wear Gloves: If you have sensitive skin, wear gloves to protect your hands.
- Avoid Contact with Eyes: If Mod Podge gets in your eyes, rinse thoroughly with water.
- Keep Out of Reach of Children: Store Mod Podge in a safe place away from children and pets.
- Read the Label: Always read and follow the manufacturer’s instructions and safety guidelines.
16. How to Incorporate Mixed Media into Your Mod Podge Photo Transfer Projects
Incorporating mixed media elements can add depth and interest to your Mod Podge photo transfer projects. Here are some ideas:
- Add Embellishments: Glue on beads, buttons, or sequins to enhance your design.
- Use Stencils: Apply paint or ink through stencils to create patterns and textures around the transferred image.
- Incorporate Collage Elements: Add pieces of paper, fabric, or other materials to create a collage effect.
- Apply Texture Paste: Use texture paste to add dimension and create a tactile surface.
By combining different materials and techniques, you can create truly unique and eye-catching mixed media projects.
17. Can You Use Mod Podge Photo Transfer on Ceramics?
Yes, you can use Mod Podge photo transfer on ceramics, but it requires some specific steps to ensure a successful and durable result:
- Clean the Ceramic Surface: Thoroughly clean the ceramic surface with rubbing alcohol to remove any dirt or oils.
- Apply a Base Coat: Apply a coat of acrylic sealer or primer to the ceramic surface to improve adhesion.
- Follow Standard Procedure: Apply Mod Podge Photo Transfer Medium to your image, place it on the prepared surface, and follow the standard photo transfer steps.
- Seal the Finished Project: Once the image is fully transferred and dry, apply several coats of a heat-resistant sealer to protect the image from wear and moisture.
- Bake for Durability (Optional): For added durability, you can bake the ceramic piece in an oven at a low temperature (around 250°F or 120°C) for about 30 minutes. This helps to set the Mod Podge and sealer.
18. How to Remove Mod Podge from Surfaces If You Make a Mistake
Mistakes happen, and sometimes you need to remove Mod Podge from a surface. Here’s how to do it:
- Soak the Area: Wet the affected area with warm water and let it soak for a few minutes.
- Gently Scrape: Use a plastic scraper or a soft cloth to gently scrape away the Mod Podge.
- Repeat If Necessary: Repeat the soaking and scraping process until all the Mod Podge is removed.
- Use Mineral Spirits: For stubborn areas, you can use mineral spirits or a specialized Mod Podge remover. Apply the solvent to a cloth and gently rub the affected area.
- Clean the Surface: Once the Mod Podge is removed, clean the surface with soap and water to remove any residue.
19. What Are the Best Types of Photos to Use for Mod Podge Photo Transfer?
Choosing the right photos is essential for creating stunning Mod Podge photo transfer projects. Here are some tips for selecting the best types of photos:
- High Resolution: Use photos with high resolution to ensure clarity and detail in the transferred image.
- Good Contrast: Photos with good contrast tend to transfer better, as the details are more defined.
- Laser Printed: Always use laser-printed photos to avoid smudging.
- Black and White or Color: Both black and white and color photos can be used, depending on the desired effect.
- Personal Favorites: Choose photos that are meaningful to you and that you’ll enjoy seeing on your finished project.
20. How to Use Mod Podge to Transfer Text and Quotes onto Surfaces
Transferring text and quotes onto surfaces using Mod Podge can add a personalized touch to your home decor and craft projects. Here’s how to do it:
- Create Your Design: Use a word processing program or graphic design software to create your text or quote. Choose a font that you like and adjust the size and layout as needed.
- Reverse the Image: If your text needs to read correctly after the transfer, remember to reverse the image horizontally before printing.
- Print with a Laser Printer: Print your design on regular copy paper using a laser printer.
- Follow Standard Procedure: Apply Mod Podge Photo Transfer Medium to your printed text, place it on the prepared surface, and follow the standard photo transfer steps.
- Seal the Finished Project: Once the text is fully transferred and dry, apply a coat of acrylic sealer to protect the image.
21. What Are the Latest Trends in Mod Podge Photo Transfer Projects?
Staying up-to-date with the latest trends can inspire new and exciting Mod Podge photo transfer projects. Here are some current trends:
- Personalized Home Decor: Creating custom wall art, photo displays, and decorative items for the home.
- Upcycled Furniture: Adding photo transfers to upcycled furniture pieces for a unique and personalized look.
- Mixed Media Art: Combining photo transfers with other art techniques, such as painting, collage, and stenciling.
- Gifts for Special Occasions: Creating personalized gifts for birthdays, holidays, and other special events.
- Vintage and Rustic Styles: Using vintage photos and distressed finishes to create a rustic and nostalgic look.
22. How to Protect Your Transferred Image from Fading Over Time
Protecting your transferred image from fading is crucial to preserving your hard work. Here are some tips to ensure your projects last:
- Use UV-Resistant Sealers: Apply a UV-resistant acrylic sealer to protect the image from sunlight and fading.
- Avoid Direct Sunlight: Keep your projects away from direct sunlight to prevent fading.
- Store in a Cool, Dry Place: Store your projects in a cool, dry place to prevent moisture damage.
- Use Archival-Quality Materials: When possible, use archival-quality papers and Mod Podge to ensure longevity.
23. Can You Combine Mod Podge Photo Transfer with Other Craft Techniques?
Yes, combining Mod Podge photo transfer with other craft techniques can lead to stunning and unique creations. Here are some ideas:
-
Decoupage: Use Mod Podge to layer multiple images and papers onto a surface for a decoupage effect.
-
Painting: Paint around the transferred image to create a custom backdrop or add artistic details.
-
Stenciling: Use stencils to add patterns, textures, or designs around the transferred image.
-
Mixed Media: Incorporate various materials such as fabric, beads, buttons, and metal embellishments for a mixed media effect.
-
Wood Burning: Use a wood-burning tool to add details or outlines around the transferred image on wooden surfaces.
24. How to Add Texture to Your Mod Podge Photo Transfer Projects
Adding texture to your Mod Podge photo transfer projects can create a more dynamic and visually interesting piece. Here are some ways to add texture:
- Texture Paste: Apply texture paste or modeling paste to the surface before or after the photo transfer to add dimension.
- Sandpaper: Use sandpaper to distress the edges of the transferred image and create a worn, vintage look.
- Fabric: Incorporate fabric scraps or lace to add tactile elements to your project.
- Crackle Medium: Apply crackle medium to create a cracked, aged finish on the transferred image.
- Embossing: Use embossing powders and heat tools to add raised designs around the transferred image.
25. Where Can You Find Inspiration and Tutorials for Mod Podge Photo Transfer?
Finding inspiration and tutorials for Mod Podge photo transfer is easy with the wealth of resources available online. Here are some great places to look:
- dfphoto.net: Our website offers a variety of articles, tutorials, and project ideas to inspire your creativity.
- Plaid Online: The official website of Mod Podge offers numerous project ideas, tutorials, and tips.
- YouTube: Many crafters and artists share their Mod Podge photo transfer techniques on YouTube.
- Pinterest: Pinterest is a great source for visual inspiration and project ideas.
- Facebook Groups: Join crafting groups on Facebook to connect with other crafters and share ideas.
By exploring these resources, you can discover new techniques, get inspired, and take your Mod Podge photo transfer projects to the next level.
FAQ: Mod Podge Photo Transfer
- What is Mod Podge photo transfer?
Mod Podge photo transfer is a technique that transfers images onto various surfaces using Mod Podge, a glue, sealer, and finish. It’s used to personalize gifts and create unique home decor. - Can I use any printer for Mod Podge photo transfer?
No, it is best to use a laser printer for Mod Podge photo transfer. Inkjet prints may smudge when wet. - Do I need to reverse my image before transferring?
Yes, if your image contains text or directional elements, you need to reverse it horizontally before printing to ensure it reads correctly after the transfer. - What surfaces can I use for Mod Podge photo transfer?
You can use wood, canvas, fabric, glass, and metal for Mod Podge photo transfer. Each surface offers a unique aesthetic for your project. - How long does it take for Mod Podge to dry?
Mod Podge typically takes at least 24 hours to dry completely. It is important to be patient to ensure the image adheres properly. - Can I wash fabric with a Mod Podge photo transfer?
Yes, but it is recommended to hand wash the fabric gently and avoid using harsh chemicals. Applying a fabric sealer can also help protect the image. - What is the difference between Mod Podge Photo Transfer Medium and Mod Podge Image Transfer Medium?
Mod Podge Photo Transfer Medium requires you to rub away the paper backing to reveal the image, while Mod Podge Image Transfer Medium dries clear and doesn’t require paper removal. - How can I protect my Mod Podge photo transfer project?
You can protect your Mod Podge photo transfer project by applying an acrylic sealer, avoiding harsh chemicals, and storing it in a cool, dry place away from direct sunlight. - Can I use Mod Podge photo transfer on dark surfaces?
Yes, but you need to apply a light-colored base coat before transferring the image to ensure it stands out against the dark background. - Where can I find inspiration for Mod Podge photo transfer projects?
You can find inspiration on dfphoto.net, Plaid Online, YouTube, Pinterest, and various crafting groups on Facebook.
Ready to start your Mod Podge photo transfer journey? Visit dfphoto.net for more detailed guides, stunning photography examples, and a vibrant community of fellow photography enthusiasts. Explore new techniques, find inspiration, and connect with others who share your passion for photography. Whether you’re looking to learn the basics, master advanced techniques, or simply find new ideas, dfphoto.net is your go-to resource. Join us today and discover the endless possibilities of photography!
Address: 1600 St Michael’s Dr, Santa Fe, NM 87505, United States
Phone: +1 (505) 471-6001
Website: dfphoto.net