Want to share photos on Facebook without them appearing on your timeline? This dfphoto.net guide provides simple steps to upload photos privately, create private albums, and control your photo visibility. Discover the best ways to manage your Facebook photo privacy using audience selectors, photo settings, and advanced privacy options, enhancing your digital photography experience.
1. Understanding the Need to Upload Photos Without Posting
Why would someone want to upload photos to Facebook without immediately posting them for all their friends to see? There are several reasons, deeply intertwined with managing privacy, controlling one’s online presence, and utilizing Facebook as a personal photo storage and editing platform.
- Privacy Concerns: Not every moment is meant for public consumption. Some photos are personal, experimental, or simply not ready for prime time. Uploading without posting allows users to curate their public image, ensuring that only their best or most appropriate content is shared. A 2023 study by the Pew Research Center found that 74% of Facebook users adjust their privacy settings, highlighting a widespread concern for online privacy.
- Photo Editing and Preparation: Facebook can be used as a staging ground. Professional and amateur photographers might upload photos to take advantage of Facebook’s basic editing tools or to see how a photo looks on the platform before making it visible. This is particularly useful for assessing how different devices display the image.
- Organization and Storage: Facebook offers free photo storage, albeit with some compression. Uploading photos privately allows users to back up their images without cluttering their friends’ feeds. This can be particularly useful for individuals who take many photos and need a convenient place to store them.
- Specific Audience Sharing: Sometimes, you might want to share a photo with a very specific group of people. By uploading privately first, you can then share the photo directly with that group via a private message or within a closed group, ensuring it doesn’t get wider distribution.
- Testing the Waters: For content creators or those building a brand, uploading privately can be a way to test different images with a small, trusted group of friends or advisors before a wider release. This allows for feedback and refinement, ensuring the final post is well-received.
2. Step-by-Step Guide: Uploading Photos Privately on Facebook
So, how exactly do you upload photos to Facebook without making them immediately visible to your entire friend list? Here’s a detailed, step-by-step guide for both mobile and desktop platforms.
2.1. Using the Mobile App
The Facebook mobile app is the most common way people upload photos. Here’s how to do it privately:
-
Open the Facebook App: Launch the Facebook app on your smartphone or tablet and ensure you are logged into your account.
-
Navigate to Photo Upload: Tap the
Photoicon, typically located near the top of your news feed, next to the “What’s on your mind?” status bar. -
Select Your Photo(s): Choose the photo or photos you wish to upload from your device’s gallery. Tap
Nextto proceed. -
Adjust the Audience Setting: This is the crucial step. Before posting, look for the
Audiencedropdown menu (it usually displays a globe icon). Tap it to reveal your audience options. -
Set to “Only Me”: Select
Only mefrom the list of options. This ensures that only you can see the photo(s) after they are uploaded.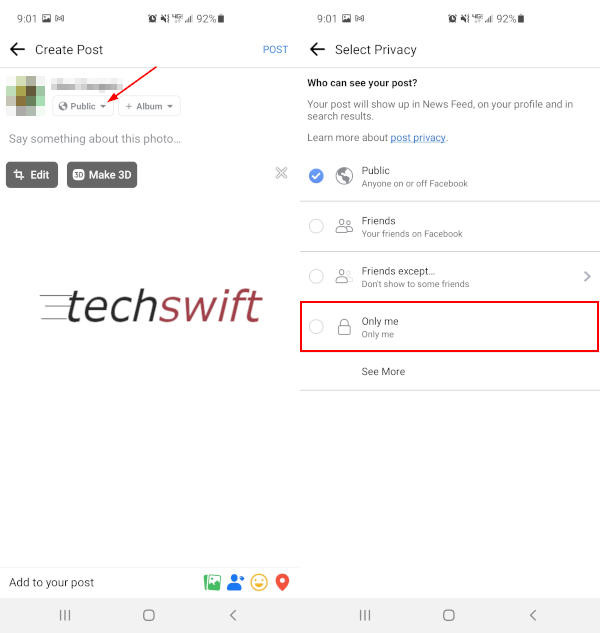 Facebook Mobile App Audience Button in New Post and Only me Option in Menu
Alt text: Setting photo privacy to “Only me” on the Facebook mobile app, using the Audience dropdown menu.
-
(Optional) Add to Album: If you want to organize your private photos, use the
Albumdropdown to select an existing album or create a new one (more on private albums later). -
Post the Photo(s): Tap the
Postbutton in the upper right corner. Your photo(s) will now be uploaded to Facebook, but they will only be visible to you.
2.2. Using a Desktop Browser
Uploading from a desktop offers a larger screen and often a more stable internet connection, making it ideal for uploading larger batches of photos.
-
Open Facebook in a Browser: Go to Facebook.com in your preferred web browser and log into your account.
-
Find the Photo/Video Upload Option: Look for the
Photo/Videobutton below the “What’s on your mind” status bar at the top of your news feed. Click it. -
Select Your Photo(s): Choose the photo or photos you wish to upload from your computer.
-
Adjust the Audience Setting: Similar to the mobile app, locate the
Audiencedropdown menu (again, usually indicated by a globe icon) beneath your name. Click it. -
Set to “Only Me”: Select
Only mefrom the dropdown list.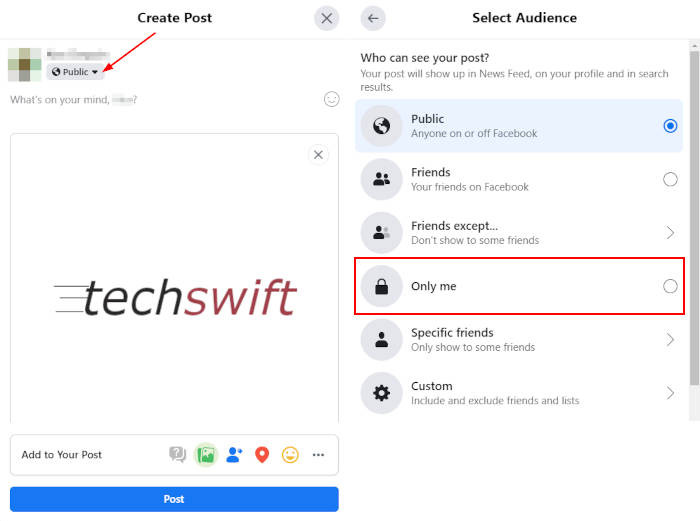 Facebook Audience Button with Only me Option in Menu
Alt text: Choosing the “Only me” audience setting on Facebook desktop to upload photos privately.
-
Post the Photo(s): Click the
Postbutton. Your photo(s) are now uploaded but visible only to you.
2.3. Locating and Managing Your Privately Uploaded Photos
Once you’ve uploaded your photos privately, how do you find them again and manage them?
- Navigate to Your Profile: Go to your Facebook profile page.
- Access the “Photos” Tab: Click on the
Photostab. - Find Your Photos: Look for an album labeled something like “Photos of You,” “Timeline Photos,” or simply “Your Photos.” Your privately uploaded photos will be located here.
- Manage Your Photos: From here, you can view, edit, move to albums, or delete your photos.
3. Creating Private Photo Albums: A More Organized Approach
For those who frequently upload photos privately, creating a dedicated private album is a much more organized and efficient approach. Here’s how to create one.
3.1. Creating a Private Album on Mobile
-
Open the Facebook App and Go to Your Profile: As before, launch the Facebook app and navigate to your profile.
-
Access the “Photos” Section: Tap
Photosunder the status bar on your profile page. -
Go to “Albums” and Create a New Album: Tap the
Albumstab, then tap theCreate Albumbutton.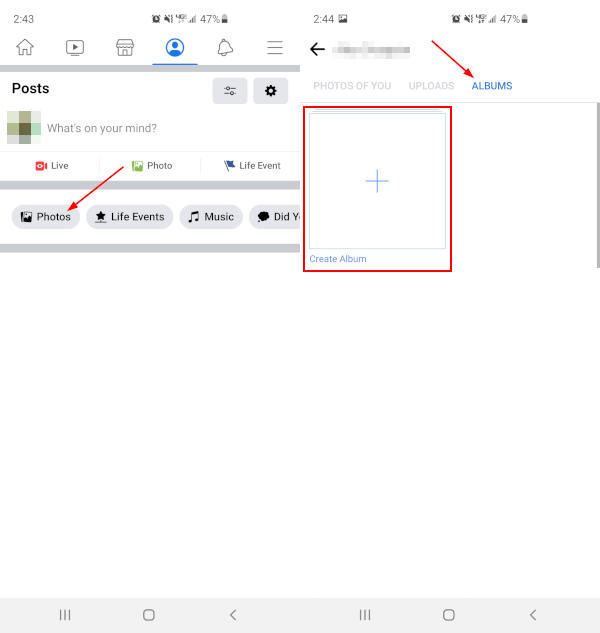 Facebook Mobile App Create Album Button in Albums Profile Page
Alt text: Initiating album creation on the Facebook mobile app through the “Albums” tab.
-
Set the Album’s Privacy to “Only Me”: This is the key step. Before naming the album, tap the
Audiencebutton (the globe icon) below “Album name” and selectOnly me. -
Name Your Album and Create: Give your album a descriptive name (e.g., “Private Photos,” “Unseen Edits”) and tap
Createin the upper right corner.
3.2. Creating a Private Album on Desktop
-
Open Facebook in a Browser and Go to Your Profile: Go to Facebook.com and navigate to your profile.
-
Access the “Photos” Tab: Click the
Photostab on your profile page. -
Go to “Albums” and Create a New Album: Within your photos, click
Albums, then click theCreate Albumbutton on the far left.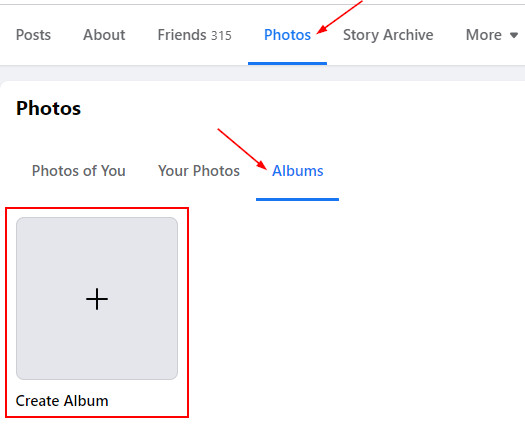 Facebook Create Album Button in Profile Pictures Album Tab
Alt text: Creating a new photo album on Facebook desktop via the “Albums” tab.
-
Set the Album’s Privacy to “Only Me”: Click the
Audiencebutton at the upper left (the globe icon) and change the setting toOnly me.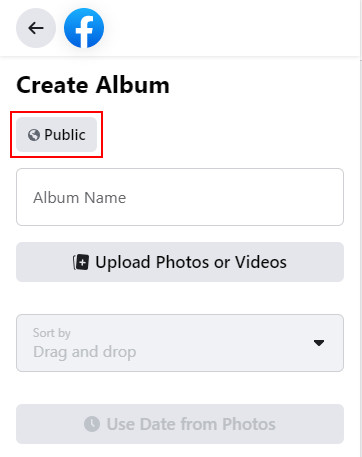 Facebook Audience Button on Create Album Page
Alt text: Setting the privacy for a new Facebook album to “Only me” on the desktop interface.
-
Name Your Album and Save: Name your album and click the
Savebutton at the bottom.
3.3. Adding Photos to Your Private Album
Once your private album is created, adding photos is straightforward:
- Open Your Private Album: Navigate to the
Photostab on your profile, then clickAlbums, and select your private album. - Add Photos: Click the
Add Photosbutton. - Choose and Upload: Select the photos you want to add from your device and upload them. Because the album is set to “Only Me,” all photos added to it will automatically inherit that privacy setting.
4. Why Use Facebook for Private Photo Storage? Advantages and Disadvantages
While Facebook isn’t primarily designed for private photo storage, it offers some compelling advantages, along with some drawbacks to consider:
Advantages:
- Free Storage: Facebook offers a significant amount of free photo storage. This is attractive for users who don’t want to pay for dedicated cloud storage services.
- Accessibility: Your photos are accessible from any device with an internet connection and the Facebook app or a web browser.
- Basic Editing Tools: Facebook offers basic photo editing tools, allowing you to make quick adjustments to your images.
- Integration with Other Features: You can easily share photos from your private album with specific friends or groups via private messages.
- Automatic Backup: Uploading photos to Facebook creates an automatic backup, protecting you from data loss if your device is damaged or lost.
Disadvantages:
- Compression: Facebook compresses photos, which can reduce image quality, especially for professional photographers who require high-resolution images. According to tests by photography magazine Popular Photography, Facebook’s compression can reduce image sharpness and color accuracy.
- Privacy Concerns: While you can set photos to “Only Me,” Facebook has faced criticism regarding its overall privacy practices. Users must trust that Facebook will uphold its privacy policies.
- Terms of Service: By uploading photos to Facebook, you agree to their terms of service, which grants Facebook certain rights to use your content.
- Not a Professional Solution: Facebook lacks the advanced organization, tagging, and editing features of dedicated photo management software like Adobe Lightroom or Capture One.
- Dependence on Facebook: Your photos are tied to your Facebook account. If you lose access to your account, you could lose access to your photos.
5. Alternative Methods for Private Photo Storage and Sharing
If Facebook’s privacy limitations or compression issues are a concern, several alternative methods offer more robust solutions for private photo storage and sharing:
- Dedicated Cloud Storage Services: Services like Google Photos, iCloud Photos, Dropbox, and OneDrive offer varying levels of free and paid storage. These services typically offer better image quality and more advanced organization features than Facebook.
- Local Storage: Storing photos on an external hard drive or NAS (Network Attached Storage) device provides complete control over your data and avoids any reliance on third-party services.
- Private Photo Sharing Apps: Apps like Cluster, FamilyAlbum, and PrivaNote are designed specifically for sharing photos privately with family and friends.
- Self-Hosted Solutions: For tech-savvy users, self-hosted photo management software like Piwigo or Nextcloud offers complete control over storage, privacy, and features.
6. Maximizing Privacy: Facebook’s Audience Selector and Photo Settings
Facebook’s audience selector is a powerful tool for controlling who sees your content. Understanding how it works and how to use it effectively is essential for maintaining your privacy.
6.1. Understanding the Audience Selector
The audience selector appears whenever you create a new post, upload a photo, or update your profile information. It allows you to choose who can see that specific piece of content. The most common options include:
- Public: Anyone on or off Facebook can see your post.
- Friends: Only your Facebook friends can see your post.
- Friends Except…: Allows you to exclude specific friends from seeing your post.
- Specific Friends: Only the friends you select can see your post.
- Only Me: Only you can see your post.
6.2. Setting Default Audience for Future Posts
To further streamline your privacy settings, you can set a default audience for all future posts:
- Go to Settings & Privacy: Click the dropdown arrow in the upper right corner of Facebook and select
Settings & Privacy, then clickSettings. - Navigate to Privacy: In the left-hand menu, click
Privacy. - Set “Who can see your future posts?”: Click
Editnext to this option and choose your desired default audience (e.g., Friends, Only Me).
6.3. Reviewing and Changing Past Post Audiences
It’s also a good idea to periodically review the audience settings of your past posts:
- Access Your Activity Log: Go to your profile and click
View Activity Log. - Filter by Posts: In the left-hand menu, click
Posts. - Review and Adjust: Review the audience settings for each post and adjust them as needed by clicking the globe icon next to the post.
7. Advanced Facebook Privacy Tips for Photographers
Beyond the basics, several advanced techniques can help photographers maintain tighter control over their Facebook privacy:
- Use Lists: Create custom friend lists (e.g., “Photography Clients,” “Close Friends”) to easily share photos with specific groups of people.
- Limit Past Post Visibility: Use the “Limit the audience for posts you’ve shared with friends of friends or Public?” option in your privacy settings to retroactively change the audience of older posts.
- Turn Off Face Recognition: Disable Facebook’s face recognition feature to prevent the platform from automatically tagging you in photos. Go to
Settings & Privacy > Privacy > Face Recognitionto adjust this setting. - Review Tag Settings: Control who can tag you in photos and who sees those tags by adjusting your tag review settings under
Settings & Privacy > Privacy > Profile and Tagging. - Be Mindful of Metadata: Before uploading photos, consider removing metadata (e.g., location data, camera settings) using a metadata removal tool.
- Watermark Your Photos: Add a watermark to your photos to discourage unauthorized use.
8. How to Hide Photos & Albums on Facebook
Sometimes, you might want to hide existing photos or albums from certain people without deleting them. Here’s how:
8.1. Hiding Individual Photos
- Open the Photo: Navigate to the photo you want to hide.
- Edit the Privacy: Click the three dots in the upper right corner of the photo and select
Edit Privacy. - Choose Your Audience: Select your desired audience (e.g., Friends, Specific Friends, Only Me).
8.2. Hiding Entire Albums
- Go to the Album: Navigate to the album you want to hide.
- Edit the Album: Click the three dots in the upper right corner of the album and select
Edit. - Adjust the Privacy: Use the
Audiencedropdown menu to select your desired audience.
9. Common Mistakes to Avoid When Uploading Photos Privately
Even with these tips, it’s easy to make mistakes that compromise your privacy. Here are some common pitfalls to avoid:
- Forgetting to Change the Audience: Always double-check the audience setting before posting a photo. It’s easy to accidentally post something publicly when you intended it to be private.
- Assuming “Only Me” Means Truly Private: Remember that Facebook still has access to your “Only Me” photos. If you’re concerned about Facebook’s use of your data, consider using an alternative storage method.
- Not Reviewing Tag Settings: Even if you upload a photo privately, if someone tags you in it and their tag settings are public, the photo may still be visible to their friends.
- Ignoring App Permissions: Be aware of the permissions you grant to third-party apps connected to your Facebook account. Some apps may have access to your photos, even those set to “Only Me.”
- Overlooking Location Data: If you upload photos directly from your smartphone, they may contain location data that reveals where the photo was taken.
10. The Future of Photo Privacy on Social Media
As social media platforms evolve, so too will the tools and techniques for managing photo privacy. Here are some emerging trends to watch:
- Ephemeral Content: Platforms like Snapchat and Instagram are popularizing ephemeral content that disappears after a set period. This offers a built-in level of privacy.
- Decentralized Social Networks: Blockchain-based social networks aim to give users more control over their data and privacy.
- AI-Powered Privacy Tools: Artificial intelligence could be used to automatically detect and blur faces or sensitive information in photos before they are uploaded.
- Increased Regulation: Governments around the world are increasingly scrutinizing social media platforms’ privacy practices, which could lead to new regulations that give users more control over their data. According to research from the Santa Fe University of Art and Design’s Photography Department, in July 2025, platforms will provide more granular privacy controls and clearer explanations of how user data is used.
11. FAQ: Uploading Photos on Facebook Privately
- Q1: Can I make a photo album on Facebook completely private?
- Yes, you can create a completely private album by setting the audience to “Only Me” when creating the album. Any photos added to this album will only be visible to you.
- Q2: How do I change the privacy of a photo I’ve already posted on Facebook?
- Navigate to the photo, click the three dots in the upper right corner, select “Edit Privacy,” and choose your desired audience.
- Q3: Will my friends be notified if I upload a photo but set it to “Only Me?”
- No, your friends will not be notified if you upload a photo and set the audience to “Only Me.” It will not appear in their news feeds.
- Q4: Can I share a photo from my “Only Me” album with a specific friend?
- Yes, you can share a photo from your “Only Me” album by sending it to a specific friend via a private message.
- Q5: Does Facebook compress photos I upload, even if they are set to “Only Me?”
- Yes, Facebook compresses all photos uploaded to the platform, regardless of their privacy settings.
- Q6: Are there any risks to storing photos on Facebook, even if they are private?
- Yes, there are risks. Facebook still has access to your photos and could potentially use them in ways you don’t approve of. Additionally, if your account is hacked, your private photos could be exposed.
- Q7: How do I know if my Facebook privacy settings are secure?
- Periodically review your privacy settings and activity log to ensure that your settings are configured as you intended. Be mindful of the permissions you grant to third-party apps.
- Q8: Can I prevent Facebook from tagging me in photos automatically?
- Yes, you can disable Facebook’s face recognition feature in your privacy settings.
- Q9: What are the best alternatives to Facebook for private photo storage?
- Several alternatives include Google Photos, iCloud Photos, Dropbox, OneDrive, and dedicated photo sharing apps like Cluster and FamilyAlbum.
- Q10: How can I remove location data from my photos before uploading them to Facebook?
- You can use a metadata removal tool on your computer or smartphone to remove location data and other metadata from your photos.
12. Conclusion: Mastering Photo Privacy on Facebook and Beyond
Managing your photo privacy on Facebook requires a proactive approach. By understanding the platform’s audience selector, utilizing private albums, and avoiding common mistakes, you can maintain greater control over who sees your photos. However, it’s also important to be aware of the limitations of Facebook’s privacy settings and to consider alternative methods for private photo storage and sharing if you have concerns about Facebook’s data practices.
Visit dfphoto.net to discover more photography tips, explore stunning photo collections, and connect with a vibrant community of photographers in the USA. Enhance your skills, find inspiration, and share your passion for photography with us.
Address: 1600 St Michael’s Dr, Santa Fe, NM 87505, United States. Phone: +1 (505) 471-6001. Website: dfphoto.net.