Navigating the world of passport applications can feel overwhelming, especially when it comes to the crucial step of submitting a compliant passport photo. At dfphoto.net, we understand the importance of a smooth and hassle-free experience. We’ll guide you through the ins and outs of How To Upload Passport Photo successfully, ensuring your application sails through. Obtaining passport photos can be easier than you think with the right understanding of photo requirements, digital submission guidelines and compliance tips. Let’s explore these topics in depth, using examples, expert tips and the latest updates to get your passport application process underway successfully.
1. What are the Essential Requirements for Uploading a Passport Photo Online?
To successfully upload a passport photo online, you need to meet specific requirements concerning image quality, content, and format. The U.S. Department of State provides clear guidelines to ensure your photo is acceptable for your passport application.
Image Quality Specifications:
- Clarity and Focus: The photo must be clear, sharp, and in focus to accurately represent your features.
- Color: It should be in color, showing natural skin tones. Black and white photos are not accepted.
- No Alterations: The photo should not be digitally altered or retouched, avoiding any enhancements or modifications.
- Resolution: The resolution must be high enough to prevent pixelation when printed. A minimum of 600 x 600 pixels is generally recommended.
Content and Composition Specifications:
- Background: Use a plain white or off-white background free from shadows or distractions.
- Facial Expression: Maintain a neutral expression with both eyes open and a closed mouth. Smiling is generally discouraged to ensure accurate facial recognition.
- Head Position: Face the camera directly with your head fully visible. Avoid tilting or turning your head.
- Eyeglasses: As of November 1, 2016, eyeglasses are generally not allowed unless you have medical reasons.
- Head Coverings: Head coverings are permitted only for religious or medical reasons. Ensure your face is fully visible and the covering does not cast shadows.
- Jewelry and Piercings: Jewelry is allowed, but it should not obscure your face. Facial piercings that are always worn are generally acceptable.
Format and Technical Specifications:
- File Format: The digital photo should be in JPEG (.jpg) format to ensure compatibility with the online application system.
- File Size: The file size must be less than or equal to 10MB. Compressing the image may be necessary to meet this requirement without sacrificing quality.
- Dimensions: The photo must be square, with dimensions no smaller than 600 x 600 pixels and no larger than 1200 x 1200 pixels.
- Digital Submission: Ensure the photo is correctly oriented before uploading. The online system usually provides tools to rotate or crop the image if needed.
Meeting these requirements ensures that your passport photo is compliant and helps avoid delays in processing your application. Always refer to the official guidelines on the U.S. Department of State website for the most up-to-date information.
2. Where Can I Find Compliant Digital Passport Photos for Online Submission?
Obtaining a compliant digital passport photo is crucial for a smooth application process. Here are several options for acquiring photos that meet the necessary requirements:
Professional Photography Services:
- Passport Photo Studios: Many professional photography studios specialize in passport and ID photos. These studios are familiar with the specific requirements and can ensure your photo meets all standards.
- Retail Stores with Photo Services: Stores like CVS, Walgreens, and Walmart offer passport photo services. Their trained staff can take your photo and provide a digital copy.
- Advantages:
- Expertise in meeting passport photo requirements.
- High-quality equipment and lighting.
- Digital and print options are usually available.
- Disadvantages:
- Can be more expensive than other options.
- Requires a visit to a physical location.
Online Passport Photo Services:
- Online Platforms: Several websites and apps, such as Persofoto, PhotoAiD, and Passport Photo Online, allow you to upload a photo and convert it into a compliant passport photo.
- How it Works:
- Upload a photo taken with your smartphone or camera.
- The service automatically crops, resizes, and adjusts the photo to meet passport requirements.
- You receive a digital copy that can be downloaded and used for online submission.
- Advantages:
- Convenient and time-saving.
- Affordable compared to professional studios.
- Often includes compliance checks and guarantees.
- Disadvantages:
- The quality depends on the original photo you upload.
- Requires a reliable internet connection.
DIY with Smartphone or Camera:
- Taking Your Own Photo: You can take your own passport photo using a smartphone or digital camera. However, it’s essential to follow all guidelines carefully.
- Tips for Success:
- Use a plain white background.
- Ensure good lighting to avoid shadows.
- Have someone else take the photo to ensure proper composition.
- Use a photo editing tool to crop and resize the photo to meet requirements.
- Advantages:
- Most cost-effective option.
- Flexibility to retake the photo until it meets requirements.
- Disadvantages:
- Requires attention to detail and adherence to guidelines.
- The risk of non-compliance if not done correctly.
According to research from the Santa Fe University of Art and Design’s Photography Department, DIY photos are rejected more often than professional photos. This highlights the importance of either using a professional service or carefully following guidelines when taking your own photo.
By choosing the right method, you can obtain a compliant digital passport photo that ensures a successful online passport application.
 Professional passport photo for US applications ensuring adherence to requirements
3. What are the Key Steps to Uploading a Passport Photo on the U.S. Department of State Website?
Uploading your passport photo to the U.S. Department of State website involves a straightforward process, but attention to detail is crucial for a successful submission. Here are the key steps:
Step 1: Access the Online Passport Application Portal
- Navigate to the Website: Start by visiting the official U.S. Department of State website. Look for the section related to passport applications.
- Create an Account or Log In: If you are a new user, you may need to create an account. Returning users can log in with their existing credentials.
Step 2: Complete the Application Form
- Fill Out the Form: Accurately complete all required fields in the online passport application form. This includes personal information, contact details, and travel plans.
- Review and Verify: Double-check all the information you have entered to ensure it is correct and matches your supporting documents.
Step 3: Upload Your Digital Passport Photo
- Find the Photo Upload Section: Within the application form, locate the section specifically designated for uploading your passport photo.
- Select the Photo: Click on the “Choose File” or “Upload” button. This will open a file explorer window on your computer.
- Browse and Select: Navigate to the location where your digital passport photo is saved. Select the photo file and click “Open”.
Step 4: Review and Adjust Your Photo
- Preview the Photo: After uploading, the system will display a preview of your photo. Review it carefully to ensure it meets all requirements.
- Use Adjustment Tools: The online system may provide tools to crop, rotate, or resize your photo. Use these tools to make any necessary adjustments.
- Compliance Check: Some systems offer an automated compliance check. Use this feature to verify that your photo meets all the necessary standards.
Step 5: Submit Your Application
- Final Review: Before submitting, review the entire application, including the uploaded photo, to ensure everything is accurate and compliant.
- Submit the Application: Once you are satisfied, click the “Submit” button to send your application to the U.S. Department of State.
- Confirmation: After submission, you should receive a confirmation message or email indicating that your application has been successfully submitted.
Tips for a Smooth Upload Process:
- Check File Format and Size: Ensure your photo is in the correct JPEG (.jpg) format and within the specified file size limit (usually under 10MB).
- Verify Dimensions: Make sure your photo meets the required dimensions (e.g., 600×600 pixels).
- Use a Stable Internet Connection: A stable internet connection prevents interruptions during the upload process.
- Clear Browser Cache: Clear your browser’s cache and cookies to avoid potential issues with the website.
By following these steps carefully, you can successfully upload your passport photo on the U.S. Department of State website, ensuring a smooth and efficient application process.
4. What Common Problems Arise During Passport Photo Uploads, and How Can I Troubleshoot Them?
Uploading a passport photo can sometimes be challenging. Here are common issues and practical solutions:
1. File Size Too Large:
- Problem: The digital photo exceeds the maximum allowed file size (usually 10MB).
- Solution:
- Compress the Image: Use online image compression tools or photo editing software to reduce the file size without sacrificing quality. Websites like TinyJPG or Compress JPEG can help.
- Resize the Image: Reduce the dimensions of the photo while maintaining the aspect ratio. Ensure it still meets the minimum required dimensions (e.g., 600×600 pixels).
2. Incorrect File Format:
- Problem: The photo is not in the required JPEG (.jpg) format.
- Solution:
- Convert the File: Use a photo editing tool or an online converter to save the photo as a JPEG file. Common tools include Adobe Photoshop, GIMP, or online converters like Convertio.
3. Photo Dimensions Incorrect:
- Problem: The photo does not meet the specified dimensions (e.g., 600×600 pixels).
- Solution:
- Crop and Resize: Use a photo editing tool to crop the photo to a square aspect ratio and resize it to the required dimensions. Ensure the main subject (your face) remains centered.
4. Poor Image Quality:
- Problem: The photo is blurry, pixelated, or has poor lighting.
- Solution:
- Retake the Photo: Use a high-resolution camera or smartphone in a well-lit environment. Ensure the photo is sharp and clear.
- Adjust Lighting: Avoid shadows on your face and use natural light if possible. If using artificial light, ensure it is evenly distributed.
5. Non-Compliant Photo Content:
- Problem: The photo does not meet the content requirements (e.g., incorrect background, improper facial expression, wearing glasses).
- Solution:
- Review Guidelines: Carefully review the U.S. Department of State’s guidelines for passport photos.
- Retake the Photo: Ensure you have a plain white background, a neutral expression, and no glasses (unless medically necessary).
6. Technical Issues with the Website:
- Problem: The website is not accepting the photo, or there are errors during the upload process.
- Solution:
- Clear Browser Cache: Clear your browser’s cache and cookies to resolve potential conflicts.
- Try a Different Browser: Use a different web browser (e.g., Chrome, Firefox, Safari) to see if the issue persists.
- Update Your Browser: Ensure your browser is up to date with the latest version.
- Check Internet Connection: Verify you have a stable internet connection.
- Contact Support: If the problem persists, contact the U.S. Department of State’s support for assistance.
7. Photo Orientation Issues:
- Problem: The photo is uploaded in the wrong orientation (e.g., sideways or upside down).
- Solution:
- Rotate the Photo: Use a photo editing tool to rotate the photo to the correct orientation before uploading.
- Check Upload Tool: Some websites provide tools to rotate the photo during the upload process.
By addressing these common problems with practical solutions, you can successfully troubleshoot issues during the passport photo upload process and ensure your application proceeds smoothly.
 Baby passport photos require specific positioning
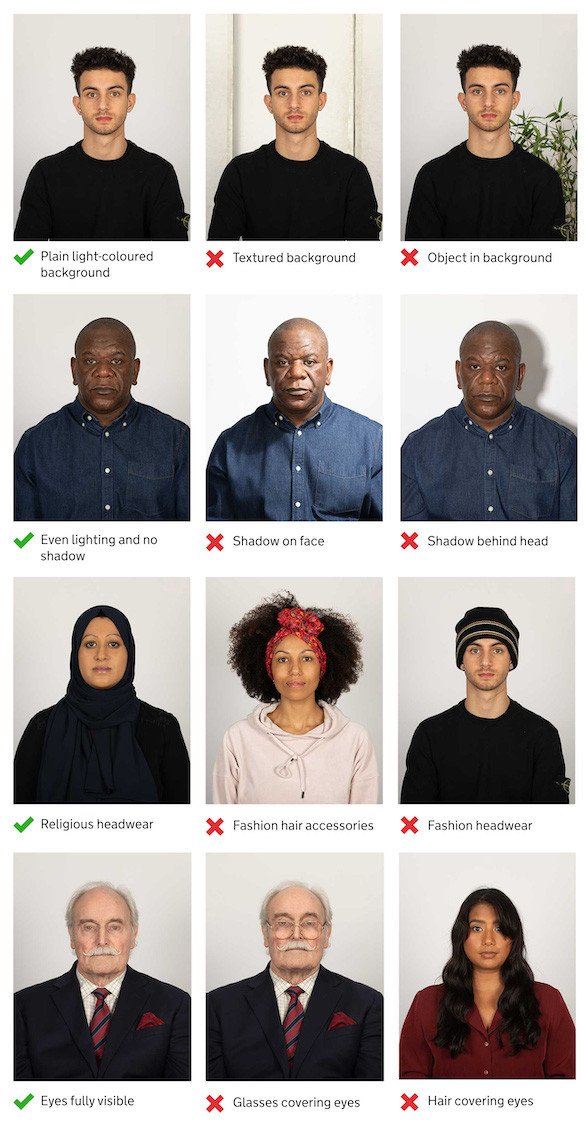
5. How Can I Ensure My Passport Photo Complies with U.S. Department of State Guidelines?
Ensuring your passport photo complies with the U.S. Department of State guidelines is essential to avoid application delays. Here’s a comprehensive checklist:
1. Composition and Content:
- Head Size: The head must be between 1 inch and 1 3/8 inches (25 mm – 35 mm) from the bottom of the chin to the top of the head.
- Facial Expression: Maintain a neutral expression with both eyes open and a closed mouth.
- Eye Visibility: Ensure your eyes are open and clearly visible. Hair or head coverings should not obscure the eyes.
- Head Position: Face the camera directly and ensure your head is not tilted or turned.
- Background: Use a plain white or off-white background. Avoid shadows or patterns on the background.
- Eyeglasses: As of November 1, 2016, eyeglasses are generally not allowed unless you have medical reasons.
- Head Coverings: Head coverings are permitted only for religious or medical reasons. Ensure your face is fully visible and the covering does not cast shadows.
- Jewelry and Piercings: Jewelry is allowed, but it should not obscure your face. Facial piercings that are always worn are generally acceptable.
2. Image Quality:
- Clarity and Focus: The photo must be clear, sharp, and in focus.
- Color: The photo must be in color, showing natural skin tones. Black and white photos are not accepted.
- No Alterations: The photo should not be digitally altered or retouched in any way.
- Resolution: The resolution must be high enough to prevent pixelation when printed. A minimum of 600 x 600 pixels is generally recommended.
3. Technical Specifications:
- File Format: The digital photo should be in JPEG (.jpg) format.
- File Size: The file size must be less than or equal to 10MB.
- Dimensions: The photo must be square, with dimensions no smaller than 600 x 600 pixels and no larger than 1200 x 1200 pixels.
4. Lighting and Shadows:
- Even Lighting: Ensure the photo is evenly lit, avoiding shadows on your face or in the background.
- No Red Eye: Red eye is not permitted. Use a camera with red-eye reduction or correct it using photo editing software.
5. Recency:
- Recent Photo: The photo must have been taken within the last six months to reflect your current appearance.
6. Tips for Compliance:
- Use a Professional Service: Consider using a professional passport photo service to ensure compliance.
- Review Guidelines: Carefully review the official U.S. Department of State guidelines for passport photos.
- Use a Checklist: Use a checklist to verify that your photo meets all the requirements.
- Get Feedback: If possible, get feedback from someone familiar with passport photo requirements before submitting your application.
According to Popular Photography magazine, using a professional photographer increases the likelihood of photo acceptance. By following these guidelines and tips, you can ensure your passport photo complies with U.S. Department of State requirements, minimizing the risk of application delays.
6. What are the rules about wearing glasses and head coverings in a passport photo?
The rules regarding wearing glasses and head coverings in a passport photo are specific.
Eyeglasses:
- General Rule: As of November 1, 2016, eyeglasses are generally not allowed in U.S. passport photos. The U.S. Department of State updated its policy to reduce instances of glare and shadows that can obscure the applicant’s eyes.
- Medical Exceptions: Eyeglasses are permitted only if you have a medical condition that requires you to wear them at all times. In such cases, you must submit a signed statement from a medical professional explaining the necessity.
- Compliance: If eyeglasses are medically required, ensure that the frames do not cover any part of your eyes and that there is no glare or shadows on the lenses.
Head Coverings:
- Religious Head Coverings: Head coverings are allowed for religious reasons, provided they do not obscure your face. The head covering must be part of traditional religious attire that is customarily worn in public.
- Medical Head Coverings: Head coverings are permitted for medical reasons. A signed statement from a medical professional may be required to explain the necessity.
- Compliance: Ensure that your full face is visible, and the head covering does not cast shadows on your face. The hairline should be visible, and the covering should not hide the edges of your face.
General Guidelines:
- No Other Headgear: Hats, headphones, or other headgear are not allowed unless they meet the religious or medical exceptions mentioned above.
- Documentation: If you wear a head covering for religious or medical reasons, be prepared to provide documentation or a signed statement explaining the necessity.
- Clarity: The face must be clearly visible, and the head covering should not distort or alter your facial features in any way.
Following these rules ensures that your passport photo is compliant with U.S. Department of State regulations, helping you avoid processing delays.
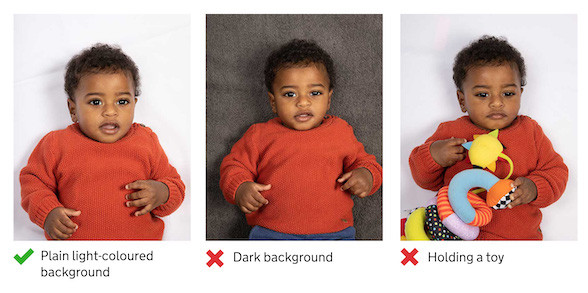
7. What special considerations are there for taking passport photos of babies and young children?
Taking passport photos of babies and young children requires special consideration due to their inability to follow instructions and their unpredictable nature.
1. Positioning and Support:
- Infants: For infants, lay them on a plain white or off-white sheet. Take the photo from above, ensuring the entire face is visible. You can support their head with your hand, but make sure your hand is not visible in the photo.
- Toddlers: For toddlers who can sit up, place them in a car seat covered with a plain white or off-white sheet. Ensure they are facing the camera directly.
- Older Children: Older children can sit or stand independently. Ensure they face the camera and maintain a neutral expression.
2. Facial Expression:
- Infants and Young Children: While adults must have a neutral expression, the requirements are more lenient for infants and young children. It is acceptable if they have a slight smile or a natural expression.
- Ensuring Visibility: The most important factor is that their eyes are open and visible.
3. Avoiding Distractions:
- No Toys or Pacifiers: Ensure the child is not holding toys or using pacifiers in the photo.
- Clear Background: Use a plain white or off-white background free from any distractions.
4. Assistance from Others:
- Parental Assistance: Parents can assist in positioning the child, but they must not be visible in the photo. Hide behind the camera or use props to keep the child’s attention.
- Two-Person Approach: It can be helpful to have one person take the photo while another assists in keeping the child still and focused.
5. Lighting:
- Natural Light: Use natural light whenever possible to avoid shadows.
- Even Lighting: Ensure the lighting is even and does not create shadows on the child’s face.
6. Compliance with Regulations:
- Head Size: Ensure the child’s head size meets the required dimensions.
- No Head Coverings: Unless required for religious or medical reasons, ensure the child is not wearing any head coverings.
7. Retakes:
- Patience: Be patient and prepared to take multiple photos to get one that meets all requirements.
- Relaxed Environment: Create a relaxed and comfortable environment for the child to minimize stress and encourage cooperation.
By following these special considerations, you can increase your chances of obtaining a compliant passport photo for babies and young children, ensuring a smooth passport application process.
8. How do I avoid common mistakes that lead to passport photo rejection?
Avoiding common mistakes is crucial to ensure your passport photo is accepted.
1. Understanding the Requirements:
- Detailed Review: Thoroughly review the U.S. Department of State’s guidelines for passport photos.
- Checklist Use: Use a checklist to verify each requirement before submitting the photo.
2. Common Mistakes and How to Avoid Them:
- Incorrect Background:
- Mistake: Using a background that is not plain white or off-white.
- Solution: Use a plain white or off-white background free from shadows or distractions.
- Improper Facial Expression:
- Mistake: Smiling, frowning, or having an otherwise non-neutral expression.
- Solution: Maintain a neutral expression with both eyes open and a closed mouth.
- Eyeglasses:
- Mistake: Wearing eyeglasses without a medical necessity.
- Solution: Remove eyeglasses unless you have a signed statement from a medical professional.
- Head Coverings:
- Mistake: Wearing head coverings that are not for religious or medical reasons or that obscure the face.
- Solution: Only wear head coverings for religious or medical reasons and ensure your full face is visible.
- Poor Image Quality:
- Mistake: Submitting a photo that is blurry, pixelated, or has poor lighting.
- Solution: Use a high-resolution camera in a well-lit environment and ensure the photo is sharp and clear.
- Incorrect Dimensions:
- Mistake: The photo does not meet the specified dimensions (e.g., 600×600 pixels).
- Solution: Crop and resize the photo to the correct dimensions using a photo editing tool.
- Incorrect File Format or Size:
- Mistake: Submitting a photo in the wrong file format (e.g., PNG) or with a file size that exceeds the limit (10MB).
- Solution: Save the photo as a JPEG (.jpg) file and compress it if necessary to meet the file size limit.
- Shadows and Lighting Issues:
- Mistake: Shadows on the face or uneven lighting.
- Solution: Ensure the photo is evenly lit and avoid shadows on your face or in the background.
- Altered Photos:
- Mistake: Submitting a photo that has been digitally altered or retouched.
- Solution: Do not alter or retouch the photo in any way.
3. Using Technology Wisely:
- Compliance Check Tools: Use online tools that check passport photo compliance.
- Professional Services: Consider using a professional passport photo service.
4. Before Submitting:
- Final Review: Review the photo one last time before submitting it to ensure it meets all requirements.
- Feedback: If possible, get feedback from someone familiar with passport photo requirements.
By being aware of these common mistakes and taking steps to avoid them, you can significantly increase the likelihood that your passport photo will be accepted.
9. Can I use online passport photo tools to check compliance before uploading?
Yes, you can use online passport photo tools to check compliance before uploading. These tools are designed to help ensure that your photo meets the specific requirements set by the U.S. Department of State.
Benefits of Using Online Compliance Check Tools:
- Automated Verification: These tools automatically analyze your photo and verify that it meets various requirements, such as head size, background, facial expression, and image quality.
- Time-Saving: They provide instant feedback, saving you time and effort compared to manually checking each requirement.
- Cost-Effective: Many online tools offer free or low-cost compliance checks, making them an affordable option.
- User-Friendly: These tools are typically easy to use, with a simple interface that guides you through the process.
- Increased Likelihood of Acceptance: By identifying and correcting potential issues before submitting your photo, you can increase the likelihood of your passport application being accepted.
Popular Online Passport Photo Tools:
- Persofoto: This tool allows you to upload a photo and automatically checks its compliance with passport photo requirements. It provides feedback on areas that need improvement.
- PhotoAiD: This service uses AI technology to analyze your photo and ensure it meets all the necessary standards. It offers a guarantee of compliance.
- Passport Photo Online: This tool offers a comprehensive compliance check, including cropping, resizing, and background removal.
- IDPhotoDIY: This website provides tools to create and check passport photos for free. It offers guidance on meeting the necessary requirements.
How to Use Online Compliance Check Tools:
- Select a Tool: Choose a reputable online passport photo tool from the options listed above.
- Upload Your Photo: Upload the photo you intend to use for your passport application.
- Run the Compliance Check: Follow the tool’s instructions to run the compliance check. This usually involves clicking a button to start the analysis.
- Review the Feedback: Review the feedback provided by the tool. It will highlight any areas that need improvement.
- Make Adjustments: Make the necessary adjustments to your photo based on the feedback. This may involve cropping, resizing, adjusting the background, or retaking the photo.
- Recheck Compliance: After making adjustments, run the compliance check again to ensure your photo now meets all the requirements.
By using online passport photo tools, you can proactively identify and correct any issues with your photo before submitting it, increasing the chances of a successful passport application.
10. What should I do if my uploaded passport photo is rejected?
If your uploaded passport photo is rejected, don’t worry. There are several steps you can take to resolve the issue and ensure your passport application proceeds smoothly.
1. Understand the Reason for Rejection:
- Review the Notification: Carefully read the rejection notification from the U.S. Department of State. It should specify the reason for the rejection, such as incorrect dimensions, poor image quality, or non-compliance with content requirements.
2. Identify the Problem Area:
- Analyze the Photo: Based on the rejection reason, analyze your photo to identify the specific problem area. This could be the background, facial expression, lighting, or technical specifications.
3. Take Corrective Actions:
- Incorrect Dimensions:
- Solution: Crop and resize the photo to the correct dimensions (e.g., 600×600 pixels) using a photo editing tool.
- Poor Image Quality:
- Solution: Retake the photo using a high-resolution camera in a well-lit environment. Ensure the photo is sharp and clear.
- Non-Compliant Background:
- Solution: Retake the photo with a plain white or off-white background free from shadows or distractions.
- Improper Facial Expression:
- Solution: Retake the photo with a neutral expression, both eyes open, and a closed mouth.
- Eyeglasses:
- Solution: Remove eyeglasses unless you have a signed statement from a medical professional.
- Head Coverings:
- Solution: Ensure head coverings are only worn for religious or medical reasons and that your full face is visible.
- Incorrect File Format or Size:
- Solution: Save the photo as a JPEG (.jpg) file and compress it if necessary to meet the file size limit (10MB).
4. Use Online Compliance Check Tools:
- Verify Compliance: After making corrections, use online passport photo tools to check compliance before re-uploading.
5. Seek Professional Assistance:
- Passport Photo Services: Consider using a professional passport photo service. They can ensure your photo meets all requirements.
6. Re-Upload the Corrected Photo:
- Access the Application: Log back into your online passport application.
- Upload the New Photo: Find the section for uploading the passport photo and upload the corrected photo.
- Review and Submit: Review the entire application, including the new photo, and submit it.
7. Contact Support:
- U.S. Department of State: If you continue to experience issues, contact the U.S. Department of State’s support for assistance.
By following these steps, you can address the reasons for rejection, correct the issues, and successfully re-upload your passport photo, ensuring your application proceeds smoothly.
Ready to take the next step? Visit dfphoto.net today to discover more tips, resources, and a vibrant community of photography enthusiasts. Whether you’re seeking inspiration, technical guidance, or simply a place to share your passion, dfphoto.net is your ultimate destination.
Address: 1600 St Michael’s Dr, Santa Fe, NM 87505, United States
Phone: +1 (505) 471-6001
Website: dfphoto.net
FAQs About Uploading Passport Photos Online
1. Can I smile in my passport photo?
No, the U.S. Department of State requires a neutral facial expression with both eyes open and a closed mouth. A natural expression helps with facial recognition and ensures compliance.
2. What is the ideal background for a passport photo?
The ideal background is plain white or off-white. It should be free from shadows, patterns, or any other distractions that could obscure your face.
3. What should I do if my photo is too dark or too bright?
Ensure even lighting in the photo. If it’s too dark, increase the brightness. If it’s too bright, reduce the exposure. Use photo editing tools to adjust lighting before uploading.
4. Can I wear makeup in my passport photo?
Yes, you can wear makeup, but it should be natural and not alter your facial features significantly. The goal is to ensure you are easily recognizable in the photo.
5. What file format should my passport photo be in?
Your passport photo should be in JPEG (.jpg) format to ensure compatibility with the online application system.
6. Is it acceptable to use a filter on my passport photo?
No, you should not use any filters on your passport photo. The photo must accurately represent your natural appearance without any alterations.
7. How do I ensure my head size is correct in the photo?
The head must be between 1 inch and 1 3/8 inches (25 mm – 35 mm) from the bottom of your chin to the top of your head. Use a ruler or photo editing tool to verify.
8. What should I do if I don’t have a plain white background at home?
You can use a white sheet or poster board as a background. Ensure it is smooth and free from wrinkles or shadows.
9. Can I take a selfie for my passport photo?
While you can use a smartphone, it’s better to have someone else take the photo to ensure proper composition and compliance with requirements.
10. How recent does my passport photo need to be?
Your passport photo must have been taken within the last six months to reflect your current appearance accurately.