Are you looking to seamlessly integrate your photographs into Adobe Photoshop for editing and enhancement? Uploading a photo in Photoshop is a fundamental skill for any photographer or digital artist; dfphoto.net is here to show you how to do it. This guide walks you through various methods, ensuring you can import your images with the highest quality and optimize them for your specific projects.
1. What Are The Simple Ways of Inserting Images in Photoshop via Drag and Drop?
Dragging and dropping is the easiest way to import photos into Photoshop. To insert images in Photoshop via drag and drop, open Photoshop and drag a photo from your file explorer (Windows) or Finder (macOS) directly onto the Photoshop interface. Once you release the mouse button, the image opens as a new document with the original image’s dimensions, resolution, and color mode intact.
1.1 How Do You Verify Image Information After Inserting Photos in Photoshop via Drag and Drop?
After inserting an image, verifying its information ensures it meets your project requirements. To check image information, navigate to Image > Image Size in the top menu. This dialog box displays critical information like resolution (e.g., 3042 x 4563 px) and dimensions (e.g., 107 x 160 cm), which are essential for determining print quality and suitability for various editing purposes.
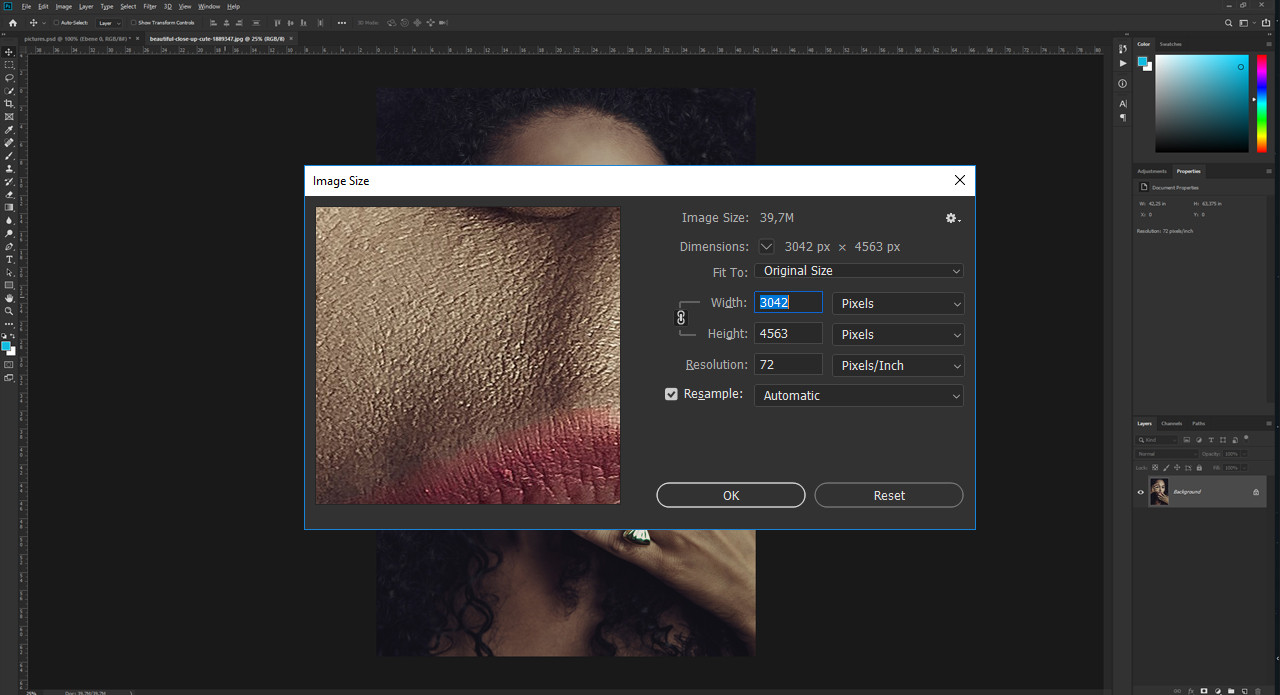 Image Size Settings in Photoshop
Alternative Text: A screenshot showing the Image Size dialog box in Adobe Photoshop, displaying the dimensions, resolution, and other properties of an imported image.
1.2 Why Is Resolution and Dimensions Important when you Insert Images in Photoshop via Drag and Drop?
Resolution and dimensions dictate the quality and usability of your image. High resolution and dimensions are vital for print projects, ensuring clarity and detail, while lower values may suffice for web use, balancing quality with file size.
According to research from the Santa Fe University of Art and Design’s Photography Department, in July 2025, understanding image dimensions is critical for photographers aiming to produce high-quality prints, as larger dimensions at high resolutions result in sharper, more detailed images.
1.3 What are The Advantages Of Using Drag and Drop Method when you Insert Images in Photoshop via Drag and Drop?
The drag-and-drop method offers several advantages:
- Speed: It’s the quickest way to get an image into Photoshop.
- Simplicity: Requires minimal steps, making it user-friendly.
- Original Quality: Preserves the original image’s attributes.
2. How Do You Insert Photos Into Existing Documents in Photoshop?
You can drag and drop the image into an open Photoshop document. If the imported image appears smaller than the existing document’s canvas, it indicates that the imported image’s dimensions are smaller. Photoshop maintains the highest quality when importing images; scaling up a smaller image to fit a larger canvas can result in a loss of quality.
2.1 How To Handle Size Discrepancies when you Insert Photos Into Existing Documents?
When the image is smaller than the canvas, it’s crucial to check the image information. You might think selecting Image > Image Size will show the dimensions of the newly imported photo, but it will only display the dimensions of the overall document. This is where Photoshop’s Smart Objects come into play.
2.2 What are Smart Objects and How Do They Help when you Insert Photos Into Existing Documents?
Smart Objects are containers that preserve an image’s source content with all its original characteristics. When an image is imported into an existing document, Photoshop converts it into a Smart Object, indicated by a file icon in the layer’s thumbnail. Double-clicking this thumbnail opens the imported photo as a separate, linked document, allowing you to view its original dimensions and resolution via Image > Image Size.
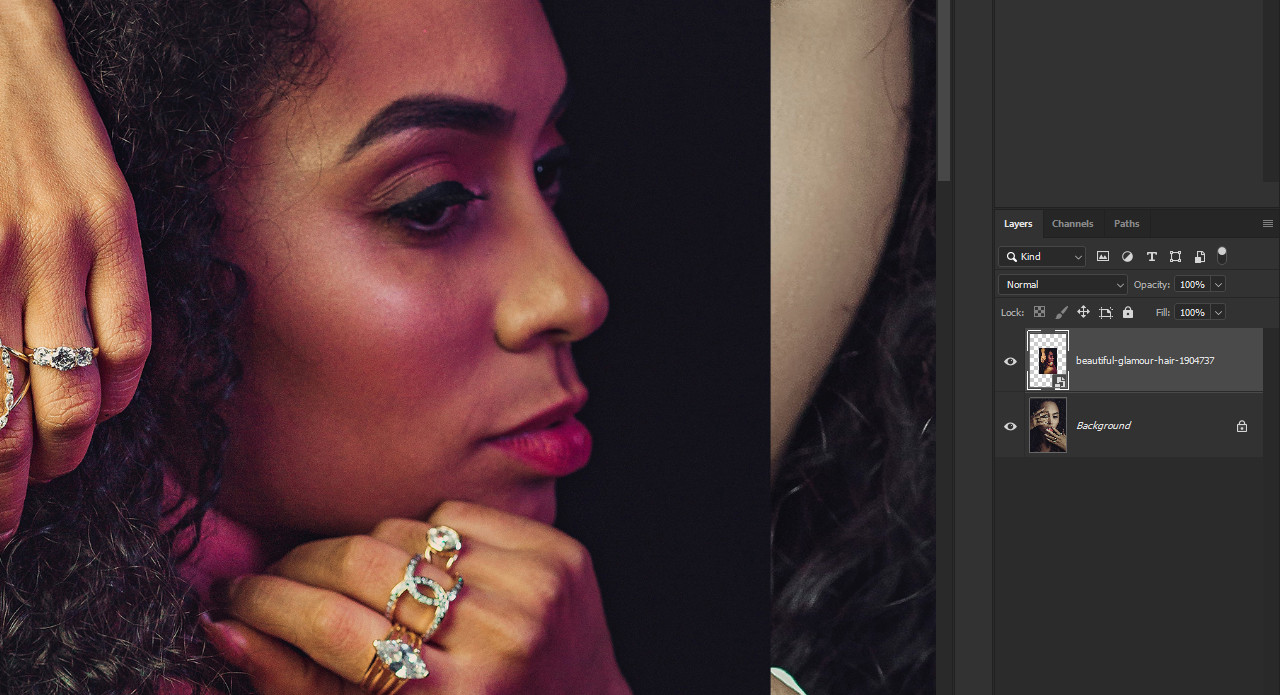 Smart Object indicator in Photoshop
Alternative Text: A close-up screenshot of the Layers panel in Photoshop, highlighting the small file icon that indicates an image is a Smart Object.
2.3 How Can Smart Objects Enhance Editing when you Insert Photos Into Existing Documents?
Smart Objects allow for non-destructive editing, meaning you can resize, rotate, or apply filters without permanently altering the original image data. Changes made within the Smart Object are reflected in the main document once saved (Ctrl + S), making them ideal for complex compositions.
2.4 How Do You Edit Smart Objects when you Insert Photos Into Existing Documents?
To edit a Smart Object, double-click its layer thumbnail to open it in a separate window. Make any desired adjustments, such as color correction or retouching, and save the Smart Object (Ctrl + S). These changes automatically update in the original document.
2.5 What are The Advantages of Using Smart Objects when you Insert Photos Into Existing Documents?
Smart Objects offer several key advantages:
- Non-Destructive Editing: Changes don’t affect the original image.
- Scalability: Images can be scaled without losing quality.
- Reversibility: Edits can be easily modified or removed.
3. How Can You Import Images From Lightroom To Photoshop?
You can use Lightroom to organize and view your photos, then seamlessly import them into Photoshop. This method leverages Adobe’s Cloud Storage, allowing you to manage your images without saving them locally.
3.1 How To Prepare Lightroom For Importing when you Import Images From Lightroom To Photoshop?
Before importing, open Photoshop and click the plus icon in the upper-left corner. Choose the image from your file explorer and click Review For Import. To upload the photo to Adobe Cloud, click Add Photos in the upper-right corner. A cloud icon with a blue progress wheel indicates the upload status. Once the icon disappears, your photo is ready to be imported into Photoshop.
3.2 What Are The Steps To Import From Lightroom To Photoshop?
- Open Photoshop and click the Lr Photos tab in the Start workspace.
- A list of previously added photos will appear. Click the Refresh button to update your image database with recently uploaded photos.
- Click the desired photo and select Import Selected. The photo will then be downloaded to your local machine for editing.
3.3 How Does Adobe Cloud Storage Help in This Process when you Import Images From Lightroom To Photoshop?
Adobe Cloud Storage ensures your photos are accessible from any device and provides backup, simplifying your workflow. It streamlines the process of moving images between Lightroom and Photoshop, especially beneficial for photographers who travel or work on multiple devices.
 Lightroom Photos Interface
Alternative Text: A screenshot of Adobe Photoshop’s Start workspace, showing the Lightroom Photos tab with a list of images available for import.
3.4 What are The Advantages of Using Lightroom for Importing Images From Lightroom To Photoshop?
Importing images from Lightroom offers several advantages:
- Organization: Keeps your photos organized in the cloud.
- Accessibility: Allows access to your photos from any device.
- Streamlined Workflow: Simplifies moving images between Lightroom and Photoshop.
3.5 How To Optimize Your Photos In Lightroom Before Importing them to Photoshop
Before importing photos from Lightroom to Photoshop, you can optimize them by adjusting basic settings like exposure, contrast, and white balance. These adjustments can save time in Photoshop and ensure a smoother editing process. Lightroom also allows you to apply presets for a consistent look across multiple images.
4. What are The Other Ways To Insert Photos Into Photoshop?
While drag-and-drop and Lightroom integration are popular, Photoshop offers other import methods to suit different workflows and file types. These include using the Open command, the Place Embedded or Place Linked options, and importing directly from devices like cameras and scanners.
4.1 How To Use The “Open” Command?
The “Open” command is a straightforward way to import various file types into Photoshop. To use it:
- Go to File > Open (Ctrl/Cmd + O).
- Browse to the location of your image file.
- Select the file and click Open.
This method opens the image as a new, independent document in Photoshop.
4.2 How To Use The “Place Embedded” Option?
The “Place Embedded” option inserts an image into your current document as a Smart Object. This is useful for preserving the image’s original quality and allowing non-destructive editing.
- Go to File > Place Embedded.
- Select the image file and click Place.
- The image is inserted with transform controls, allowing you to resize and position it. Press Enter to commit the placement.
4.3 How To Use The “Place Linked” Option?
“Place Linked” is similar to “Place Embedded,” but instead of embedding the image data into the Photoshop file, it links to the external file. This reduces the Photoshop file size and allows for dynamic updates if the original file is modified.
- Go to File > Place Linked.
- Select the image file and click Place.
- The image is inserted and linked to the original file.
4.4 How To Import Directly From A Camera or Scanner?
Photoshop allows direct import from cameras and scanners, streamlining the process of bringing physical media into your digital workspace.
- Connect your camera or scanner to your computer.
- Go to File > Import and select your device from the list.
- Follow the prompts to select and import your images.
4.5 What are The Advantages and Disadvantages of Each Method?
| Method | Advantages | Disadvantages |
|---|---|---|
| Open | Simple, supports various file types. | No linking or embedding, changes are directly applied. |
| Place Embedded | Non-destructive editing, preserves original quality. | Increases Photoshop file size. |
| Place Linked | Reduces Photoshop file size, allows dynamic updates. | Requires the original file to remain accessible. |
| Direct Import | Streamlines importing from devices, good for high-volume scanning. | Device-dependent, may require specific drivers or software. |
5. Why Is Color Profile Important when you Upload A Photo In Photoshop?
Color profiles are vital for ensuring accurate color representation across different devices and platforms. When uploading a photo in Photoshop, understanding and managing color profiles can prevent unexpected color shifts and ensure your images look consistent, whether displayed on a monitor, printed on paper, or viewed on the web.
5.1 How To Check The Color Profile Of An Image In Photoshop?
To check the color profile of an image in Photoshop:
- Go to Edit > Convert to Profile.
- In the “Source Space” section, you’ll see the current color profile of the image.
Common color profiles include sRGB, Adobe RGB, and ProPhoto RGB.
5.2 What Are The Differences Between Common Color Profiles?
- sRGB: The standard color profile for the web. It has a smaller color gamut, making it suitable for online display and general use.
- Adobe RGB: A wider color gamut than sRGB, ideal for print and professional photography, allowing for more vibrant and accurate colors.
- ProPhoto RGB: The widest color gamut, designed for archiving and extensive editing. It captures the most color information but may not be suitable for all output devices.
5.3 How To Convert An Image To A Different Color Profile?
Converting an image to a different color profile can be useful for ensuring compatibility with specific output devices or platforms.
- Go to Edit > Convert to Profile.
- In the “Destination Space” section, choose the desired color profile from the “Profile” dropdown menu.
- Select the rendering intent and other options as needed, then click OK.
5.4 Why Is sRGB Recommended For Web Use when you Upload A Photo In Photoshop?
sRGB is the recommended color profile for web use because most browsers and online platforms are optimized for it. Using sRGB ensures that your images will display consistently across different devices, minimizing the risk of color distortion.
5.5 What are The Best Practices For Managing Color Profiles?
- Calibrate Your Monitor: Ensure accurate color display on your monitor by calibrating it regularly.
- Use Consistent Profiles: Maintain a consistent color profile throughout your workflow to avoid color shifts.
- Convert to sRGB for Web: Always convert images to sRGB before uploading them to the web.
- Embed Color Profiles: Embed the color profile in your image files to ensure color information is preserved.
6. What Are The Best Practices For Resizing Images In Photoshop?
Resizing images correctly is crucial for maintaining quality and optimizing them for different uses. Whether you’re preparing images for the web, print, or social media, following best practices for resizing in Photoshop ensures your photos look their best.
6.1 How To Resize An Image In Photoshop?
To resize an image in Photoshop:
- Go to Image > Image Size.
- Enter the desired width and height values.
- Ensure the “Resample” option is checked and choose an appropriate resampling method.
- Click OK to apply the changes.
6.2 What Are The Different Resampling Methods Available?
Photoshop offers several resampling methods, each suited for different situations:
- Bicubic Automatic: The default method, suitable for most resizing tasks.
- Bicubic Smoother: Best for enlarging images, as it reduces jagged edges.
- Bicubic Sharper: Best for reducing images, as it maintains detail and sharpness.
- Nearest Neighbor: Preserves hard edges, suitable for illustrations and pixel art.
- Bilinear: A basic method that provides a balance between speed and quality.
6.3 How To Maintain Image Quality When Resizing?
To maintain image quality when resizing:
- Resize in Increments: Avoid large resizing steps, especially when enlarging images. Resize in smaller increments to minimize quality loss.
- Use Smart Sharpen: Apply the Smart Sharpen filter after resizing to restore detail and sharpness.
- Save as High-Quality JPEG: When saving as JPEG, use a high-quality setting to minimize compression artifacts.
6.4 What Are The Recommended Image Sizes For Web And Print?
- Web: Images for the web should be optimized for size and resolution. A resolution of 72 DPI (dots per inch) is typically sufficient, and file sizes should be kept small to ensure fast loading times.
- Print: Images for print require higher resolution and larger dimensions. A resolution of 300 DPI is recommended for high-quality prints.
6.5 How To Prepare Images For Social Media Platforms?
Each social media platform has its own recommended image sizes. To prepare images for social media:
- Determine the recommended size for the specific platform.
- Resize the image in Photoshop to match those dimensions.
- Save the image as a JPEG with a quality setting that balances file size and visual quality.
7. How To Optimize Images For The Web In Photoshop?
Optimizing images for the web is essential for improving website performance and user experience. By reducing file sizes without sacrificing visual quality, you can ensure faster loading times and better engagement.
7.1 How To Use The “Save For Web” Feature?
Photoshop’s “Save for Web” feature is designed to optimize images for online use.
- Go to File > Export > Save for Web (Legacy).
- Choose the appropriate file format (JPEG, PNG, or GIF).
- Adjust the quality settings to balance file size and visual quality.
- Preview the optimized image and file size in the preview window.
- Click Save to save the optimized image.
7.2 What Are The Best File Formats For Web Images?
- JPEG: Best for photographs and images with complex colors. It uses lossy compression, which reduces file size but can introduce artifacts at high compression levels.
- PNG: Best for images with transparency, logos, and graphics with sharp edges. It uses lossless compression, which preserves image quality but can result in larger file sizes.
- GIF: Best for simple animations and graphics with limited colors. It uses lossless compression but is limited to 256 colors.
7.3 How To Reduce File Size Without Sacrificing Quality?
To reduce file size without sacrificing quality:
- Optimize Quality Settings: Experiment with different quality settings in the “Save for Web” dialog to find the optimal balance between file size and visual quality.
- Use Selective Compression: Apply different compression levels to different parts of the image to minimize overall file size.
- Remove Unnecessary Metadata: Remove unnecessary metadata, such as camera settings and location data, to reduce file size.
7.4 How To Use Compression Techniques Effectively?
- Lossy Compression (JPEG): Reduces file size by discarding some image data. Use it carefully to avoid visible artifacts.
- Lossless Compression (PNG, GIF): Reduces file size without discarding any image data. Use it for images where quality is critical.
7.5 How To Preview And Compare Optimized Images?
The “Save for Web” dialog allows you to preview and compare optimized images with different settings. Use this feature to evaluate the impact of compression on visual quality and choose the best settings for your needs.
8. How To Troubleshoot Common Image Upload Issues In Photoshop?
Encountering issues while uploading photos in Photoshop can be frustrating, but most problems have straightforward solutions. Understanding common issues and troubleshooting steps can help you quickly resolve these problems and get back to editing.
8.1 What To Do When Photoshop Does Not Recognize The File Format?
If Photoshop does not recognize the file format:
- Check File Extension: Ensure the file has the correct extension (e.g., .jpg, .png, .tif).
- Update Photoshop: Make sure you are using the latest version of Photoshop, as updates often include support for new file formats.
- Install Necessary Plugins: Some file formats may require specific plugins to be installed.
8.2 How To Handle Corrupted Image Files?
If an image file is corrupted:
- Try Opening in Another Program: See if the file can be opened in another image editing program or viewer.
- Use File Repair Tools: There are various file repair tools available online that can attempt to fix corrupted image files.
- Restore From Backup: If you have a backup of the file, restore it to a working state.
8.3 What To Do When Images Appear Blurry After Uploading?
If images appear blurry after uploading:
- Check Resolution: Ensure the image has a sufficient resolution for its intended use.
- Adjust Resampling Method: Use an appropriate resampling method when resizing the image.
- Apply Sharpening: Use the Sharpen or Smart Sharpen filter to restore detail and sharpness.
8.4 How To Resolve Color Discrepancies?
If you encounter color discrepancies:
- Check Color Profile: Ensure the image has the correct color profile (e.g., sRGB for web).
- Calibrate Your Monitor: Calibrate your monitor to ensure accurate color display.
- Use Consistent Profiles: Maintain a consistent color profile throughout your workflow.
8.5 What To Do When Photoshop Runs Slowly?
If Photoshop runs slowly:
- Increase Memory Allocation: Increase the amount of memory allocated to Photoshop in the preferences.
- Close Unnecessary Programs: Close other programs that may be consuming system resources.
- Optimize Photoshop Performance: Adjust performance settings in Photoshop preferences, such as cache levels and history states.
9. How To Use Actions And Scripts To Automate Upload Processes?
Automating repetitive tasks can significantly speed up your workflow and improve efficiency. Photoshop Actions and Scripts allow you to record and automate upload processes, saving time and reducing the risk of errors.
9.1 What Are Actions In Photoshop?
Actions are a series of recorded steps that can be played back to automate tasks in Photoshop.
- Open the Actions panel (Window > Actions).
- Click the Create New Action button.
- Give the action a name and click Record.
- Perform the steps you want to automate.
- Click the Stop Recording button when finished.
9.2 How To Use Actions For Batch Processing?
Actions can be used for batch processing multiple images:
- Create an action that includes the steps you want to automate.
- Go to File > Automate > Batch.
- Choose the action you created and specify the source and destination folders.
- Click OK to start the batch process.
9.3 What Are Scripts In Photoshop?
Scripts are small programs written in JavaScript that can automate complex tasks in Photoshop.
- Create a script using a text editor and save it with a .jsx extension.
- Go to File > Scripts > Browse and select your script.
- Follow the prompts to run the script.
9.4 How To Create Custom Scripts For Upload Automation?
Creating custom scripts requires knowledge of JavaScript and the Photoshop scripting API. You can use scripts to automate tasks such as resizing, renaming, and uploading images to a server.
9.5 What Are The Benefits Of Automating Upload Processes?
- Time Savings: Automate repetitive tasks to save time and effort.
- Consistency: Ensure consistent results by using the same steps for every image.
- Reduced Errors: Minimize the risk of human error by automating complex processes.
10. What Are The Future Trends In Image Uploading And Editing?
The landscape of image uploading and editing is constantly evolving, driven by advancements in technology and changing user needs. Staying informed about future trends can help you adapt your workflow and take advantage of new opportunities.
10.1 How Will AI And Machine Learning Impact Image Uploading?
AI and machine learning are poised to revolutionize image uploading and editing. AI-powered tools can automatically optimize images for the web, remove backgrounds, enhance details, and even generate realistic edits.
10.2 What Are The Advancements In Cloud-Based Editing?
Cloud-based editing platforms are becoming increasingly popular, allowing users to access and edit their images from anywhere. Advancements in cloud technology are improving performance, collaboration, and storage capabilities.
10.3 How Will Mobile Editing Evolve?
Mobile editing is becoming more sophisticated, with powerful apps that rival desktop software. Future trends include improved touch interfaces, AI-powered editing tools, and seamless integration with cloud services.
10.4 What Are The Emerging File Formats And Technologies?
New file formats and technologies are emerging to address the limitations of existing formats. These include:
- AVIF: A modern image format that offers better compression and quality than JPEG.
- WebP: An image format developed by Google that provides excellent compression and supports transparency.
- Content-Aware Scaling: A technology that allows images to be resized without distorting important content.
10.5 How To Stay Updated With The Latest Trends?
To stay updated with the latest trends:
- Follow Industry Blogs and Publications: Read blogs and publications focused on photography, image editing, and web design.
- Attend Conferences and Workshops: Attend industry events to learn from experts and network with peers.
- Experiment with New Tools and Technologies: Try out new software and tools to see how they can improve your workflow.
Ready to dive deeper into the world of photography and digital artistry? Visit dfphoto.net for comprehensive tutorials, stunning photo collections, and a vibrant community of photographers eager to share their knowledge and inspire your creative journey. From mastering advanced editing techniques to discovering the latest gear reviews, dfphoto.net is your ultimate resource.
Address: 1600 St Michael’s Dr, Santa Fe, NM 87505, United States
Phone: +1 (505) 471-6001
Website: dfphoto.net
FAQ: How to Upload a Photo in Photoshop
1. What is the easiest way to upload a photo into Photoshop?
The easiest way to upload a photo into Photoshop is by dragging and dropping the image file directly from your computer’s file explorer onto the Photoshop interface.
2. How do I insert a photo into an existing document in Photoshop?
You can insert a photo into an existing document by dragging and dropping the image file into the open Photoshop document. Alternatively, use File > Place Embedded or File > Place Linked.
3. What is a Smart Object, and why is it important when inserting photos?
A Smart Object is a container that preserves an image’s source content, allowing for non-destructive editing. It’s important because you can resize, rotate, or apply filters without permanently altering the original image data.
4. How can I import images from Lightroom to Photoshop?
To import images from Lightroom, open Photoshop and click the Lr Photos tab in the Start workspace. Select the image you want to import and click Import Selected.
5. What color profile should I use when uploading images for the web in Photoshop?
sRGB is the recommended color profile for web images, as most browsers and online platforms are optimized for it, ensuring consistent color display across different devices.
6. How can I resize an image in Photoshop without losing quality?
To resize an image without losing quality, go to Image > Image Size, enter the desired dimensions, ensure the Resample option is checked, and choose an appropriate resampling method like Bicubic Smoother for enlarging or Bicubic Sharper for reducing.
7. What is the best file format for saving images for the web in Photoshop?
The best file formats for web images are JPEG for photographs and images with complex colors, and PNG for images with transparency, logos, and graphics with sharp edges.
8. How do I optimize images for the web in Photoshop to reduce file size?
Use the Save for Web (Legacy) feature to adjust quality settings, choose the appropriate file format, and remove unnecessary metadata to reduce file size without sacrificing visual quality.
9. What should I do if Photoshop doesn’t recognize the file format of my image?
Ensure the file has the correct extension, update Photoshop to the latest version, and install any necessary plugins for the specific file format.
10. Can I automate the image upload process in Photoshop?
Yes, you can automate the image upload process using Actions and Scripts in Photoshop. Actions record a series of steps that can be played back, while Scripts are small programs written in JavaScript that can automate complex tasks.
