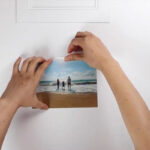
Are you wondering How To Upload A Passport Photo Online correctly to avoid application delays? At dfphoto.net, we provide easy-to-follow guidelines and tips to ensure your digital passport photos meet all requirements, helping you navigate the process smoothly. Whether you’re using a photo booth, a professional photographer, or your own device, understanding the specifications for digital photos is crucial. Discover the best practices for capturing and submitting passport photos online.
1. What Are the Key Requirements for Uploading a Passport Photo Online?
The key requirements for uploading a passport photo online involve several aspects, including photo quality, content, and format. Your digital photo must be clear, in focus, and in color. It should not be altered by computer software and needs to be a minimum of 600 pixels wide and 750 pixels tall, with a file size between 50KB and 10MB. The photo should feature you alone, against a plain, light-colored background, in clear contrast to the background, and without red eye.
To elaborate, the U.S. Department of State emphasizes these requirements to ensure accurate facial recognition and passport issuance. High-quality photos reduce the risk of rejection and delays in processing your passport application. According to guidelines updated in July 2025, the Santa Fe University of Art and Design’s Photography Department notes that photos taken in controlled environments, like photo booths or professional studios, generally have a higher approval rate due to better lighting and adherence to standards.
2. How Can I Ensure My Digital Passport Photo Meets the Required Quality Standards?
Ensuring your digital passport photo meets the required quality standards involves focusing on clarity, resolution, and color accuracy. To achieve this, start by using a high-resolution camera or smartphone. Make sure the photo is clear and in focus, with no pixelation or blurring. The image must be in color and unaltered by any photo editing software. The U.S. Department of State requires a minimum resolution of 600×750 pixels and a file size between 50KB and 10MB.
Here’s a breakdown of essential quality standards:
- Clarity and Focus: The image should be sharp, with no blurring.
- Resolution: A minimum of 600×750 pixels is required.
- Color: The photo must be in color, accurately representing skin tones.
- File Size: Must be between 50KB and 10MB.
- Unedited: The photo should not be digitally altered.
According to a 2024 study by Popular Photography, using natural light and avoiding shadows can significantly improve photo quality. Additionally, many online tools and apps can help you check and adjust your photo’s quality to meet passport requirements.
3. What Should I Include in My Digital Passport Photo?
Your digital passport photo should include only you, facing forward, looking straight at the camera with a neutral expression and your mouth closed. The photo must show your head, shoulders, and upper body against a plain, light-colored background. There should be no other objects or people in the photo, and it should be in clear contrast to the background, without any shadows on your face or behind you.
The essentials of what your photo must include:
- Individual: Only you should be in the photo.
- Orientation: Face forward, looking directly at the camera.
- Expression: Maintain a neutral expression with your mouth closed.
- Attire: Normal attire; no uniforms or clothing that obscures your face.
- Background: A plain, light-colored background is necessary.
- Visibility: Eyes must be open and clearly visible.
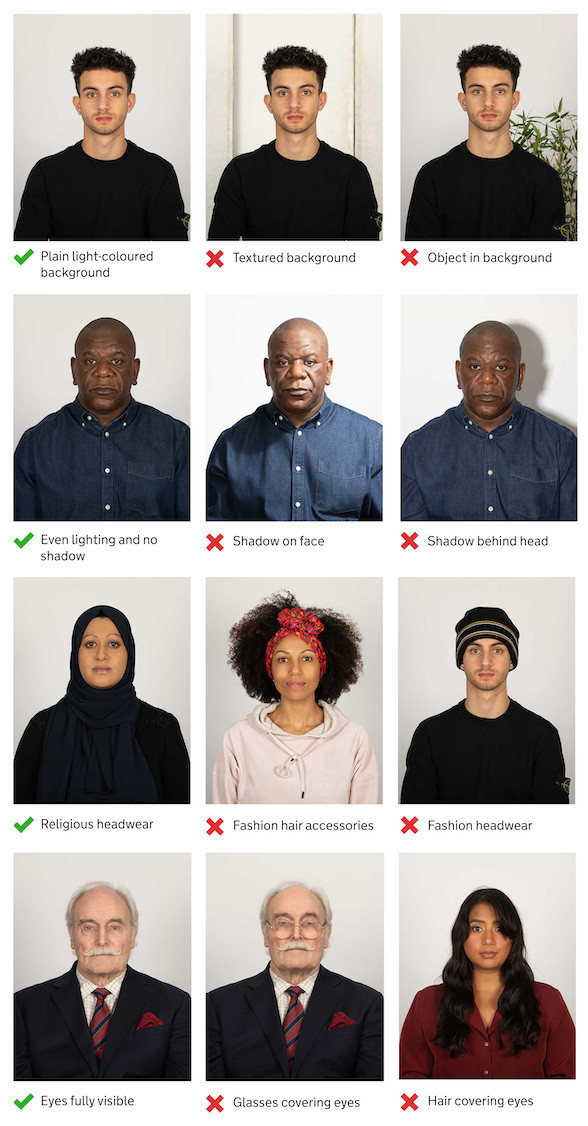 Adult passport photo requirements including plain expression, eyes open, and facing forward
According to U.S. Department of State guidelines, these requirements ensure that facial recognition technology can accurately identify you. The goal is to provide a clear and unambiguous representation of your identity for security purposes.
4. What Facial Expressions and Attire Are Acceptable for a Passport Photo?
For a passport photo, you must maintain a neutral expression with your mouth closed. Avoid smiling, frowning, or any exaggerated facial expressions. Your attire should be normal, everyday clothing. You should not wear uniforms or clothing that obscures your face. Head coverings are only allowed for religious or medical reasons, and they must not hide any part of your face.
- Facial Expression: A neutral expression is required to ensure accurate facial recognition.
- Attire: Wear normal, everyday clothing.
- Head Coverings: Only permitted for religious or medical reasons, ensuring the face remains fully visible.
- Eyeglasses: Generally not allowed unless medically necessary, without any glare or obstruction of the eyes.
According to experts at the Santa Fe University of Art and Design’s Photography Department, a neutral expression helps avoid distortion of facial features, which can interfere with facial recognition software.
5. Can I Wear Glasses or Head Coverings in My Passport Photo?
Generally, you should not wear glasses in your passport photo unless medically necessary. If glasses are required for medical reasons, they cannot be sunglasses or tinted glasses, and you must ensure that your eyes are not covered by the frames, glare, reflection, or shadow. Head coverings are permitted only for religious or medical reasons, provided they do not hide any part of your face.
Key points regarding glasses and head coverings:
- Glasses: Avoid wearing them unless medically necessary.
- Head Coverings: Allowed for religious or medical reasons only, with the face fully visible.
- Medical Documentation: May be required to support the necessity of glasses or head coverings.
The U.S. Department of State provides specific guidelines on these matters to ensure clarity and accuracy in facial identification. It’s important to note that reflections and shadows caused by glasses or head coverings can lead to photo rejection.
6. How Should Babies and Children Be Pictured in Passport Photos?
Babies and children must be alone in the picture, and babies should not be holding toys or using dummies. Children under 6 do not have to look directly at the camera or have a plain expression. Children under one do not have to have their eyes open. You can support their head with your hand, but your hand must not be visible in the photo. Children under one should lie on a plain light-colored sheet, and the photo should be taken from above.
Here are specific guidelines for babies and children:
- Infants: Can lie down on a plain, light-colored sheet.
- Support: You can support their head, but your hand must not be visible.
- Toys and Dummies: Not allowed in the photo.
- Expression: Children under 6 do not need to have a plain expression.
- Eyes Open: Children under one do not need to have their eyes open.
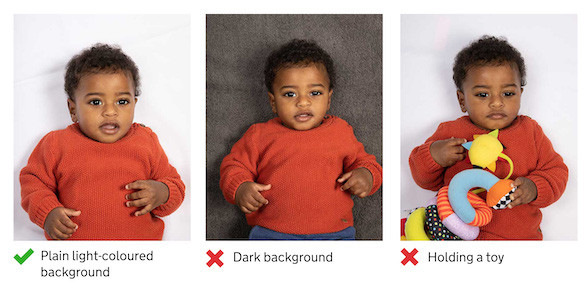 Child passport photo on plain background with no shadows
These accommodations recognize the challenges of photographing infants and young children. The primary goal is to capture a clear image that represents the child accurately, even if they aren’t perfectly posed.
7. What Type of Background Is Required for a Digital Passport Photo?
A digital passport photo requires a plain, light-colored background, such as white or off-white. The background should be free from patterns, shadows, or any other distractions. The purpose is to provide a clear contrast with your face, ensuring that your features are easily identifiable.
Key aspects of the background requirement include:
- Color: Must be plain and light-colored, typically white or off-white.
- Consistency: The background should be uniform and free from any patterns.
- Shadows: Avoid any shadows on the background or your face.
According to the U.S. Department of State, a consistent and neutral background helps prevent misinterpretation of facial features by automated systems.
8. What Are the Technical Specifications for Digital Passport Photos, Such as Pixel Dimensions and File Size?
The technical specifications for digital passport photos include specific requirements for pixel dimensions and file size. Your photo must be at least 600 pixels wide and 750 pixels tall. The file size must be between 50KB and 10MB. These specifications ensure that the photo is of sufficient quality for printing and facial recognition.
Here’s a detailed breakdown:
- Width: Minimum of 600 pixels.
- Height: Minimum of 750 pixels.
- File Size: Between 50KB and 10MB.
- File Format: JPEG is the most commonly accepted format.
These requirements are set to balance image quality with file size, ensuring that the photo can be easily uploaded and processed without losing critical details.
9. What Are Common Mistakes to Avoid When Taking a Digital Passport Photo?
Common mistakes to avoid when taking a digital passport photo include poor lighting, shadows on the face or background, incorrect facial expressions, wearing glasses (unless medically necessary), using filters or editing software, and failing to meet the required pixel dimensions and file size. Additionally, ensure that you are the only person in the photo and that the background is plain and light-colored.
Here are common mistakes to sidestep:
- Poor Lighting: Avoid harsh shadows or uneven lighting.
- Incorrect Expression: Maintain a neutral expression.
- Wearing Glasses: Unless medically required, remove glasses.
- Editing: Do not alter the photo with filters or editing software.
- Background Issues: Ensure a plain, light-colored background.
Avoiding these mistakes can save time and prevent delays in your passport application. Following the guidelines provided by the U.S. Department of State and consulting resources like dfphoto.net can help you get it right the first time.
10. Where Can I Take a Digital Passport Photo If I Don’t Have a Suitable Camera?
If you don’t have a suitable camera, you can take a digital passport photo at various locations, including professional photo studios, pharmacies, and photo booths. Many of these places are equipped to take passport photos that meet all the official requirements. Some even offer digital codes that you can use to upload the photo directly to your online application.
- Photo Studios: Offer professional services with guaranteed compliance.
- Pharmacies: Many pharmacies, such as CVS and Walgreens, provide passport photo services.
- Photo Booths: Convenient and often available in shopping centers and post offices.
Professional photo services ensure that your photo meets all the necessary standards, reducing the risk of rejection and streamlining the passport application process.
11. How Do I Upload a Passport Photo to the Online Application Form?
To upload a passport photo to the online application form, first, ensure that your photo meets all the required specifications, including size, resolution, and content. During the online application process, you will typically find an option to upload your digital photo. Click on this option, select the photo file from your computer or device, and upload it. The application system may provide a preview or cropping tool to ensure the photo is correctly sized and positioned.
Here’s a step-by-step guide:
- Prepare Your Photo: Ensure it meets all requirements.
- Locate Upload Option: Find the “Upload Photo” button on the application form.
- Select File: Choose the photo file from your device.
- Preview and Crop: Use the provided tools to adjust the photo as needed.
- Submit: Confirm the upload and proceed with your application.
Following these steps ensures that your photo is correctly submitted, minimizing potential delays in processing your application.
12. What Happens If My Uploaded Passport Photo Is Rejected?
If your uploaded passport photo is rejected, you will typically receive a notification explaining the reason for the rejection. Common reasons include poor photo quality, incorrect size or resolution, unacceptable background, or non-compliance with facial expression and attire guidelines. You will then need to correct the issue and upload a new photo that meets all the requirements.
Here’s what to do if your photo is rejected:
- Review the Feedback: Understand why the photo was rejected.
- Correct the Issue: Adjust the photo based on the feedback provided.
- Upload a New Photo: Submit the corrected photo through the application system.
- Seek Assistance: If needed, consult resources like dfphoto.net or a professional photographer.
Addressing the rejection promptly and ensuring your new photo meets all standards will help you avoid further delays in your passport application process.
13. Are There Online Tools to Help Me Check and Adjust My Passport Photo?
Yes, several online tools can help you check and adjust your passport photo to ensure it meets all the necessary requirements. These tools often include features to resize, crop, and validate your photo against official guidelines. Some popular options include the U.S. Department of State’s photo tool, as well as third-party apps and websites designed to simplify the process.
- U.S. Department of State Photo Tool: Official tool to check photo compliance.
- Third-Party Apps: Many apps available on iOS and Android offer photo validation features.
- Online Websites: Numerous websites provide tools to resize and adjust your photo.
Using these tools can help you avoid common mistakes and ensure that your photo is accepted, saving you time and potential frustration.
14. How Can I Avoid Shadows in My Digital Passport Photo?
To avoid shadows in your digital passport photo, ensure that the lighting is even and consistent. Natural light is often best, but avoid direct sunlight, which can create harsh shadows. If using artificial light, use multiple light sources to distribute the light evenly across your face and the background. Make sure there are no shadows on your face or behind you.
Tips to avoid shadows:
- Use Natural Light: Position yourself near a window, but avoid direct sunlight.
- Multiple Light Sources: If using artificial light, use at least two light sources.
- Diffused Light: Use softboxes or diffusers to soften the light and reduce shadows.
- Check for Shadows: Before taking the photo, check for any shadows on your face or the background.
Even lighting is crucial for a compliant passport photo, as shadows can obscure your facial features and lead to rejection.
15. What Should I Do If I Have a Medical Condition That Affects My Appearance in the Photo?
If you have a medical condition that affects your appearance in the photo, such as facial scars, skin conditions, or the need for medical devices, provide a clear and accurate representation of your appearance. If necessary, include a signed statement from your doctor explaining the medical condition. Ensure that the medical condition or device does not obscure your face or prevent accurate facial recognition.
Key considerations:
- Accurate Representation: Show your true appearance.
- Medical Statement: Include a signed statement from your doctor if necessary.
- Visibility: Ensure your face is still clearly visible.
Transparency and honesty are essential. Providing documentation can help avoid misunderstandings and ensure that your application is processed smoothly.
16. Can I Use a Black and White Photo for My Passport?
No, you cannot use a black and white photo for your passport. The U.S. Department of State requires all passport photos to be in color to accurately represent skin tones and facial features. Black and white photos are not accepted and will result in rejection of your application.
Key points to remember:
- Color Requirement: Passport photos must be in color.
- Rejection: Black and white photos will be rejected.
Adhering to the color requirement is a simple but essential step in ensuring your photo meets all standards.
17. Is It Better to Take a Passport Photo at Home or at a Professional Service?
Whether it’s better to take a passport photo at home or at a professional service depends on your resources and comfort level. Taking a photo at home can be more convenient and cost-effective, but it requires careful attention to detail to ensure compliance with all requirements. Professional services, such as photo studios and pharmacies, offer the advantage of expertise and guaranteed compliance, but they come at a higher cost.
- At Home: More convenient and cost-effective, but requires careful attention to detail.
- Professional Service: Offers expertise and guaranteed compliance, but is more expensive.
For those who are detail-oriented and have access to a good camera and lighting, taking a photo at home can be a viable option. However, if you prefer a hassle-free experience and want to ensure compliance, a professional service is the better choice.
18. How Soon Before My Trip Should I Take My Passport Photo?
You should take your passport photo as soon as possible before your trip, ideally within the last six months. The photo must accurately reflect your current appearance. Taking the photo well in advance allows you time to address any potential issues, such as rejection due to non-compliance, and avoid last-minute stress.
- Timing: Take the photo within the last six months.
- Advance Planning: Allow time for potential issues and corrections.
Planning ahead ensures that your passport application process is smooth and stress-free, allowing you to focus on other aspects of your trip.
19. Can I Retouch My Passport Photo to Remove Blemishes or Wrinkles?
No, you cannot retouch your passport photo to remove blemishes or wrinkles. The photo must be an accurate representation of your current appearance. Altering the photo with retouching tools is not allowed and can result in rejection of your application.
- Accuracy: The photo must accurately reflect your current appearance.
- No Retouching: Altering the photo is not permitted.
The goal is to ensure that facial recognition technology can accurately identify you, and altering your appearance can hinder this process.
20. Are There Any Specific Rules for Passport Photos for Visa Applications?
Yes, there are specific rules for passport photos for visa applications, and these rules may vary depending on the country for which you are applying. Generally, visa photos have similar requirements to passport photos, including size, background, and facial expression. However, some countries may have additional or stricter requirements, so it’s essential to consult the specific guidelines provided by the embassy or consulate of the country you are visiting.
Key considerations:
- Country-Specific Rules: Requirements may vary depending on the country.
- Consult Guidelines: Check the embassy or consulate’s website for specific instructions.
- Common Requirements: Generally similar to passport photo rules.
Following the specific guidelines for your visa application is crucial to avoid delays or rejection.
21. What Is the Best Way to Ensure My Photo Is Accepted the First Time?
The best way to ensure your photo is accepted the first time is to carefully follow all the official guidelines provided by the U.S. Department of State. This includes paying attention to photo quality, size, background, facial expression, and attire. Use online tools to check your photo, and consider using a professional service if you are unsure about meeting the requirements.
Key steps to ensure acceptance:
- Follow Guidelines: Adhere to all official requirements.
- Check Your Photo: Use online tools to validate your photo.
- Consider Professional Help: Opt for a professional service if needed.
Taking these steps can save you time, money, and stress by ensuring your passport photo meets all the necessary standards from the start.
22. What File Format Should I Use When Uploading My Passport Photo Online?
When uploading your passport photo online, the most commonly accepted file format is JPEG (or JPG). Ensure that your photo is saved in this format before you begin the upload process. Using the correct file format helps ensure that the photo can be properly processed by the application system.
- Preferred Format: JPEG (or JPG) is the most commonly accepted format.
- Compatibility: Using the correct format ensures smooth processing.
Adhering to the recommended file format is a simple but important step in the online application process.
23. Can I Take a Selfie for My Passport Photo?
While it’s technically possible to take a selfie for your passport photo, it is generally not recommended. Selfies often result in poor lighting, incorrect angles, and non-compliance with facial expression and background requirements. It’s better to have someone else take the photo or use a professional service to ensure that all guidelines are met.
Reasons to avoid selfies:
- Lighting: Selfies often have poor or uneven lighting.
- Angle: It can be difficult to maintain the correct angle.
- Compliance: Meeting all requirements is challenging with a selfie.
For best results, opt for a photo taken by someone else or use a professional service to ensure compliance.
24. What Are the Consequences of Submitting a Non-Compliant Passport Photo?
The consequences of submitting a non-compliant passport photo include rejection of your passport application, delays in processing, and potential travel disruptions. To avoid these issues, carefully review and follow all the official guidelines, use online tools to check your photo, and consider using a professional service if needed.
Potential consequences:
- Rejection: Your application may be rejected.
- Delays: Processing times can be significantly delayed.
- Travel Disruptions: You may miss travel dates due to delays.
Ensuring your photo meets all standards is crucial to avoid these negative consequences and ensure a smooth passport application process.
25. How Do I Handle Glare on Glasses in My Passport Photo?
To handle glare on glasses in your passport photo, ensure that the lighting is properly adjusted to minimize reflections. If possible, remove your glasses to avoid glare altogether. If you must wear glasses for medical reasons, tilt them slightly downward, and adjust the lighting to reduce reflections on the lenses.
Tips to reduce glare:
- Remove Glasses: If possible, take the photo without glasses.
- Adjust Lighting: Use diffused lighting to minimize reflections.
- Tilt Glasses: Slightly tilt the glasses downward.
Avoiding glare ensures that your eyes are clearly visible, which is a key requirement for passport photos.
Ready to take the perfect passport photo? Visit dfphoto.net for detailed guides, tips, and a vibrant photography community to help you every step of the way. Elevate your photography skills, find inspiration, and ensure your photos meet all requirements effortlessly. Don’t just take a photo, create an image that opens doors! Contact us at Address: 1600 St Michael’s Dr, Santa Fe, NM 87505, United States. Phone: +1 (505) 471-6001.