Updating Microsoft Photos ensures you have the latest features, bug fixes, and performance improvements. DFphoto.net is here to guide you through keeping your photo management tools sharp. This article will walk you through the steps to update Microsoft Photos, explain the benefits of doing so, and highlight some of the exciting new features you can expect, including cloud synchronization and advanced search capabilities.
1. Why Should I Update Microsoft Photos?
Keeping your Microsoft Photos app up to date is essential for several reasons:
- New Features: Updates often bring exciting new features, such as improved editing tools, better organization options, and enhanced integration with other services like OneDrive and iCloud.
- Bug Fixes: Updates address bugs and glitches that can cause the app to crash or malfunction, providing a smoother user experience.
- Performance Improvements: Updates often include performance optimizations that make the app faster and more responsive, especially when dealing with large photo libraries.
- Security Updates: Updates can include security patches that protect your data and privacy.
- Compatibility: Keeping your app updated ensures it remains compatible with the latest operating systems and devices.
Think of it like this: updating Microsoft Photos is like giving your favorite car a regular tune-up. It keeps everything running smoothly and ensures you get the best possible performance.
2. How to Check for Updates in the Microsoft Store
The easiest way to update Microsoft Photos is through the Microsoft Store. Here’s how:
- Open the Microsoft Store: Click the Microsoft Store icon on your taskbar or search for it in the Start Menu.
- Search for Photos: In the Microsoft Store, type “Microsoft Photos” in the search bar and press Enter.
- Check for Updates: On the Microsoft Photos app page, look for an “Update” button. If you see one, click it to start the update process.
- Automatic Updates: If there is no “Update” button, ensure that automatic app updates are enabled in the Microsoft Store settings to keep all your apps, including Photos, up to date.
Step-by-Step Guide to Enabling Automatic App Updates:
- Open the Microsoft Store: Click the Microsoft Store icon on your taskbar or search for it in the Start Menu.
- Access Settings: Click on your profile picture in the top right corner and select “App settings”.
- Enable Updates: Make sure the “App updates” toggle is switched to the “On” position.
By enabling automatic updates, you can rest assured that Microsoft Photos and your other apps will always be running the latest versions, without you having to manually check for updates.
3. What to Do If the Update Button Is Not Available
Sometimes, the “Update” button might not be visible, even if there’s a newer version available. Here are a few troubleshooting steps:
- Restart the Microsoft Store: Close the Microsoft Store completely and reopen it. This can sometimes refresh the app and make the update button appear.
- Check Your Internet Connection: Ensure you have a stable internet connection. A poor connection can prevent the Microsoft Store from checking for updates.
- Sign Out and Sign Back In: Sign out of your Microsoft account in the Microsoft Store and then sign back in. This can help resolve any account-related issues that might be preventing updates.
- Run the Windows Store Apps Troubleshooter: Windows includes a built-in troubleshooter that can automatically detect and fix problems with Microsoft Store apps.
- Go to Settings > Update & Security > Troubleshoot > Additional troubleshooters.
- Select Windows Store Apps and click Run the troubleshooter.
- Reset the Microsoft Store Cache: Resetting the cache can sometimes resolve issues with app updates.
- Press Win + R to open the Run dialog.
- Type
wsreset.exeand press Enter. - A blank Command Prompt window will appear for a few seconds, then the Microsoft Store will open.
By following these steps, you should be able to resolve most issues that prevent the “Update” button from appearing in the Microsoft Store.
4. Key New Features in Recent Microsoft Photos Updates
Recent updates to Microsoft Photos have brought several exciting new features and improvements:
| Feature | Description | Benefit |
|---|---|---|
| iCloud Photos Integration | Allows you to sync and view your iCloud photos directly within the Photos app. | Provides a seamless way to access your iCloud photos on your Windows 10 or Windows 11 PC, eliminating the need to manually transfer photos between devices. |
| Windows App SDK and WinUI 3 | The Photos app has been updated to use the new Windows App SDK platform, leveraging its modern UI and performance optimizations. | Offers a more consistent, performant, and visually appealing experience across different versions of the app. |
| Gallery Navigation Update | The navigation panel in the Gallery has been updated to improve usability and make it easier to find your local and cloud content. | Simplifies the process of navigating your photo library, allowing you to quickly access photos from different sources, such as your PC, iCloud, or OneDrive. |
| Visual Search with Bing | In the Viewer, you can search your images online using the new Visual Search with Bing feature. | Enables you to quickly find similar images, related products, and other related content online, directly from within the Photos app. |
| Performance Improvements | An option has been added to run the Photos app in the background with minimal processes, to improve the app startup speed. | Reduces the app’s startup time, making it faster and more responsive. You can also disable background activity if you prefer. |
| Quick Edit in File Explorer | You can now quickly edit an image in File Explorer or on the desktop by right-clicking on the image and selecting “Edit in Photos”. | Provides a convenient way to quickly access the Photo Editor for basic editing tasks like cropping, rotating, and marking up images. |
| AI-Powered Editing | Integration of AI-powered editing tools that can automatically enhance your photos with just a few clicks. | Allows you to quickly improve the quality of your photos without requiring advanced editing skills. |
| Improved OneDrive Sync | Enhanced synchronization with OneDrive, ensuring your photos are always backed up and accessible across all your devices. | Offers a reliable and convenient way to keep your photos safe and accessible, regardless of where you are or what device you’re using. |
| Enhanced Video Playback | Better support for playing videos within the Photos app, with improved performance and format compatibility. | Provides a seamless experience for watching videos, with better performance and support for a wider range of video formats. |
| Accessibility Improvements | Updates to improve accessibility for users with disabilities, such as better screen reader support and keyboard navigation. | Makes the Photos app more inclusive and accessible to all users, regardless of their abilities. |
These updates demonstrate Microsoft’s commitment to continuously improving the Photos app and providing users with a powerful and user-friendly tool for managing and editing their photos.
5. Accessing and Viewing ICloud Photos on Windows 10
One of the most exciting features of the recent Microsoft Photos update is the ability to access and view your iCloud photos directly on Windows 10. Here’s how to set it up:
- Install iCloud for Windows: Download and install the latest iCloud for Windows app from the Microsoft Store. You can find it by searching for “iCloud for Windows” in the Microsoft Store.
- Sign In with Your Apple ID: Open the iCloud for Windows app and sign in with your Apple ID and password.
- Choose to Sync iCloud Photos: In the iCloud for Windows app, make sure the “Photos” option is selected and that iCloud Photos is enabled.
- Access iCloud Photos in the Photos App: Open the Microsoft Photos app and click on the “iCloud Photos” pivot in the navigation panel. Within minutes, you should see your iCloud photos starting to appear automatically.
This integration makes it incredibly convenient to access your iCloud photos on your Windows 10 PC without having to manually transfer them.
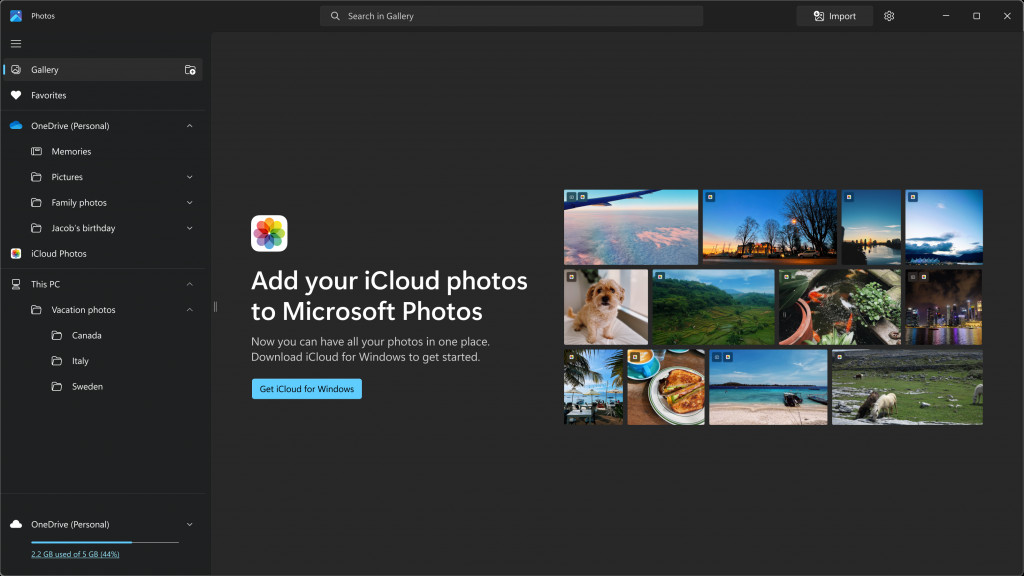 Install iCloud for Windows and view iCloud photos directly into the Photos app
6. Understanding the Windows App SDK and WinUI 3 Upgrade
The update to the Windows App SDK and WinUI 3 platform brings significant improvements to the Microsoft Photos app, particularly in terms of user interface (UI) and performance. Here’s what you need to know:
- Modern UI: WinUI 3 provides a modern and visually appealing UI that is more consistent with the overall Windows 11 design language.
- Improved Performance: The Windows App SDK platform offers various performance optimizations that make the app faster and more responsive.
- Enhanced Reliability: The new platform is designed to be more reliable and stable, reducing the likelihood of crashes and other issues.
- Future-Proofing: By adopting the Windows App SDK, Microsoft is ensuring that the Photos app is well-positioned to take advantage of future Windows updates and features.
This upgrade represents a significant investment in the long-term development and maintenance of the Microsoft Photos app.
7. Navigating the Updated Gallery
The updated navigation panel in the Gallery makes it easier to find your photos, regardless of where they’re stored. Here’s a breakdown of the new layout:
- Gallery: This option at the top lets you access all your photo content in one place, whether it’s stored on your PC, in iCloud, or on OneDrive.
- Cloud Provider Options: Below the “Gallery” option, you’ll find separate sections for each of your cloud providers, such as “OneDrive – Personal,” “OneDrive – Business,” and “iCloud Photos.” Clicking on these options will take you directly to your photos stored in those services.
- This PC: At the bottom of the navigation panel, you’ll find the “This PC” section, which lists all the folders on your computer that have been added to the Photos app. To include more photos and videos in this view, click on the “Add Folder” icon next to ‘Gallery’.
This new navigation structure provides a more organized and intuitive way to browse your photo library.
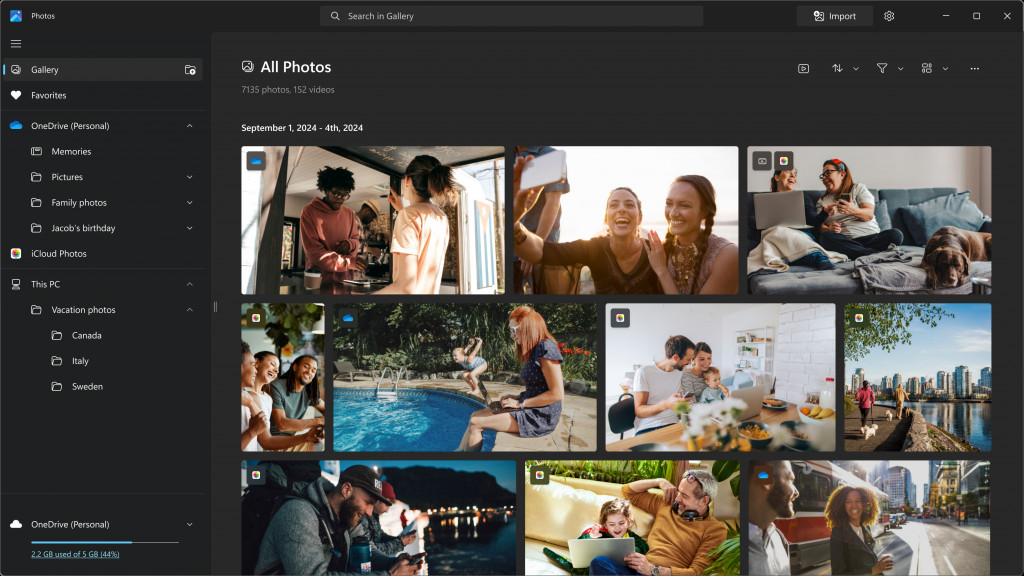 Updated navigation panel in Photo Gallery
8. Using Image Search with Bing
The Visual Search with Bing feature allows you to search for images online directly from within the Photos app. Here’s how to use it:
- Open an Image in the Viewer: Select an image in the Photos app and open it in the Viewer.
- Click the Visual Search with Bing Icon: Look for the Visual Search with Bing icon at the bottom of the image (it’s a small magnifying glass with the Bing logo). You can also access this feature by right-clicking on the image and selecting “Visual Search with Bing” from the context menu.
- View Search Results in Bing: Clicking the icon will open the search results in Bing, including similar images, related products, and other related content.
This feature can be incredibly useful for identifying objects in your photos, finding similar images, or discovering more information about a particular subject.
 Visual Search with Bing button at the bottom of the Viewer
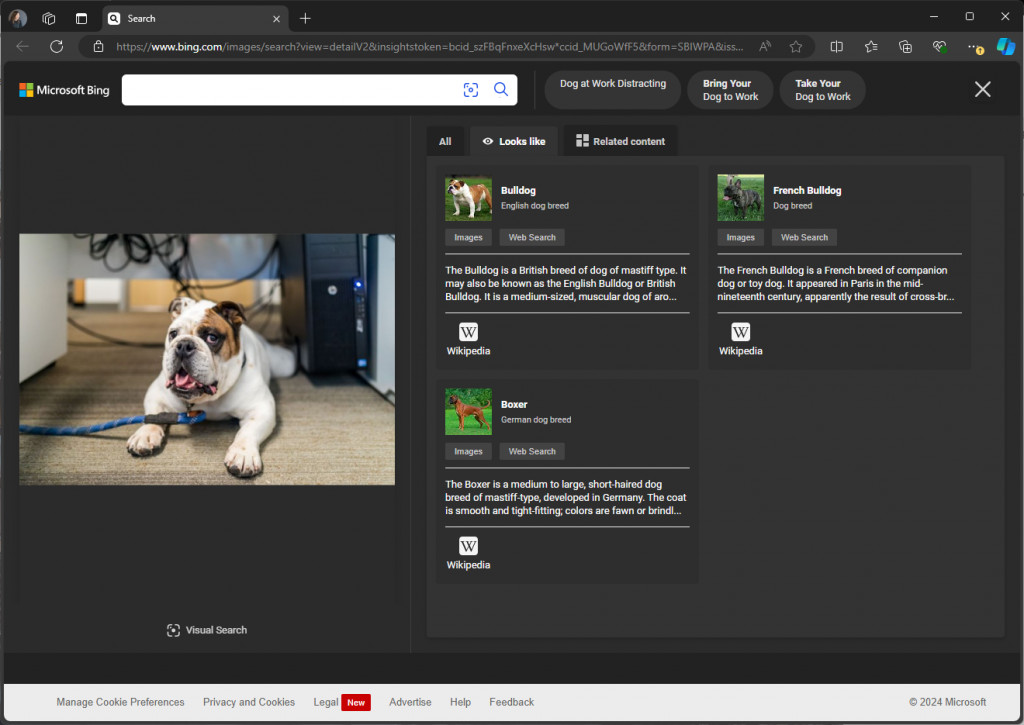 Search results shown in Bing via Microsoft Edge
9. Optimizing Performance Settings
The Microsoft Photos app includes several performance settings that you can adjust to optimize its speed and responsiveness. Here are a few key settings to consider:
- Background App Activity: The Photos app has an option to run in the background with minimal processes to improve app startup speed. If you don’t want Photos running in the background, you can turn off the “Performance” option under “Settings”.
- Cache Management: The Photos app uses a cache to store frequently accessed data, which can improve performance. However, if the cache becomes too large, it can start to slow down the app. You can clear the cache in the app settings.
- Hardware Acceleration: The Photos app can use your computer’s graphics card to accelerate certain tasks, such as image decoding and rendering. Make sure that hardware acceleration is enabled in the app settings.
Experiment with these settings to find the optimal configuration for your system.
10. Quick Editing Images from File Explorer
The “Edit in Photos” context menu option makes it easy to quickly edit images directly from File Explorer or the desktop. Here’s how it works:
- Right-Click on an Image: In File Explorer or on the desktop, right-click on the image you want to edit.
- Select “Edit in Photos”: From the context menu, select the “Edit in Photos” option.
- Edit the Image: The Photo Editor will open, allowing you to crop, rotate, mark up the image, as well as applying adjustments and AI-powered edits.
This feature provides a convenient way to quickly make basic edits to your photos without having to open the Photos app first.
11. Exploring the Microsoft Photos Interface: A Comprehensive Guide
The Microsoft Photos app boasts a user-friendly interface designed to make photo management and editing a breeze. Let’s delve into the key components of the interface:
11.1. The Main Window
When you launch the Microsoft Photos app, you’re greeted with the main window, which serves as the central hub for all your photo-related activities.
- Title Bar: Located at the very top, the title bar displays the name of the app (Microsoft Photos) and the standard window controls (minimize, maximize, and close).
- Menu Bar: Positioned just below the title bar, the menu bar provides access to various app functions, such as “File,” “Edit,” “View,” and “Help.”
- Navigation Pane: Situated on the left-hand side of the window, the navigation pane allows you to quickly access different sections of your photo library, such as “Gallery,” “Albums,” “People,” and “Folders.”
- Content Area: The main portion of the window, where your photos and videos are displayed. You can customize the view by adjusting the thumbnail size, sorting order, and filtering options.
- Status Bar: Located at the bottom of the window, the status bar provides information about the selected photo or video, such as its file name, size, and date taken.
11.2. The Gallery View
The Gallery view is the default view in the Microsoft Photos app, displaying all your photos and videos in a chronological order.
- Thumbnail Grid: Photos and videos are arranged in a grid of thumbnails, making it easy to browse your entire collection at a glance.
- Sorting Options: You can sort your photos and videos by date taken, date modified, file name, or file size.
- Filtering Options: You can filter your photos and videos by date range, folder, or rating.
- Selection Mode: You can select multiple photos and videos by clicking on their thumbnails. Once selected, you can perform various actions, such as deleting, sharing, or adding them to an album.
11.3. The Album View
The Album view allows you to organize your photos and videos into albums, making it easier to find and share them.
- Album List: The left-hand side of the window displays a list of all your albums.
- Album Content: When you select an album, the right-hand side of the window displays all the photos and videos in that album.
- Album Creation: You can create new albums by clicking on the “New Album” button.
- Album Management: You can rename, delete, or rearrange your albums as needed.
11.4. The People View
The People view uses facial recognition technology to identify and group photos of the same people.
- Face Detection: The app automatically scans your photos and identifies faces.
- Face Grouping: You can group photos of the same person together.
- Face Naming: You can name the people in your photos, making it easier to find them later.
- Privacy Controls: You can control whether or not the app uses facial recognition technology.
11.5. The Folder View
The Folder view displays your photos and videos in the same folder structure as your computer’s file system.
- Folder Tree: The left-hand side of the window displays a tree view of your computer’s folders.
- Folder Content: When you select a folder, the right-hand side of the window displays all the photos and videos in that folder.
- Folder Addition: You can add new folders to the Photos app by clicking on the “Add Folder” button.
- Folder Removal: You can remove folders from the Photos app by right-clicking on them and selecting “Remove Folder.”
11.6. The Photo Viewer
When you double-click on a photo or video, it opens in the Photo Viewer, which provides a full-screen view and access to various editing and sharing options.
- Navigation Controls: You can navigate between photos and videos using the arrow keys or the on-screen controls.
- Zoom Controls: You can zoom in and out of photos using the mouse wheel or the on-screen controls.
- Rotation Controls: You can rotate photos using the on-screen controls.
- Editing Tools: You can access various editing tools, such as cropping, adjusting brightness and contrast, and applying filters.
- Sharing Options: You can share photos and videos via email, social media, or other apps.
- Information Panel: You can view information about the photo or video, such as its file name, size, date taken, and camera settings.
11.7. The Video Editor
The Microsoft Photos app includes a built-in video editor that allows you to create and edit videos.
- Timeline: The video editor uses a timeline-based interface, where you can add and arrange video clips, photos, audio tracks, and text overlays.
- Editing Tools: You can trim, split, merge, and reorder video clips.
- Audio Tools: You can add background music, adjust audio levels, and add voiceovers.
- Text Tools: You can add text overlays to your videos, with various font, size, and color options.
- Effects and Transitions: You can add special effects and transitions to your videos.
- Export Options: You can export your videos in various formats and resolutions.
11.8. The Settings Menu
The Settings menu provides access to various app settings, such as:
- Account Settings: You can manage your Microsoft account and connected services.
- Privacy Settings: You can control the app’s access to your camera, microphone, and location.
- Performance Settings: You can adjust the app’s performance settings, such as hardware acceleration and background activity.
- Storage Settings: You can manage the app’s storage usage, such as clearing the cache and managing offline files.
- About: You can view information about the app, such as its version number and license agreement.
By understanding the different components of the Microsoft Photos interface, you can effectively manage and edit your photos and videos.
12. Troubleshooting Common Update Issues
Even with the best instructions, sometimes things go wrong. Here are some common issues you might encounter when updating Microsoft Photos, along with solutions:
- Error Code During Update: If you encounter an error code while updating, search online for the specific code. Microsoft and other tech communities often have solutions for common error codes.
- Update Stuck at a Certain Percentage: If the update seems stuck, try restarting your computer. Sometimes a simple restart can resolve the issue.
- Photos App Not Working After Update: If the Photos app is not working correctly after the update, try uninstalling and reinstalling it from the Microsoft Store.
- Compatibility Issues: If you experience compatibility issues after the update, check if there are any driver updates available for your graphics card or other hardware components.
Remember to back up your important photos and videos before performing any major updates or troubleshooting steps.
13. Microsoft Photos vs. Other Photo Management Software
Microsoft Photos is a decent tool, but how does it stack up against other photo management software? Here’s a quick comparison:
| Feature | Microsoft Photos | Adobe Lightroom | Google Photos |
|---|---|---|---|
| Price | Free | Paid | Free/Paid |
| Editing Tools | Basic | Advanced | Basic/Advanced |
| Organization | Simple | Robust | Smart |
| Cloud Storage | OneDrive | Adobe Cloud | Google Drive |
| AI Features | Limited | Extensive | Extensive |
| User Friendliness | Easy | Complex | Easy |
- Adobe Lightroom: A professional-grade photo editing and management software with advanced features and capabilities. It’s a paid product but offers a free trial.
- Google Photos: A cloud-based photo storage and sharing service with excellent organization and AI-powered features. It offers limited free storage and paid plans for more storage.
Ultimately, the best photo management software for you will depend on your specific needs and preferences.
14. Advanced Editing Techniques in Microsoft Photos
While Microsoft Photos offers basic editing tools, you can still achieve impressive results with a little creativity and know-how. Here are some advanced editing techniques:
- Color Correction: Use the color sliders to adjust the white balance, exposure, contrast, highlights, shadows, and blacks to bring out the best in your photos.
- Selective Editing: Use the spot healing tool to remove blemishes and other imperfections from your photos.
- Creative Filters: Experiment with the various filters to add a unique look and feel to your photos.
- Panorama Creation: Use the panorama feature to stitch together multiple photos into a seamless panoramic image.
- Video Editing: Use the built-in video editor to create and edit videos, add music, and apply effects.
Remember to always make a copy of your original photo before making any edits, so you can always revert to the original if needed.
15. Connecting with the Photography Community at dfphoto.net
Now that you’re up to date with the latest Microsoft Photos features, why not take your photography skills to the next level? DFphoto.net offers a wealth of resources for photographers of all levels:
- Tutorials and Guides: Learn new photography techniques and editing tips from our comprehensive tutorials and guides.
- Inspiration: Discover stunning photos from talented photographers around the world and find inspiration for your own work.
- Community Forum: Connect with other photographers, share your work, and get feedback in our friendly and supportive community forum.
- Equipment Reviews: Get expert reviews and recommendations on the latest cameras, lenses, and other photography equipment.
Visit dfphoto.net today and start your journey to becoming a better photographer!
16. Understanding Photo File Formats
Different photo file formats offer varying levels of quality, compression, and compatibility. Understanding these formats can help you make informed decisions about how to save and store your photos. Here are some common photo file formats:
- JPEG (Joint Photographic Experts Group): A widely used format that offers good quality and compression. It’s ideal for sharing photos online and storing large photo libraries.
- PNG (Portable Network Graphics): A lossless format that preserves all the original image data. It’s ideal for images with sharp lines, text, and graphics.
- TIFF (Tagged Image File Format): A high-quality format that is often used for professional photography and archiving. It supports lossless compression and can store a wide range of color information.
- RAW: A format that contains the unprocessed data captured by your camera’s sensor. It offers the most flexibility for editing but requires specialized software to open and edit.
Choose the file format that best suits your needs, considering factors such as image quality, file size, and compatibility.
17. The Future of Microsoft Photos
Microsoft is constantly working to improve the Photos app, and we can expect to see even more exciting features and improvements in the future. Here are some potential developments:
- Enhanced AI Features: We can expect to see even more AI-powered features, such as automatic photo enhancement, object recognition, and smart album creation.
- Deeper Integration with Other Services: Microsoft will likely continue to integrate Photos with other services, such as OneDrive, Teams, and Skype, to provide a seamless experience across all platforms.
- Improved Editing Tools: We can expect to see more advanced editing tools, such as layers, masks, and selective color correction.
- Better Support for Video: Microsoft will likely continue to improve the video editing capabilities of Photos, adding features such as multi-track editing, motion graphics, and advanced audio tools.
The future of Microsoft Photos looks bright, and we can’t wait to see what new features and improvements are in store.
18. Tips for Organizing Your Photo Library
A well-organized photo library can save you time and frustration. Here are some tips for organizing your photos:
- Create a Consistent Folder Structure: Use a consistent folder structure to organize your photos by date, event, or subject.
- Use Descriptive File Names: Use descriptive file names that include the date, event, and subject of the photo.
- Add Tags and Keywords: Add tags and keywords to your photos to make them easier to search and find.
- Create Albums: Create albums to group photos by theme or event.
- Delete Unnecessary Photos: Delete duplicate, blurry, or otherwise unnecessary photos to keep your library clean and organized.
By following these tips, you can keep your photo library organized and easy to navigate.
19. Essential Photography Equipment for Beginners
If you’re just starting out in photography, you don’t need to spend a fortune on equipment. Here are some essential pieces of equipment for beginners:
- A Camera: A basic DSLR or mirrorless camera is a good starting point.
- A Kit Lens: Most cameras come with a kit lens, which is a versatile lens that can be used for a variety of subjects.
- A Memory Card: You’ll need a memory card to store your photos.
- A Camera Bag: A camera bag will protect your camera and lenses from damage.
- A Tripod: A tripod will help you take sharp photos in low light.
As you progress in your photography journey, you can add more specialized equipment, such as lenses, flashes, and filters.
20. Mastering Composition Techniques
Composition is the art of arranging the elements in your photo to create a visually appealing image. Here are some essential composition techniques:
- Rule of Thirds: Divide your image into nine equal parts with two horizontal and two vertical lines. Place the important elements of your photo along these lines or at the intersections.
- Leading Lines: Use lines to guide the viewer’s eye through the image.
- Symmetry and Patterns: Use symmetry and patterns to create a sense of balance and harmony.
- Framing: Use elements in the foreground to frame the subject of your photo.
- Negative Space: Use negative space to create a sense of depth and isolation.
By mastering these composition techniques, you can create more visually appealing and engaging photos.
Updating Microsoft Photos is a simple but essential task that ensures you get the best possible experience. From new features to bug fixes and performance improvements, keeping your app up to date is well worth the effort. So, take a few minutes to check for updates today and enjoy the latest that Microsoft Photos has to offer. Don’t forget to visit dfphoto.net for more photography tips, inspiration, and community!
Address: 1600 St Michael’s Dr, Santa Fe, NM 87505, United States
Phone: +1 (505) 471-6001
Website: dfphoto.net
Frequently Asked Questions About Updating Microsoft Photos
Question 1: How often should I update Microsoft Photos?
You should update Microsoft Photos whenever a new update is available. It’s a good practice to check for updates regularly, perhaps once a week or every other week. By staying current, you’ll enjoy the latest features, bug fixes, and performance improvements.
Question 2: Will updating Microsoft Photos delete my photos?
No, updating Microsoft Photos will not delete your photos. Updates are designed to enhance the app’s functionality and performance, not to remove your existing content. However, it’s always a good idea to back up your important photos and videos before performing any major updates, just in case something goes wrong.
Question 3: Can I revert to an older version of Microsoft Photos after updating?
Unfortunately, there is no official way to revert to an older version of Microsoft Photos after updating. Once you’ve updated the app, you’re committed to the new version. This is why it’s essential to ensure that you’re comfortable with the changes before updating.
Question 4: What happens if I don’t update Microsoft Photos?
If you don’t update Microsoft Photos, you’ll miss out on new features, bug fixes, and performance improvements. You may also experience compatibility issues with newer operating systems and devices. Over time, the app may become less reliable and less enjoyable to use.
Question 5: Is it possible to schedule automatic updates for Microsoft Photos?
Yes, you can schedule automatic updates for Microsoft Photos and other apps in the Microsoft Store. By enabling automatic updates, you can rest assured that your apps will always be running the latest versions, without you having to manually check for updates.
Question 6: Does updating Microsoft Photos require a lot of data?
The size of the update will vary depending on the number of changes included in the new version. However, most updates are relatively small and should not consume a significant amount of data. If you’re concerned about data usage, you can download updates over a Wi-Fi connection.
Question 7: Can I update Microsoft Photos on Windows 10 and Windows 11?
Yes, you can update Microsoft Photos on both Windows 10 and Windows 11. The update process is the same on both operating systems: simply check for updates in the Microsoft Store.
Question 8: Are there any known issues with recent Microsoft Photos updates?
Microsoft typically releases a list of known issues with each update. You can find this information on the Microsoft support website or in the release notes for the update. Be sure to check for any known issues before updating, so you can be prepared for any potential problems.
Question 9: How do I provide feedback to Microsoft about the Photos app?
You can provide feedback to Microsoft about the Photos app through the Feedback Hub app in Windows. Simply open the Feedback Hub, select “Apps > Photos,” and then enter your feedback. Microsoft values your feedback and uses it to improve the Photos app.
Question 10: Is Microsoft Photos the best photo management software for me?
Whether Microsoft Photos is the best photo management software for you depends on your specific needs and preferences. It’s a decent tool for basic photo management and editing, but if you need more advanced features, you may want to consider other options, such as Adobe Lightroom or Google Photos.