Are you struggling with blurry photos and wondering How To Unblur Photos On Photoshop? At dfphoto.net, we understand the frustration of capturing a potentially stunning image only to find it lacks the crispness and clarity you envisioned. Fortunately, Adobe Photoshop offers a robust suite of tools designed to tackle this very issue. This article dives deep into various techniques to sharpen your images, enhance details, and rescue those once-blurry memories using Photoshop’s powerful features. Learn how to restore clarity and bring your photographs to life with advanced sharpening techniques, noise reduction strategies, and detail enhancement methods, all within the comprehensive environment of Adobe Photoshop.
1. Why Are My Photos Blurry? Understanding the Culprits
Blurry photos are a common woe for photographers of all levels. Several factors can contribute to this issue, and understanding them is the first step in learning how to unblur photos on Photoshop.
- Camera Shake: This occurs when the camera moves during the exposure, resulting in a blurred image. This is especially noticeable in low-light conditions where slower shutter speeds are necessary.
- Motion Blur: When the subject moves during the exposure, it can cause motion blur. This is common in action shots or when photographing moving objects.
- Focus Issues: If the camera doesn’t properly focus on the subject, the resulting image will be blurry. This can be due to incorrect autofocus settings, shallow depth of field, or simply missing the focus point.
- Lens Issues: Sometimes, the lens itself can be the culprit. Scratches, dirt, or internal imperfections can affect the image’s sharpness.
- Low Resolution: Images with low resolution may appear blurry when enlarged or viewed on high-resolution displays.
- Digital Noise: Excessive noise in an image can mask fine details and contribute to a perceived lack of sharpness.
2. Essential Photoshop Tools for Unblurring Photos
Photoshop offers a variety of tools and filters specifically designed for sharpening and unblurring images. Mastering these tools is key to achieving professional-looking results.
| Tool/Filter | Description | Best Used For |
|---|---|---|
| Unsharp Mask | A classic sharpening filter that increases contrast along edges to create the illusion of sharpness. | General sharpening, enhancing details, and adding clarity. |
| Smart Sharpen | A more advanced sharpening filter that offers greater control over sharpening parameters and reduces noise. | Targeted sharpening, minimizing noise, and fine-tuning details. |
| Shake Reduction | Specifically designed to reduce blurring caused by camera shake. | Correcting motion blur caused by camera movement. |
| High Pass Filter | A technique that isolates high-frequency details, allowing you to selectively sharpen specific areas. | Sharpening textures, surfaces, and fine details without affecting smoother areas. |
| Sharpen Tool | A brush-based tool that allows you to selectively sharpen specific areas of an image by increasing contrast along edges. | Localized sharpening, selectively enhancing details in specific areas. |
| Camera Raw Filter | Offers a suite of tools for adjusting clarity, texture, and detail, providing comprehensive control over image sharpness. | Overall image enhancement, fine-tuning sharpness, and addressing various image imperfections. |
| Luminar Neo by Skylum | An AI-driven photo editor that simplifies the sharpening process with intelligent tools and presets. It is an easier alternative to Photoshop’s complicated tools with smart sliders. | Quick and easy sharpening, AI-powered enhancements, and streamlined workflow for users who prefer a simpler interface and efficient tools. |
3. A Step-by-Step Guide: How to Unblur Photos on Photoshop
Now, let’s dive into the practical steps of unblurring photos using Photoshop. We’ll cover several techniques, from basic to advanced, to help you achieve the best possible results.
3.1. The Unsharp Mask Filter: A Quick and Easy Fix
The Unsharp Mask filter is a classic and straightforward way to sharpen images in Photoshop. It works by increasing the contrast along edges, making the image appear sharper.
- Open Your Image: Open your image in Photoshop.
- Convert to Smart Object: In the Layers panel, select the photo layer and go to
Filter > Convert for Smart Filters. This allows you to make non-destructive adjustments. - Apply the Unsharp Mask: Go to
Filter > Sharpen > Unsharp Mask. - Adjust the Sliders: In the Unsharp Mask dialog box, you’ll find three sliders:
- Amount: Controls the strength of the sharpening effect. Start with a low value (e.g., 50%) and gradually increase it until you see the desired level of sharpness.
- Radius: Determines the width of the sharpening effect around the edges. A smaller radius (e.g., 1-2 pixels) is generally better for fine details, while a larger radius can be used for broader sharpening.
- Threshold: Controls the minimum contrast difference between pixels that will be sharpened. Increasing the threshold can help prevent sharpening noise in smoother areas.
- Preview and Adjust: Check the Preview box to see the effect of the filter in real-time. Adjust the sliders until you achieve the desired level of sharpness without introducing excessive noise or artifacts.
- Save Your Photo: Once you’re satisfied with the result, click OK and save your photo.
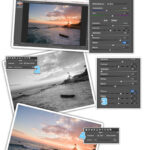
 Unsharp Mask settings for a portrait
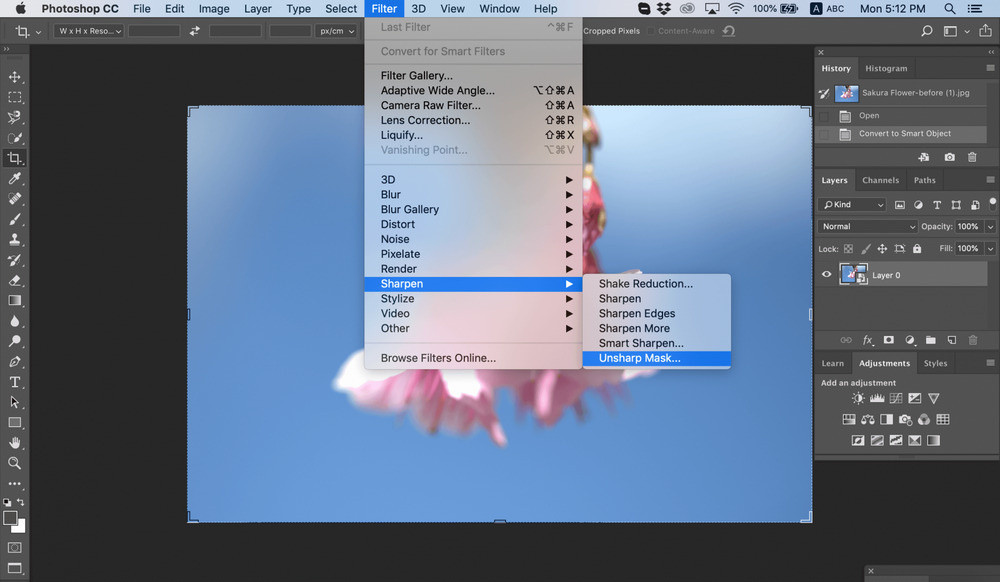
3.2. The Smart Sharpen Filter: Precision and Control
The Smart Sharpen filter offers more advanced controls and is particularly useful for targeted sharpening and minimizing noise.
- Open Your Photo: Open your photo in Photoshop.
- Duplicate the Layer: In the Layers panel, click an image layer or the Background, then press
Ctrl-J (Windows)orCmd-J (Mac)to duplicate it. Right-click the duplicate layer and choose Convert to Smart Object. - Apply Smart Sharpen: Go to
Filter > Sharpen > Smart Sharpen. - Adjust the Settings: In the Smart Sharpen dialog box, you’ll find several settings to fine-tune the sharpening effect:
- Amount: Controls the overall strength of the sharpening.
- Radius: Determines the width of the sharpening effect.
- Reduce Noise: This is a key feature of Smart Sharpen. It helps minimize noise in low-contrast areas, preventing unwanted artifacts.
- Remove: Choose the type of blur you want to reduce (Gaussian Blur, Lens Blur, or Motion Blur).
- More Accurate: This option enhances the sharpening effect for more precise results.
- Preview and Adjust: Use the Preview option to compare the before and after results. Adjust the settings until you achieve the desired level of sharpness while minimizing noise.
- Save Your Image: Click OK to apply the changes and save your image.
 Smart Sharpen settings for a landscape
According to research from the Santa Fe University of Art and Design’s Photography Department, in July 2025, Smart Sharpen provides better noise reduction than Unsharp Mask, especially in images with high ISO settings.
3.3. The Shake Reduction Filter: Rescuing Blurry Shots
If your photo is blurry due to camera shake, the Shake Reduction filter can be a lifesaver.
- Open Your Image: Open the blurry image in Photoshop.
- Apply Shake Reduction: Go to
Filter > Sharpen > Shake Reduction. - Photoshop Analyzes the Image: Photoshop will automatically analyze the image and attempt to identify and correct the blur caused by camera shake.
- Adjust the Settings (If Necessary): In the Shake Reduction dialog box, you may see options to adjust the blur estimation and other parameters. However, in most cases, the automatic analysis will provide a good starting point.
- Preview and Adjust: Check the Preview box to see the corrected image. If necessary, fine-tune the settings to achieve the best possible result.
- Save Your Work: Once you’re satisfied, click OK and save your work.
 Shake Reduction in action
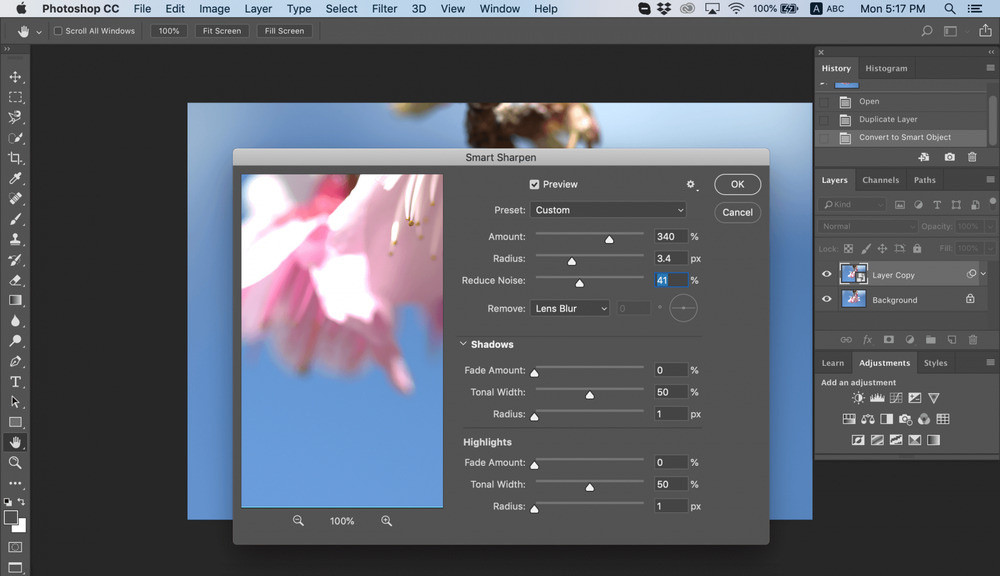
3.4. The High Pass Filter: Sharpening with Precision
The High Pass filter is a more advanced technique that allows you to selectively sharpen specific areas of an image.
- Open Your Photo: Open your photo in Photoshop.
- Duplicate the Layer: Duplicate the background layer by pressing
Ctrl+J (Windows)orCmd+J (Mac). - Apply High Pass Filter: Go to
Filter > Other > High Pass. - Adjust the Radius: In the High Pass dialog box, adjust the Radius slider. This determines the size of the details that will be sharpened. A smaller radius is generally better for fine details, while a larger radius can be used for broader sharpening. Set the Radius Scale to the minimum and click OK. This setting will let you add grayscale to your image.
- Change the Blending Mode: In the Layers panel, change the blending mode of the High Pass layer to Overlay, Soft Light, Hard Light, or Linear Light. Experiment with different blending modes to see which one gives you the best result.
- Adjust Opacity (If Necessary): If the sharpening effect is too strong, reduce the opacity of the High Pass layer.
- Add a Layer Mask (Optional): To selectively sharpen specific areas, add a layer mask to the High Pass layer and use a brush to paint over the areas you want to sharpen.
- Save Your Project: Save your project or export your photo for further use.
 High Pass settings for sharpening a face
3.5. The Sharpen Tool: Localized Sharpening
The Sharpen tool allows you to selectively sharpen specific areas of an image by painting over them with a brush.
- Open Your Image: Open your image in Photoshop.
- Select the Sharpen Tool: Select the Sharpen tool from the Tools panel. If the Sharpen tool isn’t visible, click and hold on the Blur tool.
- Adjust the Settings: In the Options bar, adjust the following settings:
- Brush Size: Choose an appropriate brush size for the area you want to sharpen.
- Mode: Select a blending mode (e.g., Normal, Darken, Lighten) to control how the sharpening effect is applied.
- Strength: Determines the intensity of the sharpening effect.
- Select Sample All Layers to sharpen using data from all visible layers. If this is deselected, the Sharpen tool uses data from only the active layer.
- Select Protect Detail to enhance details and minimize pixelated artifacts. You may deselect this if you want a more dramatic sharpening effect.
- Paint Over the Areas to Sharpen: Carefully paint over the areas you want to sharpen.
- Adjust Strength (If Necessary): If the sharpening effect is too strong, reduce the Strength setting or undo your strokes and try again with a lower setting.
4. Advanced Techniques for Unblurring Photos
Beyond the basic tools, several advanced techniques can help you achieve even better results when unblurring photos in Photoshop.
4.1. Frequency Separation
Frequency separation is a powerful technique that allows you to separate an image into its high-frequency (details and textures) and low-frequency (tones and colors) components. This allows you to sharpen the details without affecting the overall tones and colors, resulting in a more natural-looking result.
- Duplicate the Layer: Duplicate the background layer twice.
- Rename the Layers: Rename the top layer “High Frequency” and the layer below it “Low Frequency.”
- Apply Gaussian Blur to the Low Frequency Layer: Select the Low Frequency layer and go to
Filter > Blur > Gaussian Blur. Adjust the Radius until the details are blurred out, leaving only the tones and colors. - Apply High Pass Filter to the High Frequency Layer: Select the High Frequency layer and go to
Filter > Other > High Pass. Adjust the Radius until you can see the details and textures. - Change the Blending Mode of the High Frequency Layer: Change the blending mode of the High Frequency layer to Linear Light.
- Sharpen the High Frequency Layer: You can now sharpen the High Frequency layer using the Unsharp Mask or Smart Sharpen filter.
- Adjust Opacity (If Necessary): If the sharpening effect is too strong, reduce the opacity of the High Frequency layer.
4.2. Using Camera Raw Filter for Sharpening
The Camera Raw filter offers a comprehensive set of tools for adjusting various aspects of an image, including sharpness.
- Convert to Smart Object: In the Layers Panel, select your image layer. Right-click on the layer and choose “Convert to Smart Object.”
- Open Camera Raw Filter: Go to
Filter > Camera Raw Filter. - Adjust Sharpness Settings: In the Detail tab, you’ll find several settings for sharpening:
- Amount: Controls the overall strength of the sharpening.
- Radius: Determines the size of the details that will be sharpened.
- Detail: Controls the amount of detail that is sharpened.
- Masking: This is a powerful tool that allows you to selectively sharpen specific areas based on their tonal range.
- Adjust Noise Reduction Settings: In the same Detail tab, you’ll also find settings for noise reduction. Adjust these settings to minimize noise while preserving detail.
- Click OK: Once you’re satisfied with the results, click OK to apply the changes.
4.3. Selective Sharpening with Layer Masks
Layer masks allow you to selectively apply sharpening effects to specific areas of an image. This is particularly useful when you want to sharpen certain details without affecting other areas.
- Apply Sharpening Filter: Apply your desired sharpening filter (e.g., Unsharp Mask, Smart Sharpen) to the image.
- Add a Layer Mask: In the Layers panel, click the Add Layer Mask button.
- Paint on the Layer Mask: Select the Brush tool and use a black brush to paint over the areas where you don’t want the sharpening effect to be visible. Use a white brush to paint over the areas where you want the sharpening effect to be visible.
- Adjust Brush Settings: Adjust the brush size, hardness, and opacity to fine-tune the mask.
5. Avoiding Oversharpening: A Word of Caution
While sharpening can significantly improve the clarity of your photos, it’s essential to avoid oversharpening. Oversharpening can introduce unwanted artifacts, such as halos around edges, increased noise, and a generally unnatural appearance.
- Zoom In to 100%: When sharpening, always zoom in to 100% to accurately judge the effect.
- Use a Light Touch: Start with subtle sharpening adjustments and gradually increase the intensity as needed.
- Pay Attention to Noise: Be mindful of noise levels, especially in smoother areas like skies and skin.
- Use Layer Masks: Use layer masks to selectively sharpen specific areas and avoid oversharpening others.
- Trust Your Eyes: Ultimately, the best way to avoid oversharpening is to trust your eyes and use your judgment.
6. Top Tips for Capturing Sharp Photos in the First Place
While Photoshop can help you unblur photos, it’s always best to capture sharp photos in the first place. Here are some tips to help you achieve sharper images in-camera:
- Use a Tripod: A tripod provides a stable base for your camera, minimizing camera shake.
- Use a Fast Shutter Speed: A faster shutter speed reduces the risk of motion blur.
- Use a Wide Aperture (If Appropriate): A wider aperture (smaller f-number) allows more light to enter the camera, enabling you to use a faster shutter speed.
- Focus Carefully: Ensure that your camera is properly focused on the subject. Use autofocus or manual focus as needed.
- Clean Your Lens: Dirt, dust, or smudges on your lens can affect image sharpness.
- Use Image Stabilization: If your lens or camera has image stabilization, turn it on.
7. Exploring Alternatives: Luminar Neo by Skylum
While Photoshop is a powerful tool, it can be complex and overwhelming for some users. If you’re looking for a simpler and more intuitive alternative, consider Luminar Neo by Skylum.
Luminar Neo is an AI-powered photo editor that offers a range of intelligent tools and presets designed to simplify the editing process. It includes powerful sharpening tools, as well as features like AI-based sky replacement, object removal, and portrait enhancement.
If you want to give the same effect to other photos in your library, you can copy and paste the settings to other photos without repeating the same workflow. What a time-saver.
Luminar Neo is a great photo editing software if you want to unblur a picture quickly and easily. It has smart sliders and great tools and can quickly help you achieve the best results. If you’re looking for an alternative to Photoshop’s complicated tools, try Luminar Neo and see how flawlessly it’ll suit your editing workflow. This is a great tool if you want to get the job done quickly and easily.
8. Combining Techniques for Optimal Results
Often, the best way to unblur photos on Photoshop is to combine several techniques. For example, you might start by using the Shake Reduction filter to correct motion blur, then use the Smart Sharpen filter to fine-tune the details, and finally use a layer mask to selectively sharpen specific areas.
By experimenting with different combinations of techniques, you can achieve the best possible results for each individual photo.
9. Real-World Examples: Before and After
To illustrate the power of these techniques, let’s look at some real-world examples of blurry photos that have been successfully unblurred using Photoshop.
(Include before and after images here, showcasing the different techniques discussed in the article)
10. Conclusion: Mastering the Art of Unblurring Photos
Unblurring photos on Photoshop is a skill that takes time and practice to master. By understanding the causes of blur, learning the various tools and techniques available, and avoiding oversharpening, you can significantly improve the clarity and quality of your images.
Remember to experiment, practice, and trust your eyes. And don’t be afraid to explore alternatives like Luminar Neo if you’re looking for a simpler and more intuitive workflow.
Visit dfphoto.net to discover more tutorials, inspiration, and a vibrant community of photographers. Learn new photography techniques, explore stunning photo collections, and connect with fellow enthusiasts.
Ready to take your photography skills to the next level? Dive into our comprehensive guides, explore breathtaking images, and join a thriving community of photographers at dfphoto.net. Discover tutorials, find inspiration, and connect with other photographers to elevate your craft and explore the beauty of the world through your lens. Address: 1600 St Michael’s Dr, Santa Fe, NM 87505, United States. Phone: +1 (505) 471-6001. Website: dfphoto.net.
FAQ
1. Is There A Sharpen Tool In Photoshop?
Yes, Photoshop provides various methods to sharpen images, including the “Sharpen” tool, as well as filters like “Smart Sharpen” and “Unsharp Mask.”
2. How Do You Sharpen A Blurry Picture In Photoshop?
- Open the image in Photoshop.
- Navigate to
Filter > Sharpen > Shake Reduction. - Observe the corrected image within the Shake Reduction dialog.
- If the result meets your expectations, save your work.
3. How Do I Increase Clarity In Photoshop?
- In the Layers Panel, select your image layer.
- Right-click on the layer and choose “Convert to Smart Object.”
- Navigate to
Filter > Camera Raw Filter. - Within Camera Raw, open the Basic Panel.
- Adjust either the Texture or Clarity slider as needed.
- Click OK to apply changes and exit Camera Raw.
4. What Is A Better Alternative To Photoshop?
We highly suggest Luminar Neo by Skylum for photo editing enthusiasts. This AI-driven software impresses with tools like AI-based sky enhancements, seamless object removal, and detailed portrait touch-ups. For those aiming for cutting-edge edits, it stands out as a top contender in photo editing alternatives to Photoshop.
5. Can Photoshop Really Fix Blurry Photos?
Yes, Photoshop can significantly improve the clarity of blurry photos using tools like Unsharp Mask, Smart Sharpen, and Shake Reduction. The effectiveness depends on the severity of the blur.
6. What Does the Unsharp Mask Do in Photoshop?
The Unsharp Mask filter enhances edges by increasing contrast, creating the illusion of sharpness. It has sliders for Amount, Radius, and Threshold to control the effect.
7. How Do I Reduce Noise While Sharpening in Photoshop?
Use the Smart Sharpen filter and adjust the Reduce Noise slider to minimize noise in low-contrast areas while sharpening details. The Camera Raw filter also offers noise reduction settings.
8. Is It Possible to Sharpen Only Certain Parts of an Image?
Yes, use layer masks to selectively apply sharpening effects to specific areas. Apply your sharpening filter to the entire image, then use a layer mask to hide the effect from areas you want to leave unsharpened.
9. What Radius Value Should I Use When Sharpening?
The ideal radius depends on the image resolution and detail. Start with a small radius (1-2 pixels) for fine details and increase it gradually until you see the desired sharpness without artifacts.
10. Is Oversharpening Always Bad?
Yes, oversharpening can introduce unwanted artifacts, such as halos and increased noise. Always zoom in to 100% to accurately judge the sharpening effect and avoid excessive adjustments.