Typing on photos on your iPhone opens a world of creative possibilities, from adding captions and quotes to crafting personalized memes. This guide will explore various methods to add text to your photos, ensuring they stand out and effectively convey your message. Whether you’re looking to enhance your social media presence or add a personal touch to your images, dfphoto.net provides all the tools and inspiration you need to master this skill. Dive into our detailed instructions and discover how easy it is to transform your photos with text.
1. Why Add Text to Photos on Your iPhone?
Adding text to photos on your iPhone is a powerful way to enhance your visual communication. It’s more than just overlaying words; it’s about enriching the image with context, emotion, and personality. Here are several reasons why you might want to add text to your photos:
- Adding Context and Information: Text can provide necessary details, such as dates, locations, or names, which might not be evident from the photo itself.
- Creating Memes: Turn your photos into shareable memes by adding funny captions or witty remarks.
- Making Announcements: Use photos with text to announce events, sales, or personal milestones.
- Adding Quotes and Inspiration: Overlay inspirational quotes or meaningful song lyrics to create visually appealing and motivational content.
- Branding and Marketing: For businesses, adding logos, slogans, or website URLs can help reinforce brand recognition and drive traffic.
- Personalization: Adding a personal message can turn a simple photo into a heartfelt gift or keepsake.
- Storytelling: Combine images and text to tell a story or create a narrative that resonates with your audience.
- Artistic Expression: Experiment with different fonts, colors, and styles to create unique and visually stunning artwork.
Adding text to photos allows you to engage with your audience more effectively and express your creativity in new ways. By choosing the right tools and techniques, you can transform ordinary photos into captivating visual stories.
2. Built-In Markup Tool in iPhone Photos App
The built-in Markup tool in the iPhone Photos app offers a quick and convenient way to add text directly to your images. This tool is perfect for simple annotations and personal touches without needing additional apps.
2.1. Accessing the Markup Tool
- Open Photos App: Launch the Photos app on your iPhone.
- Select Photo: Choose the photo you want to edit.
- Tap Edit: Tap the “Edit” button located in the top-right corner of the screen.
- Tap Markup Icon: Look for the Markup icon (a pen inside a circle) and tap it to open the Markup toolbar.
2.2. Adding Text with Markup
-
Select the Text Tool: In the Markup toolbar, tap the plus (+) button.
-
Choose Text: Select “Text” from the options that appear. A text box will be added to your photo.
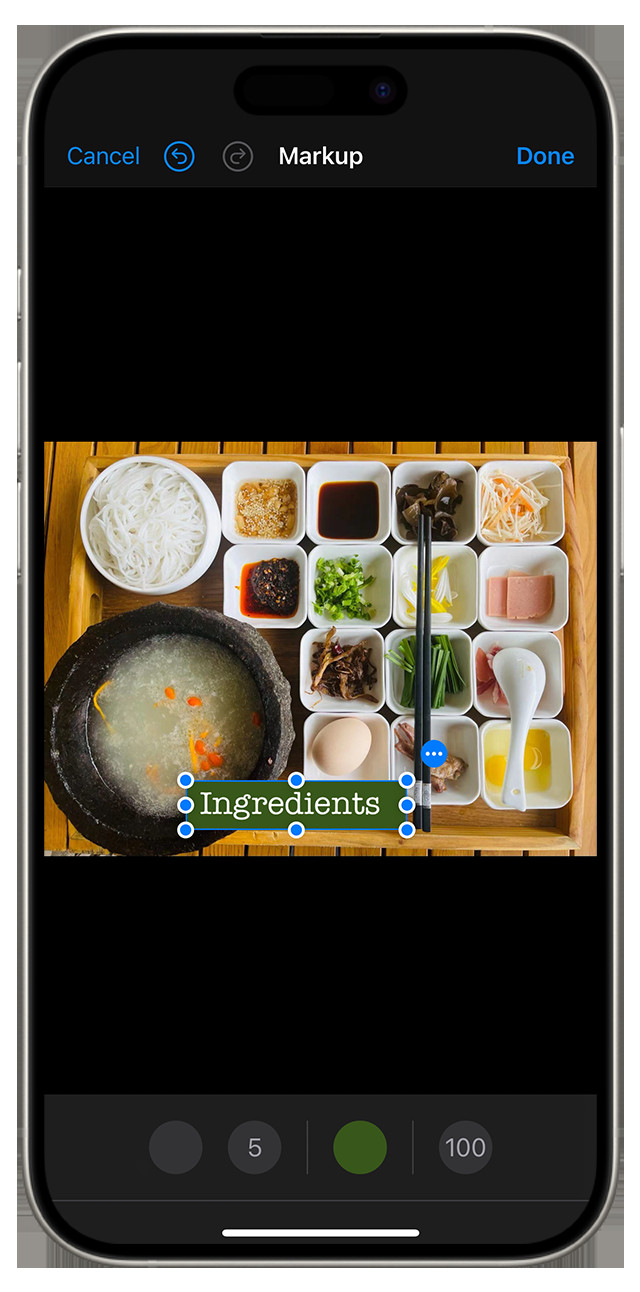 Adding text using the Markup tool in Photos, showing the "+" button and text options
 -
Type Your Text: Double-tap the text box to bring up the keyboard and type your desired text.
-
Customize Text:
- Font: Tap the “Aa” icon to change the font style, size, and alignment.
- Color: Select a color from the palette at the bottom of the screen.
-
Position and Resize: Drag the text box to position it where you want on the photo. Use the blue handles to resize the text box.
-
Save Changes: Tap “Done” in the Markup toolbar, then tap “Done” again in the main edit screen to save your changes.
2.3. Tips for Using Markup
- Experiment with Fonts: Try different font styles to find one that complements your photo.
- Use Contrasting Colors: Choose a text color that stands out against the background of your photo for better readability.
- Keep It Simple: Avoid overcrowding your photo with too much text. Focus on conveying your message clearly and concisely.
- Utilize the Undo Button: If you make a mistake, use the Undo button to revert to the previous state.
- Consider the Photo’s Theme: Match the text style and color to the overall theme and mood of your photo.
The Markup tool is excellent for quick, basic text additions. However, for more advanced features and creative options, you might want to explore third-party apps.
3. Third-Party Apps for Typing on Photos
While the built-in Markup tool is handy for basic text additions, numerous third-party apps offer more advanced features, creative options, and greater customization. These apps cater to various needs, from adding stylish typography to creating professional-looking designs.
3.1. Phonto – Text on Photos
Phonto is a popular app specifically designed for adding text to photos. It offers a wide range of fonts and customization options, making it a favorite among users who want creative control over their typography.
Key Features of Phonto:
- Extensive Font Library: Access over 400 fonts and the ability to install custom fonts.
- Text Customization: Adjust font size, color, style, kerning, line spacing, and shadow.
- Background Colors and Patterns: Add background colors or patterns behind your text for emphasis.
- Text Rotation and Curving: Rotate or curve text to fit the contours of your photo.
- 3D Text Effects: Create 3D text effects to make your text stand out.
- Text Styles: Apply various styles such as stroke, shadow, and gradients.
How to Use Phonto:
- Download and Open: Download Phonto from the App Store and open the app.
- Load Photo: Tap the photo icon and select “Load new image from device.”
- Add Text: Tap anywhere on the photo to add a text box.
- Type Your Text: Enter your text and tap “Done.”
- Customize Text: Use the options at the bottom of the screen to adjust the font, size, style, and color.
- Position and Resize: Drag the text to position it on the photo. Use the pinch gesture to resize the text.
- Save Photo: Tap the save icon to save the edited photo to your device.
Why Choose Phonto?
Phonto is an excellent choice for users who want a dedicated text-on-photo app with a vast font library and extensive customization options. It’s user-friendly and provides all the tools you need to create stylish and eye-catching text overlays.
3.2. Over – Add Text & Edit Photos
Over is a versatile app that combines photo editing with graphic design capabilities. It’s perfect for creating marketing materials, social media posts, and personalized designs with text and graphics.
Key Features of Over:
- Extensive Graphic Library: Access a library of templates, graphics, and fonts.
- Text Customization: Adjust font size, color, style, kerning, and opacity.
- Photo Editing Tools: Crop, filter, and adjust your photos directly within the app.
- Layering: Add multiple layers of text, graphics, and photos to create complex designs.
- Templates: Use pre-designed templates to quickly create professional-looking graphics.
- Brand Kits: Save your brand colors, logos, and fonts for consistent branding.
How to Use Over:
- Download and Open: Download Over from the App Store and open the app.
- Start a Project: Choose a template or start with a blank canvas.
- Add Photo: Add your photo to the canvas.
- Add Text: Tap the “+” button and select “Text.”
- Type Your Text: Enter your text and tap “Done.”
- Customize Text: Use the options to adjust the font, size, style, and color.
- Position and Resize: Drag the text to position it on the photo. Use the pinch gesture to resize the text.
- Add Graphics: Enhance your design with graphics from the app’s library.
- Save Project: Save your project and export the edited photo to your device.
Why Choose Over?
Over is ideal for users who need a comprehensive design tool with photo editing and graphic design features. It’s perfect for creating professional-looking marketing materials, social media posts, and personalized designs.
3.3. Canva – Graphic Design & Video
Canva is a widely used graphic design platform that offers a mobile app for creating stunning visuals on the go. It’s perfect for designing social media graphics, presentations, posters, and more, with a strong emphasis on user-friendly design tools.
Key Features of Canva:
- Vast Template Library: Access thousands of pre-designed templates for various purposes.
- Drag-and-Drop Interface: Easily add and arrange text, graphics, and photos.
- Extensive Graphic Library: Access millions of photos, icons, and illustrations.
- Text Customization: Adjust font size, color, style, spacing, and effects.
- Collaboration: Collaborate with team members on designs in real-time.
- Brand Kit: Save your brand colors, logos, and fonts for consistent branding.
How to Use Canva:
- Download and Open: Download Canva from the App Store and open the app.
- Choose a Template: Select a template from the library or start with a blank canvas.
- Add Photo: Add your photo to the canvas.
- Add Text: Tap the “+” button and select “Text.”
- Type Your Text: Enter your text and tap “Done.”
- Customize Text: Use the options to adjust the font, size, style, and color.
- Position and Resize: Drag the text to position it on the photo. Use the pinch gesture to resize the text.
- Add Graphics: Enhance your design with graphics from the app’s library.
- Save Design: Save your design and export the edited photo to your device.
Why Choose Canva?
Canva is perfect for users who need a powerful and user-friendly design tool with a vast library of templates and graphics. It’s ideal for creating professional-looking social media graphics, presentations, and marketing materials.
3.4. Adobe Photoshop Express
Adobe Photoshop Express is a mobile version of the popular Photoshop software, offering a range of photo editing and enhancement tools. It allows users to add text, apply filters, make adjustments, and create stunning visuals on their iPhones.
Key Features of Adobe Photoshop Express:
- Photo Editing Tools: Crop, rotate, adjust exposure, contrast, and saturation.
- Filters and Effects: Apply a variety of filters and effects to enhance your photos.
- Text Tool: Add text with customizable fonts, colors, and styles.
- Healing Tool: Remove blemishes and imperfections from your photos.
- Collages: Create photo collages with various layouts and backgrounds.
- Perspective Correction: Fix skewed perspectives in your photos.
How to Use Adobe Photoshop Express:
- Download and Open: Download Adobe Photoshop Express from the App Store and open the app.
- Load Photo: Select a photo from your device.
- Edit Photo: Use the editing tools to enhance your photo.
- Add Text: Tap the “Text” tool.
- Type Your Text: Enter your text and tap “Done.”
- Customize Text: Adjust the font, size, style, and color.
- Position and Resize: Drag the text to position it on the photo. Use the pinch gesture to resize the text.
- Save Photo: Save the edited photo to your device.
Why Choose Adobe Photoshop Express?
Adobe Photoshop Express is ideal for users who want a powerful photo editing app with text adding capabilities. It offers a range of tools for enhancing your photos and creating professional-looking visuals.
3.5. PicLab – Photo Editor
PicLab is a comprehensive photo editor with a focus on typography and design elements. It allows users to add text, graphics, and effects to create visually appealing images for social media and personal projects.
Key Features of PicLab:
- Photo Editing Tools: Crop, adjust brightness, contrast, and saturation.
- Text Tool: Add text with customizable fonts, colors, and styles.
- Graphics and Stickers: Access a library of graphics, stickers, and overlays.
- Filters and Effects: Apply a variety of filters and effects to enhance your photos.
- Collages: Create photo collages with various layouts and backgrounds.
- Drawing Tool: Add hand-drawn elements to your photos.
How to Use PicLab:
- Download and Open: Download PicLab from the App Store and open the app.
- Load Photo: Select a photo from your device.
- Edit Photo: Use the editing tools to enhance your photo.
- Add Text: Tap the “Text” tool.
- Type Your Text: Enter your text and tap “Done.”
- Customize Text: Adjust the font, size, style, and color.
- Position and Resize: Drag the text to position it on the photo. Use the pinch gesture to resize the text.
- Save Photo: Save the edited photo to your device.
Why Choose PicLab?
PicLab is ideal for users who want a photo editor with a strong focus on typography and design elements. It offers a range of tools for creating visually appealing images for social media and personal projects.
By exploring these third-party apps, you can find the perfect tool to add text to your photos and create stunning visuals that capture your unique style and message. Each app offers a different set of features and capabilities, so experiment to find the one that best suits your needs.
4. Creative Tips for Adding Text to Photos
Adding text to photos is not just about conveying information; it’s also an opportunity to express creativity and enhance the visual appeal of your images. Here are some creative tips to help you make the most of this technique:
4.1. Choosing the Right Font
The font you choose can significantly impact the overall look and feel of your photo. Consider the following when selecting a font:
- Match the Mood: Choose a font that complements the mood of your photo. For example, a playful script font might be suitable for a fun, casual photo, while a classic serif font might be better for a more formal or elegant image.
- Readability: Ensure the font is easy to read. Avoid overly decorative or complex fonts that can be difficult to decipher.
- Contrast: Select a font that contrasts well with the background of your photo. This will help the text stand out and improve readability.
- Limit Font Usage: Stick to one or two fonts per photo to maintain a cohesive and professional look.
- Experiment: Try different fonts to see what works best with your photo. Don’t be afraid to experiment and try new things.
4.2. Playing with Colors
Color is a powerful tool for adding visual interest and emphasis to your text. Here are some tips for using color effectively:
- Contrast: Use colors that contrast well with the background to make the text stand out.
- Complementary Colors: Choose colors that complement the colors in your photo to create a harmonious look.
- Color Psychology: Consider the psychological effects of different colors. For example, blue can evoke feelings of calmness and serenity, while red can convey excitement and energy.
- Brand Colors: If you’re using text for branding purposes, use your brand colors to maintain consistency.
- Gradients: Experiment with gradients to add depth and visual interest to your text.
4.3. Text Placement and Layout
The placement and layout of your text can impact the overall composition of your photo. Here are some tips for effective text placement:
- Rule of Thirds: Use the rule of thirds to guide your text placement. Position your text along the lines or at the intersections of the lines for a balanced composition.
- Negative Space: Utilize negative space in your photo to create a clean and uncluttered look. Place your text in areas of negative space to avoid distracting from the main subject.
- Alignment: Align your text consistently. Choose a left, right, or center alignment and stick to it throughout your design.
- Hierarchy: Create a visual hierarchy by using different font sizes and styles to emphasize important words or phrases.
- Angle and Curve: Experiment with angling or curving your text to add visual interest and dynamism to your photo.
4.4. Adding Shadows and Effects
Shadows and effects can add depth and dimension to your text, making it stand out and creating a more polished look. Here are some tips for using shadows and effects:
- Shadows: Add a subtle shadow to your text to create a sense of depth and separation from the background.
- Glows: Use a glow effect to make your text stand out in low-light situations or against dark backgrounds.
- Outlines: Add an outline to your text to define its edges and improve readability.
- Textures: Experiment with textures to add visual interest to your text. Try using textures like wood, metal, or fabric to create a unique look.
- Opacity: Adjust the opacity of your text to create a subtle or bold effect.
4.5. Using Quotes and Captions
Quotes and captions can add context, emotion, and personality to your photos. Here are some tips for using quotes and captions effectively:
- Relevance: Choose quotes and captions that are relevant to the subject of your photo.
- Brevity: Keep your quotes and captions concise and to the point.
- Creativity: Be creative and original with your quotes and captions.
- Attribution: Give credit to the original source of the quote.
- Humor: Use humor to engage your audience and make your photos more memorable.
By incorporating these creative tips into your text-on-photo designs, you can create stunning visuals that capture attention and effectively convey your message. Experiment with different techniques and find what works best for your style and preferences.
5. Use Cases for Text on Photos
Adding text to photos opens up a wide range of possibilities for personal and professional use. Here are some common scenarios where this technique can be particularly effective:
5.1. Social Media Marketing
In the fast-paced world of social media, visually appealing content is essential for capturing attention and engaging your audience. Adding text to photos can help you stand out from the crowd and effectively convey your message.
- Promotions and Sales: Use photos with text to announce promotions, sales, and special offers.
- Event Announcements: Create eye-catching graphics to promote events, webinars, and workshops.
- Quotes and Inspiration: Share inspirational quotes and motivational messages to engage your audience.
- Tips and Tutorials: Create visual guides and tutorials with step-by-step instructions.
- Brand Awareness: Add your logo and brand colors to photos to reinforce brand recognition.
- Product Highlights: Showcase your products with compelling visuals and descriptive text.
5.2. Personal Expressions
Adding text to photos can also be a meaningful way to express yourself, share your thoughts, and connect with others on a personal level.
- Memes: Create funny and relatable memes to share with your friends and followers.
- Birthday Wishes: Send personalized birthday wishes with a photo and heartfelt message.
- Thank You Notes: Express your gratitude with a photo and a thank you message.
- Inspirational Messages: Share inspirational messages and quotes to uplift and motivate others.
- Travel Photos: Add captions and annotations to your travel photos to share your experiences.
- Family Memories: Create personalized photo albums with captions and stories.
5.3. Business and Branding
For businesses, adding text to photos can be a powerful way to reinforce brand identity, promote products and services, and engage with customers.
- Logos and Watermarks: Add your logo and watermark to protect your photos and promote your brand.
- Product Showcases: Create visually appealing product showcases with descriptive text and pricing information.
- Testimonials: Share customer testimonials with a photo and a quote.
- Behind-the-Scenes: Give your audience a glimpse behind the scenes with photos and captions.
- Announcements: Announce new products, services, and company milestones with engaging visuals.
- Educational Content: Create informative graphics and infographics to educate your audience.
5.4. Educational Purposes
Adding text to photos can be a valuable tool for creating educational materials, presentations, and tutorials.
- Infographics: Create visually appealing infographics with text and graphics to present data and information.
- Presentations: Enhance your presentations with photos and captions to engage your audience.
- Tutorials: Create step-by-step tutorials with photos and annotations to guide your audience.
- Flashcards: Create flashcards with photos and text to help students learn and memorize information.
- Educational Posters: Design educational posters with photos and captions to teach important concepts.
5.5. Event Invitations
Creating event invitations with text on photos can be a creative and effective way to invite people to your events.
- Party Invitations: Design fun and festive party invitations with photos and event details.
- Wedding Invitations: Create elegant and personalized wedding invitations with photos and text.
- Corporate Events: Design professional-looking invitations for corporate events and conferences.
- Save the Dates: Create save-the-date cards with photos and event information.
- Thank You Cards: Send thank you cards with photos and a message of gratitude after the event.
By understanding the various use cases for adding text to photos, you can effectively leverage this technique to achieve your personal and professional goals. Whether you’re looking to enhance your social media presence, promote your business, or express yourself creatively, adding text to photos can help you make a lasting impact.
6. Overcoming Common Challenges
While adding text to photos on your iPhone can be a fun and creative process, you might encounter some challenges along the way. Here are some common issues and how to overcome them:
6.1. Text Readability
One of the most common challenges is ensuring that your text is readable against the background of your photo. Here are some tips to improve text readability:
- Contrast: Use a text color that contrasts well with the background.
- Shadows and Outlines: Add a subtle shadow or outline to your text to define its edges.
- Backgrounds: Place a solid or semi-transparent background behind your text to create a clear separation.
- Font Choice: Choose a font that is easy to read and avoid overly decorative or complex fonts.
- Size: Use a font size that is large enough to be easily read on different devices.
6.2. Text Placement
Another challenge is finding the right placement for your text. Here are some tips for effective text placement:
- Rule of Thirds: Use the rule of thirds to guide your text placement.
- Negative Space: Utilize negative space in your photo to create a clean and uncluttered look.
- Hierarchy: Create a visual hierarchy by using different font sizes and styles to emphasize important words or phrases.
- Experiment: Try different placements to see what works best with your photo.
6.3. Font Selection
Choosing the right font can be tricky, especially with so many options available. Here are some tips for font selection:
- Match the Mood: Choose a font that complements the mood of your photo.
- Readability: Ensure the font is easy to read.
- Limit Font Usage: Stick to one or two fonts per photo to maintain a cohesive and professional look.
- Experiment: Try different fonts to see what works best with your photo.
6.4. Image Quality
Adding text to low-quality images can result in a blurry or pixelated final product. Here are some tips to ensure optimal image quality:
- Use High-Resolution Images: Start with high-resolution images whenever possible.
- Avoid Over-Editing: Avoid over-editing your photos, as this can degrade image quality.
- Save in the Right Format: Save your edited photos in a high-quality format like JPEG or PNG.
6.5. App Limitations
Some apps may have limitations in terms of font selection, customization options, or image quality. Here are some tips to overcome app limitations:
- Explore Different Apps: Try different apps to find one that meets your specific needs.
- Use Multiple Apps: Use multiple apps to achieve the desired effect. For example, you might use one app to edit your photo and another app to add text.
- Update Your Apps: Keep your apps updated to take advantage of the latest features and bug fixes.
By addressing these common challenges, you can improve your text-on-photo skills and create stunning visuals that effectively convey your message.
7. dfphoto.net: Your Resource for Photography Inspiration
At dfphoto.net, we are dedicated to providing you with the resources, inspiration, and community you need to excel in photography. Whether you’re a beginner or a seasoned pro, our platform offers a wealth of information and opportunities to enhance your skills and creativity.
7.1. Explore Tutorials and Guides
Discover a wide range of tutorials and guides on various photography topics, including composition, lighting, editing, and more. Our expert instructors provide step-by-step instructions and practical tips to help you master new techniques and improve your skills.
7.2. View Stunning Photo Galleries
Immerse yourself in our stunning photo galleries featuring the work of talented photographers from around the world. Get inspired by their creativity and learn from their techniques. Our galleries showcase a variety of genres, styles, and subjects, providing endless inspiration for your own photography projects.
7.3. Join Our Photography Community
Connect with fellow photographers from around the world in our vibrant community forum. Share your work, ask questions, offer advice, and collaborate on projects. Our community is a supportive and welcoming space for photographers of all levels to connect, learn, and grow together.
7.4. Stay Updated with the Latest Trends
Stay up-to-date with the latest trends, technologies, and techniques in the world of photography. Our blog features articles, news, and reviews on the latest gear, software, and industry developments. Stay ahead of the curve and discover new ways to enhance your photography.
7.5. Participate in Challenges and Contests
Challenge yourself and showcase your skills in our regular photography challenges and contests. Receive feedback from experienced judges and win prizes. Our challenges and contests are a fun and engaging way to push your boundaries, improve your skills, and gain recognition for your work.
7.6. Connect with Professionals
Find the perfect photographer for your needs. Browse our directory to find photographers specializing in various styles such as, event, portrait or product photography.
8. FAQ: Typing on Photos on iPhone
Here are some frequently asked questions about typing on photos on your iPhone:
8.1. Can I Add Text to Live Photos?
Yes, you can add text to Live Photos using the Markup tool in the Photos app or third-party apps. However, keep in mind that the text will be static and will not move with the Live Photo animation.
8.2. How Can I Change the Font Size?
To change the font size, tap the “Aa” icon in the Markup tool or use the font size options in third-party apps. You can also use the pinch gesture to resize the text box.
8.3. How Can I Add a Background to the Text?
To add a background to the text, use the shape tool in the Markup tool or third-party apps to create a rectangle or other shape behind the text. You can then customize the color and opacity of the background.
8.4. Can I Use Custom Fonts?
Yes, some third-party apps like Phonto allow you to install and use custom fonts. This gives you more flexibility and creative control over your typography.
8.5. How Do I Make the Text Stand Out?
To make the text stand out, use a color that contrasts well with the background, add a shadow or outline, or place a solid or semi-transparent background behind the text.
8.6. How Can I Curve the Text?
Some third-party apps like Phonto allow you to curve the text. Look for the curve or arc tool in the app’s text editing options.
8.7. How Do I Add a Text Stroke?
To add a stroke to the text, look for the stroke or outline option in the text editing settings of the Markup tool or third-party apps.
8.8. Can I Animate the Text?
While the built-in Markup tool does not support text animation, some third-party apps like Canva offer options to animate text and create dynamic visuals.
8.9. How Do I Save the Photo After Adding Text?
To save the photo after adding text, tap “Done” in the Markup tool or the save icon in third-party apps. Make sure to choose a high-quality format like JPEG or PNG to preserve image quality.
8.10. What is the Best App for Adding Text to Photos?
The best app for adding text to photos depends on your specific needs and preferences. The built-in Markup tool is great for basic text additions, while third-party apps like Phonto, Over, Canva, Adobe Photoshop Express, and PicLab offer more advanced features and customization options.
9. Conclusion
Adding text to photos on your iPhone is a versatile and creative way to enhance your images and convey your message. Whether you’re using the built-in Markup tool or exploring third-party apps, the possibilities are endless. By following the tips and techniques outlined in this guide, you can create stunning visuals that capture attention, engage your audience, and express your unique style.
Remember to choose the right font, color, and placement for your text, and don’t be afraid to experiment with different effects and styles. With a little creativity and practice, you can transform ordinary photos into extraordinary works of art.
Visit dfphoto.net today to discover more tutorials, inspiration, and community resources to enhance your photography skills. Connect with fellow photographers, explore stunning photo galleries, and stay updated with the latest trends in the world of photography. Start your journey towards creating captivating visuals and expressing your unique vision through the lens of your iPhone.
Address: 1600 St Michael’s Dr, Santa Fe, NM 87505, United States. Phone: +1 (505) 471-6001. Website: dfphoto.net.