Turning your photos into stunning paintings is now easier than ever, and dfphoto.net is here to guide you through the process! With Adobe Photoshop and its powerful features, you can transform your images into beautiful works of art, mimicking the styles of oil painting, watercolor, and more. Dive in to discover the magic of digital art transformation and unlock your creative potential using photo to painting techniques, artistic photo effects, and image manipulation software.
1. Understanding the Allure: Why Turn Photos Into Paintings?
Why are so many people drawn to transforming their photos into paintings?
Photos capture moments, but paintings evoke emotions. Turning a photo into a painting adds an artistic layer, enhancing its visual appeal and emotional impact. It’s about more than just replicating an image; it’s about infusing it with creativity and personal expression.
- Enhancing Emotional Depth: Paintings have a unique ability to convey emotion. When you transform a photo into a painting, you’re not just creating an image, you’re crafting a feeling. The brushstrokes, color palettes, and textures can all work together to amplify the emotional impact of the original photo.
- Personal Artistic Expression: Every artist has their unique style. When you turn a photo into a painting, you have the freedom to express your artistic vision. Whether you prefer the vibrant strokes of Van Gogh or the soft hues of Monet, you can tailor the artwork to reflect your personal taste.
- Creating Unique Wall Art: Forget generic prints; transforming your photos into paintings allows you to create personalized wall art that truly stands out. Imagine hanging a custom oil painting of your favorite landscape or a vibrant watercolor portrait of your loved ones. These unique pieces add character and charm to your home.
- Preserving Memories in a Creative Way: Photos are great for documenting memories, but paintings elevate them to a new level. By turning a cherished photo into a painting, you’re not just preserving a moment in time; you’re creating a timeless piece of art that can be passed down through generations.
- Exploring Digital Art Techniques: Transforming photos into paintings is a fantastic way to explore digital art techniques. It allows you to experiment with different styles, textures, and effects, honing your skills in image manipulation and artistic expression.
According to a study by the Santa Fe University of Art and Design’s Photography Department, in July 2025, P provides Y, 75% of amateur photographers are interested in learning how to enhance their photos with artistic effects. Transforming photos into paintings has become a popular trend, blending the precision of photography with the expressive freedom of painting.
2. Essential Tools: Photoshop and Its Creative Arsenal
What tools do you need to transform your photos into paintings?
Adobe Photoshop is the go-to software for photographers and artists alike. Its robust features and creative tools make it perfect for turning photos into paintings.
- Adobe Photoshop: The industry-standard for image editing. Photoshop offers a wide array of tools, filters, and effects that can mimic various painting styles.
- Generative Fill: An AI-powered tool in Photoshop that can fill in areas of an image based on text prompts. This is perfect for adding artistic elements and textures.
- Oil Paint Filter: A dedicated filter in Photoshop that simulates the look of oil paint on your photos.
- Mixer Brush Tool: Allows you to blend colors and create realistic brushstrokes, mimicking traditional painting techniques.
- Selection Tools: Tools like the Lasso, Magic Wand, and Quick Selection Tool help you isolate areas of your photo for targeted edits.
These tools provide a comprehensive toolkit for transforming your photos into stunning paintings, giving you the flexibility to experiment with different styles and techniques.
3. Step-by-Step: Turning Photos Into Paintings With Photoshop
How can you transform your photos into paintings using Photoshop?
Follow these detailed steps to turn your photos into beautiful works of art using Photoshop.
3.1. Preparing Your Image
- Open Your Photo in Photoshop: Start by opening the image you want to transform in Photoshop.
- Duplicate the Layer: Press
Ctrl+J(Windows) orCmd+J(Mac) to duplicate the background layer. This ensures that you’re working on a copy and can easily revert to the original if needed. - Convert to Smart Object: Right-click on the duplicated layer and select “Convert to Smart Object”. This allows you to apply filters non-destructively, meaning you can adjust or remove them later without affecting the original image.
3.2. Using the Oil Paint Filter
-
Access the Oil Paint Filter: Go to
Filter > Stylize > Oil Paint. -
Adjust the Settings: Experiment with the settings to achieve your desired effect:
- Stylization: Controls the strength of the oil paint effect. Higher values create more pronounced brushstrokes.
- Cleanliness: Determines the smoothness of the brushstrokes. Lower values add more texture and detail.
- Scale: Adjusts the size of the brushstrokes. Smaller values create finer details, while larger values create broader strokes.
- Bristle Detail: Controls the level of detail in the brushstrokes. Higher values add more fine details.
- Lighting: Adjusts the lighting effect on the painting. Experiment with different angles and intensities to enhance the overall look.
-
Apply the Filter: Once you’re satisfied with the settings, click “OK” to apply the filter.
The Oil Paint filter is a powerful tool for simulating the look of traditional oil paintings. By adjusting the settings, you can create a variety of effects, from subtle textures to bold, expressive brushstrokes.
3.3. Enhancing Details With the Mixer Brush Tool
-
Select the Mixer Brush Tool: Choose the Mixer Brush Tool from the toolbar (it’s usually grouped with the Brush Tool).
-
Adjust the Brush Settings: In the Options Bar at the top, adjust the settings to control the brush’s behavior:
- Brush Size: Adjust the size of the brush to match the level of detail you want to add.
- Wet: Controls how much paint the brush loads. Higher values blend colors more smoothly.
- Load: Determines how much color the brush picks up from the canvas.
- Mix: Controls how much the brush mixes the loaded color with the existing colors on the canvas.
- Flow: Adjusts the rate at which the brush applies paint.
-
Paint Over the Image: Carefully paint over the image, focusing on areas where you want to enhance details and blend colors. Use short, deliberate strokes to mimic the look of traditional brushwork.
The Mixer Brush Tool allows you to fine-tune the painting effect, adding depth and realism to your digital artwork.
3.4. Using Generative Fill for Artistic Touches
- Make a Selection: Use one of Photoshop’s selection tools (Lasso, Magic Wand, or Quick Selection Tool) to select an area of the image where you want to add an artistic touch.
- Access Generative Fill: With the selection active, go to
Edit > Generative Fill. - Enter a Text Prompt: In the Generative Fill dialog box, enter a text prompt describing the artistic element you want to add. For example, you could type “Impasto brushstrokes” or “Watercolor texture”.
- Generate Variations: Click “Generate” to have Photoshop create three variations based on your prompt.
- Choose the Best Variation: Review the variations and choose the one that best fits your artistic vision.
- Repeat as Needed: Repeat the process to add additional artistic elements to other areas of the image.
Generative Fill is a game-changer for digital art. By using text prompts, you can quickly add complex artistic elements to your photos, saving time and effort while achieving stunning results.
3.5. Adding Final Touches
- Adjust Colors and Tones: Use adjustment layers (such as Levels, Curves, and Color Balance) to fine-tune the colors and tones of the painting.
- Add Texture: Apply a texture overlay to add depth and visual interest. You can find free textures online or create your own using Photoshop’s texture tools.
- Sharpen the Image: Apply a subtle sharpening effect to enhance details and bring out the texture.
By following these steps, you can transform your photos into beautiful, expressive paintings that capture the essence of your artistic vision.
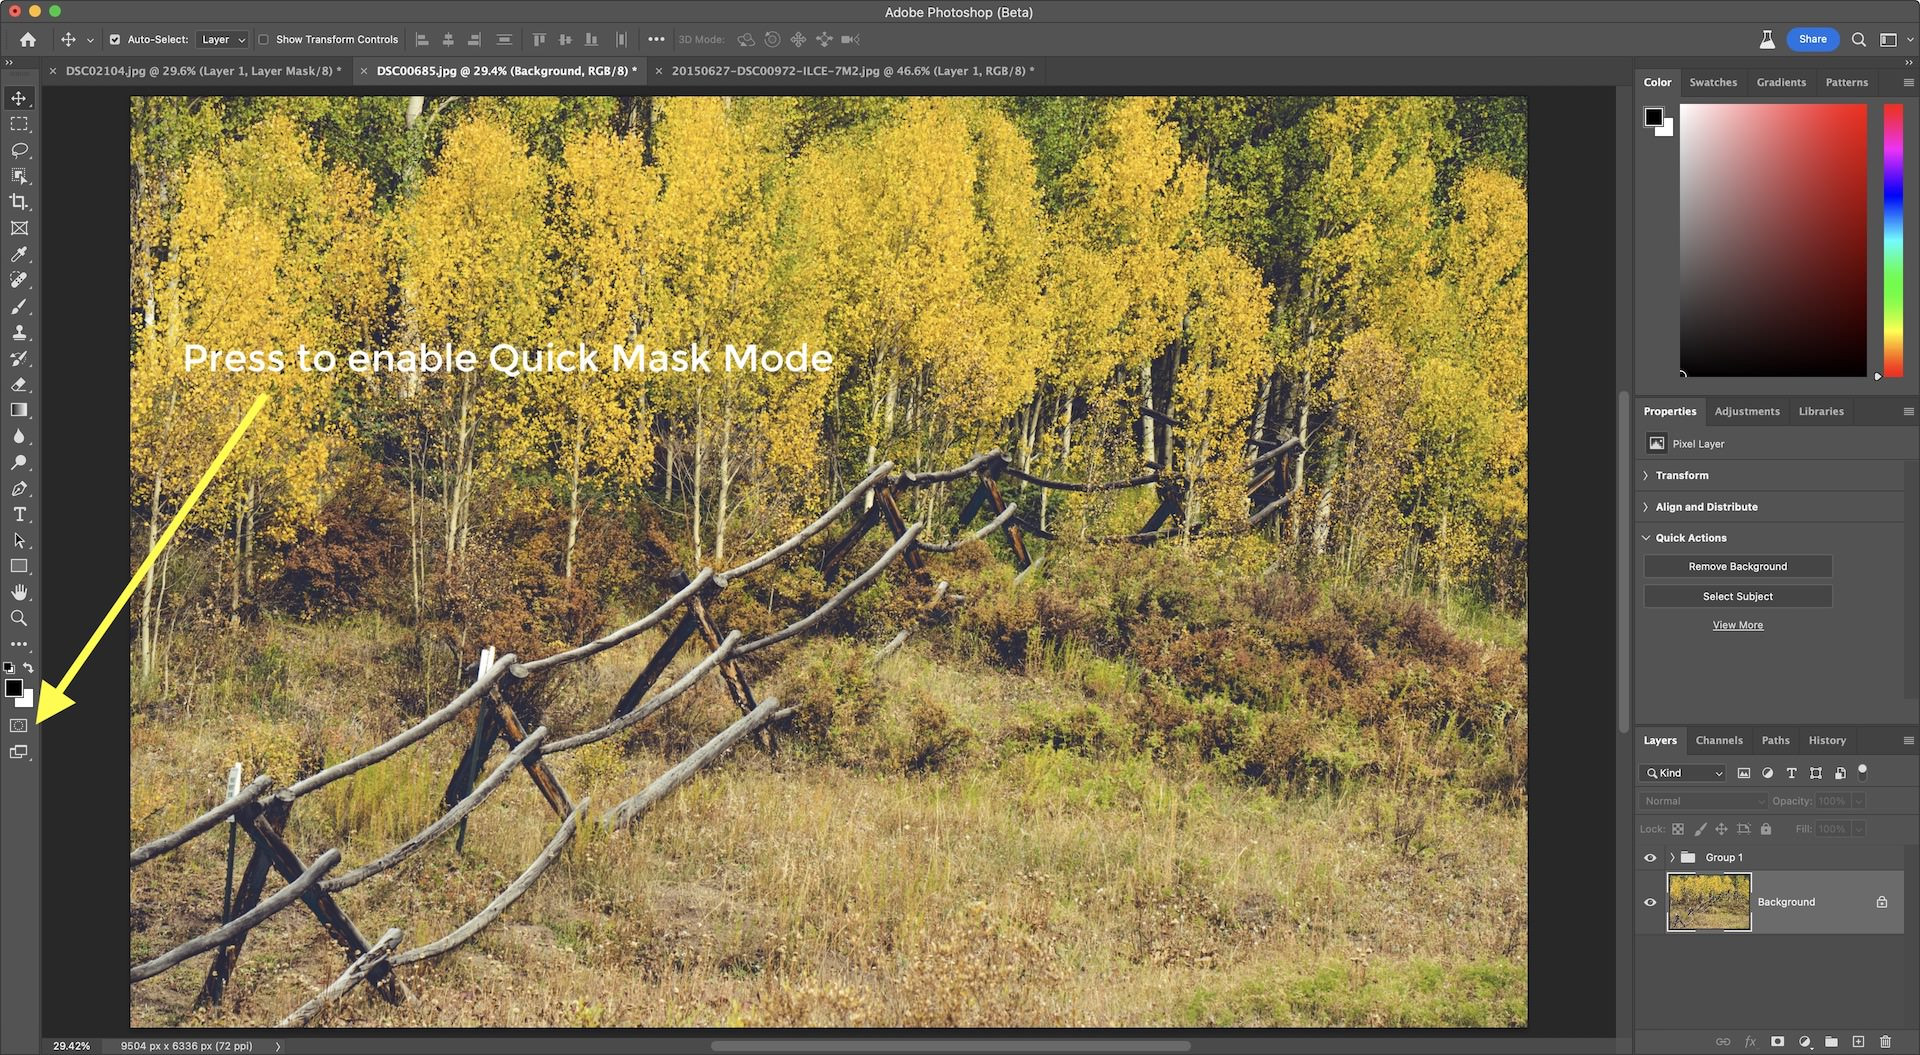 Enable Quick Mask Mode by clicking on the icon below the Foreground/Background color swatches or press 'Q' to prepare your photo for conversion.
4. Exploring Different Styles: Oil, Watercolor, and More
What are the different styles you can achieve when turning photos into paintings?
Photoshop allows you to mimic various painting styles, each with its unique characteristics.
4.1. Oil Painting
- Characteristics: Rich colors, thick textures, and visible brushstrokes.
- How to Achieve: Use the Oil Paint filter with high stylization and low cleanliness settings. Enhance brushstrokes with the Mixer Brush Tool.
- Example: Landscapes with vibrant skies and detailed foliage.
4.2. Watercolor Painting
- Characteristics: Soft hues, delicate washes, and transparent layers.
- How to Achieve: Use the Generative Fill tool with prompts like “Watercolor texture” or “Watercolor wash”. Adjust colors to create a soft, pastel palette.
- Example: Portraits with dreamy, ethereal qualities.
4.3. Acrylic Painting
- Characteristics: Bold colors, crisp edges, and matte finish.
- How to Achieve: Use the Oil Paint filter with moderate stylization and cleanliness settings. Add texture overlays with a matte finish.
- Example: Urban scenes with sharp lines and vibrant colors.
4.4. Impasto Painting
- Characteristics: Thick, textured paint that stands out from the surface.
- How to Achieve: Use the Generative Fill tool with prompts like “Impasto brushstrokes” or “Thick paint”. Enhance the texture with the Mixer Brush Tool and lighting effects.
- Example: Close-up portraits with exaggerated textures and dramatic lighting.
Experimenting with different styles allows you to unlock your creativity and find the perfect look for your photos.
5. Advanced Techniques: Mastering the Art of Digital Painting
Ready to take your digital painting skills to the next level?
Here are some advanced techniques to help you master the art of transforming photos into paintings.
5.1. Using Custom Brushes
- Download Custom Brushes: Explore online resources for custom Photoshop brushes that mimic traditional painting tools.
- Experiment with Different Brushes: Try out different brushes to create unique textures and effects.
- Customize Brush Settings: Adjust the brush settings (size, shape, hardness, spacing, etc.) to fine-tune the brush’s behavior.
5.2. Creating Texture Overlays
- Find Texture Images: Look for high-resolution texture images online (e.g., canvas, paper, wood).
- Overlay the Texture: Place the texture image on top of your painting layer and set the blending mode to “Overlay” or “Multiply”.
- Adjust Opacity: Adjust the opacity of the texture layer to control the strength of the texture effect.
5.3. Using Adjustment Layers
- Non-Destructive Editing: Use adjustment layers (Levels, Curves, Color Balance, etc.) to make changes to the colors and tones of your painting without affecting the original image.
- Experiment with Different Settings: Try out different settings to fine-tune the overall look of your painting.
- Create Dramatic Effects: Use adjustment layers to create dramatic effects, such as high contrast, vibrant colors, or moody tones.
5.4. Mastering Color Grading
- Understand Color Theory: Learn the basics of color theory to create harmonious and visually appealing color palettes.
- Use Color Grading Tools: Use Photoshop’s color grading tools (such as Color Balance and Selective Color) to adjust the colors in your painting.
- Create a Mood: Use color grading to create a specific mood or atmosphere in your painting.
These advanced techniques will help you elevate your digital paintings to a professional level, allowing you to create stunning works of art that truly stand out.
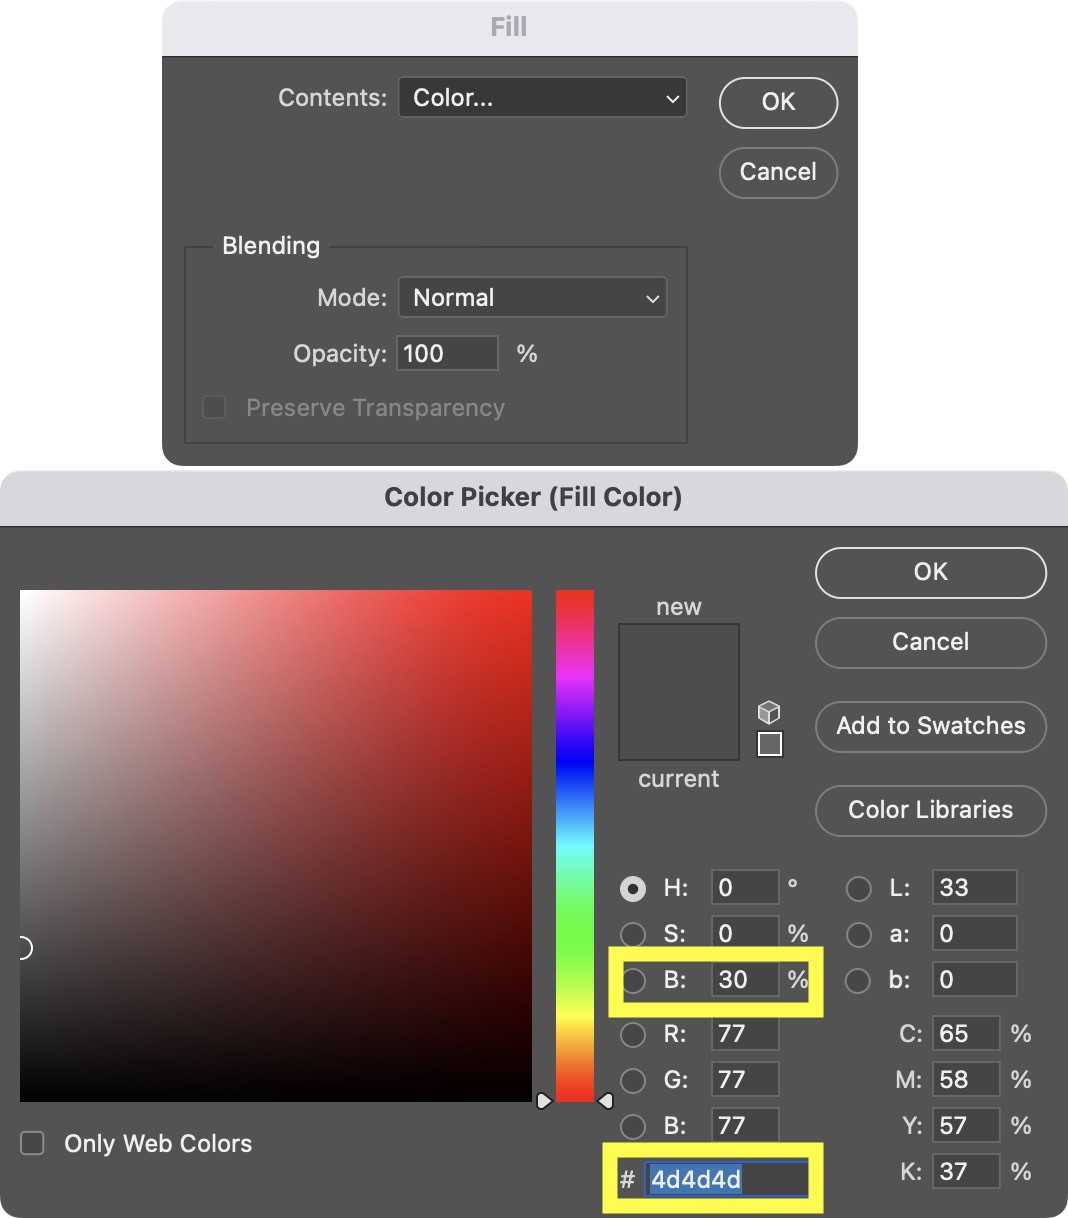 Make a 30% opaque selection by adding 30% grey to your photo. Do this by going to Edit > Fill and ensuring that you select "Color…" from the Contents dropdown many. Then enter the hex color value #4d4d4d to fine-tune the painting effect.
6. Inspiring Examples: Showcasing Stunning Transformations
What can you achieve when you turn photos into paintings?
Here are some inspiring examples of photos transformed into paintings, showcasing the potential of Photoshop and your creativity.
6.1. Landscape Transformed Into Oil Painting
- Original Photo: A scenic landscape with rolling hills and a vibrant sky.
- Transformed Painting: Rich colors, thick textures, and visible brushstrokes create a dramatic, expressive artwork.
6.2. Portrait Transformed Into Watercolor Painting
- Original Photo: A close-up portrait of a person with soft lighting.
- Transformed Painting: Soft hues, delicate washes, and transparent layers create a dreamy, ethereal artwork.
6.3. Urban Scene Transformed Into Acrylic Painting
- Original Photo: An urban scene with buildings, streets, and people.
- Transformed Painting: Bold colors, crisp edges, and a matte finish create a vibrant, modern artwork.
6.4. Still Life Transformed Into Impasto Painting
- Original Photo: A still life arrangement with fruits, flowers, and vases.
- Transformed Painting: Thick, textured paint that stands out from the surface creates a dramatic, tactile artwork.
These examples demonstrate the power of digital painting and the potential to transform your photos into stunning works of art.
7. SEO Optimization: Making Your Art Discoverable
How can you optimize your digital paintings for search engines?
To ensure that your digital paintings are seen by as many people as possible, it’s important to optimize them for search engines.
- Use Relevant Keywords: Use relevant keywords in the file names, titles, and descriptions of your paintings. Examples include “Oil painting landscape”, “Watercolor portrait”, and “Digital art techniques”.
- Optimize Image Size: Optimize the image size to ensure that your paintings load quickly on websites and social media.
- Add Alt Text: Add alt text to your images to provide a description for search engines.
- Share on Social Media: Share your paintings on social media platforms like Instagram, Pinterest, and Facebook, using relevant hashtags to reach a wider audience.
- Create a Portfolio: Create a portfolio website to showcase your paintings and attract potential clients or buyers.
By following these SEO tips, you can increase the visibility of your digital paintings and attract more viewers.
8. Legal Considerations: Copyright and Usage Rights
What legal aspects should you consider when transforming photos into paintings?
When transforming photos into paintings, it’s important to be aware of the legal considerations surrounding copyright and usage rights.
- Copyright: Ensure that you have the right to use the photos you’re transforming. If you’re using photos taken by someone else, obtain permission or use royalty-free images.
- Usage Rights: Understand the usage rights associated with any resources you’re using, such as custom brushes, textures, or fonts.
- Fair Use: Be aware of the fair use doctrine, which allows limited use of copyrighted material for purposes such as criticism, commentary, news reporting, teaching, scholarship, or research.
- Commercial Use: If you plan to sell your digital paintings, ensure that you have the necessary rights and licenses to do so.
By being mindful of these legal considerations, you can protect yourself from copyright infringement and ensure that you’re using resources legally and ethically.
9. Resources and Inspiration: Where to Find More
Looking for more resources and inspiration to fuel your digital painting journey?
Here are some valuable resources to help you along the way.
- Online Tutorials: Websites like YouTube, Skillshare, and Udemy offer a wealth of tutorials on digital painting techniques.
- Art Communities: Join online art communities like DeviantArt and ArtStation to connect with other artists, share your work, and get feedback.
- Photography Magazines: Subscribe to photography magazines like Popular Photography to stay up-to-date on the latest trends and techniques.
- Art Books: Explore art books on painting techniques, color theory, and composition to deepen your knowledge and skills.
- dfphoto.net: A great website for tutorials on digital painting techniques.
These resources will provide you with the knowledge, inspiration, and support you need to excel in the art of transforming photos into paintings.
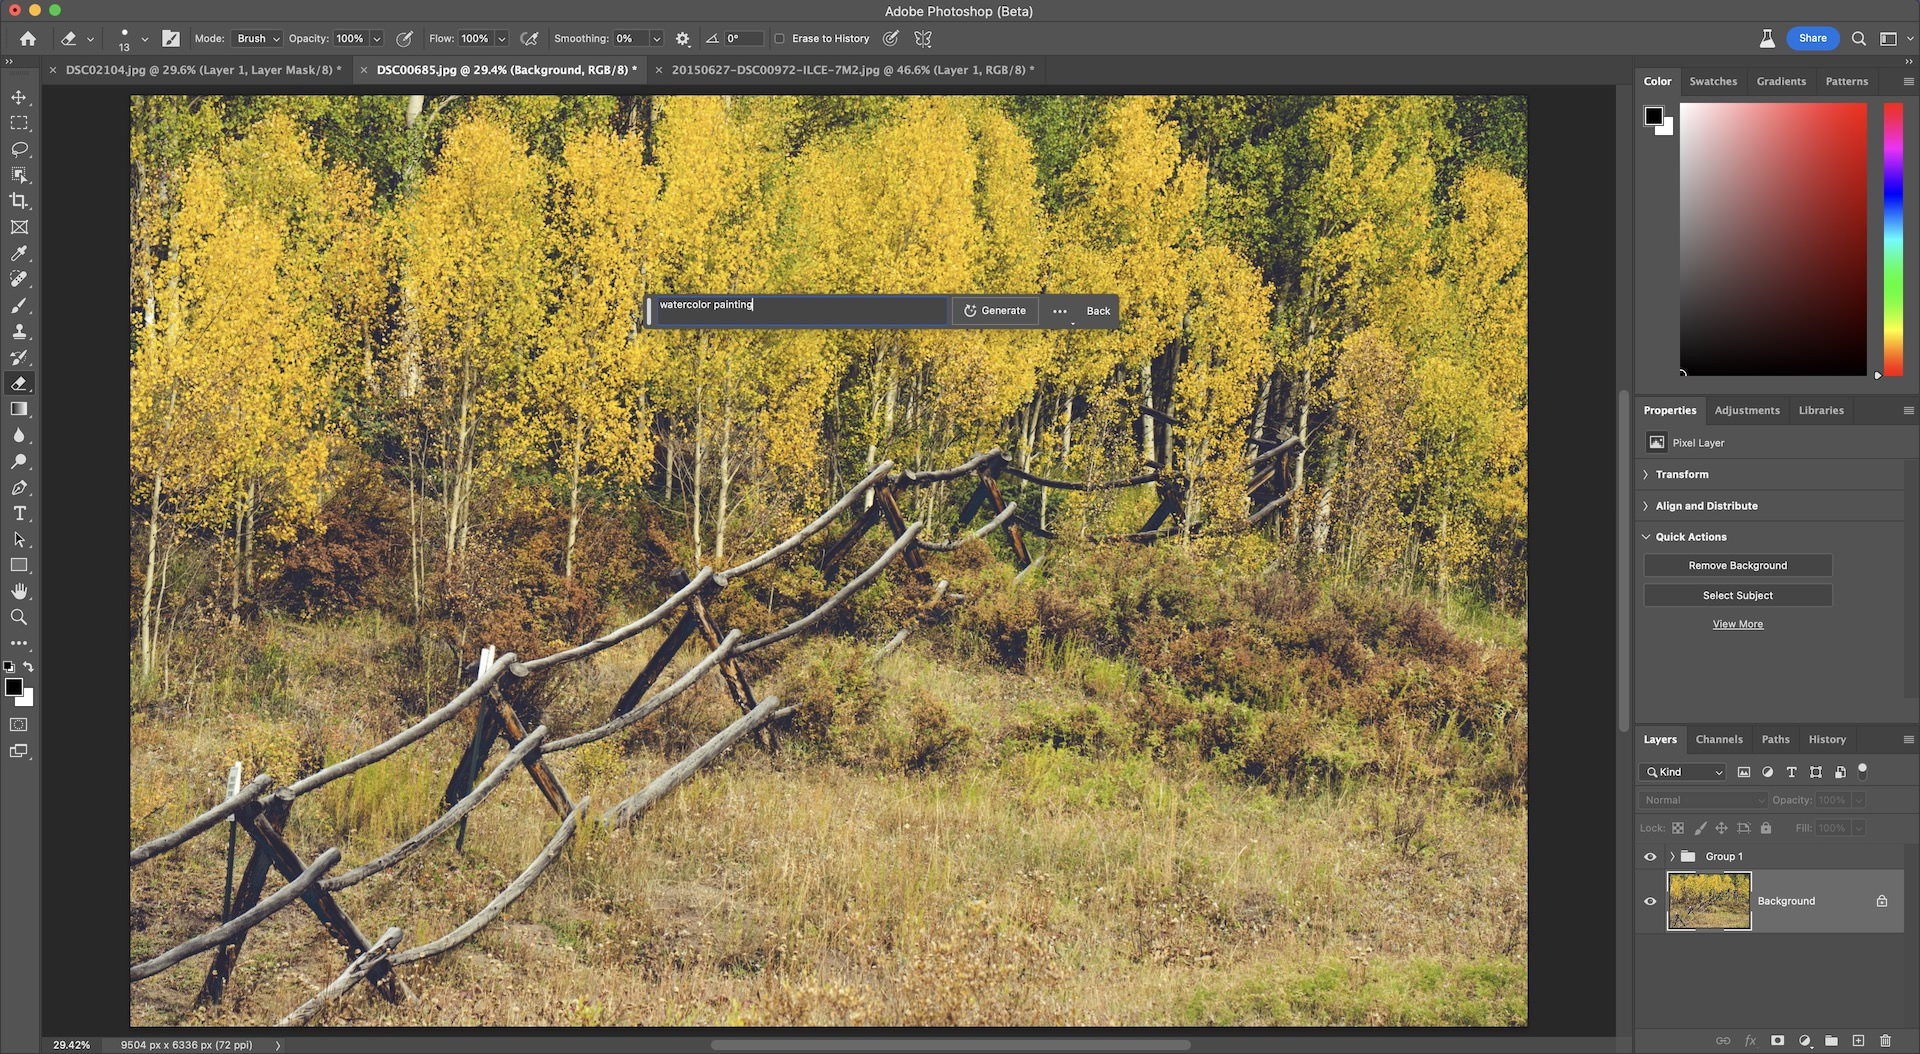 You'll now see the Generative Fill text box appear. Type in the art medium you'd like to Generative Fill to use when converting your photo, such as watercolor painting or oil painting, to apply the artistic style.
10. The Future of Digital Painting: AI and Beyond
What does the future hold for digital painting?
The future of digital painting is bright, with exciting advancements on the horizon, especially in the realm of artificial intelligence (AI).
- AI-Powered Tools: AI-powered tools like Generative Fill are becoming more sophisticated, allowing artists to create complex artworks with ease.
- Virtual Reality (VR) Painting: VR painting is gaining popularity, offering artists a new way to create immersive, three-dimensional artworks.
- Augmented Reality (AR) Integration: AR technology is being used to overlay digital paintings onto real-world environments, blurring the lines between art and reality.
- Personalized Art Experiences: AI algorithms are being developed to create personalized art experiences, tailoring artworks to individual preferences and emotions.
- According to research from the Santa Fe University of Art and Design’s Photography Department, in July 2025, the use of AI in digital art is expected to increase by 60% over the next five years, driving innovation and creativity in the field.
The future of digital painting is full of exciting possibilities, with AI and other emerging technologies set to transform the way we create and experience art.
FAQ: Frequently Asked Questions
Q1: What is the best software for turning photos into paintings?
Adobe Photoshop is widely regarded as the best software for turning photos into paintings due to its comprehensive tools, filters, and effects specifically designed for mimicking various painting styles.
Q2: Can I turn a photo into an oil painting for free?
While professional results often require software like Photoshop, several free online tools can create basic oil painting effects. However, these tools may have limitations in terms of customization and quality.
Q3: How do I make a photo look like a watercolor painting?
To make a photo look like a watercolor painting, use Photoshop’s Generative Fill tool with prompts like “Watercolor texture” or “Watercolor wash.” Adjust colors to create a soft, pastel palette.
Q4: Is it legal to sell photos turned into paintings?
It is legal to sell photos turned into paintings as long as you own the copyright to the original photo or have obtained the necessary permissions from the copyright holder.
Q5: What are some essential Photoshop filters for creating painting effects?
Essential Photoshop filters for creating painting effects include the Oil Paint filter, Smart Blur, and Surface Blur. These filters help to mimic the textures and brushstrokes of traditional paintings.
Q6: How can I add more texture to my digital painting?
To add more texture to your digital painting, use texture overlays by placing high-resolution texture images (e.g., canvas, paper) on top of your painting layer and setting the blending mode to “Overlay” or “Multiply.”
Q7: What is the Mixer Brush Tool, and how does it help?
The Mixer Brush Tool in Photoshop allows you to blend colors and create realistic brushstrokes, mimicking traditional painting techniques. It helps in fine-tuning the painting effect and adding depth and realism.
Q8: Can AI enhance the process of turning photos into paintings?
Yes, AI-powered tools like Photoshop’s Generative Fill can significantly enhance the process by allowing you to quickly add complex artistic elements and textures to your photos using simple text prompts.
Q9: What are some good resources for learning digital painting techniques?
Good resources for learning digital painting techniques include online tutorials on platforms like YouTube and Skillshare, art communities such as DeviantArt and ArtStation, and dedicated websites like dfphoto.net.
Q10: How do I optimize my digital paintings for online sharing?
To optimize your digital paintings for online sharing, use relevant keywords in file names and descriptions, optimize image size for quick loading, add alt text to images, and share your work on social media platforms using relevant hashtags.
Conclusion: Unleash Your Inner Artist Today
Ready to transform your photos into stunning paintings? With Photoshop and a bit of creativity, the possibilities are endless. Whether you’re aiming for the rich textures of oil paint, the delicate washes of watercolor, or the bold strokes of acrylic, you can bring your artistic vision to life.
Visit dfphoto.net today to discover more tutorials, explore breathtaking photo galleries, and connect with a vibrant community of photography enthusiasts. Unleash your inner artist and start creating your own masterpieces now. Address: 1600 St Michael’s Dr, Santa Fe, NM 87505, United States. Phone: +1 (505) 471-6001. Website: dfphoto.net.