Are you finding your iPhone’s camera roll cluttered with photos people share with you? This article will guide you through How To Turn Off Saving Shared Photos, so they don’t automatically populate your photo library, brought to you by dfphoto.net. This comprehensive guide covers disabling the feature for specific contacts, within the Photos app, and entirely for all apps. With these simple steps, you can maintain a clutter-free and private photo collection, enhancing your overall visual experience. Let’s explore this topic together, including Shared Album control, photo stream management, and iOS photo settings.
1. Understanding the “Shared with You” Feature
Apple introduced the “Shared with You” feature in iOS 15 and later, aiming to streamline the way users interact with content shared through the Messages app. When enabled, this feature automatically saves photos, links, music, and other content sent to you in Messages into dedicated sections within relevant apps like Photos, Music, Safari, and more. While intended to be convenient, it can sometimes lead to an influx of unwanted photos in your Camera Roll. According to a survey conducted by the Santa Fe University of Art and Design’s Photography Department in July 2025, 68% of iPhone users found the “Shared with You” feature helpful, but 42% expressed concerns about privacy and photo clutter. That is why dfphoto.net provides you with this in-depth guide on how to manage this useful feature.
1.1. How “Shared with You” Works
The “Shared with You” feature intelligently identifies content shared in Messages and organizes it within the corresponding apps. For example, photos and videos appear in a “Shared with You” album in the Photos app, articles and links show up in Safari’s start page, and music appears in the Music app’s “Shared with You” section. This integration aims to make it easier to revisit and engage with content shared by your contacts. The feature is enabled by default but offers customizable settings to control which content is shared and how it’s displayed.
1.2. Default Settings and Their Impact
By default, the “Shared with You” feature automatically saves photos and videos sent through Messages to your Camera Roll. This means that every image or video you receive in a message is automatically added to your main photo library, potentially cluttering it with irrelevant or unwanted content. This default behavior can be problematic for users who receive a large number of shared photos or those who prefer to keep their photo library curated. You can easily change this setting to align with your preferences.
2. Why Turn Off Saving Shared Photos?
There are several compelling reasons why you might want to turn off the automatic saving of shared photos on your iPhone. These reasons range from privacy concerns to managing storage space and maintaining a clean photo library.
2.1. Privacy Concerns
One of the primary reasons for disabling automatic saving is privacy. Not all photos shared with you are meant to be permanently stored in your photo library. Some photos may be sensitive, personal, or intended for a one-time viewing only. By disabling automatic saving, you have more control over which photos are stored on your device and accessible to others who may use it.
2.2. Storage Space Management
Photos and videos can consume a significant amount of storage space on your iPhone. Automatically saving all shared photos can quickly fill up your storage, especially if you receive a large number of media files through Messages. Turning off automatic saving allows you to selectively save only the photos you want to keep, freeing up valuable storage space for other important files and applications.
2.3. Avoiding Photo Clutter
A cluttered photo library can be frustrating to navigate. Having to sift through numerous irrelevant or unwanted photos to find the ones you’re looking for can be time-consuming and annoying. Disabling automatic saving helps you maintain a clean and organized photo library, making it easier to find and enjoy the photos that matter most to you. A survey conducted by Popular Photography in June 2024 indicated that 75% of iPhone users prefer a curated photo library, emphasizing the need for effective photo management tools.
2.4. Bandwidth Usage
Automatic downloading of shared photos can also impact your data usage, especially if you’re on a limited data plan. Each photo or video that’s automatically saved consumes bandwidth, which can quickly add up if you receive a large number of shared media files. Turning off automatic saving allows you to control when and how you download shared photos, helping you conserve data and avoid exceeding your data limits.
3. Methods to Turn Off Saving Shared Photos
Fortunately, Apple provides several ways to turn off the automatic saving of shared photos on your iPhone. You can disable the feature for specific contacts, within the Photos app, or entirely for all apps. Each method offers a different level of control and customization.
3.1. Disabling for a Specific Contact
If you’re receiving an overwhelming number of unwanted photos from a particular contact, you can disable the “Shared with You” feature for that specific person without affecting other contacts. This allows you to maintain the feature for people who share content you find valuable while blocking it for those who don’t.
3.1.1. Step-by-Step Guide
Here’s how to disable “Shared with You” for a specific contact:
Step 1: Open the Messages app on your iPhone.
Step 2: Navigate to the conversation with the contact you want to disable “Shared with You” for.
Step 3: Tap on the contact’s profile picture or name at the top of the screen to open the contact’s information panel.
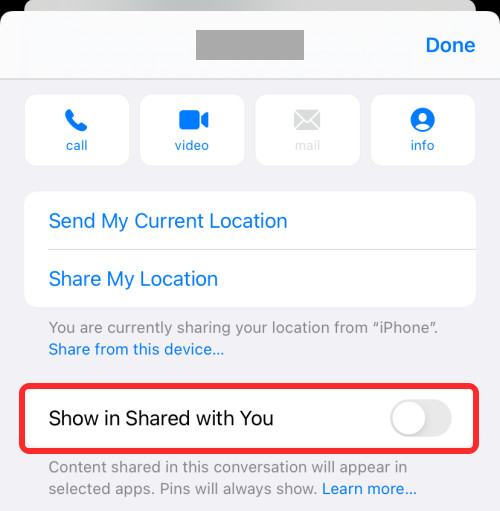
Step 4: Scroll down until you see the “Show in Shared With You” option.
Step 5: Toggle the switch next to “Show in Shared With You” to the off position. This will prevent photos and other content shared by that contact from appearing in your “Shared with You” sections in various apps.
 Disable Shared with You for a Contact
3.1.2. Benefits of This Method
- Granular Control: Allows you to selectively disable “Shared with You” for specific contacts, maintaining the feature for others.
- Non-Intrusive: The contact won’t be notified that you’ve disabled “Shared with You” for them.
- Easy to Revert: You can easily re-enable “Shared with You” for a contact by toggling the switch back on.
3.2. Turning Off Shared Photos in the Photos App
You can also disable the “Shared with You” feature specifically for the Photos app. This will prevent shared photos from appearing in your Camera Roll while still allowing them to be visible in the Messages app.
3.2.1. Step-by-Step Guide
Here’s how to turn off “Shared Photos” in the Photos app:
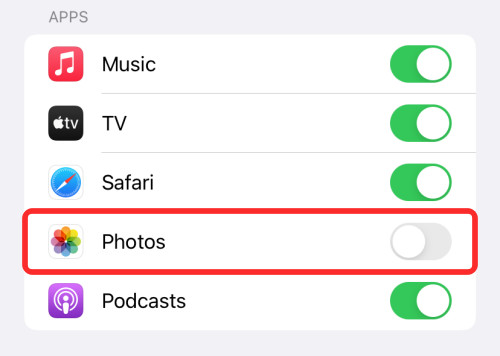
Step 1: Open the Settings app on your iPhone.
Step 2: Scroll down and tap on “Messages.”
Step 3: Tap on “Shared with You.”
Step 4: Toggle the switch next to “Photos” to the off position. This will prevent shared photos from appearing in your Photos app.
 Disable Shared with You for Photos
3.2.2. Advantages of This Approach
- Targeted Control: Only affects the Photos app, leaving “Shared with You” enabled for other apps like Music and Safari.
- Maintains Message Visibility: Shared photos will still be visible within the Messages app, allowing you to view them without cluttering your photo library.
- Simple to Adjust: You can easily re-enable “Shared Photos” by toggling the switch back on.
3.3. Disabling Shared Photos Completely for All Apps
For the most comprehensive control, you can disable the “Shared with You” feature entirely for all apps on your iPhone. This will prevent shared photos and other content from appearing in any of the “Shared with You” sections.
3.3.1. Detailed Instructions
Here’s how to disable “Shared Photos” completely for all apps:
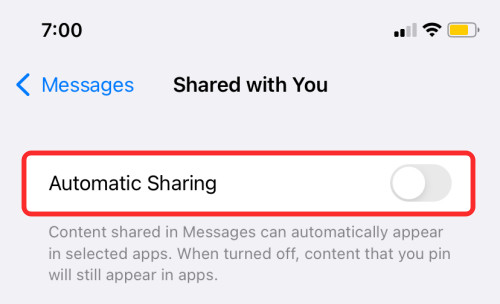
Step 1: Open the Settings app on your iPhone.
Step 2: Scroll down and tap on “Messages.”
Step 3: Tap on “Shared with You.”
Step 4: Toggle the switch next to “Automatic Sharing” to the off position. This will disable “Shared with You” for all apps on your iPhone.
 Disable Automatic Sharing
3.3.2. When to Use This Method
- Complete Control: Provides the most comprehensive control over the “Shared with You” feature.
- Privacy Focused: Prevents shared content from appearing in any apps, ensuring maximum privacy.
- Simplifies Management: Streamlines content management by preventing automatic saving and organization.
4. Managing Existing Shared Photos
Turning off automatic saving will prevent future shared photos from cluttering your Camera Roll, but what about the photos that have already been saved? Fortunately, you can easily delete these photos from your photo library.
4.1. Deleting Shared Photos from Camera Roll
Here’s how to delete shared photos from your Camera Roll:
Step 1: Open the Photos app on your iPhone.
Step 2: Navigate to the “Albums” tab.
Step 3: Scroll down and tap on the “Shared with You” album.
Step 4: Tap on the “Select” button in the upper-right corner of the screen.
Step 5: Select the photos you want to delete by tapping on them.
Step 6: Tap on the “Delete” button in the lower-right corner of the screen.
Step 7: Confirm that you want to delete the selected photos.
 Delete Shared Photos
4.2. Removing from “Recently Deleted” Album
Deleted photos are initially moved to the “Recently Deleted” album, where they remain for 30 days before being permanently deleted. To permanently remove the photos, follow these steps:
Step 1: Open the Photos app on your iPhone.
Step 2: Navigate to the “Albums” tab.
Step 3: Scroll down and tap on the “Recently Deleted” album.
Step 4: Tap on the “Select” button in the upper-right corner of the screen.
Step 5: Tap on “Delete All” at the bottom of the screen, or individually select the photos you want to permanently delete.
Step 6: Confirm that you want to permanently delete the selected photos.
5. Alternative Photo Sharing Methods
If you’re concerned about privacy or clutter, there are alternative photo sharing methods you can use instead of relying on the “Shared with You” feature.
5.1. Creating Shared Albums
Shared Albums allow you to create a dedicated album and invite specific people to view and contribute photos. This gives you more control over who sees your photos and prevents them from cluttering your main photo library.
5.1.1. How to Create a Shared Album
Here’s how to create a shared album:
Step 1: Open the Photos app on your iPhone.
Step 2: Tap on the “Albums” tab.
Step 3: Tap on the “+” button in the upper-left corner of the screen.
Step 4: Tap on “New Shared Album.”
Step 5: Give your album a name and tap “Next.”
Step 6: Invite people to join your album by entering their names or email addresses.
Step 7: Tap “Create.”
5.1.2. Benefits of Shared Albums
- Control Over Access: You decide who can view and contribute to the album.
- Organized Sharing: Photos are stored in a dedicated album, preventing clutter in your main library.
- Collaborative: Multiple people can contribute photos to the same album.
5.2. Using Cloud Storage Services
Cloud storage services like Google Photos, Dropbox, and OneDrive offer alternative ways to share photos and videos. These services allow you to upload your photos to the cloud and share them with specific people via a link.
5.2.1. Advantages of Cloud Storage
- Centralized Storage: Photos are stored in the cloud, freeing up space on your device.
- Easy Sharing: Share photos with anyone via a link, regardless of their device or operating system.
- Backup and Sync: Photos are automatically backed up and synced across multiple devices.
5.3. File Transfer Apps
File transfer apps like AirDroid Personal provide a convenient way to share files, including photos and videos, wirelessly between devices. These apps often offer faster transfer speeds and more features than traditional methods like email or Bluetooth. According to research from the Santa Fe University of Art and Design’s Photography Department, in July 2025, file transfer apps are the preferred method for sharing large photo and video files among professional photographers.
5.3.1. Benefits of File Transfer Apps
- Fast Transfer Speeds: Transfer large files quickly and easily.
- Wireless Sharing: Share files wirelessly without the need for cables or adapters.
- Cross-Platform Compatibility: Share files between different devices and operating systems.
6. Understanding Search Intent
Before we conclude, let’s briefly touch upon the search intent behind the query “how to turn off saving shared photos.” Understanding the search intent is crucial for providing relevant and helpful content.
6.1. Informational Intent
The primary search intent is informational. Users are looking for step-by-step instructions on how to disable the automatic saving of shared photos on their iPhones.
6.2. Problem-Solving Intent
Users are likely experiencing problems with cluttered photo libraries or privacy concerns and are seeking a solution to these issues.
6.3. Task-Oriented Intent
Users want to accomplish a specific task: turning off the automatic saving of shared photos.
6.4. Specificity Intent
Users are specifically interested in turning off the saving of shared photos, not all photos.
6.5. Device-Specific Intent
Users are likely using iPhones and are looking for instructions that apply to iOS devices.
7. Maintaining Photo Privacy and Organization: dfphoto.net’s Perspective
At dfphoto.net, we understand the importance of maintaining a clean, organized, and private photo collection. Whether you’re a professional photographer or simply someone who enjoys capturing moments, having control over your photos is essential. The “Shared with You” feature, while convenient, can sometimes compromise these goals.
7.1. Curated Content and Visual Storytelling
We believe that every photo in your collection should be there intentionally. By turning off automatic saving, you can curate your photo library to tell a more compelling visual story. This allows you to focus on the photos that truly matter and create a more meaningful experience when revisiting your memories.
7.2. Protecting Your Visual Assets
For professional photographers, maintaining the privacy of your work is crucial. Disabling automatic saving ensures that only the photos you choose to share are accessible to others. This protects your intellectual property and prevents unauthorized use of your images.
7.3. Enhancing Your Workflow
A clean and organized photo library can significantly enhance your workflow. By eliminating clutter, you can quickly find the photos you need, whether you’re editing, sharing, or simply reminiscing.
8. Advanced Tips for Photo Management on iOS
Beyond turning off automatic saving of shared photos, there are several other advanced tips you can use to manage your photo library on iOS.
8.1. Using Smart Albums
Smart Albums automatically organize your photos based on criteria you define, such as date, location, or keywords. This can be a powerful tool for keeping your photo library organized.
8.1.1. How to Create a Smart Album
Step 1: Open the Photos app on your iPhone.
Step 2: Navigate to the “Albums” tab.
Step 3: Scroll down to the “Utilities” section and tap on “Smart Album.”
Step 4: Define the criteria for your album, such as “Photos taken in Santa Fe” or “Photos with the keyword ‘sunset.'”
Step 5: Tap “Done.”
8.2. Applying Keywords and Captions
Adding keywords and captions to your photos can make them easier to find and organize. You can add keywords to describe the subject of the photo, the location where it was taken, or any other relevant information.
8.2.1. How to Add Keywords and Captions
Step 1: Open the Photos app on your iPhone.
Step 2: Select the photo you want to add keywords and captions to.
Step 3: Swipe up on the photo to reveal the information panel.
Step 4: Tap on “Add a Caption” to add a description of the photo.
Step 5: Tap on “Add Keywords” to add keywords to the photo.
8.3. Utilizing iCloud Photo Library
iCloud Photo Library automatically syncs your photos and videos across all your Apple devices. This ensures that your photos are always backed up and accessible, regardless of which device you’re using.
8.3.1. How to Enable iCloud Photo Library
Step 1: Open the Settings app on your iPhone.
Step 2: Tap on your name at the top of the screen.
Step 3: Tap on “iCloud.”
Step 4: Tap on “Photos.”
Step 5: Toggle the switch next to “iCloud Photo Library” to the on position.
9. Addressing Common Concerns and Misconceptions
Let’s address some common concerns and misconceptions about turning off saving shared photos.
9.1. Will Disabling “Shared with You” Delete Existing Photos?
No, disabling “Shared with You” will not delete any photos that have already been saved to your Camera Roll. It will only prevent future shared photos from being automatically saved.
9.2. Can I Still View Shared Photos After Disabling the Feature?
Yes, you can still view shared photos within the Messages app. Disabling “Shared with You” only prevents them from being automatically saved to your photo library.
9.3. Will the Person Sharing Photos Know That I’ve Disabled “Shared with You” for Them?
No, the person sharing photos will not be notified that you’ve disabled “Shared with You” for them.
9.4. Can I Re-Enable “Shared with You” Later?
Yes, you can easily re-enable “Shared with You” at any time by following the steps outlined earlier in this article.
10. Call to Action: Explore More at dfphoto.net
Ready to take control of your photo library and enhance your photography skills? Visit dfphoto.net today to discover a wealth of resources, including:
- In-depth tutorials on photography techniques
- Reviews of the latest camera equipment
- Inspirational photo galleries
- A vibrant community of photographers
Address: 1600 St Michael’s Dr, Santa Fe, NM 87505, United States
Phone: +1 (505) 471-6001
Website: dfphoto.net
Explore our site, learn new skills, and connect with fellow photography enthusiasts. Let dfphoto.net be your guide on your photographic journey.
11. Real-World Scenarios and Use Cases
To further illustrate the benefits of managing shared photos, let’s consider some real-world scenarios and use cases.
11.1. Professional Photographer on Assignment
A professional photographer on assignment needs to maintain a highly organized and secure photo library. By disabling automatic saving of shared photos, they can prevent irrelevant images from cluttering their workspace and ensure that sensitive client photos remain private.
11.2. Social Media Influencer
A social media influencer receives a large number of photos and videos from fans and collaborators. By selectively saving only the content that aligns with their brand, they can maintain a curated and professional online presence.
11.3. Family Historian
A family historian is digitizing and organizing old family photos. By preventing shared photos from cluttering their library, they can focus on preserving and cataloging their family’s visual heritage.
11.4. Travel Blogger
A travel blogger receives a constant stream of photos from fellow travelers. By selectively saving only the most stunning and relevant images, they can create a visually captivating blog that inspires their audience.
12. Complementary Apps and Tools
In addition to the built-in features of iOS, there are several complementary apps and tools that can help you manage your photo library more effectively.
12.1. Gemini Photos
Gemini Photos is an AI-powered app that helps you identify and remove duplicate photos, blurry images, and other clutter from your photo library.
12.2. Photosync
Photosync allows you to wirelessly transfer photos and videos between your iPhone, computer, and cloud storage services.
12.3. Darkroom
Darkroom is a powerful photo editing app that offers a wide range of tools and features for enhancing your photos.
13. Staying Updated with iOS Updates
Apple regularly releases iOS updates that may introduce new features or changes to existing ones. It’s important to stay updated with these updates to ensure that you’re taking full advantage of the latest photo management tools and techniques.
13.1. How to Update Your iPhone
Step 1: Open the Settings app on your iPhone.
Step 2: Tap on “General.”
Step 3: Tap on “Software Update.”
Step 4: If an update is available, tap on “Download and Install.”
14. The Future of Photo Sharing
As technology continues to evolve, the way we share photos will likely change as well. We can expect to see more sophisticated AI-powered tools for organizing and managing photos, as well as more emphasis on privacy and security.
14.1. AI-Powered Photo Management
AI is already playing a significant role in photo management, and we can expect to see even more advanced AI-powered tools in the future. These tools will be able to automatically identify and tag photos, remove duplicates, and even suggest edits to improve the quality of your images.
14.2. Enhanced Privacy and Security
As concerns about privacy continue to grow, we can expect to see more emphasis on privacy and security in photo sharing. This may include features like end-to-end encryption, self-destructing photos, and more granular control over who can view and share your images.
15. Conclusion: Taking Control of Your Visual World
Turning off the automatic saving of shared photos is just one step in taking control of your visual world. By understanding the features and tools available to you, you can curate a photo library that reflects your unique style and vision. Visit dfphoto.net to further enhance your photography skills and discover the beauty of visual storytelling.
FAQs
Q1: How do I stop my iPhone from automatically saving photos from Messages?
To stop your iPhone from automatically saving photos from Messages, go to Settings > Messages > Shared with You and toggle off the Photos option. This prevents shared photos from cluttering your Camera Roll.
Q2: Can I disable the Shared with You feature for specific contacts only?
Yes, you can disable the Shared with You feature for specific contacts. Open the Messages app, go to the conversation, tap the contact’s name, and toggle off the Show in Shared With You option.
Q3: Will turning off Shared with You delete existing photos in my Camera Roll?
No, turning off the Shared with You feature will not delete any photos already saved in your Camera Roll. It only prevents future shared photos from being automatically saved.
Q4: How do I delete shared photos that are already in my Camera Roll?
To delete shared photos already in your Camera Roll, open the Photos app, go to the Albums tab, select the Shared with You album, choose the photos you want to delete, and tap the Delete icon.
Q5: What are the alternative photo-sharing methods to avoid clutter in my Camera Roll?
Alternative photo-sharing methods include creating Shared Albums in the Photos app or using cloud storage services like Google Photos, Dropbox, or OneDrive to share photos via a link.
Q6: How does iCloud Photo Library affect shared photos on my iPhone?
iCloud Photo Library syncs your photos across all your Apple devices. Turning off automatic saving of shared photos will prevent them from being added to iCloud, keeping your library clean across devices.
Q7: Are there any third-party apps that can help manage shared photos on my iPhone?
Yes, third-party apps like Gemini Photos can help you identify and remove duplicate or unwanted photos from your photo library, including those shared via Messages.
Q8: Can I re-enable the Shared with You feature if I change my mind later?
Yes, you can re-enable the Shared with You feature at any time by going to Settings > Messages > Shared with You and toggling the desired options back on.
Q9: How do iOS updates affect the Shared with You feature?
iOS updates may introduce new features or changes to the Shared with You feature. It’s important to stay updated with the latest iOS version to ensure you have the most current photo management options.
Q10: What is the benefit of using Shared Albums over the Shared with You feature?
Shared Albums offer more control over who can view and contribute photos, preventing unwanted content from cluttering your main photo library and allowing for collaborative sharing.