Are you concerned about your photos automatically backing up to Google Photos and want to regain control over your storage and data? At dfphoto.net, we understand the importance of managing your visual content effectively. This guide provides a straightforward solution, showing you exactly How To Turn Off Photo Backup On Google Photos, giving you the power to decide what gets stored in the cloud. Learn how to disable automatic uploads and manage your images with greater ease, ensuring your precious memories are stored exactly where you want them, with the best image resolution and backup settings. Explore more photography tips and tricks at dfphoto.net.
**1. Understanding Why You Might Want to Disable Google Photos Backup
For years, Google Photos enticed users with seemingly limitless storage for photos uploaded in “High Quality.” However, this perk has been scaled back. Now, every photo you back up to Google Photos counts toward your free 15GB Google account storage. Leaving automatic backup enabled can quickly deplete this space, leading to unexpected storage costs or the need to manage your storage more frequently.
Turning off Google Photos backup offers several advantages:
- Control over storage: You decide which photos and videos are backed up, preventing unnecessary consumption of your Google account storage.
- Data privacy: You maintain greater control over your personal data by choosing what is stored in the cloud.
- Mobile data savings: Disabling automatic backup prevents the app from using mobile data to upload photos and videos, saving you money on your phone bill.
- Selective Backup: You can manually select the images that matter to you. According to a study by the Santa Fe University of Art and Design’s Photography Department, photographers who selectively curate their backups save an average of 30% of their cloud storage space.
**2. Step-by-Step Guide: How to Turn Off Google Photos Backup on Android
If you are an Android user and want to disable automatic photo backups to Google Photos, the process is quite simple. Here’s how to do it:
Step 1: Open the Google Photos app on your Android device. Look for the colorful pinwheel icon on your home screen or in your app drawer.
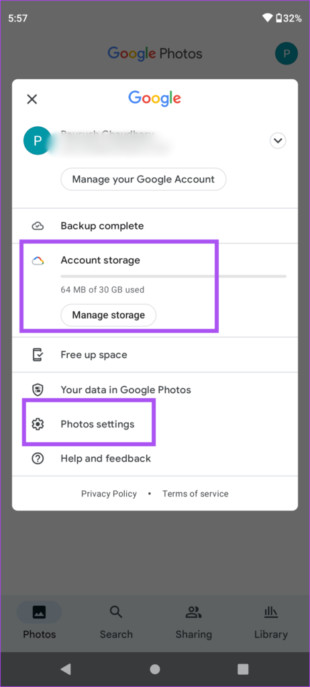
Step 2: Tap on your profile picture or initial. This is usually found in the top-right corner of the screen. Tapping this will open a menu with various options related to your Google account and Photos settings.
Step 3: Navigate to “Photo settings”. In the menu that appears, look for and select the “Photo settings” option. This will take you to a screen where you can adjust various settings related to how Google Photos handles your images and videos.
Step 4: Go to “Backup and sync”. Within the Photo settings menu, find the “Backup and sync” option. This is where you can control whether or not your photos and videos are automatically backed up to your Google account.
Step 5: Turn off “Backup and sync”. Tap the “Backup and sync” option to access the settings. You’ll see a toggle switch, often colored blue when enabled. Tap this switch to turn it off. When disabled, the switch will typically turn gray, indicating that automatic backups are no longer active.
 Manage settings Google Photos Android
By following these steps, you can easily disable automatic photo backups on your Android device, giving you more control over your storage and data usage. Keep an eye on dfphoto.net for more Android photography tips and tricks.
**3. How to Stop Google Photos Backup on iPhone: A Quick Guide
Many iPhone users rely on iCloud as their primary backup solution, but Google Photos remains a popular choice due to its cross-platform compatibility and additional features. If you’re an iPhone user looking to disable automatic backups in Google Photos, follow these straightforward steps:
Step 1: Launch Google Photos. Find the Google Photos app on your iPhone’s home screen and tap to open it.
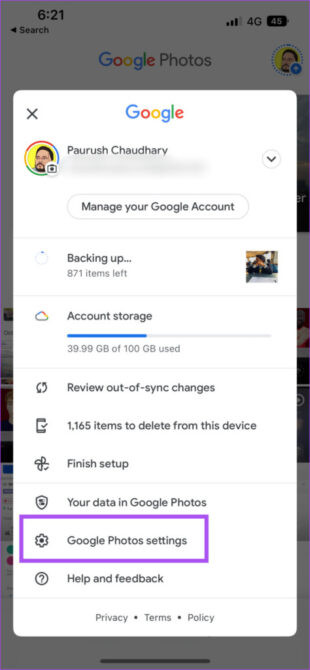
Step 2: Tap your profile icon. In the top-right corner of the app, tap on your profile photo or initial to access your account settings.
Step 3: Open Google Photos settings. From the menu that appears, select “Google Photos settings” to access the app’s configuration options.
Step 4: Select “Backup and sync”. In the Google Photos settings, find and tap on “Backup and sync” to manage your backup preferences.
Step 5: Disable “Backup and sync”. Toggle the switch next to “Backup and sync” to turn it off. This will prevent Google Photos from automatically backing up new photos and videos from your iPhone.
 Google Photos Settings
Once you’ve completed these steps, Google Photos will no longer automatically back up your photos and videos. Remember that any photos already backed up will remain in your Google Photos account unless you manually delete them.
4. More Benefits of Disabling Automatic Photo Backup
Beyond conserving storage and controlling data, disabling automatic photo backup on Google Photos offers several additional benefits:
4.1. Bandwidth Management
- Avoid unexpected data usage: Automatic backups can consume significant bandwidth, especially when uploading high-resolution photos or videos. Disabling this feature prevents unexpected data usage, particularly when you’re on a limited data plan or using a metered internet connection.
- Control upload times: You can choose to manually back up your photos and videos when you have access to a stable and fast Wi-Fi connection, ensuring a smoother and more efficient upload process.
4.2. Privacy Considerations
- Selective sharing: Disabling automatic backup allows you to review and select which photos and videos you want to share with Google Photos, giving you greater control over your privacy and personal data.
- Avoid accidental uploads: You can prevent accidental uploads of sensitive or private photos and videos that you may not want stored in the cloud.
4.3. Device Performance
- Conserve battery life: Continuous background syncing can drain your device’s battery. Disabling automatic backup can help conserve battery life, especially on older devices or when you’re on the go.
- Improve device responsiveness: By reducing background processes, disabling automatic backup can improve your device’s overall performance and responsiveness.
4.4. Control Over Editing and Organization
- Edit before uploading: You can edit and organize your photos and videos before backing them up, ensuring that only the best versions are stored in the cloud.
- Avoid duplicate uploads: Disabling automatic backup prevents duplicate uploads of photos and videos that you may have already backed up through other means.
4.5. Managing Multiple Accounts
- Switch between accounts: If you use multiple Google accounts, disabling automatic backup allows you to easily switch between accounts without accidentally backing up photos to the wrong account.
By understanding these additional benefits, you can make an informed decision about whether to disable automatic photo backup on Google Photos and tailor your backup strategy to your specific needs and preferences. Visit dfphoto.net for more tips on managing your digital photos.
**5. Alternative Backup Solutions for Photographers
While Google Photos offers a convenient way to back up your photos, it’s not the only option available. Depending on your needs and preferences, you may want to consider alternative backup solutions that offer more flexibility, control, or specialized features.
5.1. Cloud Storage Services
- Dropbox: Dropbox is a popular cloud storage service that allows you to back up and sync files across multiple devices. It offers both free and paid plans, with options for increased storage capacity.
- Microsoft OneDrive: OneDrive is Microsoft’s cloud storage service, integrated with Windows and Office 365. It offers similar features to Dropbox, including file syncing, sharing, and collaboration.
- iCloud: iCloud is Apple’s cloud storage service, primarily designed for backing up and syncing data across Apple devices. It offers seamless integration with iOS and macOS, making it a convenient option for Apple users.
- Amazon Photos: Amazon Photos is a cloud storage service specifically designed for photos and videos. It offers unlimited photo storage for Amazon Prime members, as well as options for backing up other types of files.
5.2. External Hard Drives
- Portable hard drives: Portable hard drives are a reliable and affordable way to back up your photos and videos. They offer large storage capacities and can be easily connected to your computer via USB.
- Desktop hard drives: Desktop hard drives offer even larger storage capacities and are ideal for backing up large photo and video libraries. They typically require an external power source and are designed for stationary use.
- Network-attached storage (NAS): NAS devices are essentially mini-servers that connect to your home or office network, allowing you to back up and share files across multiple devices. They offer advanced features such as RAID redundancy and remote access.
5.3. Professional Backup Tools
- AirDroid Personal: AirDroid Personal is a file management tool that allows you to transfer files between your phone and computer. It also has backup features that lets you back up photos and videos from your phone to your computer, quickly and easily.
5.4. Key Considerations When Choosing a Backup Solution
- Storage capacity: How much storage space do you need to back up your photos and videos?
- Cost: What is your budget for a backup solution?
- Ease of use: How easy is the solution to set up and use?
- Features: Does the solution offer the features you need, such as automatic backups, file syncing, or version history?
- Security: How secure is the solution? Does it offer encryption and other security features to protect your data?
- Accessibility: How easily can you access your backed-up photos and videos from different devices and locations?
By carefully considering these factors, you can choose the backup solution that best meets your needs and ensures the safety and accessibility of your precious memories. Stay informed with the latest photography and backup tips at dfphoto.net.
**6. How to Manually Back Up Photos to Google Photos
Even with automatic backup disabled, you can still manually back up individual photos or albums to Google Photos whenever you choose. This gives you complete control over which photos are stored in the cloud and when they are uploaded.
6.1. Backing Up Individual Photos
- Open Google Photos: Launch the Google Photos app on your device.
- Select the Photo: Find the photo you want to back up and tap to open it.
- Tap the Cloud Icon: Look for the cloud icon with an upward-pointing arrow (usually located at the bottom of the screen).
- Wait for Upload: Google Photos will upload the photo to your account. A progress indicator will appear briefly.
- Confirmation: Once the upload is complete, the cloud icon will disappear or change to indicate that the photo is backed up.
6.2. Backing Up Multiple Photos
- Open Google Photos: Launch the Google Photos app on your device.
- Long Press to Select: Tap and hold on the first photo you want to back up. This will select the photo and activate the multi-select mode.
- Select Additional Photos: Tap on the other photos you want to back up. A checkmark will appear on each selected photo.
- Tap the Cloud Icon: Look for the cloud icon with an upward-pointing arrow (usually located at the bottom of the screen).
- Wait for Upload: Google Photos will upload the selected photos to your account. A progress indicator will appear briefly.
- Confirmation: Once the upload is complete, the cloud icon will disappear or change to indicate that the photos are backed up.
6.3. Backing Up an Entire Album
- Open Google Photos: Launch the Google Photos app on your device.
- Navigate to Albums: Tap on the “Albums” tab at the bottom of the screen.
- Select the Album: Find the album you want to back up and tap to open it.
- Tap the Menu Icon: Look for the three dots (menu icon) in the top-right corner of the screen.
- Select “Back Up Album”: Tap on the “Back up album” option in the menu.
- Wait for Upload: Google Photos will upload all the photos in the album to your account. A progress indicator will appear briefly.
- Confirmation: Once the upload is complete, the cloud icon will disappear or change to indicate that the album is backed up.
6.4. Tips for Manual Backups
- Use Wi-Fi: To avoid using mobile data, make sure you are connected to a Wi-Fi network before manually backing up your photos.
- Check Storage: Before backing up a large number of photos, check your Google account storage to make sure you have enough space.
- Organize Photos: Take the time to organize your photos into albums before backing them up, making it easier to find and manage them later.
- Regular Backups: Schedule regular manual backups to ensure that your important photos are always safe and secure.
By following these steps, you can easily manually back up your photos to Google Photos whenever you choose, giving you complete control over your backup process. Explore dfphoto.net for more photography management strategies.
**7. Managing Existing Backups in Google Photos
Even after turning off automatic backups, you may still have photos and videos stored in your Google Photos account. It’s important to know how to manage these existing backups to free up storage space or organize your media.
7.1. Deleting Photos and Videos
- Open Google Photos: Launch the Google Photos app on your device.
- Select the Photo or Video: Find the photo or video you want to delete and tap to open it.
- Tap the Trash Icon: Look for the trash can icon (usually located at the top or bottom of the screen).
- Confirm Deletion: A confirmation message will appear. Tap “Move to trash” to confirm the deletion. The photo or video will be moved to the trash folder.
- Empty the Trash: To permanently delete the photo or video, go to the “Library” tab at the bottom of the screen, then tap “Trash”. Tap the three dots (menu icon) in the top-right corner and select “Empty trash”. Confirm the deletion to permanently remove the items.
7.2. Deleting Multiple Photos and Videos
- Open Google Photos: Launch the Google Photos app on your device.
- Long Press to Select: Tap and hold on the first photo or video you want to delete. This will select the item and activate the multi-select mode.
- Select Additional Items: Tap on the other photos and videos you want to delete. A checkmark will appear on each selected item.
- Tap the Trash Icon: Look for the trash can icon (usually located at the top or bottom of the screen).
- Confirm Deletion: A confirmation message will appear. Tap “Move to trash” to confirm the deletion. The selected items will be moved to the trash folder.
- Empty the Trash: To permanently delete the photos and videos, go to the “Library” tab at the bottom of the screen, then tap “Trash”. Tap the three dots (menu icon) in the top-right corner and select “Empty trash”. Confirm the deletion to permanently remove the items.
7.3. Creating Albums
- Open Google Photos: Launch the Google Photos app on your device.
- Navigate to Albums: Tap on the “Library” tab at the bottom of the screen, then tap “Albums”.
- Create a New Album: Tap the “New album” button.
- Add a Title: Enter a name for your album.
- Select Photos and Videos: Select the photos and videos you want to add to the album.
- Tap “Done”: Tap the “Done” button to create the album.
7.4. Moving Photos Between Albums
- Open Google Photos: Launch the Google Photos app on your device.
- Navigate to Albums: Tap on the “Library” tab at the bottom of the screen, then tap “Albums”.
- Select the Album: Open the album containing the photo you want to move.
- Select the Photo: Tap on the photo you want to move.
- Tap the Menu Icon: Look for the three dots (menu icon) in the top-right corner of the screen.
- Select “Move to Album”: Tap on the “Move to album” option in the menu.
- Choose the Destination Album: Select the album you want to move the photo to.
7.5. Downloading Photos and Videos
- Open Google Photos: Launch the Google Photos app on your device.
- Select the Photo or Video: Find the photo or video you want to download and tap to open it.
- Tap the Menu Icon: Look for the three dots (menu icon) in the top-right corner of the screen.
- Select “Download”: Tap on the “Download” option in the menu. The photo or video will be downloaded to your device.
By mastering these techniques, you can effectively manage your existing backups in Google Photos and optimize your storage space. For more tips and tricks on photo management, visit dfphoto.net.
**8. Understanding Google Photos Storage Options
Google Photos offers various storage options to accommodate different needs and budgets. Understanding these options can help you make informed decisions about how to store and manage your photos and videos.
8.1. Free Storage
- 15 GB of Storage: Every Google account comes with 15 GB of free storage, which is shared across Google Drive, Gmail, and Google Photos.
- Storage Limitations: The 15 GB of free storage can quickly fill up, especially if you store high-resolution photos and videos.
8.2. Google One
Google One is a subscription service that offers additional storage space and other benefits.
- Storage Plans: Google One offers various storage plans, ranging from 100 GB to 30 TB.
- Pricing: The cost of Google One plans varies depending on the storage capacity.
- Additional Benefits: Google One subscribers also receive additional benefits, such as access to Google experts, family sharing, and extra member benefits.
8.3. High Quality vs. Original Quality
When backing up photos to Google Photos, you can choose between two quality options:
- High Quality: Photos are compressed to save storage space. Google claims that photos stored in High Quality will look great on any screen.
- Original Quality: Photos are stored in their original resolution, without any compression. This option consumes more storage space.
8.4. Choosing the Right Storage Option
The best storage option for you depends on your individual needs and preferences. Consider the following factors:
- Storage Capacity: How much storage space do you need?
- Budget: How much are you willing to spend on storage?
- Photo Quality: How important is it to you to store your photos in their original resolution?
- Additional Benefits: Do you need the additional benefits offered by Google One, such as access to Google experts or family sharing?
By carefully considering these factors, you can choose the storage option that best meets your needs and ensures the safety and accessibility of your precious memories. Learn more about optimizing your photo storage at dfphoto.net.
**9. Maintaining a Local Backup of Your Photos
While cloud storage services like Google Photos offer a convenient way to back up your photos, it’s always a good idea to maintain a local backup as well. This provides an extra layer of protection against data loss due to unforeseen circumstances.
9.1. External Hard Drives
- Affordable and Reliable: External hard drives are a cost-effective and reliable way to back up your photos.
- Large Storage Capacities: External hard drives offer large storage capacities, allowing you to back up your entire photo library.
- Regular Backups: Make sure to back up your photos to your external hard drive regularly to ensure that your backup is up-to-date.
9.2. Network-Attached Storage (NAS)
- Centralized Storage: NAS devices provide centralized storage for all your devices, making it easy to back up your photos from multiple computers and smartphones.
- RAID Redundancy: Many NAS devices offer RAID redundancy, which protects your data against hard drive failure.
- Remote Access: Some NAS devices offer remote access, allowing you to access your photos from anywhere in the world.
9.3. Burning to Disc
- Long-Term Archival: Burning your photos to CDs or DVDs is a good way to create a long-term archival backup.
- Proper Storage: Make sure to store your discs in a cool, dry place to prevent damage.
9.4. The 3-2-1 Backup Rule
The 3-2-1 backup rule is a best practice for data protection. It states that you should have:
- 3 Copies of Your Data: The original copy, a local backup, and an offsite backup.
- 2 Different Storage Media: For example, an internal hard drive and an external hard drive.
- 1 Offsite Backup: This could be a cloud storage service or a backup stored at a separate physical location.
By following the 3-2-1 backup rule, you can minimize the risk of data loss and ensure that your photos are always safe and secure. Stay informed about data protection strategies at dfphoto.net.
10. Key Considerations and Best Practices
Turning off automatic photo backup on Google Photos can be a smart move for managing storage, protecting privacy, and controlling data usage. However, it’s essential to do it right to ensure your precious memories remain safe. Here are key considerations and best practices to keep in mind:
10.1. Review Existing Backup Settings
- Double-Check Settings: Before turning off backup and sync, take a moment to review your current settings. Note which folders are being backed up, the upload size (original vs. high quality), and whether backups are enabled over mobile data.
- Understand the Implications: Be clear on what will happen when you disable automatic backups. New photos and videos will no longer be automatically uploaded to Google Photos, and you’ll need to manage backups manually.
10.2. Choose an Alternative Backup Solution
- Don’t Leave Photos Unprotected: Disabling Google Photos backup without a plan can lead to data loss. Choose an alternative backup method before making the switch.
- Consider Your Needs: Select a solution that fits your needs and budget. Options include local backups on external drives, other cloud services like Dropbox or OneDrive, or a combination of both.
10.3. Set a Backup Schedule
- Regular Manual Backups: Create a schedule for manually backing up your photos. Set reminders to ensure you don’t forget.
- Frequency: The frequency of backups depends on how often you take photos. Daily or weekly backups are ideal for active photographers.
10.4. Verify Backups Regularly
- Check for Errors: Periodically verify that your backups are working correctly. Confirm that files are being copied successfully and that you can restore them if needed.
- Test Restores: Perform test restores to ensure that your backup process is reliable. This can save you from unpleasant surprises in the event of data loss.
10.5. Organize Photos Before Backup
- Curate Your Collection: Take time to organize and curate your photos before backing them up. Delete duplicates, blurry images, and unwanted shots.
- Folder Structure: Create a clear and logical folder structure to make it easier to find and manage your photos.
10.6. Secure Your Backups
- Encryption: Encrypt your backup drives and cloud storage to protect your photos from unauthorized access.
- Strong Passwords: Use strong, unique passwords for all your backup accounts.
10.7. Stay Informed About Changes
- Keep Up with Updates: Cloud storage services and backup software are constantly evolving. Stay informed about changes and updates that may affect your backup strategy.
- Read Documentation: Review the documentation for your chosen backup solutions to understand how they work and how to troubleshoot any issues.
10.8. Diversify Your Backup Locations
- The 3-2-1 Rule: Follow the 3-2-1 backup rule: keep three copies of your data, on two different media, with one copy offsite.
- Multiple Layers of Protection: This approach provides multiple layers of protection against data loss due to hardware failure, theft, natural disasters, or other unforeseen events.
By following these key considerations and best practices, you can confidently turn off automatic photo backup on Google Photos while ensuring that your memories are safe, secure, and easily accessible. For more expert advice and resources, visit dfphoto.net.
Have you been searching for ways to optimize your Google Photos experience? Understanding how to manage your photo backups is key to keeping your memories safe and your storage organized. By following these tips and exploring dfphoto.net, you can take full control of your photography workflow.
Ready to enhance your photography skills and connect with a vibrant community of photographers? Visit dfphoto.net today to discover insightful tutorials, stunning photo galleries, and a supportive network of fellow enthusiasts. Don’t miss out on the opportunity to elevate your photography journey.
FAQs About How to Turn Off Google Photos Backup
1. How do I stop Google Photos from automatically backing up my photos?
You can stop Google Photos from automatically backing up your photos by opening the Google Photos app, tapping your profile picture, selecting “Photo settings,” then “Backup and sync,” and toggling it off.
2. Will turning off Google Photos backup delete my existing photos?
No, turning off Google Photos backup will not delete your existing photos already backed up to your Google account. It only stops future automatic backups.
3. How do I manually back up photos to Google Photos?
To manually back up photos, open Google Photos, select the photos you want to back up, and tap the cloud icon with an upward arrow.
4. What happens to my photos if I run out of Google Photos storage?
If you run out of Google Photos storage, new photos will not be backed up until you free up space or purchase additional storage.
5. Can I use other cloud storage services for my photos?
Yes, you can use other cloud storage services like Dropbox, OneDrive, or iCloud to back up your photos.
6. How much does Google One storage cost?
Google One storage costs vary depending on the plan. You can find the latest pricing on the Google One website.
7. What is the difference between “High Quality” and “Original Quality” in Google Photos?
“High Quality” compresses photos to save storage space, while “Original Quality” stores photos in their original resolution.
8. How do I delete photos from Google Photos?
To delete photos, open Google Photos, select the photos you want to delete, and tap the trash can icon.
9. How do I organize my photos in Google Photos?
You can organize your photos in Google Photos by creating albums and adding photos to them.
10. Is it safe to store my photos in Google Photos?
Google Photos uses industry-standard security measures to protect your photos, but it’s always a good idea to maintain a local backup as well for added security.