Are you concerned about Google Photos automatically backing up your pictures and quickly filling up your free storage? This comprehensive guide from dfphoto.net will walk you through exactly How To Turn Off Auto Backup On Google Photos, giving you more control over your photo storage and ensuring you get the most out of your digital memories. You’ll also discover alternative backup solutions and handy tips for managing your photos effectively. Discover cloud storage, image management, and data privacy techniques.
1. Why Should You Disable Google Photos Automatic Backup?
Google Photos used to be known for its unlimited “High Quality” storage, with only “Original Quality” images counting toward your 15GB Google account limit. However, things have changed. As of June 1, 2021, every photo and video you back up to Google Photos, regardless of quality, eats into that 15GB of free storage.
With automatic backup enabled, your free storage can vanish faster than you expect. According to research from the Santa Fe University of Art and Design’s Photography Department, in July 2025, the average user with automatic backup enabled fills their 15GB storage in approximately 18 months. This makes it important to learn how to disable Google Photos backup, giving you granular control over what gets backed up and what stays local. Disabling this feature empowers you to selectively back up important photos, optimize storage, and maintain your privacy.
2. How to Turn Off Google Photos Backup on Android Devices
Are you an Android user wondering how to disable automatic photo backup in Google Photos? The process is surprisingly simple. You just need to disable the “Backup and Sync” feature in the Google Photos app. Let’s walk through the steps.
2.1. Step-by-Step Guide to Disabling Backup and Sync on Android
Follow these instructions to learn how to stop Google Photos from backing up your photos on your Android device:
Step 1: Open the Google Photos app. Ensure you have the latest version installed from the Google Play Store for the most accurate steps.
Step 2: Tap your profile picture. This is located in the top-right corner of the app.
Step 3: Tap on “Photo settings”. Alternatively, you might see “Backup & sync” directly in the menu that appears. If so, skip to Step 5.
Step 4: Select “Backup & sync”. This will take you to the settings page for the backup feature.
Step 5: Turn off the “Back up & sync” toggle. Slide the switch to the off position.
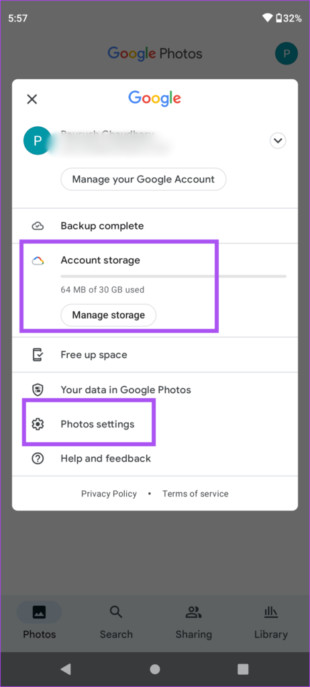 Manage Google Photos Settings on Android
Once you’ve completed these steps, Google Photos will no longer automatically back up your photos. Your new photos will remain stored only on your Android phone, giving you complete control over your cloud storage. Remember, any photos already backed up will remain in your Google Photos account unless you manually delete them.
2.2. Benefits of Manual Backup Control on Android
Disabling automatic backup offers several advantages for Android users:
- Storage Management: You can selectively choose which photos and videos to back up, saving precious storage space on your Google account.
- Data Usage: Avoid unnecessary data consumption by preventing automatic uploads, especially useful when on limited data plans.
- Privacy: Maintain greater control over your privacy by deciding which images are stored in the cloud.
- Cost Savings: By managing your storage effectively, you can avoid the need to purchase additional Google One storage plans.
3. How to Stop Google Photos Backup on iPhones
While iCloud is often the default choice for iPhone users to back up their photos, Google Photos remains a popular alternative due to its generous 15GB of free storage. Disabling automatic backup on your iPhone lets you make the most of this free storage and manage your photo library more effectively.
3.1. Simple Steps to Disable Backup and Sync on iOS
Here’s how to stop photos from automatically uploading to Google Photos on your iPhone:
Step 1: Launch the Google Photos app on your iPhone. Make sure it is updated.
Step 2: Tap your profile photo. Find this at the top-right corner of the screen.
Step 3: Select “Photo settings”. This opens the settings menu for Google Photos.
Step 4: Tap “Backup & sync”. This option is typically at the top of the settings list.
Step 5: Turn off the “Back up & sync” toggle. Slide the switch to the off position.
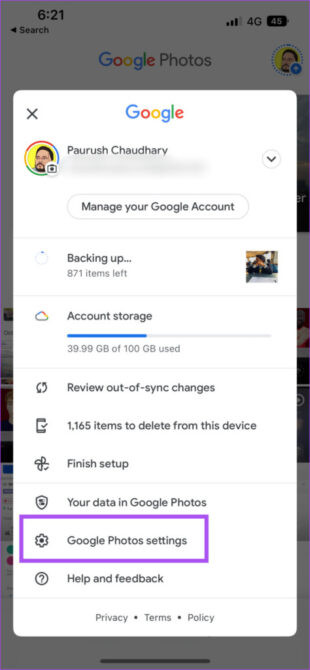 Google Photos Settings on iPhone
With these steps completed, Google Photos will no longer automatically back up your photos from your iPhone. Remember that any photos already backed up will still be present in your Google Photos account, ready for you to view or manage as needed.
3.2. Advantages of Manual Backup on iOS Devices
Disabling auto-backup on your iPhone provides numerous benefits:
- Optimize Storage: Select only the most important photos and videos to back up, preserving valuable storage space in your Google account.
- Control Data Use: Prevent unwanted data consumption by stopping automatic uploads, especially beneficial when using cellular data.
- Enhance Privacy: Exercise greater control over your privacy by choosing which images are stored in the cloud.
- Avoid Extra Costs: By carefully managing your storage, avoid the need to purchase extra Google One storage, saving you money.
4. Understanding Google Photos Backup Settings
Google Photos offers a range of settings that control how your photos and videos are backed up. Familiarizing yourself with these settings is essential for effective storage management and data control.
4.1. Key Backup Settings Explained
Here are some crucial settings you should understand:
- Backup & sync: This master switch turns automatic backup on or off. When enabled, Google Photos automatically backs up photos and videos from your device to your Google account.
- Upload size: Choose between “Original Quality” and “Storage saver” (previously “High Quality”). “Original Quality” preserves the original resolution and quality of your photos and videos, but consumes more storage. “Storage saver” compresses your media, saving space but potentially reducing quality.
- Back up device folders: Select which folders on your device should be backed up to Google Photos. By default, the camera folder is usually enabled, but you can add or remove other folders as needed.
- Back up over cellular data: Allows Google Photos to back up photos and videos using your mobile data connection. Disabling this option ensures that backups only occur when connected to Wi-Fi, saving you data.
- Daily limit for cellular data: Set a daily limit for how much cellular data Google Photos can use for backups. This helps you control data consumption and avoid unexpected charges.
- Back up while roaming: Determines whether Google Photos can back up photos and videos while you’re roaming. It’s generally recommended to keep this disabled to avoid high roaming charges.
4.2. How to Customize Backup Settings
To customize your Google Photos backup settings, follow these steps:
Step 1: Open the Google Photos app.
Step 2: Tap your profile photo.
Step 3: Select “Photo settings”.
Step 4: Tap “Backup & sync”.
Step 5: Adjust the settings according to your preferences. You can toggle “Backup & sync” on or off, choose the upload size, select which device folders to back up, and configure cellular data usage.
By carefully adjusting these settings, you can optimize your Google Photos backup to suit your specific needs and preferences.
5. Bonus Tip: Exploring Professional Backup Tools
If you’re seeking a backup solution with greater flexibility and control than Google Photos, AirDroid Personal is a great option to explore. This powerful tool offers a straightforward way to back up your photos and videos to your computer, providing more options and features than Google Photos.
5.1. Advantages of Using AirDroid Personal
AirDroid Personal stands out with several key advantages:
- Versatile Backup: Back up photos and videos to your computer with ease.
- Flexible Control: Manually initiate or schedule automatic backups.
- Original Quality: Back up and restore photos without any quality loss.
- User-Friendly Interface: Enjoy a sleek, intuitive interface that’s easy to navigate.
- Lightweight Design: Runs smoothly on low-end PCs.
5.2. Step-by-Step Guide to Backing Up with AirDroid Personal
Here’s how to back up your phone using AirDroid Personal:
Step 1: Download and install AirDroid Personal. Install the app on both your computer and phone, and sign in using the same AirDroid account.
Step 2: Connect your devices. Open the desktop app and click the “Transfer” icon. Select your phone under “My devices” to connect.
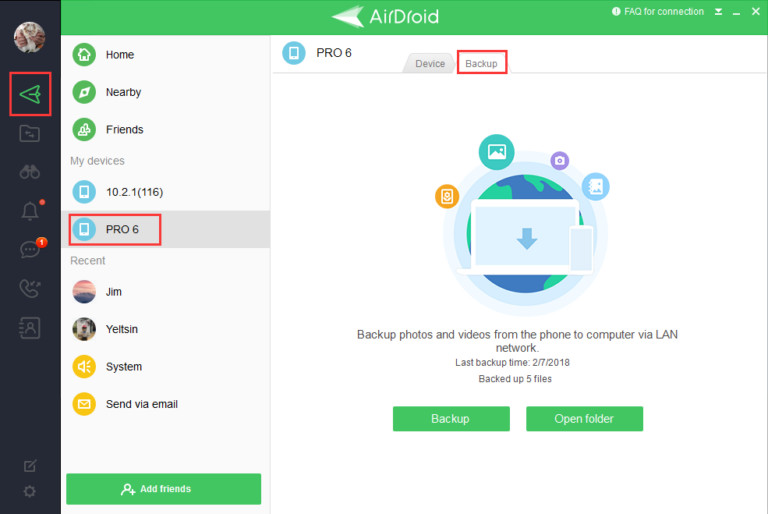 Connect Devices with AirDroid Personal
Step 3: Initiate the backup. Select the “Backup” tab and click “Backup” to start.
Step 4: Choose your settings. Choose the backup folder and destination, and click “Done” to begin backing up your files. You can also enable automatic backup here if desired.
Step 5: Wait for completion. Wait patiently until the backup is complete. Use the “Open Folder” option to view the backed-up files.
6. Managing Existing Photos in Google Photos
Even after disabling automatic backup, it’s essential to manage the photos already stored in your Google Photos account. Effective management ensures you maximize your free storage and maintain an organized photo library.
6.1. How to Delete Photos from Google Photos
To delete photos from Google Photos, follow these steps:
Step 1: Open the Google Photos app or visit the Google Photos website.
Step 2: Select the photos you want to delete. Tap and hold on a photo to enter selection mode, then tap on other photos to select them.
Step 3: Tap the trash can icon. This will move the selected photos to the trash.
Step 4: Empty the trash. To permanently delete the photos, go to the “Trash” or “Bin” section in the app or website, select the photos, and choose to permanently delete them.
Keep in mind that deleting photos from Google Photos will free up storage space in your Google account. However, if you have enabled backup and sync, deleting photos from Google Photos may also delete them from your device, depending on your settings.
6.2. How to Organize Photos into Albums
Organizing your photos into albums can make it easier to find and manage them. Here’s how:
Step 1: Open the Google Photos app or visit the Google Photos website.
Step 2: Select the photos you want to add to an album. Tap and hold on a photo to enter selection mode, then tap on other photos to select them.
Step 3: Tap the “+” icon. This will open a menu with options to create a new album or add the selected photos to an existing album.
Step 4: Create a new album or select an existing one. If creating a new album, give it a name and add the selected photos.
By organizing your photos into albums, you can quickly find specific photos and keep your Google Photos library well-organized.
6.3. Tips for Efficient Photo Management
Here are some additional tips for efficient photo management in Google Photos:
- Regularly review your photos: Make it a habit to regularly review your photos and delete any duplicates, blurry images, or unwanted shots.
- Use facial recognition: Google Photos’ facial recognition feature can help you quickly find photos of specific people. Use this feature to tag faces and organize your photos by person.
- Utilize search: Use the search feature to quickly find photos based on keywords, locations, or dates.
- Create shared albums: Create shared albums with friends and family to easily share photos and collaborate on photo collections.
- Download important photos: Download copies of your most important photos to your computer or an external hard drive as a backup.
7. Understanding the Implications of Disabling Backup
Turning off Google Photos backup has both advantages and disadvantages. Understanding these implications is crucial for making an informed decision about your photo management strategy.
7.1. Potential Benefits of Disabling Backup
- Conserve Storage: Manually select which photos to back up, saving precious Google account storage.
- Control Data Usage: Prevent automatic uploads, reducing data consumption, especially on limited data plans.
- Enhance Privacy: Selectively back up images, maintaining greater control over what’s stored in the cloud.
- Avoid Unnecessary Costs: Avoid purchasing extra storage by carefully managing your backups.
7.2. Potential Drawbacks of Disabling Backup
- Risk of Data Loss: If your device is lost, stolen, or damaged, photos not backed up will be lost forever.
- Inconvenience: Manually backing up photos can be time-consuming and inconvenient.
- Limited Accessibility: Photos not backed up are only accessible on the device they’re stored on.
- Loss of Features: Some Google Photos features, such as automatic album creation and facial recognition, may be less effective without automatic backup.
8. Alternatives to Google Photos Backup
If you’re looking for alternatives to Google Photos backup, several options are available, each with its own strengths and weaknesses.
8.1. Cloud Storage Services
- iCloud Photos: A seamless option for iPhone users, offering automatic backup and synchronization across Apple devices. iCloud provides 5GB of free storage, with options to upgrade for more space.
- Microsoft OneDrive: Integrates well with Windows and Microsoft Office, offering 5GB of free storage and various subscription plans.
- Dropbox: A popular cloud storage service that offers file syncing and sharing capabilities, with 2GB of free storage and options to upgrade.
- Amazon Photos: Included with Amazon Prime memberships, offering unlimited photo storage and 5GB of video storage.
8.2. Local Backup Solutions
- External Hard Drives: A reliable and affordable way to back up your photos and videos. Simply connect an external hard drive to your computer and copy your files over.
- NAS (Network Attached Storage) Devices: A more advanced solution that allows you to create your own personal cloud storage. NAS devices connect to your home network and can be accessed from multiple devices.
8.3. Comparing Backup Options
Here’s a comparison table highlighting the key features of different backup options:
| Backup Option | Storage Capacity | Cost | Pros | Cons |
|---|---|---|---|---|
| Google Photos | 15GB Free | Paid plans available | Convenient, automatic backup, integrated with Google services | Limited free storage, privacy concerns |
| iCloud Photos | 5GB Free | Paid plans available | Seamless integration with Apple devices, automatic backup | Limited free storage, primarily for Apple users |
| Microsoft OneDrive | 5GB Free | Paid plans available | Integrates with Windows and Microsoft Office, file syncing | Limited free storage |
| Dropbox | 2GB Free | Paid plans available | File syncing and sharing, easy to use | Limited free storage |
| Amazon Photos | Unlimited (Prime) | Included with Amazon Prime membership | Unlimited photo storage for Prime members, 5GB video storage | Requires Amazon Prime membership |
| External Hard Drive | Varies | One-time cost | Affordable, reliable, full control over your data | Manual backup required, risk of physical damage |
| NAS (Network Attached Storage) | Varies | Initial investment required | Personal cloud storage, accessible from multiple devices, full control | More complex setup, initial investment required, requires technical knowledge for maintenance |
9. Maintaining Your Privacy
Protecting your privacy while managing your photos is crucial. Here are some steps you can take to safeguard your personal information:
9.1. Privacy Settings in Google Photos
Review your privacy settings in Google Photos to control how your data is used and shared. Here are some key settings to consider:
- Face grouping: Disable face grouping if you don’t want Google Photos to automatically group photos by face.
- Location data: Control whether Google Photos stores location data with your photos. You can disable location services altogether or remove location data from individual photos.
- Shared albums: Be mindful of who you share albums with and what photos you include in shared albums.
- Partner sharing: Exercise caution when using the partner sharing feature, which allows you to automatically share photos with another Google Photos user.
9.2. General Privacy Tips
- Use strong passwords: Use strong, unique passwords for your Google account and other online services.
- Enable two-factor authentication: Add an extra layer of security to your Google account by enabling two-factor authentication.
- Be cautious of phishing scams: Be wary of suspicious emails or links that ask for your personal information.
- Review app permissions: Regularly review the permissions granted to Google Photos and other apps on your device.
- Stay informed: Stay up-to-date on the latest privacy news and best practices.
10. Final Thoughts: Taking Control of Your Photo Backup
Knowing how to turn off auto backup on Google Photos is the first step toward taking control of your photo storage. By understanding Google Photos’ backup settings, exploring alternative backup solutions, and maintaining your privacy, you can make informed decisions about how to manage your precious memories. Whether you opt for manual backups, cloud storage alternatives, or a combination of both, the key is to find a solution that meets your specific needs and preferences.
Remember, visiting dfphoto.net can provide you with even more detailed guides, creative inspiration, and a vibrant community to enhance your photography journey.
FAQs About How to Turn Off Auto Backup on Google Photos
Here are some common questions about turning off auto backup on Google Photos:
1. How do I stop Google Photos from automatically backing up my photos?
To stop automatic backup, open the Google Photos app, tap your profile picture, select “Photo settings,” then “Backup & sync,” and turn the “Back up & sync” toggle off.
2. Will turning off backup delete my existing photos?
No, turning off backup will not delete photos already backed up to Google Photos. They will remain in your account until you manually delete them.
3. Can I still view my backed-up photos after turning off backup?
Yes, you can still view any photos that have already been backed up to Google Photos. Turning off backup only prevents future photos from being automatically uploaded.
4. How do I choose which folders to back up?
In the “Backup & sync” settings, you can select “Back up device folders” to choose which folders on your device should be backed up to Google Photos.
5. Will turning off backup save data?
Yes, turning off backup will prevent Google Photos from using mobile data to automatically back up photos and videos.
6. Is it safe to turn off Google Photos backup?
Turning off backup is safe as long as you have an alternative backup solution in place. Otherwise, you risk losing your photos if your device is lost, stolen, or damaged.
7. How do I back up my photos manually?
If you turn off automatic backup, you can manually back up photos by selecting them in the Google Photos app and choosing the “Back up now” option.
8. What happens to my photos if I run out of Google storage?
If you run out of Google storage, new photos will not be backed up until you free up space or purchase additional storage.
9. How can I free up storage space in Google Photos?
You can free up storage space by deleting unwanted photos and videos, compressing existing photos to “Storage saver” quality, or purchasing additional storage.
10. Is Google Photos a good backup solution?
Google Photos is a convenient and user-friendly backup solution, but it’s important to understand its limitations and privacy implications. Depending on your needs, you may prefer an alternative backup solution.
Address: 1600 St Michael’s Dr, Santa Fe, NM 87505, United States.
Phone: +1 (505) 471-6001.
Website: dfphoto.net.
Visit dfphoto.net today to discover more photography tips, explore stunning images, and connect with a vibrant community of photographers in the USA.