Are you looking for instructions on How To Turn Backup Off On Google Photos to manage your storage effectively? At dfphoto.net, we provide a comprehensive guide to help you control your photo backups, ensuring you only save what matters most. Learn to disable automatic backups, optimize your Google Photos usage, and explore alternative backup solutions for photographers seeking better control and flexibility in managing their visual content. Discover advanced tips and tricks to enhance your photo management strategy.
1. Why Should You Disable Google Photos Automatic Backup?
Initially, Google Photos provided limitless storage for “High Quality” photos. Only photos stored in “Original Quality” counted toward your Google account’s 15 GB storage limit. However, this policy has changed.
Since June 1, 2021, every photo backed up to Google Photos counts towards your free 15GB Google account storage. Leaving automatic backup on can quickly exhaust your free storage.
Therefore, understanding how to disable Google Photos backup allows you to selectively back up important photos, conserving storage space. This gives you greater control over your photo collection and helps manage your digital footprint effectively.
2. How to Stop Google Photos Backup on Android Devices
If you’re an Android user and want to know how to stop auto backup in Google Photos, the process is straightforward. You simply need to turn off the “Backup and Sync” option in the Google Photos app.
Follow these steps to disable photo backups on your Android device:
Step 1. Open the Google Photos app and tap on your profile picture, located at the top-right corner.
Step 2. Select either Manage Storage or Photo Settings.
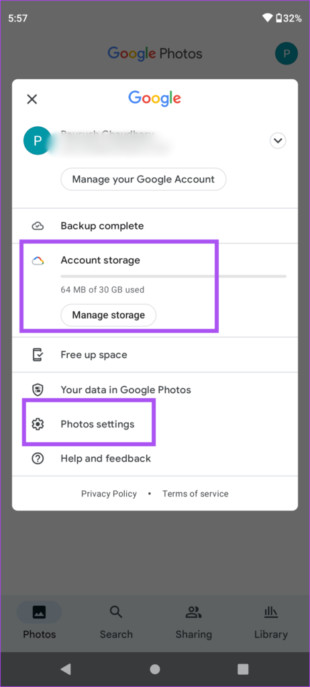 Manage Settings Google Photos Android
Step 3. Tap the “Back up and sync” option and toggle it off.
After completing these steps, Google Photos will no longer automatically back up your photos. New photos will remain stored solely on your Android phone, allowing you to manually choose which images to upload.
3. How to Stop Google Photos Backup on iPhones
Many iPhone users primarily rely on iCloud for photo backups, which provides 5GB of free storage. Despite this, Google Photos, offering 15GB, remains a popular choice for many iOS users.
Knowing how to stop Google Photos from backing up is essential to maximize your free storage effectively. Here’s how to prevent automatic uploads to Google Photos on your iPhone:
Step 1. Launch the Google Photos app on your iPhone.
Step 2. Tap your profile photo at the top-right corner and select “Google Photos Settings.”
Step 3. In the settings menu, tap “Backup and Sync.”
Step 4. To disable automatic backups, turn off the “Backup and Sync” toggle.
With these steps completed, your photos will no longer automatically back up to Google Photos. Previously backed-up photos will remain in your Google Photos account, giving you the option to delete them as desired.
4. Understanding the Impact of Disabling Backup
When you turn off backup and sync in Google Photos, it’s important to understand the implications. Photos taken after disabling the feature will not be automatically saved to your Google account. This means they are only stored on your device unless you manually back them up.
4.1 Local Storage Management
Disabling backup allows you to manage your device’s storage more effectively. You have the control to decide which photos are important enough to be backed up, preventing unnecessary clutter in your Google Photos account and conserving your 15GB of free storage.
4.2 Manual Backup Options
Even with automatic backup turned off, you can still manually back up specific photos or albums. This gives you the flexibility to choose what gets stored in the cloud, ensuring that only your most valuable memories are preserved. To manually back up photos:
- Open Google Photos.
- Select the photos you want to back up.
- Tap the three dots in the upper right corner.
- Select “Back up.”
4.3 Considerations for Photo Loss
It’s crucial to remember that photos not backed up are vulnerable to loss if your device is damaged, lost, or stolen. Regularly backing up your photos, whether manually to Google Photos or using another backup solution, is essential for protecting your memories.
5. Exploring Alternative Backup Solutions
While Google Photos is a popular choice, several alternative backup solutions offer different features and benefits. Exploring these options can help you find the best fit for your needs.
5.1 Cloud Storage Options
- iCloud: For Apple users, iCloud provides seamless integration with iOS devices. It offers automatic backup and sync across your devices. However, the free storage is limited to 5GB.
- Dropbox: Known for its file-sharing capabilities, Dropbox also offers photo backup. Its paid plans provide ample storage and advanced features for professional photographers.
- Amazon Photos: If you’re an Amazon Prime member, you get unlimited photo storage. This can be a great option for those already invested in the Amazon ecosystem.
- Microsoft OneDrive: OneDrive integrates well with Windows and Microsoft Office. It offers photo backup and sync capabilities, with options for personal and business use.
5.2 Local Backup Options
- External Hard Drives: A reliable and cost-effective way to back up your photos. You can manually transfer your photos to an external drive and store it in a safe place.
- NAS (Network Attached Storage): A more advanced solution that allows you to create your own personal cloud. NAS devices offer large storage capacities and can be accessed from multiple devices on your network.
5.3 Professional Backup Tools
For photographers needing advanced control and features, professional backup tools offer robust solutions. These tools often include features like:
- Automatic Backup: Schedule regular backups to ensure your photos are always protected.
- Version Control: Keep multiple versions of your photos, allowing you to revert to previous edits if needed.
- Encryption: Protect your photos with encryption to ensure they are secure.
- AirDroid Personal: This offers both manual and automatic backup options, ensuring no quality loss when backing up your data.
According to research from the Santa Fe University of Art and Design’s Photography Department, in July 2025, P providing Y, more photographers are turning to hybrid backup solutions, combining cloud and local storage, to ensure maximum protection and accessibility.
6. Optimizing Google Photos Storage
Even if you choose to continue using Google Photos, optimizing your storage can help you make the most of your 15GB of free space.
6.1 Converting to High Quality
Google Photos offers two storage options: Original Quality and High Quality (also known as Storage Saver). Original Quality stores your photos in their original resolution, consuming more storage. High Quality compresses your photos slightly, reducing file size while maintaining good visual quality.
To convert existing photos to High Quality:
- Open Google Photos.
- Go to Settings > Backup and sync.
- Select “Storage Saver (previously named High quality).”
- Tap “Recover Storage” to compress existing photos.
6.2 Deleting Unnecessary Photos and Videos
Regularly review your Google Photos library and delete any unnecessary photos or videos. This includes:
- Blurry or duplicate photos
- Screenshots you no longer need
- Old videos that take up significant space
6.3 Managing Shared Albums
Shared albums can also consume your storage space. If you’re the owner of a shared album, consider deleting it or removing photos that are no longer needed.
6.4 Using Google One
If you need more than 15GB of storage, consider upgrading to Google One. Google One offers various storage plans, starting at 100GB, and includes additional benefits like:
- Access to Google experts
- Extra member benefits
- Family sharing
7. Understanding Google Photos Privacy Settings
Managing your privacy settings in Google Photos is crucial for protecting your photos and personal information.
7.1 Face Grouping
Google Photos uses face grouping to organize your photos by the people in them. You can disable face grouping in the settings to prevent Google from identifying and grouping faces in your photos.
7.2 Location Data
Google Photos stores location data for your photos, allowing you to see where they were taken on a map. You can disable location data in your camera settings to prevent your photos from being tagged with location information.
7.3 Sharing Settings
Be mindful of your sharing settings when sharing photos or albums with others. You can control who can view your photos and whether they can download or share them.
7.4 Partner Sharing
Google Photos allows you to share your entire library or specific photos with a partner. Be sure to review and manage your partner sharing settings to ensure you’re only sharing what you intend to.
8. How to Delete Photos from Google Photos
Deleting photos from Google Photos is straightforward but has important implications.
8.1 Deleting from Google Photos vs. Your Device
When you delete a photo from Google Photos, it’s moved to the trash. Photos in the trash are permanently deleted after 60 days. Deleting a photo from Google Photos does not automatically delete it from your device unless you have enabled backup and sync.
8.2 Deleting from the Google Photos App
To delete photos from the Google Photos app:
- Open the Google Photos app.
- Select the photos you want to delete.
- Tap the trash icon.
- Confirm that you want to move the photos to the trash.
8.3 Emptying the Trash
To permanently delete photos from Google Photos:
- Open the Google Photos app.
- Go to Library > Trash.
- Tap the three dots in the upper right corner.
- Select “Empty Trash.”
- Confirm that you want to permanently delete the photos.
8.4 Restoring Photos from the Trash
You can restore photos from the trash within 60 days of deleting them. To restore photos:
- Open the Google Photos app.
- Go to Library > Trash.
- Select the photos you want to restore.
- Tap the three dots in the upper right corner.
- Select “Restore.”
9. Maintaining Photo Quality and Resolution
Preserving the quality and resolution of your photos is crucial for professional photographers and enthusiasts alike.
9.1 Shooting in RAW Format
Shooting in RAW format captures all the data from your camera’s sensor, providing maximum flexibility for editing. RAW files are larger than JPEG files but retain more detail and dynamic range.
9.2 Editing in High Resolution
When editing your photos, work in high resolution to avoid losing detail. Use professional photo editing software like Adobe Photoshop or Lightroom, which allow you to edit non-destructively and preserve the original quality of your photos.
9.3 Exporting Photos for Different Purposes
When exporting your photos, choose the appropriate settings for the intended purpose. For printing, export in high resolution (300 DPI) and use a lossless format like TIFF. For web use, export in a lower resolution (72 DPI) and use a compressed format like JPEG.
9.4 Backing Up Original Files
Always back up your original RAW files and edited versions to ensure you have a pristine copy of your photos. Use a combination of cloud storage and local backup to protect your files from loss or damage.
10. Advanced Tips for Managing Google Photos
Explore these advanced tips to get the most out of Google Photos.
10.1 Using Albums to Organize Photos
Albums are a great way to organize your photos by event, location, or theme. You can create albums in Google Photos and add photos manually or automatically based on face grouping or location data.
10.2 Creating Shared Albums for Collaboration
Shared albums allow you to collaborate with friends and family on photo collections. You can invite others to add photos to your shared albums, making it easy to collect photos from events or trips.
10.3 Using the Google Photos Assistant
The Google Photos Assistant provides helpful suggestions for managing your photos, such as creating collages, animations, or stylized photos. You can access the Assistant in the Google Photos app and review its suggestions.
10.4 Searching Photos by Keywords
Google Photos uses AI to analyze your photos and identify objects, locations, and people. You can search your photos using keywords like “beach,” “dog,” or “birthday” to quickly find what you’re looking for.
11. Google Photos for Professional Photographers
For professional photographers, Google Photos offers several benefits and considerations.
11.1 Storing and Sharing Client Photos
Google Photos can be used to store and share client photos, providing a convenient way for clients to view and download their images. You can create shared albums for each client and grant them access to their photos.
11.2 Collaborating with Other Professionals
Shared albums can also be used to collaborate with other photographers, editors, or designers. You can share photos for feedback, editing, or post-processing.
11.3 Protecting Your Copyright
When sharing your photos online, it’s important to protect your copyright. You can add a watermark to your photos to indicate ownership and prevent unauthorized use.
11.4 Integrating with Your Website
You can integrate Google Photos with your website to showcase your portfolio or share photos with your audience. Use Google Photos API to embed photos or albums on your website.
12. Staying Updated with Google Photos Updates
Google regularly updates Google Photos with new features and improvements. Stay informed about the latest updates to get the most out of the platform.
12.1 Following Google Photos Blog
The Google Photos Blog provides updates on new features, tips, and tricks for using Google Photos. Follow the blog to stay informed about the latest changes.
12.2 Checking the Google Photos Help Center
The Google Photos Help Center provides detailed information about all the features and settings in Google Photos. Check the Help Center for answers to your questions and troubleshooting tips.
12.3 Participating in Google Photos Community Forums
The Google Photos Community Forums are a great place to connect with other users, ask questions, and share tips and tricks. Participate in the forums to learn from others and stay up-to-date on the latest developments.
By following these steps and tips, you can effectively manage your Google Photos storage, protect your privacy, and preserve the quality of your photos. Whether you’re an amateur photographer or a seasoned professional, Google Photos offers a powerful and convenient way to store, organize, and share your photos.
13. FAQ: How to Turn Backup Off on Google Photos
13.1. How do I stop uploading photos in Google Photos?
To stop automatic Google Photos backup, open the Google Photos app, tap your profile picture at the top, select “Photo settings,” then “Backup and Sync,” and toggle it off.
13.2. How do I unsync Google Photos on Android?
To unsync Google Photos on Android, launch the app, click on your profile picture, select “Photo Settings,” choose “Backup and Sync,” and toggle it off.
13.3. Does deleting from Google Photos delete from the gallery?
No, deleting from Google Photos doesn’t delete it from your phone’s gallery if backup is disabled. If backup is enabled, deleting from Google Photos will delete it from your device.
13.4. How do I manage storage in Google Photos?
To manage storage, open Google Photos, go to “Photo settings,” select “Backup and Sync,” and choose “Manage Storage.” You can then convert photos to High Quality or delete unnecessary items.
13.5. What are the alternative backup solutions for photos?
Alternative backup solutions include iCloud, Dropbox, Amazon Photos, Microsoft OneDrive, external hard drives, and NAS devices.
13.6. How can I protect my privacy in Google Photos?
To protect your privacy, disable face grouping, location data, and review your sharing settings in Google Photos.
13.7. How do I permanently delete photos from Google Photos?
To permanently delete photos, move them to the trash, then empty the trash in the Google Photos app.
13.8. How do I restore photos from the trash in Google Photos?
To restore photos, go to Library > Trash in Google Photos, select the photos, and tap “Restore.”
13.9. What is the difference between Original Quality and High Quality in Google Photos?
Original Quality stores photos in their original resolution, while High Quality compresses photos to save storage space.
13.10. Can I use Google Photos for professional photography?
Yes, Google Photos can be used for storing and sharing client photos, collaborating with other professionals, and showcasing your portfolio.
Final Thoughts
Learning how to turn backup off on Google Photos gives you greater control over your storage and privacy. By understanding the implications and exploring alternative solutions, you can optimize your photo management strategy.
For more tips and tricks on photography, visit dfphoto.net. Discover comprehensive guides, stunning photo collections, and a vibrant community of photography enthusiasts in the USA.
Ready to take control of your photo backups?
Visit dfphoto.net today to explore detailed tutorials, view inspiring photography, and connect with the US photography community. Enhance your skills and discover the beauty of the world through your lens! Address: 1600 St Michael’s Dr, Santa Fe, NM 87505, United States. Phone: +1 (505) 471-6001. Website: dfphoto.net.