Turning a photo into a silhouette is a fantastic way to create striking visual art and capture unique memories, and dfphoto.net is here to show you how. Whether you’re aiming for classic portraiture or contemporary design, mastering silhouette creation opens up a world of artistic possibilities. This guide delves into the step-by-step processes, tools, and creative ideas to help you transform your photos into captivating silhouettes. Learn the best methods and elevate your photography with this timeless technique, while exploring resources for further inspiration at dfphoto.net. Discover related photography techniques, artistic effects, and digital editing tips.
1. What Exactly is a Silhouette and Why Create One?
A silhouette is an image consisting of the outline of a subject, usually filled in with a solid color, most often black, against a lighter background. Creating silhouettes is a captivating art form that has seen resurgence, as noted in a 2024 study by the Santa Fe University of Art and Design’s Photography Department. The reason is simple, silhouettes emphasize shape and form, stripping away details to highlight the essence of a subject. Silhouettes offer a dramatic and artistic way to portray subjects, making them ideal for various creative projects from wall art to digital designs.
- Simplicity and Impact: Silhouettes distill an image to its most basic form, creating a strong visual statement.
- Timeless Appeal: This art form has been around for centuries and remains popular for its elegant and classic look.
- Versatility: Silhouettes can be used in a variety of applications, including portraits, landscapes, and abstract designs.
2. What are the Key Elements of a Great Silhouette Photo?
Creating a compelling silhouette involves careful consideration of several key elements. The main goal is to emphasize the shape of the subject while ensuring it’s easily recognizable and visually appealing.
- Distinctive Outline: A strong silhouette relies on a well-defined and recognizable outline.
- Contrast: High contrast between the subject and background is essential for a silhouette to stand out.
- Interesting Shape: Choose subjects with interesting and dynamic shapes that will translate well into a silhouette.
- Clean Background: A simple, uncluttered background helps the silhouette stand out without distractions.
- Lighting: Backlighting is key to creating a silhouette, as it places the subject in shadow.
- Composition: Use the rules of composition, such as the rule of thirds, to create a visually balanced image.
3. What Equipment Do I Need to Take Silhouette Photos?
You don’t need high-end professional gear to capture striking silhouette photos. With a basic camera or even a smartphone, you can create stunning silhouette effects. The key is understanding how to use light and composition to your advantage.
- Camera: Any digital camera or smartphone with a camera will work.
- Lens: A versatile lens, such as a kit lens (18-55mm), is suitable for most silhouette shots.
- Tripod: A tripod can help keep your camera steady, especially in low-light conditions.
- Light Source: The sun, a bright window, or an off-camera flash can be used as a backlight.
- Editing Software: Software like Adobe Photoshop, Lightroom, or free alternatives like GIMP or Canva can help enhance your silhouettes.
4. How Do I Capture a Silhouette Photo with a Camera?
Capturing a silhouette with a camera involves proper setup and understanding of lighting. Backlighting is crucial, as it creates the shadow effect that defines the silhouette.
- Choose the Right Time of Day: Golden hour (sunrise and sunset) provides soft, warm light that works well for silhouettes.
- Position Your Subject: Place your subject in front of a bright light source, such as the sun or a window.
- Meter for the Background: Set your camera to meter for the background, which will underexpose the subject and turn it into a silhouette.
- Use Manual Mode: For greater control, use manual mode (M) and adjust your aperture and shutter speed accordingly.
- Focus Manually: Ensure the background is in focus to create a sharp silhouette.
5. What Are the Best Camera Settings for Silhouette Photography?
Selecting the appropriate camera settings is crucial for achieving the desired silhouette effect. These settings help control the amount of light entering the camera and the overall exposure of the image.
- Aperture: Use a narrow aperture (e.g., f/8 to f/16) to ensure a sharp focus on both the subject and background.
- Shutter Speed: Adjust the shutter speed to properly expose the background while keeping the subject dark.
- ISO: Keep the ISO as low as possible (e.g., ISO 100 or 200) to minimize noise in the image.
- Metering Mode: Use spot metering to meter for the brightest part of the background.
- Focus Mode: Use manual focus to ensure the background is sharp.
6. How to Create a Silhouette in Natural Light?
Natural light offers a beautiful and accessible way to create silhouettes. The key is to use the sun or a bright window as your light source and position your subject accordingly.
- Shoot During Golden Hour: The soft, diffused light during sunrise and sunset is perfect for creating silhouettes.
- Find a Bright Background: Use the sky, a bright wall, or a window as your background.
- Position Your Subject: Place your subject between you and the light source, ensuring they are backlit.
- Meter for the Background: Let the camera expose for the background, which will underexpose your subject.
- Experiment with Angles: Try different angles and perspectives to find the most compelling silhouette.
7. What are the Steps to Turn a Photo into a Silhouette Using Adobe Photoshop?
Adobe Photoshop is a powerful tool for turning photos into silhouettes. With its precise editing capabilities, you can achieve a professional-looking silhouette with ease.
- Open Your Image: Launch Photoshop and open the photo you want to turn into a silhouette.
- Adjust Levels: Go to Image > Adjustments > Levels and move the sliders to increase the contrast.
- Create a Selection: Use the Quick Selection Tool or Pen Tool to select the subject.
- Fill with Black: Go to Edit > Fill and choose Black as the fill color.
- Refine Edges: Use the Eraser Tool or a layer mask to clean up any rough edges.
- Adjust Background: If necessary, adjust the background color to ensure a clean, high-contrast image.
8. How to Make a Silhouette Using Adobe Lightroom?
Adobe Lightroom is another excellent tool for creating silhouettes, offering a streamlined workflow and powerful editing capabilities.
- Import Your Image: Import the photo you want to edit into Lightroom.
- Adjust Exposure: Lower the exposure slider significantly to darken the subject.
- Increase Contrast: Increase the contrast slider to enhance the difference between the subject and background.
- Adjust Highlights and Shadows: Lower the highlights and shadows sliders to create a more dramatic effect.
- Use Adjustment Brush: Use the adjustment brush to refine specific areas of the silhouette, such as the edges.
- Export Your Image: Export the edited image in your desired format.
9. How Do I Create Silhouettes Using Free Online Tools?
For those who don’t have access to professional software, several free online tools can help you create silhouettes. These tools offer user-friendly interfaces and basic editing features to achieve the desired effect.
- Canva: Canva is a popular online design tool that offers a background remover and various editing options.
- Upload your photo to Canva.
- Use the background remover to isolate the subject.
- Adjust the colors and contrast to create a silhouette.
- Download your new silhouette.
- Fotor: Fotor is another online photo editor that offers a range of editing tools, including silhouette creation.
- Upload your photo to Fotor.
- Use the cutout tool to remove the background.
- Change the subject color to black.
- Adjust the contrast and brightness.
- Save your new silhouette.
- Lunapic: Lunapic is a free online photo editor with a simple interface and useful editing features.
- Upload your photo to Lunapic.
- Use the transparent background tool to remove the background.
- Change the color of the subject to black.
- Adjust the brightness and contrast.
- Download your new silhouette.
10. Can I Make Silhouette Art on My Smartphone?
Yes, creating silhouette art on your smartphone is entirely possible. Numerous mobile apps offer the tools and features needed to transform your photos into stunning silhouettes directly on your device.
- Snapseed: Snapseed is a powerful mobile photo editing app developed by Google.
- Open your photo in Snapseed.
- Use the “Tune Image” tool to decrease brightness and increase contrast.
- Use the “Selective” tool to darken specific areas.
- Save your silhouette.
- PicsArt: PicsArt is a popular mobile app with a wide range of editing tools and effects.
- Upload your photo to PicsArt.
- Use the “Cutout” tool to remove the background.
- Change the color of the subject to black.
- Adjust the brightness and contrast.
- Save your silhouette.
- Adobe Photoshop Express: This mobile version of Photoshop offers essential editing tools for creating silhouettes on the go.
- Import your photo to Adobe Photoshop Express.
- Adjust the exposure and contrast.
- Use the “Reduce Luminance” tool to darken the subject.
- Save your silhouette.
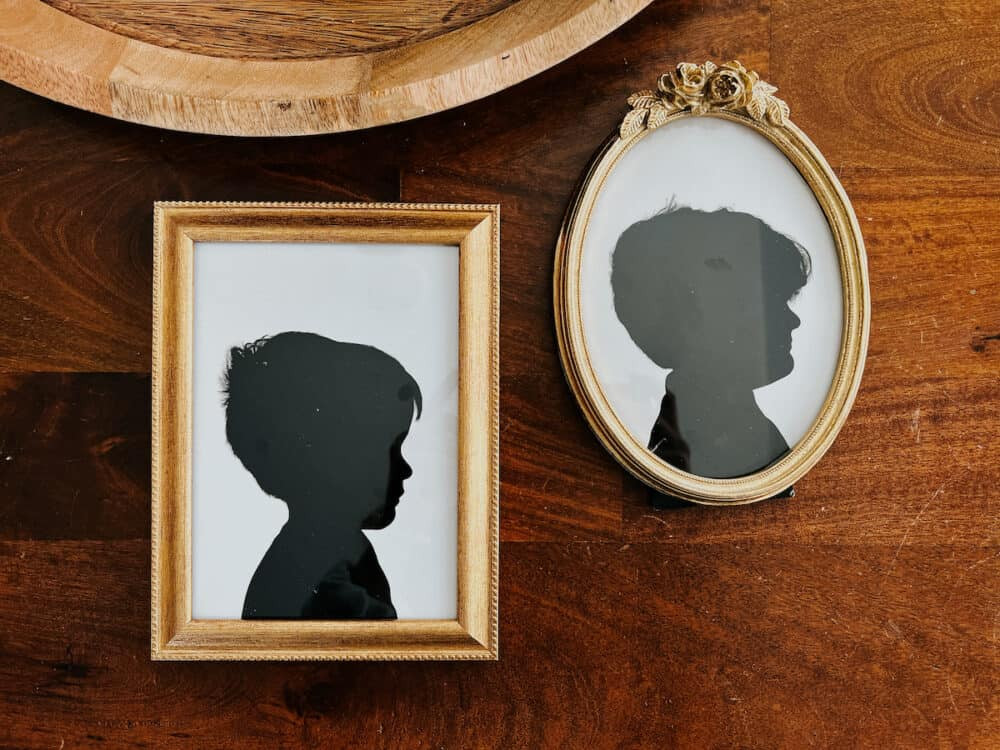
11. How to Use Silhouette Art for Wall Decor?
Silhouette art makes an excellent addition to home decor, offering a personalized and elegant touch to any room. Whether you opt for framed prints, wall decals, or DIY projects, silhouettes can transform your living space.
- Framed Prints: Print your silhouette images and frame them for a classic and sophisticated look.
- Wall Decals: Create custom wall decals featuring silhouette designs to add a unique touch to your walls.
- DIY Projects: Use silhouette images as stencils for painting or crafting projects.
- Gallery Walls: Combine silhouette art with other prints and photos to create an eye-catching gallery wall.
- Personalized Gifts: Create personalized silhouette art as thoughtful and unique gifts for friends and family.
12. What Are Some Creative Ideas for Silhouette Photography?
Silhouette photography offers endless opportunities for creativity. Experiment with different subjects, compositions, and lighting techniques to create unique and captivating images.
- Portraits: Capture striking silhouette portraits of people, highlighting their profiles and expressions.
- Landscapes: Create dramatic landscape silhouettes featuring trees, mountains, and skylines.
- Animals: Photograph animal silhouettes against the sunset or a bright sky.
- Abstract Shapes: Experiment with abstract shapes and forms to create visually interesting silhouettes.
- Action Shots: Capture dynamic action shots of people jumping, running, or dancing in silhouette.
 Creative Silhouette Photography Example
13. What are the Common Mistakes to Avoid When Creating Silhouettes?
While creating silhouettes is relatively straightforward, there are some common mistakes to avoid to ensure your images are visually appealing and impactful.
- Poor Lighting: Inadequate backlighting can result in a weak or undefined silhouette.
- Cluttered Backgrounds: Busy backgrounds can distract from the silhouette and make it difficult to see.
- Lack of Contrast: Insufficient contrast between the subject and background can make the silhouette appear dull.
- Uninteresting Shapes: Subjects with uninteresting or undefined shapes may not translate well into silhouettes.
- Over-Editing: Excessive editing can make the silhouette look unnatural or artificial.
14. How to Choose the Right Subject for a Silhouette?
Selecting the right subject is crucial for creating a compelling silhouette. Look for subjects with strong, recognizable shapes and interesting outlines.
- Recognizable Shape: Choose subjects with distinct and easily identifiable shapes.
- Dynamic Outline: Look for subjects with interesting and dynamic outlines.
- Simple Form: Avoid subjects that are too complex or cluttered.
- Interesting Pose: For portraits, choose poses that are expressive and visually appealing.
- Consider the Background: Ensure the subject contrasts well with the background.
15. What is the Role of Composition in Silhouette Photography?
Composition plays a vital role in silhouette photography, helping to create visually balanced and engaging images.
- Rule of Thirds: Use the rule of thirds to position your subject in a visually appealing way.
- Leading Lines: Use leading lines to draw the viewer’s eye towards the silhouette.
- Symmetry: Create symmetrical compositions for a balanced and harmonious look.
- Negative Space: Use negative space to emphasize the silhouette and create a sense of depth.
- Framing: Use natural elements to frame the silhouette and add context to the image.
16. How to Edit Silhouette Photos for a More Dramatic Effect?
Editing is a crucial step in enhancing silhouette photos and creating a more dramatic effect. By adjusting the contrast, brightness, and colors, you can transform a simple silhouette into a stunning work of art.
- Increase Contrast: Boost the contrast to create a sharper distinction between the subject and background.
- Adjust Brightness: Fine-tune the brightness to ensure the silhouette is dark and the background is bright.
- Color Grading: Experiment with color grading to add a unique mood and atmosphere to the image.
- Add Vignetting: Add a subtle vignette to draw the viewer’s eye towards the silhouette.
- Sharpen the Image: Sharpen the image to enhance the details and edges of the silhouette.
17. What Are the Ethical Considerations in Silhouette Photography?
When creating silhouette photography, it’s important to consider the ethical implications, particularly when photographing people.
- Privacy: Respect the privacy of your subjects and obtain their consent before taking and sharing their photos.
- Representation: Be mindful of how your silhouette images may be interpreted and avoid perpetuating harmful stereotypes.
- Manipulation: Avoid excessive manipulation of images that could misrepresent the subject.
- Copyright: Respect copyright laws and obtain permission when using other people’s images.
- Transparency: Be transparent about your editing process and any modifications made to the original image.
18. How Can I Use Silhouettes in Graphic Design Projects?
Silhouettes are a versatile element in graphic design, adding visual interest and impact to various projects, from logos to website designs.
- Logos: Use silhouette images to create simple and memorable logos.
- Website Design: Incorporate silhouettes into website headers, banners, and backgrounds.
- Posters and Flyers: Use silhouettes to create eye-catching posters and flyers.
- Social Media Graphics: Use silhouettes to create engaging social media content.
- Infographics: Incorporate silhouettes into infographics to illustrate concepts and data.
19. How to Print and Display Your Silhouette Art?
Once you’ve created your silhouette art, printing and displaying it properly can enhance its visual impact and create a stunning presentation.
- Choose the Right Paper: Select high-quality photo paper or cardstock for printing.
- Print at High Resolution: Ensure your images are printed at a high resolution (300 DPI or higher) for最佳 results.
- Use a Professional Printing Service: Consider using a professional printing service for high-quality prints.
- Frame Your Art: Frame your silhouette prints to protect them and add a polished look.
- Create a Gallery Wall: Display your silhouette art as part of a gallery wall for a personalized touch.
20. What are the Latest Trends in Silhouette Photography?
Silhouette photography continues to evolve, with new trends and techniques emerging to push the boundaries of this classic art form.
- Double Exposure Silhouettes: Combining silhouettes with double exposure techniques to create surreal and dreamlike images.
- Color Silhouettes: Using color gels or filters to create vibrant and eye-catching silhouettes.
- Minimalist Silhouettes: Emphasizing simplicity and minimalism in silhouette photography.
- Urban Silhouettes: Capturing silhouettes in urban environments, showcasing cityscapes and architecture.
- Nature Silhouettes: Blending silhouettes with natural elements, such as flowers, leaves, and water.
21. How to Tell a Story Through Silhouette Photography?
Silhouette photography can be a powerful medium for storytelling, conveying emotions and narratives through visual simplicity.
- Choose Expressive Poses: Select poses that convey emotion and tell a story.
- Use Props and Elements: Incorporate props and elements that add context and meaning to the image.
- Create a Series: Tell a story through a series of silhouette images.
- Experiment with Composition: Use composition to guide the viewer’s eye and create a narrative.
- Add Text or Captions: Use text or captions to provide additional context and meaning.
22. How to Create a Silhouette Animation?
Silhouette animation is a captivating art form that combines the elegance of silhouettes with the dynamism of animation.
- Use Digital Animation Software: Use software such as Adobe Animate, Toon Boom Harmony, or Synfig Studio to create silhouette animations.
- Create a Storyboard: Plan your animation by creating a storyboard.
- Design Your Characters: Design your characters and backgrounds as silhouettes.
- Animate Your Scenes: Animate your scenes using the software’s animation tools.
- Add Sound Effects and Music: Enhance your animation with sound effects and music.
23. How to Start a Silhouette Photography Project?
Embarking on a silhouette photography project can be a rewarding creative endeavor.
- Define Your Theme: Choose a theme or concept for your project.
- Plan Your Shoots: Scout locations, gather props, and plan your shoots.
- Experiment with Techniques: Try different techniques and approaches to silhouette photography.
- Edit Your Images: Edit your images to enhance their visual impact and consistency.
- Share Your Work: Share your project online or in exhibitions to gain feedback and recognition.
24. What are the Legal Aspects of Selling Silhouette Art?
Selling silhouette art involves understanding and complying with legal aspects to protect your work and ensure fair business practices.
- Copyright: Understand copyright laws and protect your original creations.
- Model Releases: Obtain model releases when photographing people for commercial purposes.
- Trademark: Be aware of trademark laws and avoid using protected logos or symbols in your art.
- Contracts: Use contracts when collaborating with other artists or selling your work.
- Business Licenses: Obtain any necessary business licenses or permits.
25. How to Protect Your Silhouette Art from Copyright Infringement?
Protecting your silhouette art from copyright infringement is crucial for preserving your creative rights and preventing unauthorized use of your work.
- Copyright Registration: Register your silhouette art with the U.S. Copyright Office to establish legal ownership.
- Watermarking: Add watermarks to your online images to deter unauthorized use.
- Terms of Use: Clearly define the terms of use for your images on your website or social media platforms.
- Monitoring: Regularly monitor the internet for unauthorized use of your images.
- Legal Action: Take legal action against copyright infringers to enforce your rights.
26. How to Find Inspiration for Silhouette Photography?
Finding inspiration is key to fueling your creativity and developing unique silhouette photography.
- Explore Online Galleries: Browse online photography galleries and websites for inspiration.
- Follow Photographers on Social Media: Follow silhouette photographers on social media platforms like Instagram and Pinterest.
- Visit Art Museums: Visit art museums and galleries to view silhouette art from different eras and cultures.
- Read Photography Books: Read books on silhouette photography techniques and styles.
- Attend Workshops and Seminars: Attend photography workshops and seminars to learn from experts and connect with other photographers.
27. What Are the Educational Resources for Learning Silhouette Photography?
Numerous educational resources are available for learning silhouette photography, from online courses to workshops and tutorials.
- Online Courses: Enroll in online photography courses that cover silhouette photography techniques.
- Photography Workshops: Attend hands-on photography workshops taught by experienced instructors.
- Tutorials: Watch online tutorials that demonstrate silhouette photography techniques.
- Photography Books: Read books that provide in-depth knowledge of silhouette photography.
- Photography Communities: Join online photography communities to learn from other photographers and share your work.
28. How to Market and Sell Your Silhouette Photography Online?
Marketing and selling your silhouette photography online can be a rewarding way to share your art and generate income.
- Create a Portfolio Website: Create a professional portfolio website to showcase your best work.
- Use Social Media: Use social media platforms to promote your photography and connect with potential buyers.
- Sell Prints Online: Sell prints of your silhouette photography through online marketplaces or your website.
- Offer Digital Downloads: Offer digital downloads of your images for licensing or personal use.
- Collaborate with Brands: Collaborate with brands on marketing campaigns that feature your silhouette photography.
29. What Are the Advantages of Using a Silhouette Maker?
Silhouette makers, whether software or online tools, offer several advantages for creating silhouette art efficiently and effectively.
- Automation: Silhouette makers automate the process of removing backgrounds and creating silhouettes.
- Efficiency: They save time and effort compared to manual editing techniques.
- Precision: They offer precise tools for refining edges and creating clean silhouettes.
- User-Friendliness: Many silhouette makers have user-friendly interfaces that are easy to learn.
- Customization: They offer customization options for adjusting the silhouette’s color, contrast, and style.
30. How Can dfphoto.net Help You Improve Your Silhouette Photography Skills?
dfphoto.net offers a wealth of resources and information to help you improve your silhouette photography skills and create stunning images. From tutorials and tips to inspiration and community support, dfphoto.net is your go-to resource for all things silhouette photography. Visit our website at dfphoto.net or contact us at +1 (505) 471-6001 to discover more today. Located at 1600 St Michael’s Dr, Santa Fe, NM 87505, United States.
- Extensive Tutorials: Access detailed tutorials on silhouette photography techniques and editing.
- Inspiring Galleries: Browse galleries of stunning silhouette images for inspiration.
- Community Forums: Connect with other photographers in our community forums to share your work and learn from others.
- Expert Advice: Get expert advice from experienced photographers on how to improve your silhouette photography skills.
- Latest Trends: Stay up-to-date with the latest trends and innovations in silhouette photography.
FAQ Section
1. What is the best time of day to take silhouette photos?
The best time is during the golden hour, which is shortly after sunrise and shortly before sunset. This is when the sun is low in the sky and the light is soft and warm, which is ideal for creating silhouettes.
2. Can I use my smartphone to create silhouette art?
Yes, you can absolutely use your smartphone. Many mobile apps offer tools and features that allow you to easily transform your photos into silhouettes right on your device.
3. What camera settings should I use for silhouette photography?
Use a narrow aperture (e.g., f/8 to f/16) for sharp focus, adjust the shutter speed to expose the background, keep ISO as low as possible, use spot metering for the background, and manual focus.
4. What if I don’t have Adobe Photoshop or Lightroom?
No problem At all! There are many free online tools such as Canva, Fotor, and Lunapic that you can use to create silhouettes.
5. How do I choose the right subject for a silhouette?
Choose subjects with distinct and easily identifiable shapes, dynamic outlines, and simple forms. For portraits, look for expressive poses.
6. What is the role of composition in silhouette photography?
Composition helps create visually balanced and engaging images. Use the rule of thirds, leading lines, symmetry, negative space, and framing to enhance your photos.
7. How can I make my silhouette photos more dramatic?
Edit your photos to increase contrast, adjust brightness, experiment with color grading, add vignetting, and sharpen the image.
8. What are some creative ideas for silhouette photography?
Try portraits, landscapes, animals, abstract shapes, and action shots. Experiment with different compositions and lighting techniques to create unique images.
9. How can I protect my silhouette art from copyright infringement?
Register your work with the U.S. Copyright Office, add watermarks, define terms of use, monitor the internet for unauthorized use, and take legal action if needed.
10. How can dfphoto.net help me improve my silhouette photography skills?
dfphoto.net offers extensive tutorials, inspiring galleries, community forums, expert advice, and the latest trends in silhouette photography. Explore our resources to enhance your skills and creativity.
By following this comprehensive guide, you’ll be well-equipped to create stunning silhouette art and elevate your photography skills. Dive into the world of silhouettes and unleash your creativity today! Be sure to visit dfphoto.net for more inspiration, resources, and community support.