While Apple devices are known for their user-friendliness, directly importing photos from a USB flash drive into the Photos app on an iPad or iPhone isn’t immediately obvious. Despite seeming unsupported, there’s a specific method to enable this direct import, streamlining your photo workflow. This guide will walk you through the necessary steps to successfully transfer your photos from a USB stick directly into your iOS Photos app, ensuring they land exactly where you want them – either in your main Library or a specific Album.
For a USB drive to be recognized for direct photo import by the Photos app on your iPad or iPhone, it must adhere to a specific folder structure and file naming convention. This structure mimics how digital cameras organize photos on SD cards, allowing iOS to recognize and import them correctly.
First, your USB flash drive must contain a folder named DCIM at its root level. This is the crucial top-level directory that iOS looks for when identifying photo storage.
Inside the DCIM folder, you need to create a subfolder where your image files will reside. While the original article mentions 100NCD90, the key requirement is an 8-character folder name where the first three characters are numbers. Examples of valid subfolder names include 100ABCDE, 123PHOTOS, or 999Media.
Regarding the image files themselves, there are also specific requirements for them to be successfully imported into the Photos app.
The image file extension must be .jpg, not .jpeg. Ensure your photos are saved in this format before transferring them to the USB drive.
Furthermore, each filename needs to be 8 characters long, with the last four characters being numbers. The first four characters can be a combination of letters, numbers, or underscores. Valid examples include DSC_0001, IMGP0001, or PIC_1234.
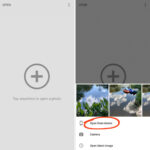
By adhering to these precise requirements, you unlock the ability to import photos directly into the Photos app. This method offers a significant advantage: you can choose the destination within the Photos app itself. For recent iOS versions, this means you can select to import photos directly into your main Library or into a specific Album you’ve created. This level of control is particularly useful for organizing your photos right from the import stage.
Testing has shown that this direct import method even works on older iPads running iOS 10. However, on older versions, the Album selection might not be available, limiting you to importing into the main Library.
It’s important to note the difference when using the Files app for import, especially in iOS 13 and iOS 14. While the Files app can import photos from a USB drive, it typically only offers the choice between importing to the Library or a Shared Album, but not directly into a user-created Album. For iOS versions older than 13, the Files app is not available, making this direct method even more valuable.
In conclusion, while not immediately obvious, transferring photos from a USB stick directly into the iOS Photos app with destination Album selection is achievable. By carefully structuring your USB drive with a DCIM folder, a correctly named subfolder, and ensuring your image files are named and formatted according to the specified conventions, you can efficiently import and organize your photos on your iPad or iPhone, leveraging the full organizational capabilities of the Photos app.