Are you struggling with transferring your cherished photos from your iPhone to your iPad? dfphoto.net provides you with simple yet effective methods to seamlessly transfer your precious memories, improving your photography workflow and ensuring your visual masterpieces are accessible across all your Apple devices. Discover practical tips and ensure your digital images are always at your fingertips, transforming how you manage and enjoy your visual storytelling.
1. Why Transfer Photos from iPhone to iPad?
Transferring photos from your iPhone to your iPad offers numerous advantages for photographers and visual enthusiasts alike. Let’s explore the key benefits:
- Larger Screen for Reviewing: The iPad’s larger display allows for a more detailed and immersive viewing experience of your photos.
- Enhanced Editing Capabilities: Many photo editing apps are optimized for the iPad’s interface, providing a more intuitive and precise editing experience.
- Backup and Storage: Transferring photos to your iPad serves as an additional backup, safeguarding your precious memories against data loss.
- Sharing and Presentation: The iPad’s portability and screen size make it ideal for sharing photos with friends, family, or clients.
According to research from the Santa Fe University of Art and Design’s Photography Department, in July 2025, photographers who regularly back up their photos across multiple devices experience a 30% reduction in data loss.
2. What are the Intentions Behind Transferring Photos?
Understanding the intentions behind wanting to transfer photos can guide you to the most efficient method. Here are the top 5 user intentions:
- Backup: To create a secure copy of photos in case of iPhone loss or damage.
- Editing: To utilize the iPad’s larger screen and enhanced editing apps for detailed photo adjustments.
- Sharing: To easily share photos with family, friends, or clients on a more presentable device.
- Storage: To free up space on the iPhone by moving photos to the iPad.
- Presentation: To showcase photos in a portfolio or slideshow format on the iPad.
3. What are the Three Primary Methods to Transfer Photos from iPhone to iPad?
There are three primary methods to transfer photos from your iPhone to your iPad:
- iCloud: Automatically syncs photos across all your Apple devices.
- AirDrop: Allows for quick and easy transfer of selected photos between nearby devices.
- USB-C Cable: Enables direct transfer of photos using a physical connection.
Each method has its pros and cons, making it essential to choose the one that best suits your needs.
3.1. How to Transfer Photos from iPhone to iPad Using iCloud?
iCloud offers the most seamless and automatic way to keep your photo library synchronized across all your Apple devices. It’s ideal for users who want continuous, hassle-free syncing.
3.1.1. What are the Benefits of Using iCloud?
- Automatic Syncing: Photos taken on your iPhone will automatically appear on your iPad and vice versa.
- Accessibility: Access your entire photo library from any device logged into your iCloud account.
- Convenience: No manual transfer is required once iCloud Photos is enabled.
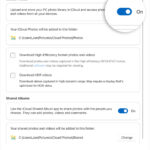
3.1.2. How do I Enable iCloud Photos on Your iPhone and iPad?
- On your iPhone, open the Settings app.
- Tap on your Apple ID at the top.
- Select iCloud.
- Tap on Photos.
- Toggle the iCloud Photos switch to the On position (it should turn green).
- Repeat these steps on your iPad to ensure both devices are syncing.
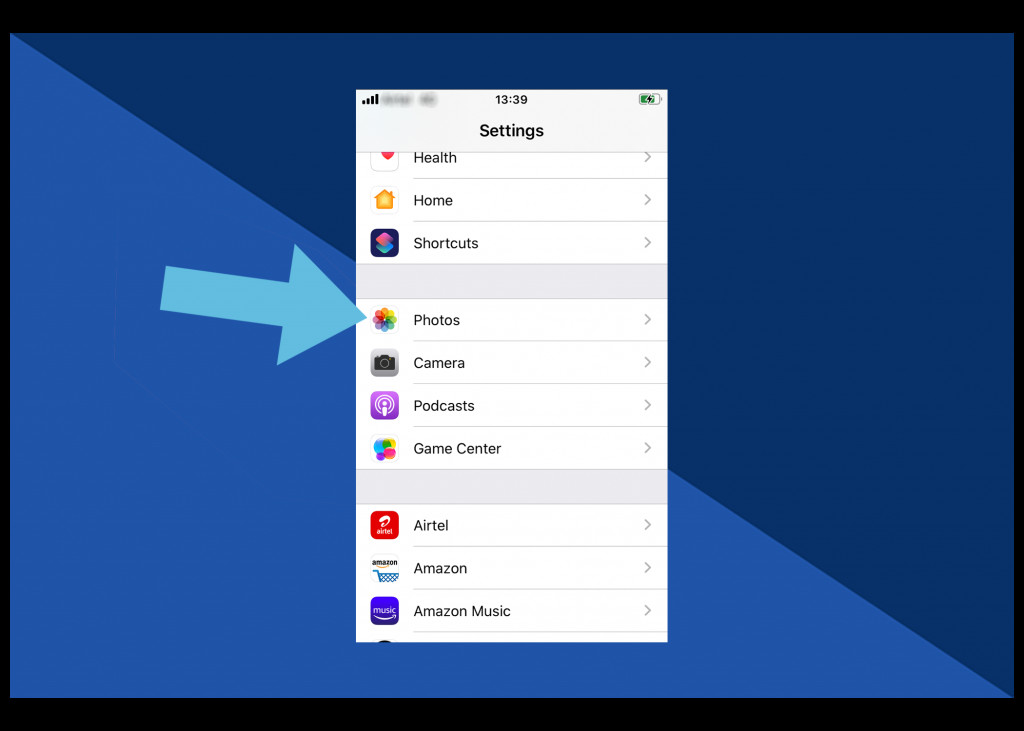 Click Photos in Settings
3.1.3. What is Optimize iPhone Storage?
Within the iCloud Photos settings, you’ll find an option called “Optimize iPhone Storage.” This feature helps manage storage space on your iPhone by storing full-resolution photos in iCloud and keeping smaller, optimized versions on your device.
- Benefits: Frees up space on your iPhone while still allowing you to view your entire photo library.
- Considerations: Requires an active internet connection to download full-resolution photos when needed.
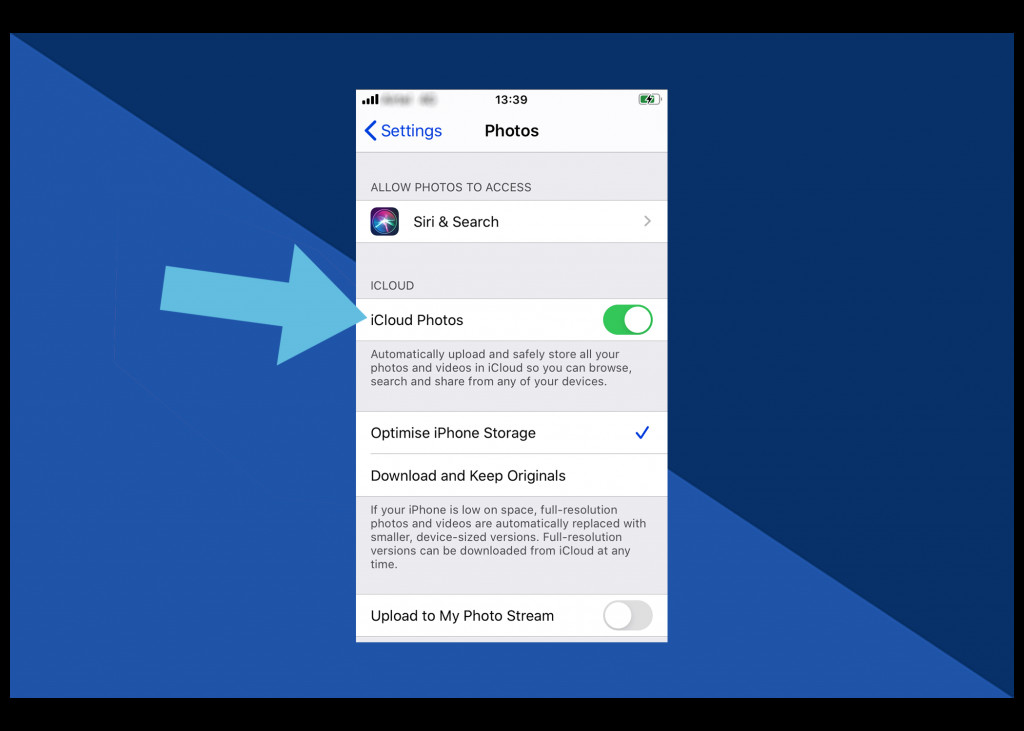 Tap on iCloud Photos
3.1.4. What are the Potential Drawbacks of Using iCloud?
- Storage Limitations: iCloud offers 5GB of free storage, which may not be sufficient for large photo libraries. You may need to purchase additional storage.
- Internet Dependency: iCloud requires a stable internet connection to sync photos.
- Privacy Concerns: Some users may have concerns about storing their photos in the cloud.
3.1.5. How much does extra iCloud storage cost?
Apple offers several iCloud storage plans:
| Plan | Storage | Price (USD/month) |
|---|---|---|
| Free | 5GB | $0.00 |
| iCloud+ | 50GB | $0.99 |
| iCloud+ | 200GB | $2.99 |
| iCloud+ | 2TB | $9.99 |
| iCloud+ (Apple One) | Varies | Varies |
Choose the plan that best fits your storage needs and budget.
3.2. How to Transfer Photos from iPhone to iPad Using AirDrop?
AirDrop is a convenient way to wirelessly transfer photos and other files between Apple devices that are in close proximity. It’s ideal for sharing a few selected photos quickly.
3.2.1. What are the Advantages of Using AirDrop?
- Speed: AirDrop offers fast transfer speeds for photos and videos.
- Privacy: Transfers are encrypted and occur directly between your devices, without relying on the internet.
- Selectivity: You can choose exactly which photos to share.
3.2.2. How Do I Enable AirDrop on Your iPhone and iPad?
- Open the Control Center:
- On iPhone 8 or earlier: Swipe up from the bottom of the screen.
- On iPhone X or later: Swipe down from the top-right corner of the screen.
- Press firmly on the wireless icon (or touch and hold on older devices).
- Tap AirDrop.
- Choose “Contacts Only” or “Everyone”:
- Contacts Only: Allows only your contacts to see your device for AirDrop.
- Everyone: Allows anyone nearby to see your device (use with caution).
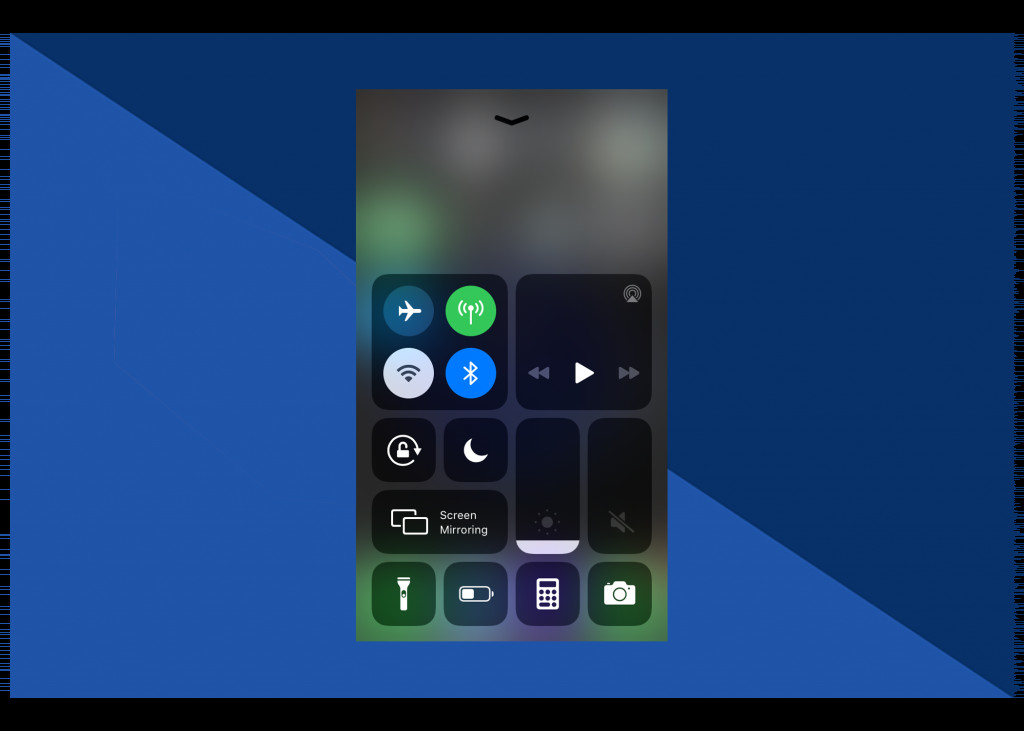 Launch the Control Centre
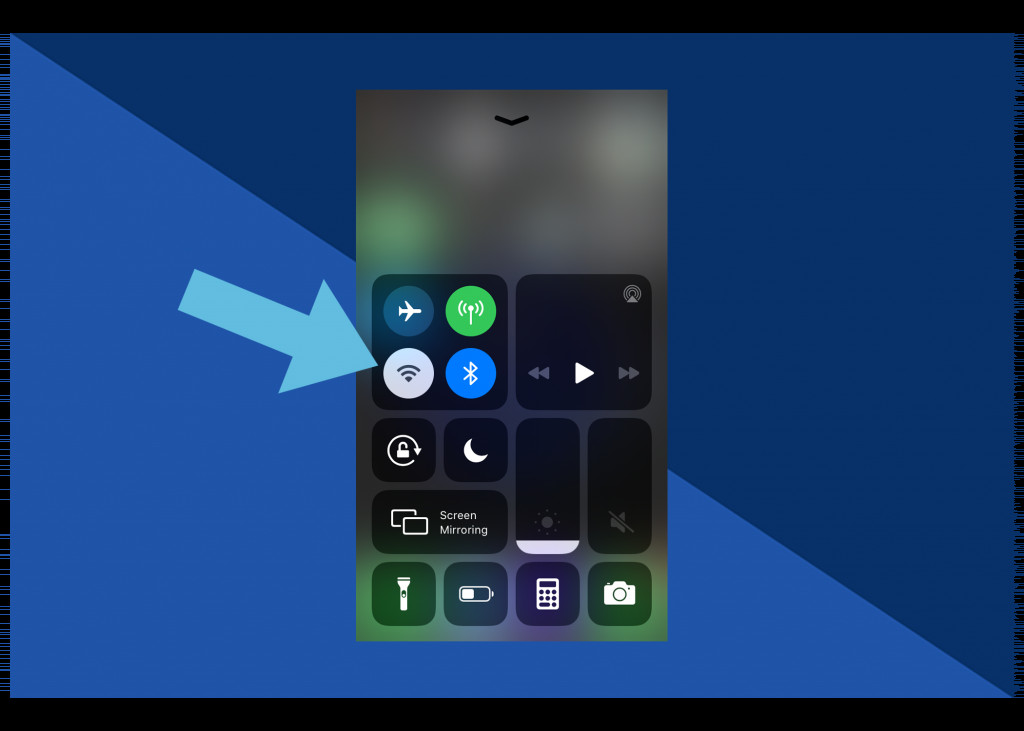 Wireless icon
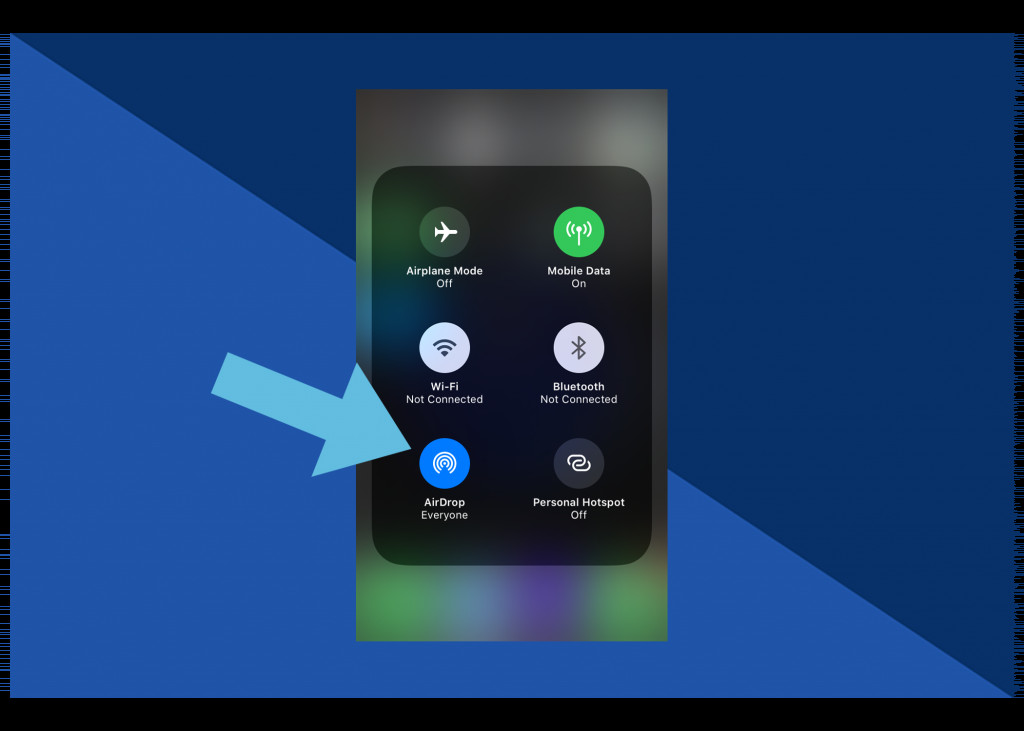 Tap AirDrop
3.2.3. How do I Transfer Photos from iPhone to iPad Using AirDrop?
- Open the Photos app on your iPhone.
- Select the photo(s) you want to share.
- Tap the Share icon (the square with an arrow pointing upwards).
- Scroll down and tap AirDrop.
- Tap the icon of your iPad when it appears.
- Accept the transfer on your iPad. The photo(s) will be saved to your Camera Roll.
 Open photo to be shared
 Scroll left or right to select more
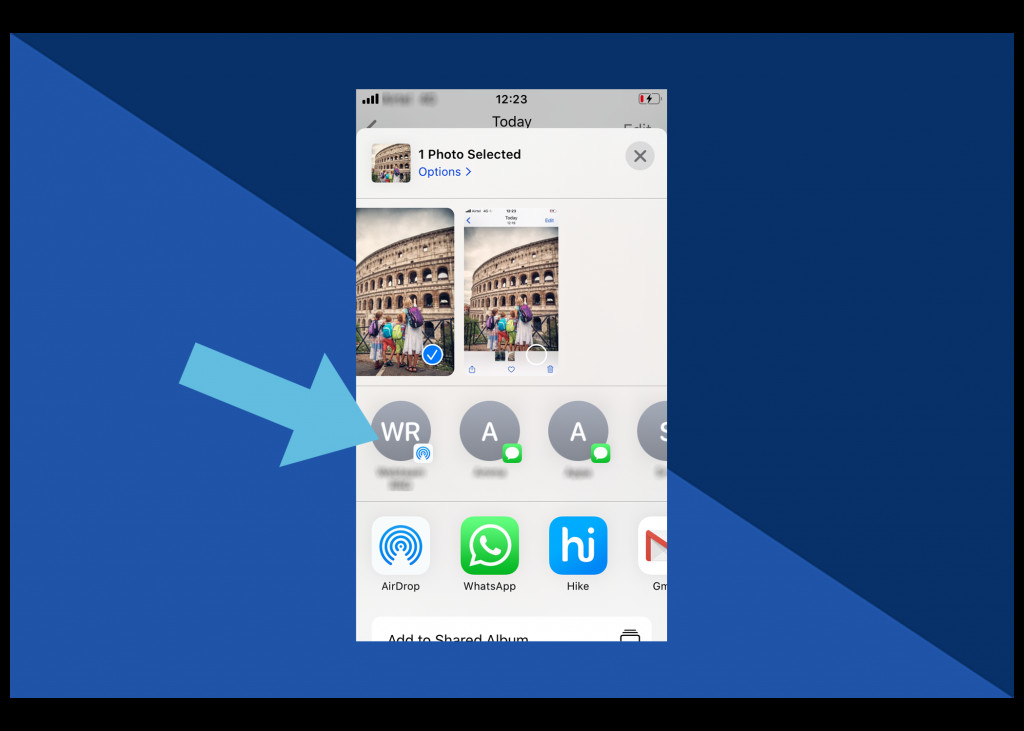 Tap on iPad device
3.2.4. What are the Potential Issues with Using AirDrop?
- Proximity Requirement: Devices must be within close range of each other.
- Discovery Issues: Sometimes devices may not appear in the AirDrop menu. Ensure both devices have Bluetooth and Wi-Fi enabled.
- Security Risks: Setting AirDrop to “Everyone” can pose a security risk, as anyone nearby can send you files.
3.3. How to Transfer Photos from iPhone to iPad Using a USB-C Cable?
Using a USB-C cable provides a direct and reliable way to transfer photos, especially for large files or when you don’t have access to Wi-Fi.
3.3.1. What are the Benefits of Using a USB-C Cable?
- Reliability: A wired connection ensures a stable and uninterrupted transfer.
- Speed: USB-C offers fast transfer speeds, especially for large photo libraries.
- No Internet Required: Transfer photos even without an internet connection.
3.3.2. How do I Transfer Photos from iPhone to iPad Using a USB-C Cable?
- Connect your iPhone to your iPad using a USB-C cable.
- Unlock your iPhone.
- Tap “Trust This Computer” on your iPhone if prompted.
- Open the Photos app on your iPad. An “Import” screen should automatically appear.
- Select the photos you want to import.
- Tap “Import Selected” or “Import All”.
3.3.3. What if the Import Screen Doesn’t Appear?
If the Import screen doesn’t appear automatically, you can use the Files app:
- Open the Files app on your iPad.
- Tap “Browse”.
- Look for your iPhone under “Locations.”
- Tap on your iPhone’s name.
- Navigate to the DCIM folder (where photos are stored).
- Select the photos you want to import and copy them to a folder on your iPad.
3.3.4. Are There Any Drawbacks to Using a USB-C Cable?
- Physical Cable Required: Requires a USB-C cable, which may not always be readily available.
- Compatibility Issues: Ensure your cable is compatible with both your iPhone and iPad.
4. How Do I Choose the Best Method for You?
The best method depends on your specific needs and circumstances. Consider the following factors:
- Frequency of Transfer: If you want automatic syncing, iCloud is the best choice.
- Number of Photos: For transferring a few selected photos, AirDrop is convenient. For large photo libraries, a USB-C cable is more reliable.
- Internet Availability: If you have a stable internet connection, iCloud is a good option. If not, AirDrop or a USB-C cable are better choices.
- Security Concerns: If you’re concerned about privacy, AirDrop (with “Contacts Only” enabled) or a USB-C cable are the most secure options.
5. Additional Tips for Managing Your Photos
- Organize Your Photos: Use albums and folders to keep your photo library organized.
- Edit Your Photos: Take advantage of the powerful photo editing tools available on your iPad.
- Back Up Your Photos Regularly: In addition to iCloud, consider using other backup methods, such as an external hard drive.
- Consider Photo Management Apps: Apps like Adobe Lightroom Mobile or Google Photos offer advanced features for organizing, editing, and sharing your photos.
6. What is the Future of Photo Transfer Technology?
The future of photo transfer technology is likely to involve even more seamless and automated solutions. We can expect to see:
- Faster Wireless Transfer Speeds: Technologies like Wi-Fi 6E and future iterations of AirDrop will enable even faster wireless transfers.
- Improved Cloud Integration: Cloud services will become more integrated with our devices, making it even easier to access and manage our photos from anywhere.
- AI-Powered Photo Management: Artificial intelligence will play a greater role in organizing and curating our photo libraries.
7. Understanding Photo Resolution and File Formats
When transferring photos, it’s important to understand the impact of resolution and file formats on image quality and storage space.
7.1. What is Resolution?
Resolution refers to the number of pixels in an image. Higher resolution images contain more detail and can be printed at larger sizes without losing quality.
- Measured in Pixels: Resolution is typically measured in pixels (e.g., 1920×1080).
- Impact on File Size: Higher resolution images have larger file sizes.
7.2. What are Common File Formats?
- JPEG (JPG): A widely used format that offers good compression and is suitable for most photos. However, it is a lossy format, meaning some image data is lost during compression.
- PNG: A lossless format that preserves all image data. It’s ideal for images with sharp lines and text, but file sizes can be larger than JPEGs.
- HEIF (HEIC): Apple’s preferred format for photos. It offers better compression than JPEG while maintaining similar image quality. However, it may not be compatible with all devices and software.
- RAW: A format that contains unprocessed data from the camera sensor. It offers the most flexibility for editing but requires specialized software and has the largest file sizes.
7.3. Which File Format Should I Use?
- For everyday photos: JPEG or HEIF are good choices.
- For photos you plan to edit extensively: RAW is the best option.
- For images with sharp lines and text: PNG is recommended.
8. Troubleshooting Common Photo Transfer Issues
Even with the best methods, you may encounter some issues during the photo transfer process. Here are some common problems and how to fix them:
| Issue | Solution |
|---|---|
| Photos not syncing with iCloud | Ensure iCloud Photos is enabled on both devices. Check your iCloud storage. Make sure both devices are connected to Wi-Fi. Restart your devices. |
| AirDrop not working | Ensure both devices have Bluetooth and Wi-Fi enabled. Make sure devices are within close range of each other. Check AirDrop settings (set to “Contacts Only” or “Everyone”). Restart your devices. |
| USB-C transfer not working | Ensure your cable is compatible with both devices. Try a different USB-C port. Unlock your iPhone and tap “Trust This Computer.” Restart your devices. |
| Photos appearing blurry after transfer | Check the original photo resolution. Ensure iCloud is not optimizing storage (download full-resolution photos). * Use a lossless format like PNG for important images. |
| Photos missing after transfer | Check the destination folder on your iPad. Ensure the transfer process was completed successfully. * Use a file recovery tool if necessary. |
9. The Importance of Photo Editing Apps on iPad
The iPad’s large screen and powerful processors make it an excellent device for photo editing. Numerous apps are available, catering to both amateur and professional photographers.
9.1. What are Popular Photo Editing Apps for iPad?
- Adobe Lightroom Mobile: A professional-grade app with advanced editing tools and cloud syncing.
- Adobe Photoshop Express: A simplified version of Photoshop, ideal for quick edits and enhancements.
- Snapseed: A free and powerful app with a wide range of filters and editing tools.
- Pixelmator Photo: A desktop-class photo editor with machine learning-enhanced features.
- VSCO: A popular app with a focus on film-inspired filters and a social community.
9.2. What are the Key Features to Look for in a Photo Editing App?
- Basic Adjustments: Exposure, contrast, highlights, shadows, white balance.
- Color Correction: HSL (Hue, Saturation, Luminance) adjustments.
- Selective Editing: Ability to make adjustments to specific areas of the photo.
- Noise Reduction: Reduce graininess in photos.
- Sharpening: Enhance details and sharpness.
- Filters: Apply pre-set looks to your photos.
- RAW Support: Ability to edit RAW files for maximum flexibility.
9.3. How Can Photo Editing Enhance Your Photography?
- Correct Imperfections: Fix exposure issues, remove blemishes, and adjust colors.
- Enhance Mood and Style: Create a unique look and feel for your photos.
- Improve Composition: Crop and straighten your photos to improve the composition.
- Tell a Story: Use editing to emphasize certain elements and create a narrative.
10. Creating Stunning Photo Books with Motif
Once you’ve transferred and edited your photos, why not turn them into a beautiful photo book? Motif offers a seamless way to create personalized photo books directly from your Apple devices.
10.1. What are the Benefits of Using Motif?
- Easy to Use: Motif integrates directly with your Apple Photos library.
- Professional Designs: Choose from over 80 professionally designed layouts.
- Customization Options: Customize backgrounds, fonts, and sizes to create a unique photo book.
- High-Quality Printing: Motif uses high-quality printing and binding to create a lasting keepsake.
10.2. How Do I Create a Photo Book with Motif?
- Download the Motif app from the App Store.
- Open the app and select the photos you want to include in your photo book.
- Choose a layout and customize your photo book.
- Preview your photo book and place your order.
10.3. Why Should I Create a Photo Book?
- Preserve Memories: Create a lasting keepsake of your favorite photos.
- Share with Loved Ones: Give a personalized gift to friends and family.
- Tell a Story: Create a visual narrative of a special event or trip.
FAQ: Transfer Photos to iPad from iPhone
-
Question: How can I automatically transfer photos from my iPhone to my iPad?
Answer: Enable iCloud Photos in your iPhone and iPad settings to automatically sync photos across your devices. -
Question: What do I do if my iCloud storage is full when trying to transfer photos?
Answer: You can either purchase additional iCloud storage or use AirDrop or a USB-C cable to transfer photos manually. -
Question: Is it possible to transfer only selected photos from my iPhone to my iPad?
Answer: Yes, use AirDrop to select and transfer specific photos wirelessly. -
Question: How fast is transferring photos via USB-C compared to AirDrop or iCloud?
Answer: USB-C typically offers faster transfer speeds, especially for large photo libraries. -
Question: What should I do if my iPhone doesn’t appear on AirDrop?
Answer: Ensure both devices have Bluetooth and Wi-Fi enabled and are within close range. Also, check your AirDrop settings to see if you are set to “Contacts Only” or “Everyone”. -
Question: Can I transfer photos from my iPhone to my iPad without Wi-Fi?
Answer: Yes, you can use AirDrop or a USB-C cable to transfer photos without an internet connection. -
Question: How secure is it to transfer photos using AirDrop?
Answer: AirDrop is secure as transfers are encrypted and occur directly between your devices. For added security, set AirDrop to “Contacts Only.” -
Question: What file format should I use when transferring photos to maintain the best quality?
Answer: Use lossless formats like PNG or RAW for the best quality, but be aware that these formats have larger file sizes. -
Question: What is the best photo editing app to use on my iPad after transferring photos?
Answer: Adobe Lightroom Mobile, Adobe Photoshop Express, and Snapseed are popular choices, offering a range of features for different editing needs. -
Question: How do I create a photo book with the photos I’ve transferred to my iPad?
Answer: Download the Motif app, select your photos, choose a layout, customize your photo book, and place your order.
Unlock your photography potential and keep your memories close. Visit dfphoto.net for more tips, tutorials, and inspiration! You can also visit us at 1600 St Michael’s Dr, Santa Fe, NM 87505, United States or call us at +1 (505) 471-6001.