Transferring photos from an SD card to your phone is a common need for photographers and visual artists. This comprehensive guide, brought to you by dfphoto.net, simplifies the process with expert tips and solutions, ensuring a smooth transfer. Learn about digital transfer and secure file storage.
1. Why Should I Transfer Photos from an SD Card to My Phone?
There are several reasons to transfer photos from your SD card to your phone:
- Convenience: Having photos on your phone allows for easy sharing on social media, editing on the go, and quick access for personal enjoyment.
- Backup: Transferring photos to your phone can serve as a backup in case your SD card is lost, damaged, or corrupted.
- Workflow: For photographers, transferring photos to a phone enables quicker client previews, instant portfolio access, and on-the-spot editing and sharing.
2. What Are the Different Methods to Transfer Photos from an SD Card to a Phone?
There are various methods to transfer photos from an SD card to your phone. Each method has its pros and cons, so the best choice depends on your specific needs and equipment.
2.1 Using an SD Card Reader and OTG Adapter
One of the most common and reliable methods is using an SD card reader and an OTG (On-The-Go) adapter.
- How it Works: An OTG adapter allows your phone to recognize USB devices, such as an SD card reader. You plug the SD card reader into the OTG adapter and then connect it to your phone.
- Pros:
- Fast transfer speeds.
- Reliable connection.
- Compatible with most Android phones.
- Cons:
- Requires purchasing an SD card reader and OTG adapter if you don’t already have them.
- Can be a bit cumbersome compared to wireless methods.
Steps to Transfer Photos Using an SD Card Reader and OTG Adapter
- Purchase the Necessary Equipment: Buy an SD card reader and an OTG adapter that is compatible with your phone’s charging port (USB-C or Micro-USB).
- Connect the SD Card Reader: Insert your SD card into the SD card reader.
- Connect to Your Phone: Plug the SD card reader into the OTG adapter, and then connect the adapter to your phone.
- Access Files: Your phone should recognize the SD card reader as a storage device. Open your phone’s file manager app.
- Copy Photos: Navigate to the SD card in the file manager, select the photos you want to transfer, and copy them to a folder on your phone.
- Verify Transfer: Check your phone’s gallery or file manager to ensure the photos have been successfully transferred.
2.2 Using a USB-C SD Card Reader
For phones with a USB-C port, a USB-C SD card reader offers a direct and efficient transfer method.
- How it Works: These readers plug directly into your phone’s USB-C port, allowing for quick data transfer.
- Pros:
- Fast transfer speeds.
- No need for an adapter.
- Simple and direct connection.
- Cons:
- Only compatible with phones that have a USB-C port.
- Requires purchasing a USB-C SD card reader if you don’t already have one.
Steps to Transfer Photos Using a USB-C SD Card Reader
- Purchase a USB-C SD Card Reader: Obtain a USB-C SD card reader.
- Insert SD Card: Place your SD card into the reader.
- Connect to Your Phone: Plug the reader into your phone’s USB-C port.
- Access Files: Your phone will recognize the SD card. Open your file manager app.
- Copy Photos: Find the SD card in the file manager, select the photos, and copy them to your phone.
- Confirm Transfer: Ensure the photos are in your phone’s gallery or file manager.
2.3 Using Cloud Storage Services (Google Drive, Dropbox, etc.)
Cloud storage services offer a wireless method to transfer photos, providing both convenience and backup.
- How it Works: You upload photos from the SD card to a cloud service using a computer or another device, and then download them to your phone.
- Pros:
- Wireless transfer.
- Automatic backup of photos.
- Accessible from any device with an internet connection.
- Cons:
- Requires a stable internet connection.
- Transfer speed depends on your internet speed.
- May require a subscription for large amounts of storage.
Steps to Transfer Photos Using Cloud Storage Services
- Choose a Cloud Service: Select a cloud storage service like Google Drive, Dropbox, or OneDrive.
- Upload Photos to the Cloud:
- From a Computer: Insert the SD card into your computer, open the cloud service’s desktop app or website, and upload the photos from the SD card to a folder in the cloud.
- From Another Device: If you have another device with an SD card reader, upload the photos to the cloud service from that device.
- Download Photos to Your Phone: On your phone, open the cloud service’s app, navigate to the folder where you uploaded the photos, and download them to your phone.
- Verify Download: Confirm that the photos have been downloaded to your phone’s gallery or file manager.
2.4 Using Wi-Fi SD Cards
Wi-Fi SD cards have built-in Wi-Fi, allowing for direct wireless transfer to your phone.
- How it Works: The SD card creates a Wi-Fi network that your phone can connect to, enabling you to transfer photos wirelessly.
- Pros:
- Wireless transfer without needing an internet connection.
- Direct transfer from SD card to phone.
- Cons:
- Wi-Fi SD cards can be more expensive than regular SD cards.
- Transfer speed may be slower compared to wired methods.
- Requires a compatible app to manage the transfer.
Steps to Transfer Photos Using Wi-Fi SD Cards
- Install the Card’s App: Download and install the Wi-Fi SD card’s companion app on your phone.
- Insert the SD Card: Put the Wi-Fi SD card into your camera.
- Connect to the Wi-Fi Network: Turn on your camera and enable the Wi-Fi SD card. On your phone, connect to the Wi-Fi network created by the SD card.
- Transfer Photos: Open the SD card’s app on your phone and follow the instructions to browse and transfer photos from the SD card to your phone.
- Confirm Transfer: Ensure the photos are in your phone’s gallery or file manager.
2.5 Using a Computer as an Intermediary
You can use a computer to transfer photos from the SD card to your phone by first transferring the photos to the computer and then to your phone.
- How it Works: Connect the SD card to your computer, copy the photos to your computer, and then transfer the photos from your computer to your phone via USB or wirelessly.
- Pros:
- Works with any phone and computer.
- Allows for editing and organizing photos on your computer before transferring them to your phone.
- Cons:
- More time-consuming than direct transfer methods.
- Requires a computer and a USB cable or wireless transfer method.
Steps to Transfer Photos Using a Computer as an Intermediary
- Connect SD Card to Computer: Insert the SD card into your computer using an SD card reader or the built-in SD card slot.
- Copy Photos to Computer: Open your computer’s file explorer, navigate to the SD card, and copy the photos to a folder on your computer.
- Connect Phone to Computer: Connect your phone to your computer using a USB cable.
- Transfer Photos to Phone:
- USB Transfer: On your computer, open the phone’s storage, and copy the photos from the folder on your computer to a folder on your phone.
- Wireless Transfer: Use a wireless transfer app or cloud service to transfer the photos from your computer to your phone.
- Verify Transfer: Check your phone’s gallery or file manager to ensure the photos have been successfully transferred.
3. How Do I Choose the Right Method for Transferring Photos?
Choosing the right method depends on your specific circumstances and preferences. Consider the following factors:
- Speed: If you need to transfer photos quickly, wired methods like using an SD card reader and OTG adapter or a USB-C SD card reader are the best options.
- Convenience: If you prefer wireless transfer, cloud storage services or Wi-Fi SD cards are more convenient.
- Equipment: Consider what equipment you already have. If you don’t have an SD card reader or OTG adapter, you may need to purchase them.
- Internet Access: Cloud storage services require a stable internet connection. If you don’t have reliable internet access, wired methods or Wi-Fi SD cards may be better options.
- Cost: Wi-Fi SD cards and cloud storage subscriptions can be more expensive than wired methods.
4. How to Transfer Photos from SD Card to iPhone
Transferring photos from an SD card to an iPhone requires slightly different methods due to Apple’s ecosystem. Here are some effective ways:
4.1 Using Apple’s Lightning to SD Card Camera Reader
Apple offers a Lightning to SD Card Camera Reader specifically designed for transferring photos to iPhones and iPads.
- How it Works: This adapter plugs into the Lightning port on your iPhone, allowing you to insert an SD card and import photos directly into the Photos app.
- Pros:
- Direct and reliable transfer.
- Seamless integration with the Photos app.
- Fast transfer speeds.
- Cons:
- Requires purchasing Apple’s adapter.
- Only compatible with iPhones and iPads with a Lightning port.
Steps to Transfer Photos Using Apple’s Lightning to SD Card Camera Reader
- Purchase the Adapter: Buy Apple’s Lightning to SD Card Camera Reader.
- Connect the Adapter: Plug the adapter into the Lightning port on your iPhone.
- Insert SD Card: Insert the SD card into the adapter.
- Open Photos App: The Photos app should automatically open to the Import tab. If it doesn’t, open the Photos app and tap the Import tab.
- Import Photos: Tap “Import All” to import all photos, or select specific photos and tap “Import.”
- Verify Transfer: Check your Photos app to ensure the photos have been successfully transferred.
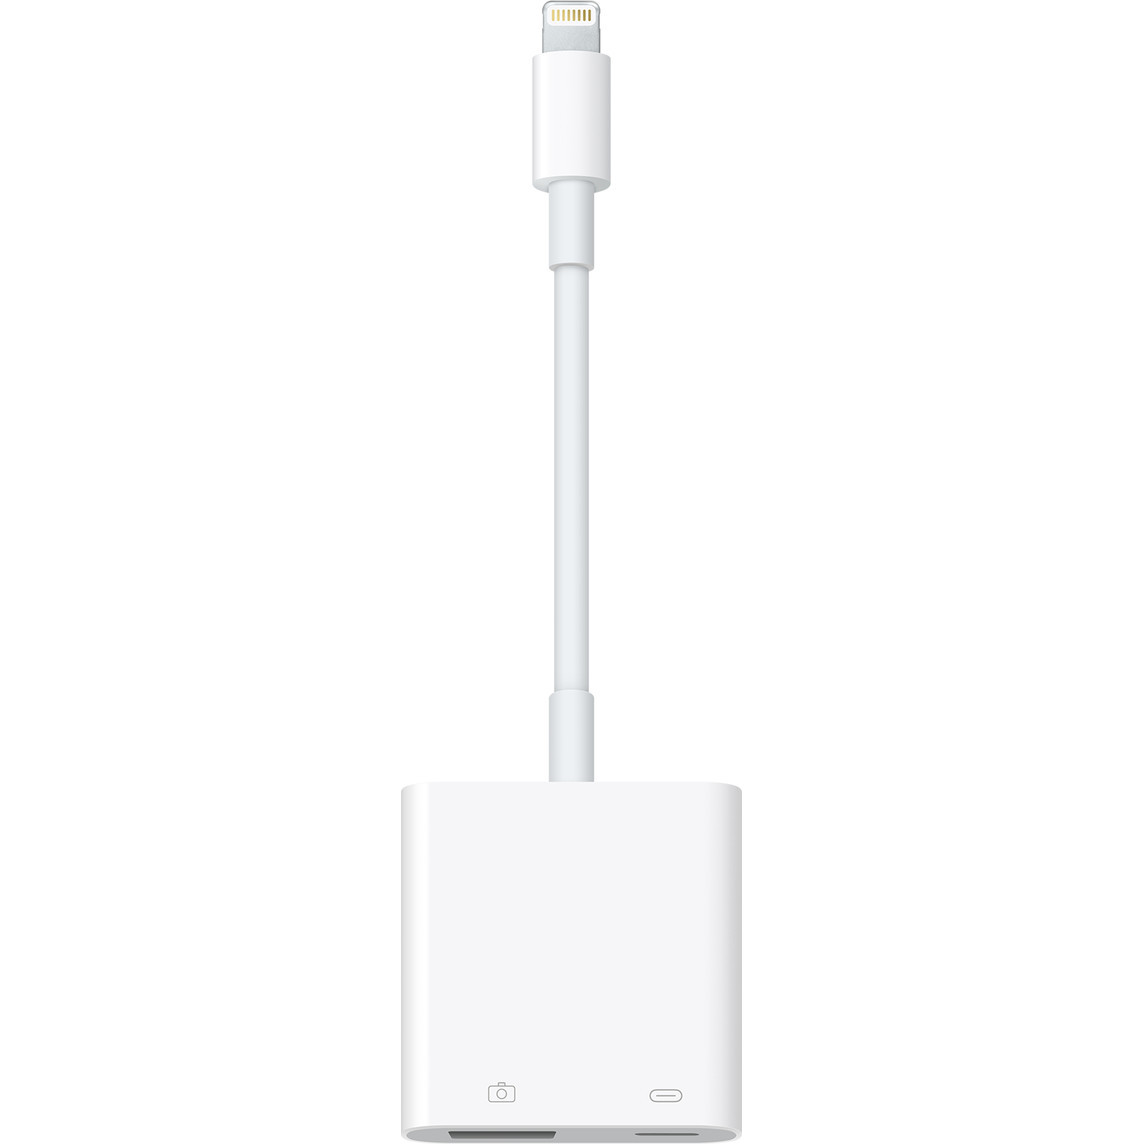 Apple Lightning to SD Card Camera Reader connected to an iPhone, with the Photos app open showing the import screen.
4.2 Using a Lightning to USB Adapter and SD Card Reader
Similar to the Android method, you can use a Lightning to USB adapter along with an SD card reader to transfer photos to your iPhone.
- How it Works: The Lightning to USB adapter allows you to connect a USB SD card reader to your iPhone.
- Pros:
- Can use existing SD card readers.
- Reliable connection.
- Cons:
- Requires purchasing a Lightning to USB adapter.
- May be slightly more cumbersome than using Apple’s dedicated adapter.
Steps to Transfer Photos Using a Lightning to USB Adapter and SD Card Reader
- Purchase the Adapter: Buy a Lightning to USB adapter.
- Connect the SD Card Reader: Insert your SD card into the SD card reader.
- Connect to Your iPhone: Plug the SD card reader into the Lightning to USB adapter, and then connect the adapter to your iPhone.
- Open Photos App: The Photos app should automatically open to the Import tab. If it doesn’t, open the Photos app and tap the Import tab.
- Import Photos: Tap “Import All” to import all photos, or select specific photos and tap “Import.”
- Verify Transfer: Check your Photos app to ensure the photos have been successfully transferred.
4.3 Using iCloud Drive
iCloud Drive offers a wireless method to transfer photos to your iPhone, similar to other cloud storage services.
- How it Works: You upload photos from the SD card to iCloud Drive using a computer, and then download them to your iPhone.
- Pros:
- Wireless transfer.
- Automatic backup of photos to iCloud.
- Accessible from any Apple device.
- Cons:
- Requires an active iCloud account with sufficient storage.
- Transfer speed depends on your internet speed.
Steps to Transfer Photos Using iCloud Drive
- Upload Photos to iCloud Drive:
- From a Computer: Insert the SD card into your computer, open iCloud Drive in Finder (on macOS) or through the iCloud website (on Windows), and upload the photos from the SD card to a folder in iCloud Drive.
- Download Photos to Your iPhone: On your iPhone, open the Files app, navigate to iCloud Drive, and download the photos to your phone.
- Verify Download: Check your Photos app to ensure the photos have been successfully transferred.
4.4 Using Cloud Storage Services (Dropbox, Google Drive, etc.)
You can also use third-party cloud storage services like Dropbox or Google Drive to transfer photos to your iPhone.
- How it Works: Upload photos from the SD card to the cloud service using a computer, and then download them to your iPhone.
- Pros:
- Wireless transfer.
- Accessible from any device with an internet connection.
- Cons:
- Requires a stable internet connection.
- Transfer speed depends on your internet speed.
- May require a subscription for large amounts of storage.
Steps to Transfer Photos Using Cloud Storage Services
- Choose a Cloud Service: Select a cloud storage service like Google Drive or Dropbox.
- Upload Photos to the Cloud:
- From a Computer: Insert the SD card into your computer, open the cloud service’s desktop app or website, and upload the photos from the SD card to a folder in the cloud.
- Download Photos to Your iPhone: On your iPhone, open the cloud service’s app, navigate to the folder where you uploaded the photos, and download them to your phone.
- Verify Download: Confirm that the photos have been downloaded to your phone’s Photos app.
5. What Are Some Common Issues and Troubleshooting Tips?
While transferring photos from an SD card to your phone is usually straightforward, you may encounter some issues. Here are common problems and how to troubleshoot them:
- Phone Not Recognizing the SD Card Reader:
- Check Compatibility: Ensure your phone supports OTG and that the OTG adapter is compatible with your phone’s charging port.
- Restart Your Phone: Sometimes, a simple restart can resolve connectivity issues.
- Try a Different Adapter or Reader: The adapter or reader may be faulty. Try using a different one to see if it resolves the issue.
- Update Your Phone’s Software: Ensure your phone’s operating system is up to date.
- Slow Transfer Speeds:
- Use a Faster SD Card Reader: Some SD card readers have faster transfer speeds than others.
- Avoid Wireless Transfer for Large Files: Wired connections are generally faster than wireless.
- Close Unnecessary Apps: Close any apps running in the background to free up system resources.
- Photos Not Appearing in Gallery:
- Check the Destination Folder: Make sure you know where the photos were transferred to and check that folder in your file manager.
- Refresh Media Scanner: Some phones require you to manually refresh the media scanner to recognize new files. You can do this by going to Settings > Apps > Media Storage > Clear Data.
- Restart Your Phone: Restarting your phone can sometimes force the media scanner to refresh.
- Incompatible File Formats:
- Convert File Formats: If your phone doesn’t support the file format of the photos, you may need to convert them to a compatible format like JPEG or PNG.
- Use a Different App: Some apps may support more file formats than the default gallery app.
6. How Do I Protect My Photos During Transfer?
Protecting your photos during transfer is crucial to prevent data loss or corruption. Here are some tips to ensure a safe transfer:
- Use Reliable Equipment: Invest in high-quality SD card readers and adapters from reputable brands.
- Ensure Stable Connection: Avoid disconnecting the SD card reader or USB cable during the transfer process.
- Safely Eject the SD Card: Always use the “Safely Eject” or “Unmount” option on your phone or computer before removing the SD card.
- Verify the Transfer: After the transfer, verify that all photos have been successfully transferred and are not corrupted.
- Backup Your Photos: As a precaution, always have a backup of your photos on another storage device or in the cloud.
7. What Are the Best SD Cards for Photo Transfer?
Choosing the right SD card can significantly impact the speed and reliability of your photo transfers. Here are some factors to consider when selecting an SD card:
- Capacity: Choose a capacity that meets your needs. Higher capacities are suitable for storing large numbers of high-resolution photos.
- Speed Class: Look for SD cards with a high-speed class, such as UHS-I or UHS-II, for faster transfer speeds.
- Brand: Stick with reputable brands like SanDisk, Samsung, and Sony for reliability and performance.
- Durability: Consider SD cards that are waterproof, shockproof, and temperature-resistant for added protection.
Here is a comparison table of some popular SD cards for photography:
| Brand | Model | Capacity | Speed Class | Key Features |
|---|---|---|---|---|
| SanDisk | Extreme Pro | 64GB-1TB | UHS-I U3 | Fast read/write speeds, ideal for 4K video recording and high-resolution photos. |
| Samsung | EVO Plus | 64GB-512GB | UHS-I U3 | Reliable performance, water and temperature-resistant. |
| Sony | SF-G Series | 32GB-128GB | UHS-II U3 | Ultra-fast read/write speeds, designed for professional photographers and videographers. |
| Lexar | Professional 1667x | 32GB-256GB | UHS-II U3 | High-speed performance, suitable for burst shooting and 4K video. |
| Transcend | Ultimate SDXC 633x | 64GB-256GB | UHS-I U3 | Affordable option with good performance for everyday photography. |
8. How Do I Organize My Photos After Transfer?
Organizing your photos after transfer can make it easier to find and manage them. Here are some tips:
- Create Folders: Create folders on your phone or computer to organize your photos by date, event, or subject.
- Rename Files: Rename your photo files with descriptive names that include the date, event, or subject.
- Use Metadata: Add metadata to your photos, such as captions, keywords, and location information, to make them searchable.
- Use Photo Management Software: Consider using photo management software like Adobe Lightroom or Google Photos to organize and edit your photos.
9. What Are the Legal Considerations When Transferring Photos?
When transferring photos, it’s essential to be aware of legal considerations related to copyright and privacy.
- Copyright: Ensure you have the right to transfer and use the photos. If you didn’t take the photos yourself, you may need to obtain permission from the copyright holder.
- Privacy: Be mindful of privacy laws when transferring photos of people. Obtain their consent before transferring or sharing their photos.
- Terms of Service: Review the terms of service of any cloud storage services you use to ensure you comply with their policies regarding photo storage and sharing.
10. How Can dfphoto.net Help You With Your Photography Needs?
At dfphoto.net, we are dedicated to providing you with the best resources and information to enhance your photography skills. Whether you’re an amateur enthusiast or a professional photographer, we offer a wealth of knowledge and tools to help you succeed.
- Extensive Tutorials: Access our comprehensive tutorials on various photography techniques, including composition, lighting, and editing.
- Equipment Reviews: Read our in-depth reviews of the latest cameras, lenses, and accessories to make informed purchasing decisions.
- Inspirational Galleries: Browse our curated galleries of stunning photographs from talented photographers around the world to spark your creativity.
- Community Forum: Connect with fellow photographers in our community forum to share your work, ask questions, and get feedback.
FAQ: Transferring Photos from SD Card to Phone
Here are some frequently asked questions about transferring photos from an SD card to your phone:
1. Can I transfer photos from an SD card to my phone without a computer?
Yes, you can transfer photos from an SD card to your phone without a computer using an SD card reader and OTG adapter, a USB-C SD card reader, a Wi-Fi SD card, or cloud storage services.
2. What is an OTG adapter, and why do I need it?
An OTG (On-The-Go) adapter allows your phone to recognize USB devices, such as an SD card reader. You need it to connect the SD card reader to your phone if your phone doesn’t have a built-in SD card slot.
3. How do I know if my phone supports OTG?
Most modern Android phones support OTG. You can check your phone’s specifications or use an OTG compatibility checker app from the Google Play Store.
4. Can I use any SD card reader with my phone?
You can use any SD card reader that is compatible with your phone’s charging port (USB-C or Micro-USB) or with the OTG adapter you are using.
5. Why is my phone not recognizing the SD card reader?
Ensure your phone supports OTG, the adapter and reader are compatible, and your phone’s software is up to date. Restarting your phone can also help.
6. How can I speed up the photo transfer process?
Use a faster SD card reader, avoid wireless transfer for large files, and close unnecessary apps running in the background.
7. What file formats are compatible with my phone?
Most phones support common file formats like JPEG, PNG, and MP4. If your photos are in a different format, you may need to convert them.
8. Is it safe to transfer photos wirelessly using cloud storage?
Yes, transferring photos wirelessly using cloud storage is generally safe, as long as you use a reputable cloud service with encryption and strong security measures.
9. How do I safely eject the SD card from my phone?
Use the “Safely Eject” or “Unmount” option in your phone’s settings or file manager before removing the SD card.
10. What should I do if my photos are not appearing in the gallery after transfer?
Check the destination folder, refresh the media scanner, or restart your phone.
Transferring photos from an SD card to your phone doesn’t have to be complicated. By following these methods and tips, you can ensure a smooth and efficient process.
Ready to elevate your photography? Visit dfphoto.net today to explore our tutorials, reviews, and inspirational galleries. Join our community and start your journey toward mastering the art of photography!
Address: 1600 St Michael’s Dr, Santa Fe, NM 87505, United States
Phone: +1 (505) 471-6001
Website: dfphoto.net