Transferring photos from your Samsung phone to your PC is a common need, whether it’s to free up phone storage, create backups, organize your memories, or share them easily. While Samsung phones don’t have a direct “Send to PC” button in the gallery, there are numerous straightforward methods to get your precious photos onto your computer.
This comprehensive guide will walk you through the best ways to transfer photos from your Samsung phone to your PC, covering both USB cable and wireless options. You’ll also discover valuable tips for a smooth transfer process and how to ensure your photos are safely backed up on your computer.
Transfer Photos from Samsung to PC Using a USB Cable
Using a USB cable remains a reliable and widely used method for transferring photos from your Samsung phone to your PC. A USB connection allows for direct file transfer, offering speed and security. Let’s explore the top USB methods:
Method 1: Utilizing MobileTrans for Samsung Photo Transfer
Wondershare MobileTrans – Phone Transfer emerges as a user-friendly and efficient tool specifically designed for file transfers between smartphones and computers. It simplifies the process of moving various file types, including photos, from your Samsung phone to your PC.
MobileTrans stands out by ensuring no data loss during transfer and providing a secure USB connection, safeguarding your files from potential online threats. Its intuitive interface makes transferring photos a breeze, often accomplished in just a few clicks.
Wondershare MobileTrans
Effortlessly Transfer Data from Samsung to PC
- Zero data loss or leaks during transfer.
- Supports a wide array of data types: photos, videos, files, apps, contacts, and more.
- Compatible with a vast range of Android and iOS devices.
4,085,556 happy users and counting
4.5/5 Excellent
To transfer photos from your Samsung phone to your PC using MobileTrans, follow these simple steps:
- Install and Launch MobileTrans: Download and install MobileTrans on your PC. Launch the “MobileTrans Phone Transfer” tool. Connect your Samsung phone to your computer using a USB cable.
- Select Phone Transfer and Export to PC: From the MobileTrans main dashboard, select “Phone Transfer” and then choose the “Export to PC” option.
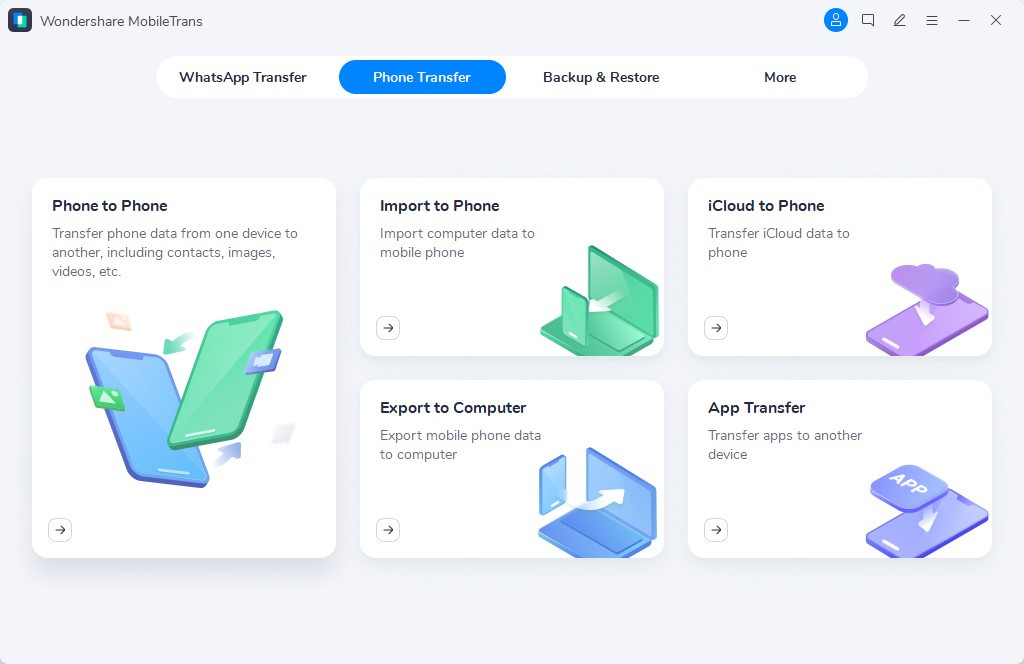 MobileTrans dashboard showcasing the Phone Transfer feature.
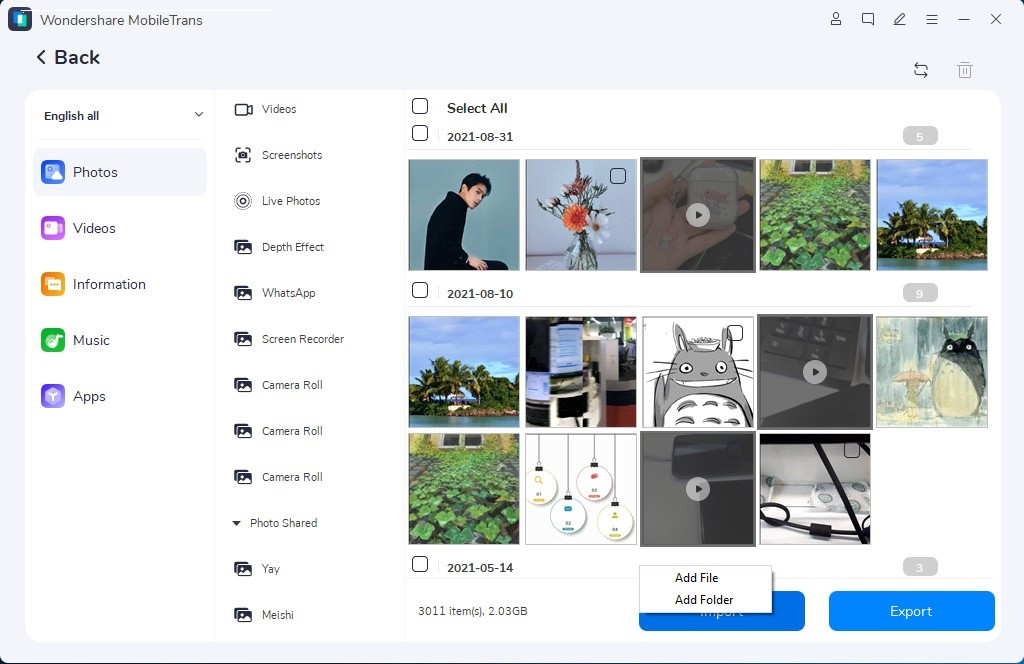
- Choose Photos and Export: Select “Photos” from the file types list. Choose the specific Samsung photos you wish to transfer to your PC. Click the “Export” button and wait for MobileTrans to complete the photo transfer process. You’ll receive a notification upon completion.
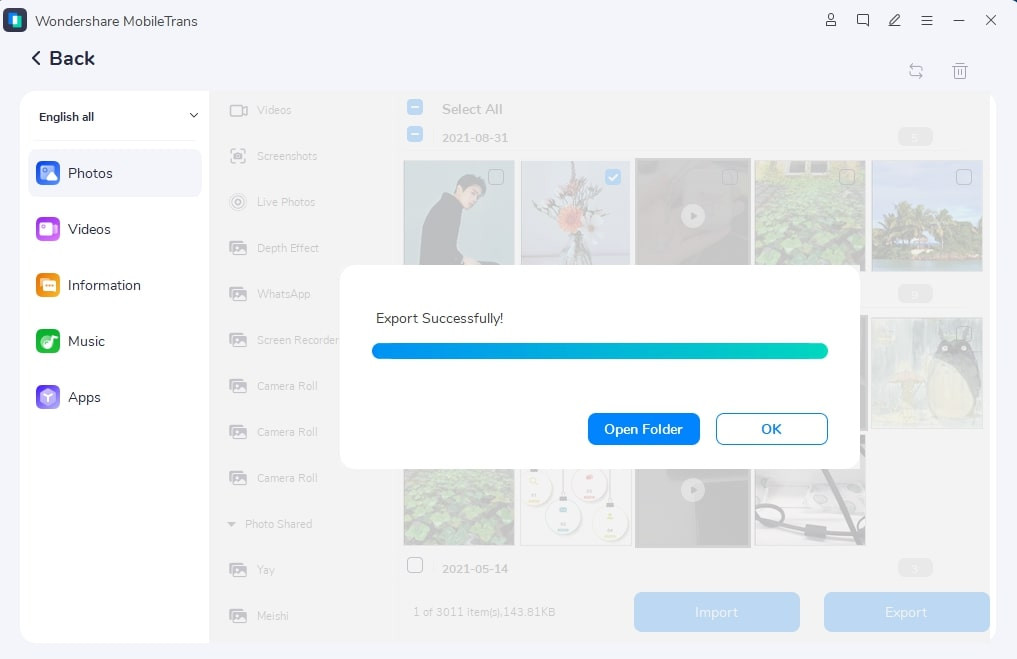 Screenshot showing the selection of Photos for export to PC within MobileTrans.
Want to transfer photos from your PC back to your Samsung phone? MobileTrans makes it just as easy:
- Launch MobileTrans and Connect: Open MobileTrans and connect your Samsung phone to your PC.
- Select Phone Transfer and Import to Phone: Choose “Phone Transfer” and then click “Import to Phone”. Select the photos you want to import from your PC to your Samsung phone and click “Import”.
 Screenshot demonstrating the Import to Phone feature in MobileTrans for transferring photos from PC to Samsung.
- Photo Transfer Complete: MobileTrans will notify you once the import is complete. You can then find your transferred photos in your Samsung phone’s Gallery app or Google Photos.
4.5/5 Excellent
Free Download Free Download Secure and Safe Download
Method 2: Transferring Photos via Windows File Explorer
Windows File Explorer offers a straightforward and universally compatible method to transfer photos from your Samsung phone to your Windows PC. It’s a default method, ensuring compatibility with all Samsung phones and Windows operating systems.
- Connect via USB and Select File Transfer Mode: Connect your Samsung phone to your PC using a USB cable. Once connected, your phone may default to “Charging” mode. Swipe down from the top of your phone screen to access notifications, tap on the USB notification, and change the USB mode to “File Transfer” or “Photo Transfer”.
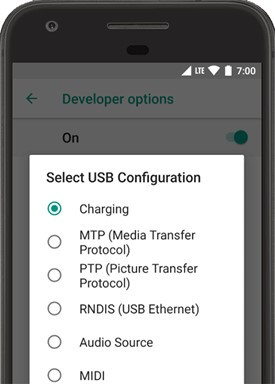 Screenshot showing the USB connection options on a Samsung phone, highlighting the "File Transfer" option.
- Access Your Phone in File Explorer: Open “Windows File Explorer” on your PC. You should see your Samsung phone listed under “Devices” or “This PC”. Click on your phone’s name to access its internal storage.
- Locate and Copy Photos: Navigate to the “DCIM” folder, which usually contains your camera photos. Inside “DCIM,” you might find a “Camera” folder or other subfolders like “Photos” or “Media” depending on your phone’s structure. Select the photos you want to transfer. Right-click on the selected photos and choose “Copy”.
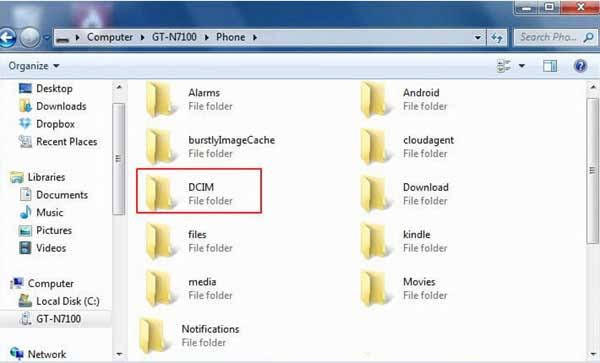 Screenshot of Windows File Explorer displaying the DCIM folder on a Samsung phone, ready for photo selection and transfer.
- Paste Photos to Your PC: Go to your desired location on your PC where you want to save the photos (e.g., your Pictures folder, desktop, or a specific folder you created). Right-click in the destination folder and select “Paste”. Your photos will be copied from your Samsung phone to your PC.
Method 3: Exporting Photos Using Samsung Smart Switch
Samsung Smart Switch is Samsung’s official software for data transfer and backup, and it’s excellent for transferring photos between Samsung devices and PCs (both Samsung and Windows PCs). Smart Switch may be pre-installed on some Samsung phones, and you can download it from the Google Play Store for your phone and the Microsoft Store for your PC.
- Install and Launch Smart Switch: Download and install Samsung Smart Switch on both your Samsung phone and your PC if you don’t already have it. Launch Smart Switch on both devices. Connect your Samsung phone to your PC with a USB cable. Unlock your phone and tap “Allow” if prompted to grant Smart Switch access to your phone’s data.
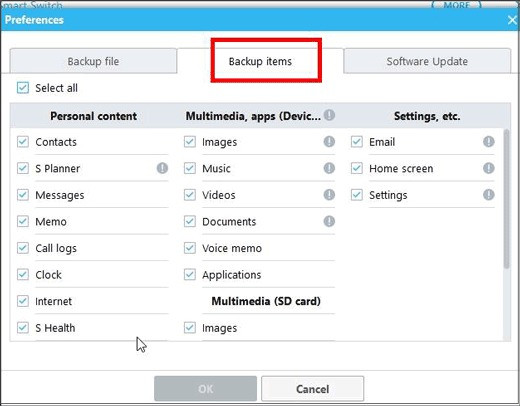
- Access Preferences and Backup Options: On your PC’s Smart Switch application, click “More” (usually located at the top-right corner) and select “Preferences”.
- Choose Photos for Backup: In the Preferences menu, click on “Backup items”. Select “Photos” as the file type you want to back up and transfer. Choose the specific photos or albums you want to transfer to your PC. Click “Backup”.
 Screenshot of Samsung Smart Switch interface on PC, highlighting the Backup options and photo selection.
- Allow Backup on Your Phone: Your Samsung phone may prompt you for permission to back up data. Tap “Allow” to proceed.
 Screenshot of a Samsung phone prompting user to allow Smart Switch to backup data, emphasizing the "Allow" button.
Smart Switch will create a backup of your selected photos on your computer. You can then access, view, and manage these photos from the backup folder on your PC. You can also use Smart Switch to restore these photos back to your Samsung phone or another device later.
Method 4: Importing Photos via the Windows Photos App
The built-in Windows Photos app offers a convenient way to import photos and videos from various devices, including your Samsung phone. This method is ideal for quickly transferring photos directly into your Windows photo library.
- Connect Phone and Set USB Mode: Connect your Samsung phone to your PC using a USB cable. On your phone, change the USB connection mode from “Charging” to “Transfer Files” or “Media Transfer” via the USB options in your notification panel.
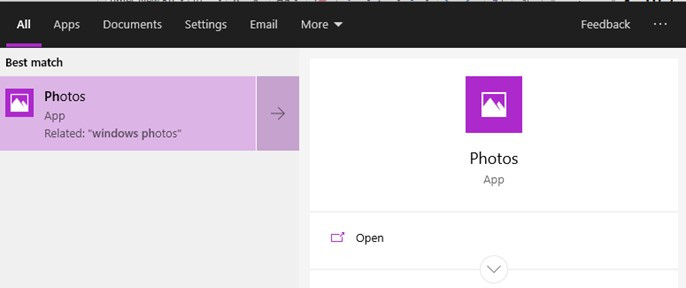
- Open Windows Photos App: Search for “Photos” in the Windows search bar (usually located on the taskbar) and open the “Photos” app. Alternatively, find it in your app list.
 Screenshot of the Windows search bar with "Photos" typed in, showing the Windows Photos app icon.
- Initiate Import: In the Windows Photos app, click on the “Import” button (often located in the top-right corner). Select your Samsung phone from the listed devices under the import options.
 Screenshot of the Windows Photos app interface, highlighting the "Import" button and device selection options.
- Select and Import Photos: The Windows Photos app will automatically detect and display the photos and videos on your Samsung phone. Select the photos you want to transfer. Choose your preferred storage location on your PC if prompted. Click “Import” to begin transferring the selected photos from your Samsung phone to your computer.
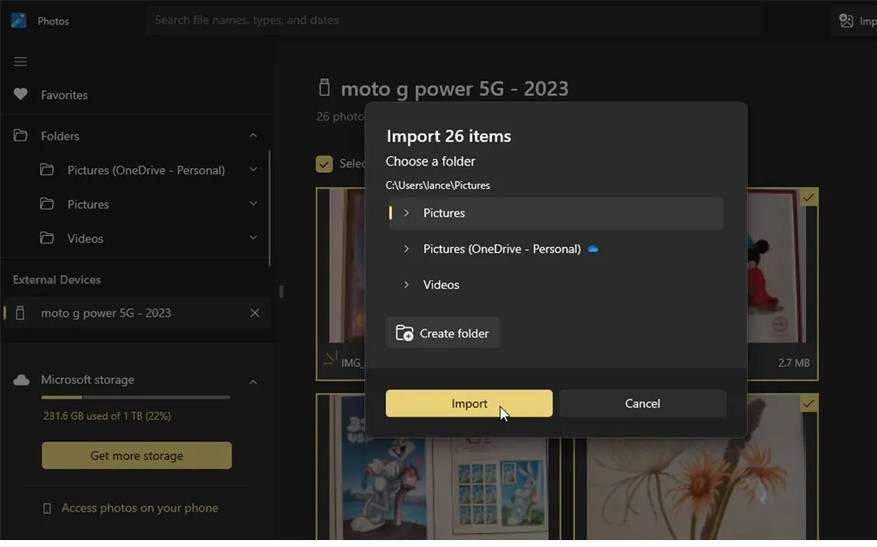 Screenshot of the Windows Photos app showing selected photos ready for import from a Samsung phone to PC.
Method 5: Transferring Photos from SD Card (If Applicable)
If your Samsung phone stores photos on an SD card, you have two options for transferring them to your PC: directly through your phone via USB or by using an SD card reader.
Option 1: Transfer via Phone (SD Card as Storage)
- Connect Phone and Access File Explorer: Connect your Samsung phone to your PC using a USB cable and unlock your phone.
- Navigate to SD Card: Open “File Explorer” on your PC. Find your Samsung phone listed under “This PC” or “Devices”. Click on your phone, and you should see both “Internal storage” and “SD card” options. Click on “SD card”.
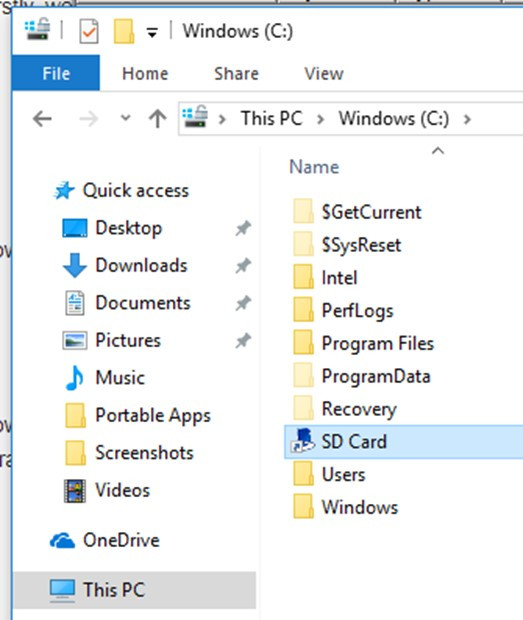 Screenshot of Windows File Explorer showing a Samsung phone's storage options, highlighting the "SD card" option.
- Copy and Paste Photos: Locate your photos on the SD card (usually in the “DCIM” folder or a designated photo folder). Copy the photos and paste them into your desired folder on your PC.
Option 2: Using a USB Card Reader
- Insert SD Card into Reader: Remove the SD card from your Samsung phone and insert it into a USB card reader. Connect the card reader to your PC’s USB port. If your PC has a built-in card reader slot, you can insert the SD card directly.
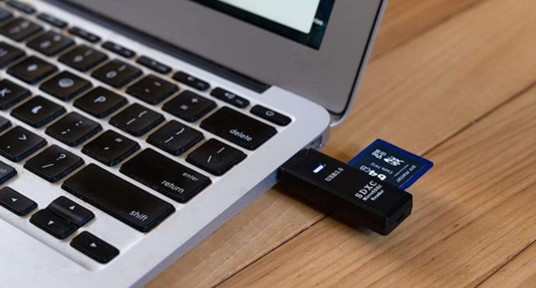 Image depicting a USB card reader with an SD card inserted, ready to be connected to a PC.
- Access SD Card and Transfer Photos: Your PC will recognize the SD card as a removable drive. Open the SD card drive in File Explorer. Copy the photos from the SD card and paste them to your chosen location on your PC.
- Eject SD Card: After transferring, safely eject the SD card from the card reader or your PC.
How to Transfer Photos from Samsung to PC Wirelessly
While USB cables offer a reliable connection, wireless transfer methods provide convenience and flexibility. While generally slightly slower than USB and potentially less secure if not using encrypted methods, wireless options are perfect for quick transfers and when cables aren’t readily available. Here are secure wireless methods to transfer photos from your Samsung phone to your PC:
Method 1: Downloading Photos from Google Drive
Google Drive is a popular cloud storage service for Android users, offering an efficient and secure way to store and access files, including photos. If you use Google Photos and have enabled backup to Google Drive, you can easily download your Samsung photos to your PC.
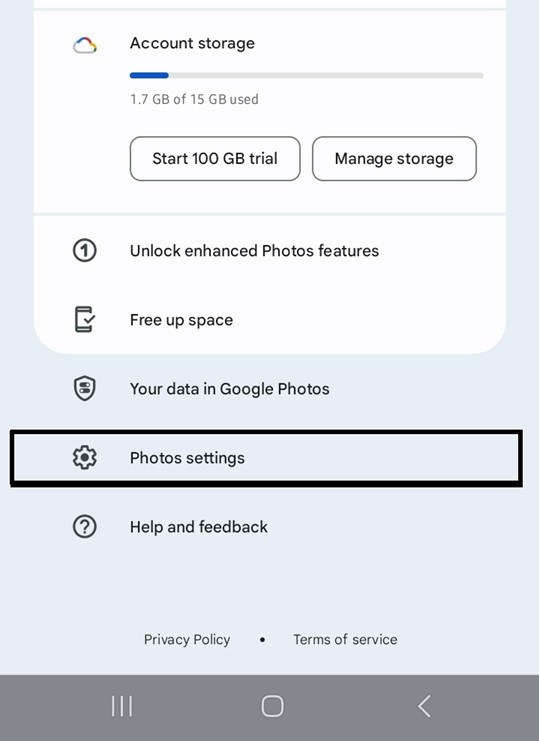
- Ensure Backup to Google Drive: On your Samsung phone, open the “Google Photos” app and sign in to your Google account. Tap your profile icon (top-right corner) and go to “Photos settings”. Select “Backup & sync” and ensure backup is turned on and set to your desired Google account. Allow sufficient time for your photos to back up to Google Drive if they aren’t already.
 Screenshot of Google Photos app on a Samsung phone, showing the Backup & sync settings.
- Access Google Drive on PC: Open a web browser on your PC and go to Google Drive or open the Google Drive desktop application if installed. Sign in to the same Google account you use on your Samsung phone.
- Download Photos: Locate your backed-up photos in Google Drive, typically within the “Google Photos” folder or “Recent” folder. You can select individual photos or entire folders. Right-click on your selection and choose “Download”.
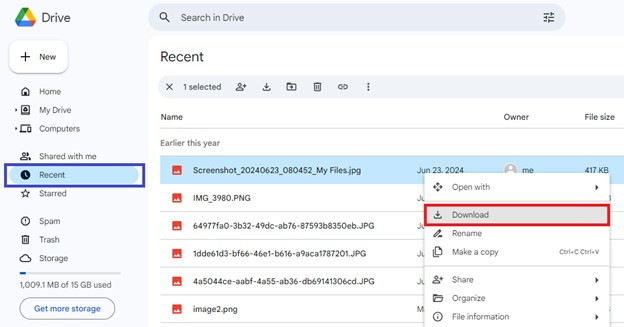 Screenshot of Google Drive interface on PC, showing photos and the "Download" option upon right-clicking.
Google Drive will download the selected photos to your PC’s default downloads folder.
Method 2: Exporting Photos from Samsung Cloud Drive
Samsung Cloud Drive functions similarly to Google Drive but is specific to Samsung devices. If you’ve backed up your photos to Samsung Cloud, you can access them on your PC. Note that Samsung Cloud’s Gallery Sync service is being discontinued and migrating to OneDrive, so this method might involve OneDrive integration.
- Check Samsung Cloud Backup (and OneDrive Sync): On your Samsung phone, go to “Settings” and tap “Accounts and backup”. Select “Samsung Cloud”.
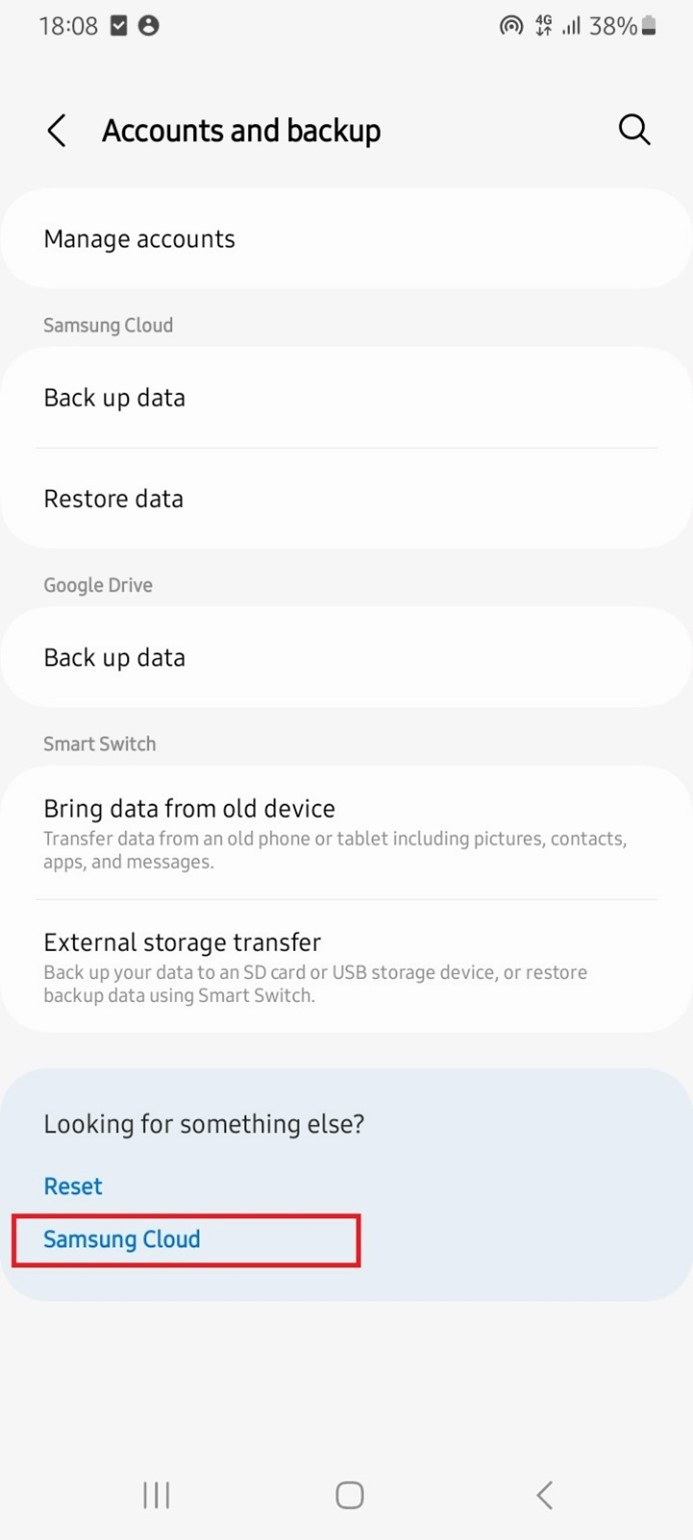 Screenshot of Samsung phone Settings menu, highlighting the "Samsung Cloud" option under Accounts and backup.
- Access Gallery Sync Settings: Tap “Gallery” under the “Sync” tab. Ensure Gallery Sync is enabled. It might prompt you to link with Microsoft OneDrive. Follow the prompts to connect your Samsung Cloud Gallery to OneDrive if necessary.
- Access Samsung Cloud or OneDrive on PC: Sign in to your Samsung Cloud account on the Samsung Cloud website or, if you’ve synced with OneDrive, sign in to your Microsoft OneDrive account on the OneDrive website or desktop app.
- Download Photos: Locate your backed-up Samsung photos within Samsung Cloud or OneDrive. Select the photos you want to transfer and download them to your PC.
Method 3: Transferring Photos via Bluetooth
Bluetooth offers a short-range wireless transfer option suitable for sending a small number of photos between your Samsung phone and PC. It’s not ideal for large albums or high-resolution images due to slower transfer speeds.
- Enable Bluetooth on Both Devices: Turn on Bluetooth on both your Samsung phone and your PC. On your PC, go to Bluetooth settings and ensure it’s discoverable.
- Select Photos and Share via Bluetooth: On your Samsung phone, go to your “Gallery” or “Photos” app and select the photos you want to transfer. Tap the “Share” icon and choose “Bluetooth”.
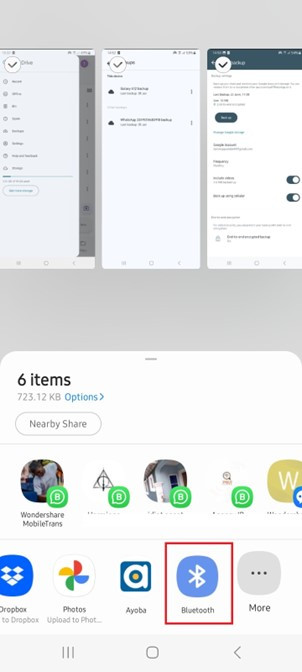 Screenshot of a Samsung phone Gallery app, showing the Share options and the Bluetooth icon highlighted.
- Receive Files on PC: On your PC, in Bluetooth settings, click “Send or receive files via Bluetooth”. Choose “Receive files”.
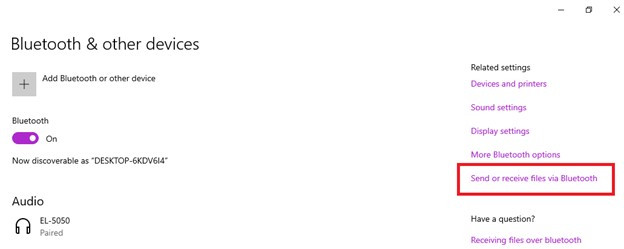 Screenshot of Windows Bluetooth settings, highlighting the "Receive files" option.
- Select PC on Phone and Accept Transfer: Your PC’s name should appear as a Bluetooth device option on your Samsung phone. Tap your PC’s name to initiate pairing and file transfer. Accept the incoming file transfer request on your PC.
- Locate Transferred Photos: The photos will be automatically transferred to your PC, usually to your “Pictures” folder or a designated Bluetooth transfer folder on your local disk.
Method 4: Sending Photos via Gmail
Gmail can be used to wirelessly transfer a few photos from your Samsung phone to your PC. However, email attachments have size limits (around 25MB per email for Gmail), so this method is only suitable for transferring a small number of photos at a time.
- Compose Email in Gmail App: Open the Gmail app on your Samsung phone and tap the “Compose” (Pen) icon to start a new email.
- Address Email to Yourself: Enter the email address that you use to access Gmail on your computer as the recipient.
- Attach Photos: Tap the “Attach files” icon (paperclip) and choose “Attach file”. Select the photos you want to transfer from your phone’s storage.
- Send Email and Download on PC: Send the email. Open Gmail in a web browser on your PC and go to your Inbox. You’ll find the email with the attached photos. Open the email and download the attached photos directly to your PC.
Method 5: Using Microsoft Edge Drop Feature
Microsoft Edge browser offers a “Drop” feature that allows you to wirelessly share files, including photos, between devices signed in to the same Microsoft account. This is a convenient option if you use Microsoft Edge and have a Microsoft account.
- Use Microsoft Edge on Both Devices: Download and open Microsoft Edge browser on your Samsung phone. Sign in to the same Microsoft account that you use on your Windows PC. Ensure you are also signed in to Microsoft Edge on your PC.
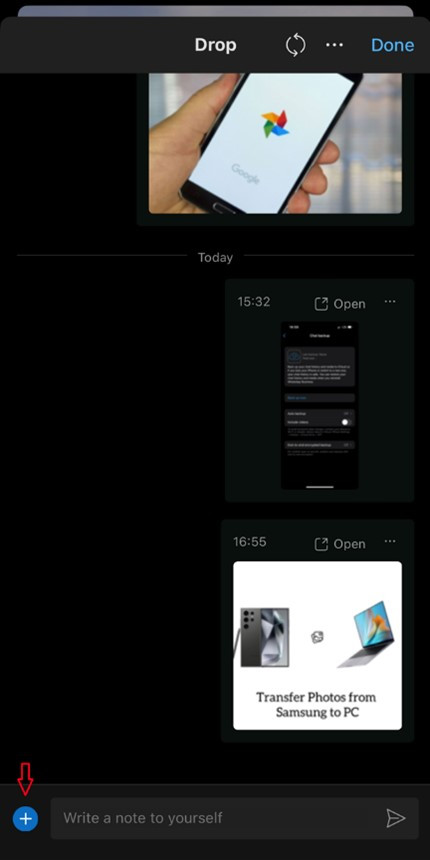
- Access Drop Feature: In Microsoft Edge on your Samsung phone, find and tap the “Drop” icon (it might be in the bottom toolbar or menu).
 Screenshot of Microsoft Edge browser on a Samsung phone, showing the "Drop" feature icon.
- Attach and Send Photos: In the Drop window, tap the “Attachment” icon (paperclip). Choose the photos you want to transfer from your phone and tap “Send”.
 Screenshot of Microsoft Edge Drop feature interface, showing the attachment icon and photos ready to be sent.
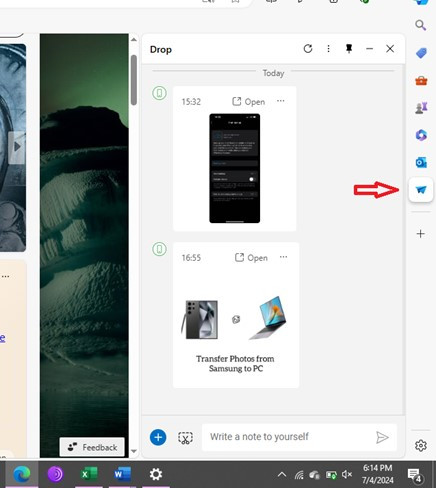
- Receive Photos on PC: Open Microsoft Edge on your PC and navigate to the “Drop” feature. You’ll see the photos you sent from your Samsung phone in the Drop window. Right-click on each photo and choose “Download” to save them to your PC. You can also use Drop to transfer photos from your PC to your Samsung phone in the same way.
Pro Tips for Transferring Samsung Photos to PC
Keep these helpful tips in mind for a smoother and more efficient photo transfer experience:
- Maintain Connection During USB Transfer: When using a USB cable, ensure your Samsung phone remains connected to your PC throughout the entire transfer process. Disconnections can lead to incomplete transfers or potential data loss.
- Use Secure Transfer Methods: Be cautious when using third-party transfer tools. Stick to reputable software and official methods to protect your data.
- Choose Transfer Method Based on Volume: For transferring a few photos, wireless methods are convenient. For large albums or high-resolution photos, USB transfer is generally faster and more reliable.
- Unlock Your Samsung Phone: Ensure your Samsung phone is unlocked when connecting to your PC, especially for USB transfers. Your PC may not be able to access files if your phone is locked.
- Regularly Back Up Your Photos: Make it a habit to regularly back up your Samsung photos to your PC. This ensures you have a secure copy of your memories and provides easy access to your photos on your computer whenever you need them.
Final Thoughts
Transferring photos from your Samsung phone to your PC is a straightforward process with multiple methods available to suit your needs and preferences. Whether you prefer the reliability of a USB cable or the convenience of wireless transfer, this guide provides you with the knowledge to choose the best approach. Remember to follow the steps carefully and prioritize secure transfer practices to safeguard your precious photo memories.
By regularly transferring and backing up your Samsung photos to your PC, you ensure their safety and accessibility for years to come.
4.5/5 Excellent
Free Download Free Download Safe and Secure Downloads
FAQ
-
Where are Samsung photos stored on a PC after transfer?
The location depends on the transfer method. Photos downloaded from cloud services or email are typically in your PC’s “Downloads” folder. When using USB transfer methods, the photos will be in the folder you chose as the destination during the transfer process, such as “Pictures” or a custom folder on your local disk. -
Why can’t I transfer photos from my Samsung phone to my PC?
Troubleshooting steps include:- Check Connections: Ensure your USB cable is properly connected if using USB transfer. For wireless methods, verify both devices are connected to the internet or Bluetooth is enabled and paired correctly.
- USB Mode: For USB transfer, ensure your Samsung phone is set to “File Transfer” or “Photo Transfer” mode in the USB notification settings.
- Account Login: For cloud services (Google Drive, Samsung Cloud), verify you are logged in to the same account on both your phone and PC.
- Storage Space: Ensure your PC has sufficient storage space to receive the photos.
- Permissions: Grant necessary permissions to file transfer apps or services on your phone if prompted.