Transferring photos from your phone to an SD card is essential for photographers and visual artists who need more storage or want to back up their precious memories, and dfphoto.net offers the solutions you need. Discover several efficient methods to move your photographic images and visual content, freeing up phone space and ensuring data security. Enhance your photography workflow with dfphoto.net and learn about image storage, backup solutions and file management.
1. Understanding the Need to Transfer Photos
Why is transferring photos from your phone to an SD card so important? It’s all about managing storage and ensuring the safety of your precious memories.
1.1. Why Transfer Photos from Phone to SD Card?
There are several reasons to transfer images from your phone to an SD card:
- Free Up Space: Phones have limited internal storage. Moving photos to an SD card frees up valuable space for apps, videos, and other files.
- Backup: SD cards provide a convenient backup solution for your photos, protecting them from loss due to phone damage or theft.
- Organization: SD cards allow you to organize your photos into folders, making it easier to find specific images.
- Transfer: It allows you to easily transfer photos between devices, such as from your phone to a computer or camera.
- Additional Storage: Photographers can easily go over their phone’s storage very quickly. An SD card serves as great additional storage for photos.
1.2. Potential Challenges
While transferring photos is generally straightforward, some challenges may arise:
- Compatibility: Ensure your phone supports SD cards and that the card is compatible with your phone’s file system.
- Transfer Speed: Transferring large numbers of photos can take time, especially with slower SD cards.
- File Corruption: Incorrect transfer procedures or faulty SD cards can lead to file corruption.
- Organization Loss: When transferring, image files, date order and album structure may be lost.
- SD Card Damage: SD cards can be easily damaged if not stored safely.
2. Methods for Transferring Photos to SD Card
There are several ways to transfer photos from your phone to an SD card. Let’s explore each method in detail.
2.1. Using Android’s Built-In File Manager
Most Android phones have a built-in file manager app that you can use to transfer photos.
2.1.1. Step-by-Step Guide
- Open the File Manager App: Look for an app called “Files” or “File Manager” on your phone. Samsung phones usually have “My Files.”
- Navigate to Internal Storage: In the file manager, go to “Internal Storage” or “Phone Storage.”
- Select Photos: Find the photos you want to transfer. You can usually select multiple photos by tapping and dragging or using tick boxes.
- Move or Copy: Tap the “Move” or “Copy” option. “Move” will remove the photos from your phone’s storage, while “Copy” will keep them in both locations.
- Choose SD Card: Select your SD card as the destination. Choose a folder on the SD card to save the photos.
- Confirm Transfer: Tap the “Move” or “Copy” button to start the transfer.
2.1.2. Pros and Cons
| Pros | Cons |
|---|---|
| Simple and direct | Requires an SD card slot on your phone |
| No need for a computer | May not preserve album structure or date order |
| Can move other file types using the same method | Only moves or copies photos, doesn’t create a backup |
| Cannot copy photos from messages |
2.2. Changing the Default Camera Save Location
To avoid manually transferring photos, you can set your camera to save new photos directly to the SD card.
2.2.1. Step-by-Step Guide
- Open Camera App: Launch your phone’s camera app.
- Open Settings: Look for a “Settings” icon (usually a gear symbol) and tap it.
- Find Storage Settings: Look for options like “Data storage,” “Storage location,” or similar.
- Select SD Card: Choose “SD card” or “Memory card” as the default storage location.
2.2.2. Pros and Cons
| Pros | Cons |
|---|---|
| Photos are automatically saved to the SD card | Requires an SD card slot on your phone |
| Quick and easy | If you want to save some photos to your phone and others to the SD card, you need to manually switch the setting before taking each photo |
| No need for a computer | Cannot copy pictures from within messages |
| No need to manually move photos across | Some Android phones may not allow you to change the default save location |
2.3. Using an SD Card Reader
If your phone doesn’t have an SD card slot, you can use an SD card reader to transfer photos.
2.3.1. Step-by-Step Guide
- Get an SD Card Reader: Buy a USB to SD card reader.
- Connect the Reader: Plug the SD card reader into your Android device. You might need to enable OTG (On-The-Go) storage in your phone’s settings.
- Open File Manager: Open the “Files” or “My Files” app.
- Select Photos: Choose the photos you want to transfer from your phone’s internal storage.
- Move to SD Card: Select your SD card in the file list and choose a folder to save the photos.
- Confirm Transfer: Tap the “tick” mark to transfer the files.
2.3.2. Pros and Cons
| Pros | Cons |
|---|---|
| Photos can be transferred quickly | SD cards need safe storage, like an SD card holder or wallet |
| Quick and easy | Can get expensive due to limited storage on some SD cards |
| Does not require the use of a computer | Cannot copy photos from messages |
2.4. Transferring Photos via PC
Using a computer to transfer photos provides more flexibility and options.
2.4.1. Step-by-Step Guide
- Connect SD Card to PC: Insert your SD card into your computer using a built-in slot or an SD card reader.
- Connect Phone to PC: Connect your Android phone to your computer using a USB cable.
- Set USB Connection Mode: On your phone, select “Transfer files” or “MTP” mode.
- Access Phone Files: On your computer, open File Explorer (Windows) or Finder (Mac) and find your phone in the list of devices.
- Copy Photos: Navigate to the photos on your phone and copy them to the SD card.
- Eject Devices: Safely eject both your phone and the SD card from your computer.
2.4.2. Using Droid Transfer
Droid Transfer is a software that simplifies file transfer between your Android phone and PC.
- Install Droid Transfer: Download and install Droid Transfer on your computer.
- Install Transfer Companion App: Download the free Transfer Companion app on your Android phone.
- Connect via Wi-Fi: Launch Droid Transfer and scan the QR code with the Transfer Companion app to connect via Wi-Fi.
- Select Photos: In Droid Transfer, select the “Photos” section.
- Choose Photos to Transfer: Select the photos you want to transfer to the SD card.
- Save to PC: Click “Save to PC” and choose your SD card as the destination.
2.4.3. Pros and Cons
| Pros | Cons |
|---|---|
| Can filter by photos, videos, and albums | Requires a computer |
| Preserves album structure | |
| Can copy only new photos | |
| Can copy photos from SMS and MMS messages | |
| Can transfer other types of files, including messages and music |
2.5. Using Cloud Storage
Cloud storage services like Google Photos, Dropbox, and OneDrive can also be used to transfer photos to an SD card.
2.5.1. Step-by-Step Guide
- Upload Photos to Cloud: Upload your photos from your phone to your chosen cloud storage service.
- Download Photos to PC: On your computer, download the photos from the cloud storage service.
- Transfer to SD Card: Copy the downloaded photos to your SD card.
2.5.2. Pros and Cons
| Pros | Cons |
|---|---|
| Provides a backup of your photos in the cloud | Requires a stable internet connection |
| Accessible from multiple devices | Can take a long time to upload and download large numbers of photos |
| Can share photos easily with others | May require a paid subscription for large storage容量 |
3. Optimizing Your Photography Workflow with dfphoto.net
Now that you know how to transfer photos to an SD card, let’s look at how dfphoto.net can help optimize your photography workflow.
3.1. Exploring dfphoto.net
dfphoto.net is a comprehensive resource for photographers of all levels. It offers a wide range of articles, tutorials, and resources to help you improve your photography skills and workflow.
3.2. Key Features and Resources
- Photography Tutorials: Learn about various photography techniques, such as composition, lighting, and post-processing.
- Equipment Reviews: Get detailed reviews of cameras, lenses, and other photography equipment.
- Inspiration: Discover stunning photos from talented photographers around the world.
- Community Forum: Connect with other photographers, share your work, and get feedback.
- Photo Challenges: Participate in fun and creative photo challenges to improve your skills.
- Software Guides: Step by step guides on the best photography software to use.
- Image Optimization Tools: To make your photos look even better.
3.3. How dfphoto.net Enhances Your Workflow
- Learning New Techniques: With dfphoto.net, you can learn new photography techniques to improve the quality of your photos.
- Choosing the Right Equipment: dfphoto.net’s equipment reviews can help you choose the right camera, lens, and accessories for your needs.
- Finding Inspiration: dfphoto.net’s stunning photo galleries can inspire you to try new things and push your creative boundaries.
- Getting Feedback: The community forum allows you to share your work and get feedback from other photographers.
- Staying Up-to-Date: dfphoto.net keeps you up-to-date on the latest photography trends and technologies.
4. Best Practices for Managing Photos on SD Cards
To ensure the longevity and security of your photos on SD cards, follow these best practices.
4.1. Choosing the Right SD Card
- Capacity: Choose an SD card with enough capacity for your needs. Consider how many photos and videos you plan to store on the card.
- Speed Class: Look for SD cards with a high-speed class (e.g., Class 10, UHS-I, UHS-II) for faster transfer speeds.
- Brand: Choose a reputable brand known for producing reliable SD cards.
- Durability: Ensure SD cards are durable and capable of withstanding common wear and tear.
4.2. Organizing Your Photos
- Create Folders: Organize your photos into folders based on date, event, or subject.
- Use Descriptive Names: Use descriptive names for your folders and files to make it easier to find specific photos.
- Avoid Overfilling: Don’t fill your SD card to its maximum capacity, as this can slow down transfer speeds and increase the risk of file corruption.
4.3. Backing Up Your Photos
- Multiple Backups: Create multiple backups of your photos on different storage devices, such as a computer, external hard drive, and cloud storage service.
- Regular Backups: Back up your photos regularly to protect against data loss.
- Offsite Backup: Store one of your backups in a different location in case of a disaster.
4.4. Protecting Your SD Card
- Handle with Care: Avoid bending, dropping, or scratching your SD card.
- Keep Away from Liquids: Keep your SD card away from water and other liquids.
- Store Properly: Store your SD card in a protective case when not in use.
- Avoid Extreme Temperatures: Don’t expose your SD card to extreme temperatures.
- Use Anti-static bags: These prevent static from damaging your SD card.
4.5. Troubleshooting Common Issues
- SD Card Not Recognized: If your phone or computer doesn’t recognize your SD card, try cleaning the contacts with a soft cloth or using a different card reader.
- Slow Transfer Speeds: If you’re experiencing slow transfer speeds, try using a faster SD card or a different card reader.
- File Corruption: If you suspect file corruption, try using a data recovery tool to recover your photos.
- SD Card is Write Protected: Ensure that the SD card is not write protected. There is often a very small switch on the side of SD cards that toggles write protection.
5. Advanced Tips and Tricks
To further enhance your experience when transferring photos from your phone to an SD card, consider these advanced tips and tricks.
5.1. Using OTG (On-The-Go) Adapters
OTG adapters allow you to connect USB devices, such as SD card readers, directly to your Android phone.
How to Use OTG Adapters
- Purchase an OTG Adapter:
- Buy an OTG adapter that is compatible with your phone’s charging port (USB-C or Micro-USB).
- Connect the SD Card Reader:
- Plug the SD card reader into the USB port of the OTG adapter.
- Connect to Your Phone:
- Plug the OTG adapter into your phone’s charging port.
- Access Files:
- Use a file manager app to access the files on the SD card and transfer photos to or from your phone.
Benefits of Using OTG Adapters
- Direct Connection: Allows direct connection without needing a computer.
- Portability: Small and easy to carry around.
- Versatility: Can be used with other USB devices like keyboards and mice.
5.2. Automating Transfers with Apps
Several apps can automate the process of transferring photos from your phone to an SD card.
Popular Automation Apps
- FolderSync:
- Allows you to automatically sync files between your phone and an SD card, cloud storage, or network folders.
- Resilio Sync:
- A peer-to-peer file syncing tool that can automatically transfer photos between devices.
- Syncthing:
- An open-source continuous file synchronization program.
How to Set Up Automated Transfers
- Install the App:
- Download and install your chosen automation app from the Google Play Store.
- Configure Sync Settings:
- Set up the app to automatically sync photos from your phone’s camera folder to a folder on your SD card.
- Schedule Syncs:
- Configure the app to sync at regular intervals, such as daily or weekly.
- Monitor Transfers:
- Check the app regularly to ensure that transfers are running smoothly and that all photos are being backed up.
5.3. Using Third-Party File Managers
Third-party file managers often offer more advanced features than the built-in file manager on your phone.
Recommended File Managers
- Solid Explorer:
- A feature-rich file manager with dual-pane browsing, cloud storage support, and advanced file management tools.
- Total Commander:
- A powerful file manager with a wide range of features, including file comparison, archive support, and batch renaming.
- Astro File Manager:
- A user-friendly file manager with cloud storage integration, app management tools, and a built-in task killer.
Benefits of Using Third-Party File Managers
- Advanced Features: Offer more advanced features like batch renaming, file compression, and network storage support.
- Customization: Allow you to customize the interface and functionality to suit your needs.
- Efficiency: Can help you manage your files more efficiently with features like dual-pane browsing and quick access to frequently used folders.
5.4. Optimizing SD Card Performance
To ensure the best performance from your SD card, follow these tips.
Tips for Optimizing SD Card Performance
- Defragment Your SD Card:
- Regularly defragment your SD card to improve read and write speeds. You can use a defragmentation tool on your computer to defragment your SD card.
- Avoid Filling the Card to Capacity:
- As mentioned earlier, avoid filling your SD card to its maximum capacity, as this can slow down transfer speeds and increase the risk of file corruption.
- Format Your SD Card Regularly:
- Regularly format your SD card to keep it running smoothly. Be sure to back up all your photos and other files before formatting, as formatting will erase all data on the card.
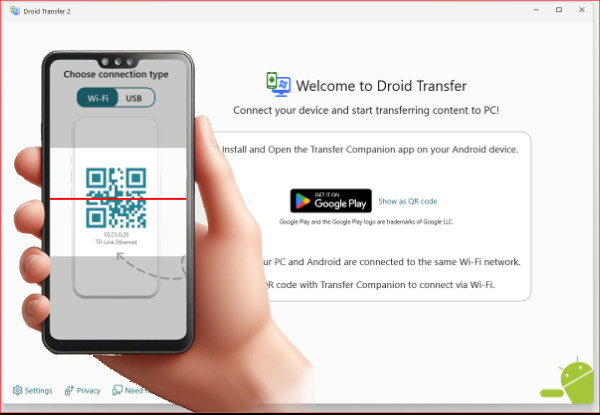 Connecting Android to PC via Wifi to transfer photos using Droid Transfer
6. Exploring Camera and Photo Equipment at dfphoto.net in Santa Fe
If you’re in Santa Fe, New Mexico, dfphoto.net is your go-to resource for all things photography. Located at 1600 St Michael’s Dr, Santa Fe, NM 87505, United States, with the phone number +1 (505) 471-6001, dfphoto.net offers a wealth of information and resources to help you enhance your skills.
6.1. Camera Equipment Reviews
dfphoto.net provides detailed reviews of the latest camera equipment, helping you make informed decisions.
Featured Reviews
- DSLR Cameras: Comprehensive reviews of top DSLR models from brands like Canon, Nikon, and Sony.
- Mirrorless Cameras: In-depth analyses of mirrorless cameras, known for their compact size and advanced features.
- Lenses: Expert opinions on a wide range of lenses, including prime lenses, zoom lenses, and specialty lenses.
- Accessories: Reviews of essential camera accessories like tripods, lighting equipment, and camera bags.
6.2. Expert Advice on Photo Equipment
Get professional guidance on selecting the right equipment for your specific needs.
Key Considerations
- Camera Type:
- Understand the differences between DSLR, mirrorless, and point-and-shoot cameras.
- Sensor Size:
- Learn about the impact of sensor size on image quality and low-light performance.
- Lens Selection:
- Choose lenses based on your preferred photography style, whether it’s landscape, portrait, or wildlife.
- Budget:
- Find equipment that fits your budget without compromising on essential features.
6.3. Photography Classes and Workshops
Enhance your photography skills with hands-on classes and workshops.
Available Courses
- Beginner Photography:
- Learn the basics of photography, including camera settings, composition, and lighting.
- Advanced Techniques:
- Explore advanced techniques like long exposure, HDR photography, and time-lapse.
- Post-Processing:
- Master post-processing skills using software like Adobe Photoshop and Lightroom.
- Specialized Workshops:
- Participate in specialized workshops focusing on specific genres like portrait, landscape, and street photography.
6.4. Community Events and Meetups
Connect with fellow photographers and expand your network.
Upcoming Events
- Photo Walks:
- Join guided photo walks to explore scenic locations and capture stunning images.
- Exhibitions:
- Attend photography exhibitions showcasing the work of local and international photographers.
- Guest Speaker Series:
- Listen to presentations from renowned photographers and industry experts.
- Networking Events:
- Connect with other photographers, share your work, and collaborate on projects.
7. SEO Optimization and Content Strategy for Photographers
To ensure your work gets noticed, it’s essential to optimize your content for search engines.
7.1. Keyword Research
Identify the keywords that your target audience is searching for.
Tools for Keyword Research
- Google Keyword Planner:
- A free tool from Google that helps you find relevant keywords and estimate search volume.
- SEMrush:
- A comprehensive SEO tool that provides insights into keyword rankings, traffic data, and competitor analysis.
- Ahrefs:
- Another powerful SEO tool that helps you analyze backlinks, track keyword rankings, and identify content gaps.
7.2. On-Page Optimization
Optimize your website and content for search engines.
Best Practices
- Title Tags:
- Create compelling title tags that include relevant keywords and accurately describe the content of the page.
- Meta Descriptions:
- Write engaging meta descriptions that encourage users to click on your search results.
- Header Tags:
- Use header tags (H1, H2, H3, etc.) to structure your content and highlight important keywords.
- Image Optimization:
- Optimize your images by using descriptive file names, alt tags, and compression to reduce file size.
- Internal Linking:
- Link to other relevant pages on your website to improve navigation and spread link equity.
7.3. Content Creation
Create high-quality, informative content that appeals to your target audience.
Content Ideas for Photographers
- Photography Tutorials:
- Share your knowledge and expertise by creating tutorials on various photography techniques.
- Equipment Reviews:
- Provide detailed reviews of cameras, lenses, and accessories.
- Behind-the-Scenes:
- Give your audience a glimpse into your creative process by sharing behind-the-scenes photos and videos.
- Case Studies:
- Showcase your best work by creating case studies that highlight your skills and expertise.
- Interviews:
- Interview other photographers and industry experts to provide valuable insights and perspectives.
7.4. Link Building
Build high-quality backlinks to your website to improve your search engine rankings.
Strategies for Link Building
- Guest Blogging:
- Write guest posts for other websites in your niche and include a link back to your website.
- Resource Pages:
- Create resource pages that provide valuable information and links to other relevant websites.
- Broken Link Building:
- Find broken links on other websites and offer to replace them with a link to your website.
- Partnerships:
- Collaborate with other businesses and organizations to create content and exchange links.
8. Legal and Ethical Considerations for Photographers
Understanding the legal and ethical aspects of photography is crucial for protecting your work and respecting the rights of others.
8.1. Copyright Law
Understand your rights as a photographer.
Key Aspects of Copyright Law
- Ownership:
- As the creator of a photograph, you automatically own the copyright to that photograph.
- Registration:
- You can register your photographs with the U.S. Copyright Office to strengthen your legal rights.
- Licensing:
- You can license your photographs to others for specific uses, such as commercial or editorial purposes.
- Infringement:
- Copyright infringement occurs when someone uses your photographs without your permission.
8.2. Model Releases
Obtain model releases when photographing people.
When to Use Model Releases
- Commercial Use:
- If you plan to use your photographs for commercial purposes, such as advertising or marketing, you need to obtain a model release from anyone who is recognizable in the photos.
- Editorial Use:
- You typically don’t need a model release for editorial use, such as news reporting or commentary, but it’s always a good idea to get one if possible.
8.3. Privacy Rights
Respect the privacy rights of individuals.
Guidelines for Respecting Privacy
- Public vs. Private Spaces:
- Be aware of the difference between public and private spaces and respect the privacy of individuals in private spaces.
- Sensitive Subjects:
- Avoid photographing sensitive subjects without permission, such as medical procedures or private moments.
- Harassment:
- Do not use your photography to harass or intimidate others.
8.4. Ethical Considerations
Adhere to ethical standards in your photography practice.
Ethical Guidelines
- Honesty:
- Be honest and transparent about your photography practices.
- Respect:
- Respect the rights and dignity of your subjects.
- Integrity:
- Maintain integrity in your work by avoiding manipulation or distortion of reality.
- Environmental Responsibility:
- Practice environmental responsibility by minimizing your impact on the environment and respecting wildlife.
9. Frequently Asked Questions (FAQ)
Here are some frequently asked questions about transferring photos from your phone to an SD card.
9.1. Can I transfer photos from my iPhone to an SD card?
Yes, but iPhones don’t have SD card slots. You’ll need an SD card reader or use a computer to transfer the photos.
9.2. How do I choose the right SD card for my phone?
Consider capacity, speed class, brand, and compatibility with your phone.
9.3. What is the best way to back up my photos?
Create multiple backups on different storage devices, including a computer, external hard drive, and cloud storage service.
9.4. How can I speed up the photo transfer process?
Use a faster SD card, a USB 3.0 card reader, or transfer photos via Wi-Fi using Droid Transfer.
9.5. What should I do if my SD card is not recognized?
Try cleaning the contacts, using a different card reader, or formatting the SD card (after backing up your photos).
9.6. Can I set my camera to automatically save photos to the SD card?
Yes, most Android phones allow you to change the default camera save location in the camera settings.
9.7. How do I organize my photos on the SD card?
Create folders based on date, event, or subject, and use descriptive names for your files.
9.8. Is it safe to store my photos on an SD card?
SD cards are generally safe, but it’s essential to handle them with care and create backups to protect against data loss.
9.9. What are the legal considerations when photographing people?
Obtain model releases for commercial use and respect privacy rights.
9.10. Where can I find more photography resources and inspiration?
Visit dfphoto.net for tutorials, equipment reviews, stunning photos, and a community forum.
10. Call to Action
Ready to take your photography to the next level? Visit dfphoto.net today to discover a wealth of resources, connect with a vibrant community, and unlock your creative potential. Whether you’re looking to master new techniques, find the perfect equipment, or simply be inspired, dfphoto.net has everything you need to succeed. Join us now and start your photography journey today! Located in beautiful Santa Fe, New Mexico, dfphoto.net is your local gateway to the world of photography.