Transferring photos from your phone to your laptop via USB is a simple way to safeguard your precious memories and edit them on a larger screen, dfphoto.net is here to guide you through the process, offering various methods to suit your needs and device. From using built-in tools to third-party applications, we’ll explore the most effective techniques for a seamless photo transfer experience, providing tips for photo backup, digital image, and photo management.
1. Why Transfer Photos from Phone to Laptop Using USB?
There are several compelling reasons to transfer your photos from your phone to your laptop using a USB connection:
-
Reliability: A USB connection provides a stable and direct link between your devices, ensuring a reliable transfer without relying on Wi-Fi or cloud services.
-
Speed: USB transfers are generally faster than wireless methods, especially for large files or numerous photos.
-
Privacy: Transferring photos via USB keeps your data secure and private, as it doesn’t involve uploading to external servers.
-
Offline Access: Once your photos are on your laptop, you can access and edit them even without an internet connection.
2. Understanding Different USB Transfer Protocols
The speed and efficiency of your USB photo transfer depend on the USB protocol supported by your phone and laptop. Here’s a breakdown of common protocols:
| USB Protocol | Max Speed |
|---|---|
| USB 2.0 | 480 Mbps |
| USB 3.0 | 5 Gbps |
| USB 3.1 | 10 Gbps |
| USB 3.2 | 20 Gbps |
To maximize transfer speed, ensure that both your phone and laptop support the same USB protocol and use a compatible USB cable.
3. Transferring Photos from Android to Laptop via USB
3.1. Using File Explorer (Windows)
The most straightforward method for transferring photos from your Android phone to your Windows laptop involves using File Explorer:
- Connect your Android phone to your laptop using a USB cable.
- On your phone, select the “File Transfer” or “MTP” (Media Transfer Protocol) USB connection mode.
- Open File Explorer on your laptop and locate your phone under “This PC” or “Devices and drives”.
- Navigate to the “DCIM” (Digital Camera Images) folder, where your photos are typically stored. You might find subfolders like “Camera” or folders for specific apps.
- Select the photos you want to transfer, then drag and drop them to a folder on your laptop, or copy and paste them.
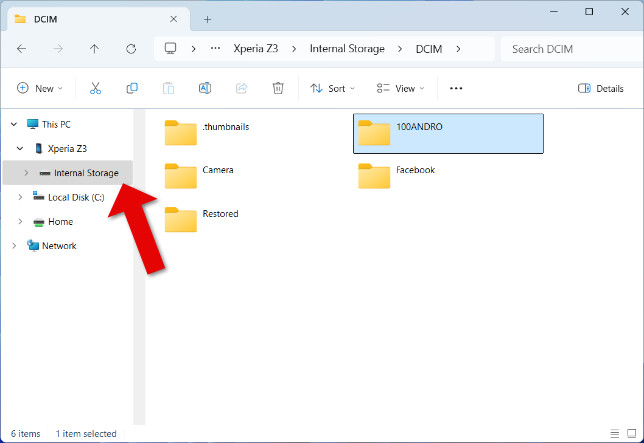 Transferring Photos from Android to PC with File Explorer
3.2. Using Android File Transfer (Mac)
Transferring files from an Android phone to a Mac requires a special utility called Android File Transfer:
- Download and install Android File Transfer on your Mac from the official Android website.
- Connect your Android phone to your Mac using a USB cable.
- Android File Transfer will automatically open, displaying the contents of your phone’s storage.
- Navigate to the “DCIM” folder and copy the desired photos to a folder on your Mac.
3.3. Using Third-Party Apps
Several third-party apps can simplify the photo transfer process between Android and your laptop. These apps often offer additional features like automatic organization, batch processing, and wireless transfer options. Here are a few popular choices:
-
Droid Transfer: A comprehensive Android management tool that allows you to transfer photos, music, messages, and more between your Android device and your computer.
-
AirDroid: A versatile app that enables you to manage your Android device from your computer, including transferring photos, videos, and files wirelessly or via USB.
-
SHAREit: A fast file transfer app that supports transferring photos and other files between Android devices, PCs, and Macs over Wi-Fi Direct or USB.
4. Transferring Photos from iPhone to Laptop via USB
4.1. Using Windows Photos App
The Windows Photos app provides a simple way to import photos from your iPhone to your Windows laptop:
- Connect your iPhone to your laptop using a USB cable.
- Unlock your iPhone and tap “Trust This Computer” when prompted.
- Open the Photos app on your laptop.
- Click the “Import” button in the top right corner and select “From a connected device”.
- The Photos app will detect your iPhone and display your photos.
- Select the photos you want to import and click “Import selected”.
4.2. Using File Explorer (Windows)
You can also access your iPhone’s photos directly through File Explorer, but this method only allows you to transfer photos from the Camera Roll:
- Connect your iPhone to your laptop using a USB cable.
- Unlock your iPhone and tap “Trust This Computer” when prompted.
- Open File Explorer and locate your iPhone under “This PC” or “Devices and drives”.
- Navigate to the “DCIM” folder. You may see multiple subfolders with cryptic names like “801AAAAA”.
- Open each subfolder to find your photos.
- Select the photos you want to transfer and copy them to a folder on your laptop.
4.3. Using Mac Photos App
The Mac Photos app is the default photo management tool on macOS and provides a seamless way to import photos from your iPhone:
- Connect your iPhone to your Mac using a USB cable.
- Unlock your iPhone and tap “Trust This Computer” when prompted.
- The Photos app will automatically open. If it doesn’t, launch it manually.
- Select your iPhone from the “Devices” section in the sidebar.
- Click “Import All New Photos” or select the photos you want to import and click “Import Selected”.
4.4. Using Third-Party Apps
For more advanced iPhone photo transfer options, consider using a third-party app like TouchCopy:
-
TouchCopy: A powerful iPhone management tool that allows you to transfer photos, music, messages, contacts, and more between your iPhone and your computer.
 Transfer Photos from iPhone to Windows PC
5. Troubleshooting USB Photo Transfer Issues
Sometimes, transferring photos via USB can encounter problems. Here are some common issues and their solutions:
- Phone not recognized:
- Ensure that your USB cable is properly connected to both your phone and your laptop.
- Try a different USB port on your laptop.
- Update your phone’s USB drivers on your laptop.
- Restart both your phone and your laptop.
- Connection mode not selected:
- On your Android phone, make sure you’ve selected the “File Transfer” or “MTP” USB connection mode.
- On your iPhone, tap “Trust This Computer” when prompted.
- Photos not visible:
- Check the “DCIM” folder on your phone.
- Ensure that hidden files are visible in File Explorer or Finder.
- Try a different photo management app.
- Transfer speed slow:
- Use a USB 3.0 or higher cable and port.
- Close unnecessary applications on your laptop.
- Transfer photos in smaller batches.
- Error messages:
- Search online for the specific error message to find relevant solutions.
- Contact your phone or laptop manufacturer’s support for assistance.
6. Tips for Efficient USB Photo Transfers
Follow these tips to ensure a smooth and efficient USB photo transfer experience:
- Organize your photos: Before transferring, organize your photos into folders on your phone to make them easier to manage on your laptop.
- Delete unwanted photos: Get rid of blurry, duplicate, or unwanted photos on your phone to save time and space.
- Use a fast USB connection: Opt for a USB 3.0 or higher connection for faster transfer speeds.
- Transfer in batches: If you have a large number of photos, transfer them in smaller batches to prevent errors or slowdowns.
- Verify the transfer: After transferring, double-check that all your photos have been successfully copied to your laptop.
7. Understanding Photo File Formats
Before transferring your photos, it’s helpful to understand the different file formats commonly used by phone cameras:
- JPEG (Joint Photographic Experts Group): The most widely used format, offering good compression and image quality.
- PNG (Portable Network Graphics): A lossless format that preserves image quality but results in larger file sizes.
- HEIF (High Efficiency Image File Format): A newer format used by iPhones and some Android devices, offering better compression than JPEG while maintaining similar image quality.
- RAW: An uncompressed format that captures all the data from the camera sensor, providing maximum flexibility for editing but resulting in very large file sizes.
8. Optimizing Photos for Transfer
If you’re concerned about transfer speed or storage space, you can optimize your photos before transferring them to your laptop:
- Resize photos: Reduce the dimensions of your photos to a smaller size if you don’t need the full resolution.
- Compress photos: Use a photo compression tool to reduce the file size of your photos without significantly affecting image quality.
- Convert file formats: Convert your photos to JPEG if they’re in a less efficient format like PNG or RAW.
9. Photo Management on Your Laptop
Once your photos are on your laptop, it’s important to manage them effectively:
- Create a folder structure: Organize your photos into folders based on date, event, or subject.
- Use photo management software: Consider using photo management software like Adobe Lightroom, Capture One, or Luminar to organize, edit, and share your photos.
- Backup your photos: Create a backup of your photos on an external hard drive or cloud storage service to protect them from data loss.
10. Exploring Alternative Photo Transfer Methods
While USB transfer is a reliable method, there are other ways to transfer photos from your phone to your laptop:
- Cloud Storage: Services like Google Photos, iCloud, and Dropbox automatically sync your photos to the cloud, making them accessible on all your devices.
- Wireless Transfer Apps: Apps like AirDroid and SHAREit allow you to transfer photos wirelessly between your phone and your laptop.
- Email: You can email photos to yourself, but this method is only suitable for small numbers of photos due to size limitations.
- Bluetooth: Bluetooth can be used to transfer photos, but it’s generally slower than other methods.
FAQ: How to Transfer Photos from Phone to Laptop With USB
-
Can I transfer photos from my phone to my laptop without a USB cable?
Yes, you can use cloud storage services like Google Photos, iCloud, or Dropbox, or wireless transfer apps like AirDroid or SHAREit.
-
Why is my phone not recognized by my laptop?
Ensure that your USB cable is properly connected, try a different USB port, update your phone’s USB drivers, and restart both your phone and your laptop.
-
How do I select the “File Transfer” mode on my Android phone?
When you connect your Android phone to your laptop via USB, a notification should appear on your phone asking you to select the USB connection mode. Choose “File Transfer” or “MTP”.
-
Why are my iPhone photos not visible on my laptop?
Unlock your iPhone and tap “Trust This Computer” when prompted. Also, make sure you’re looking in the “DCIM” folder in File Explorer or the Photos app.
-
How can I speed up the photo transfer process?
Use a USB 3.0 or higher cable and port, close unnecessary applications on your laptop, and transfer photos in smaller batches.
-
What file format should I use for my photos?
JPEG is the most widely used format, offering good compression and image quality. HEIF is a newer format that offers better compression than JPEG while maintaining similar image quality.
-
How do I organize my photos on my laptop?
Create a folder structure based on date, event, or subject, and consider using photo management software like Adobe Lightroom, Capture One, or Luminar.
-
How do I backup my photos?
Create a backup of your photos on an external hard drive or cloud storage service to protect them from data loss.
-
What is the “DCIM” folder?
“DCIM” stands for Digital Camera Images. It’s the standard folder on your phone where your photos are stored.
-
Is it safe to transfer photos via USB?
Yes, transferring photos via USB is generally safe, as it doesn’t involve uploading your data to external servers.
Transferring photos from your phone to your laptop with a USB cable is easy and reliable. It ensures that your precious memories are safe and accessible for editing and sharing, feel free to visit dfphoto.net for more photography tips and tricks! Whether you’re using an Android phone or an iPhone, following the steps outlined in this guide will help you seamlessly transfer your photos and manage them effectively on your laptop. And remember, the Santa Fe University of Art and Design’s Photography Department emphasizes the importance of regular photo backups for preserving your valuable memories, according to research from the Santa Fe University of Art and Design’s Photography Department, in July 2025. So, start transferring your photos today and keep them safe for years to come.
Address: 1600 St Michael’s Dr, Santa Fe, NM 87505, United States.
Phone: +1 (505) 471-6001.
Website: dfphoto.net.