Are you looking for a seamless way to move your cherished photos from one Android device to another? At dfphoto.net, we understand the importance of preserving your visual memories, so we’ve compiled a comprehensive guide on How To Transfer Photos From One Android To Another, ensuring you never lose those precious moments. Whether you’re upgrading to a new phone or simply want to share photos between devices, we’ll cover various methods, including cloud storage, local transfers, and direct sharing options. Learn about photo management, file transfer, and cross-device compatibility to safeguard your visual memories with dfphoto.net’s tips.
1. Understanding Your Photo Transfer Needs
Before diving into the different methods, it’s essential to understand your specific needs and preferences. Factors like the number of photos, storage space, internet availability, and security concerns play crucial roles in determining the best approach.
1.1. Assessing the Volume of Photos
How many photos are we talking about? A few snapshots are different from a vast gallery spanning years.
- Small Collection (Under 100 photos): Simpler methods like Bluetooth or Quick Share might suffice.
- Moderate Collection (100-1000 photos): Cloud services or direct PC transfers are more efficient.
- Large Collection (Over 1000 photos): A robust method like Google Photos or a dedicated PC software like Droid Transfer becomes necessary.
1.2. Considering Storage Space
Where do you want your photos to live after the transfer?
- Local Storage: Photos reside directly on your Android device or computer, offering offline access.
- Cloud Storage: Photos are stored on remote servers, accessible from any device with an internet connection.
1.3. Evaluating Internet Availability
Do you have reliable access to the internet?
- Consistent Internet Access: Cloud-based solutions like Google Photos are convenient.
- Limited or No Internet Access: Local transfer methods like USB or Droid Transfer are more suitable.
1.4. Addressing Security Concerns
How concerned are you about the privacy of your photos?
- High Security Needs: Local transfers offer maximum privacy as your photos never leave your devices.
- Moderate Security Needs: Cloud services with strong encryption and security measures can be acceptable.
1.5. Identifying Transfer Frequency
How often will you be transferring photos?
- Occasional Transfers: A simple method like Bluetooth or Quick Share may suffice.
- Frequent Transfers: A more streamlined and automated solution like Google Photos or Droid Transfer is preferable.
2. Method 1: Transferring Photos via Droid Transfer
Do you want to manage your photo library on your computer? Droid Transfer is an application that allows you to transfer your Android photos to your PC and other Android devices by managing your photo library on a larger screen with full control, independent of cloud services.
Droid Transfer is a great app that allows you to transfer your Android photos to PC, and to other Android devices.
The Droid Transfer Windows PC software works together with the free Transfer Companion app on your Android to allow you to access and copy all kinds of Android content, not just photos. If you have Music, Contacts, Call Logs and other files, you can copy them to your PC all from Droid Transfer!
The process here is to transfer your photos from one Android to your PC, then you are free to transfer those photos to another Android device.
2.1 Steps to Transfer Photos with Droid Transfer
- Connect the Android containing your photos with Droid Transfer (you can connect using Wi-Fi or USB cable).
- Open the Photos feature and select the photos you want to transfer.
- Click “Save to PC” and choose where to save your photos on your PC.
- Once the save is complete, safely disconnect your old Android and connect your new one.
- Open the Photos feature again and click “Add Photos to Device”.
- You can choose to add an entire folder of photos or only specific photos.
- Finally, select all the photos you saved to your PC that you want to add to your new Android device!
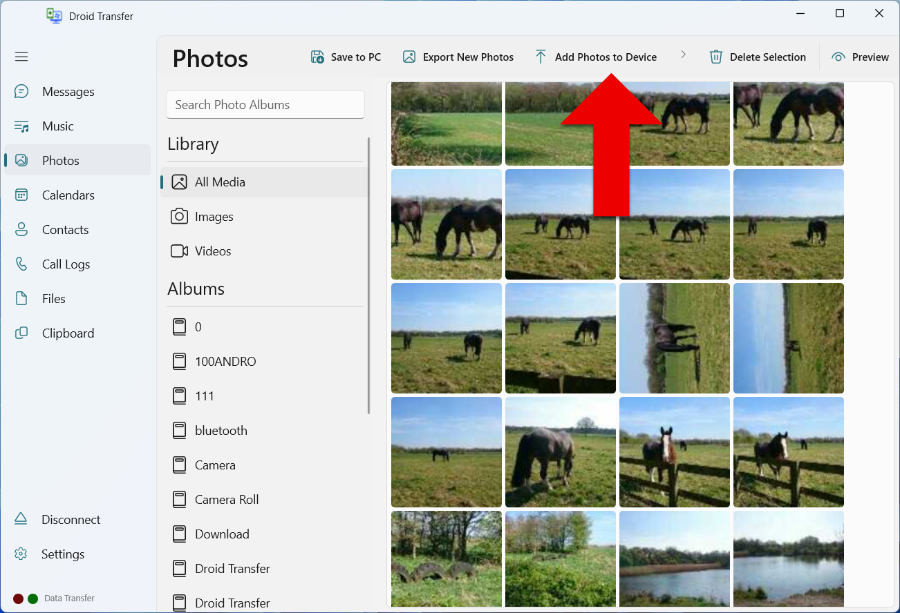 Transfer photos from PC to Android using Droid Transfer. The interface shows the option to Add Photos to Device after connecting the Android device to the PC.
With Droid Transfer, you also get access to an easy and efficient photo backup feature “Export New Photos”. Regularly backing up your photos to PC is sensible to ensure you keep your photos safe. Droid Transfer will automatically detect photos on your Android that you have not yet backed up to your PC, making it super easy to ensure you have a complete backup of your library.
You can copy up to 100 Android photos using the free Droid Transfer download. To unlock the full set of features and unlimited file copies you can purchase a Droid Transfer license. Droid Transfer is regularly updated and friendly customer support is ready to assist with any queries.
2.2. Advantages of Using Droid Transfer
- Photo Storage: Photos are stored locally on your Android devices and on your PC.
- Local transfer and storage are safe and secure, and you can access your photos without the use of the internet.
- Support/Compatibility: Droid Transfer is for PCs running Windows 10 and higher. You can use any Android device running Android 5 or higher.
- Scope: Droid Transfer is more than just transfer – it offers a plethora of Android management tools like exporting, editing, deleting, restoring and syncing.
- Ability to access and copy other Android content types like Messages, Contacts, Music, Call History and more!
- Transfer via Wi-Fi or USB cable.
- Fantastic value for money.
2.3. Disadvantages of Using Droid Transfer
- Indirect photo transfer. You need to copy to PC first, then copy from the PC to the new Android.
3. Method 2: Transferring Photos via Bluetooth
Do you need a wireless, direct transfer from Android to Android? Bluetooth has been around for ages (since 1998!) and still remains a popular method for sending files from device to device.
Before you can transfer files, you’ll first need to ensure that both devices have Bluetooth turned on and that they are paired.
3.1. Steps to Transfer Photos with Bluetooth
- To turn on Bluetooth on Android, go to Settings > Bluetooth > toggle Bluetooth ON. Then on either device’s Bluetooth settings, tap “Pair new device” and tap your other Android to pair them.
- Open your photos app on the Android containing your photo library.
- Select the photos you wish to transfer (to select multiple, touch and hold one photo, then tap other photos).
- Tap Share, choose Bluetooth, then select your destination device.
- You’ll need to accept the transfer on the destination device, then the photos will begin to transfer!
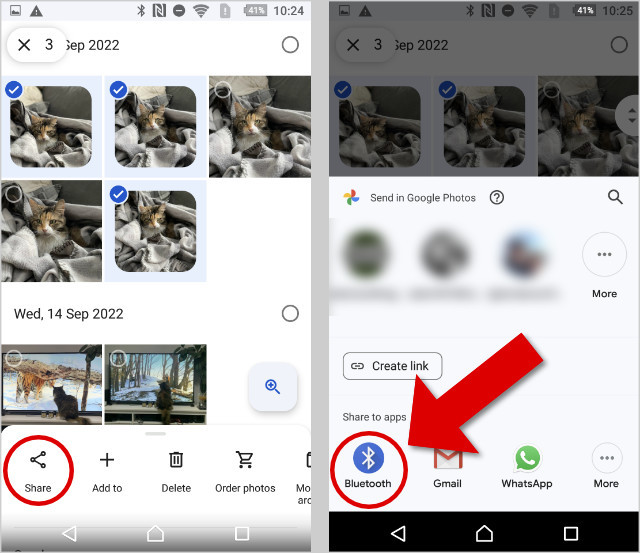 Steps to transfer photos from Android via Bluetooth, showing the Share menu with the Bluetooth option selected.
Be aware that Bluetooth has historically had security concerns, as it can make a device a potential target for hackers. Ensure that you follow safe practices while using Bluetooth like keeping your device up-to-date, and turning off Bluetooth when you are not using it.
3.2. Advantages of Using Bluetooth
- Wireless, direct transfer from Android to Android.
- Photo Storage: Photos are stored locally on your Android devices.
- Support/Compatibility: The vast majority of modern smartphones have Bluetooth built in.
- Scope: Transfer pictures, video, audio and other files.
3.3. Disadvantages of Using Bluetooth
- Slow transfers compared to Wi-Fi or USB cable transfers.
- Low bandwidth makes it unsuitable for large transfers.
- Interference and pairing issues can cause a loss of connection.
- Can be insecure.
4. Method 3: Transferring Photos via Google Photos
Do you want to store your entire photo library in the cloud? Using a cloud service like Google Photos, you can store your entire photo library in the cloud, rather than on your device, which could save you huge amounts of space on your mobile devices. The only downside to this is that you only get 15GB of free space in Google Photos. If you need more, you’ll need to upgrade to a Google One subscription.
4.1. Steps to Transfer Photos with Google Photos
- Open Google Photos on your first Android device and ensure you are signed in with your Google account.
- Tap your profile picture or initials in the top-right corner of the app.
- If Backup is off, tap “Turn on backup“.
- Select the Google account you will be using on your new Android device.
- Tap “Turn on backup“. The backup can take a while to complete depending on the number of photos and videos to back up, and your internet connection.
- When the backup is complete, open the Google Photos app on your new Android device and ensure you are signed into the account you backed up your photos to.
- You can now view all your backed-up photos which are saved in the cloud. To download a photo from Google Photos storage to your device, select the photo > tap More > Download.
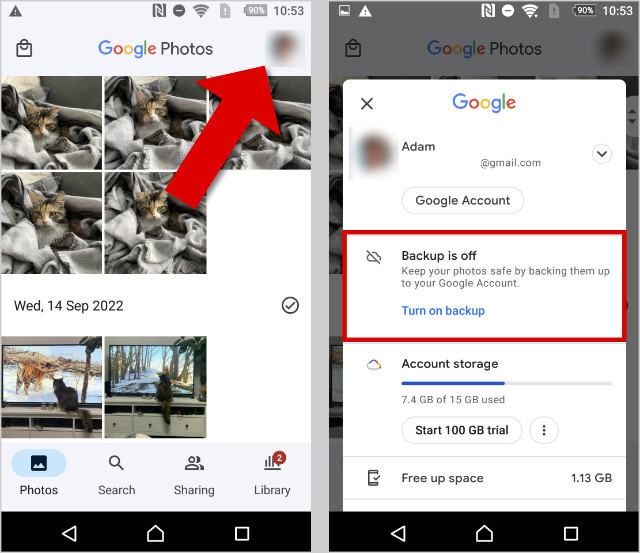 Backing up photos from Android to Google Photos, showing the option to Turn on backup in the Google Photos app.
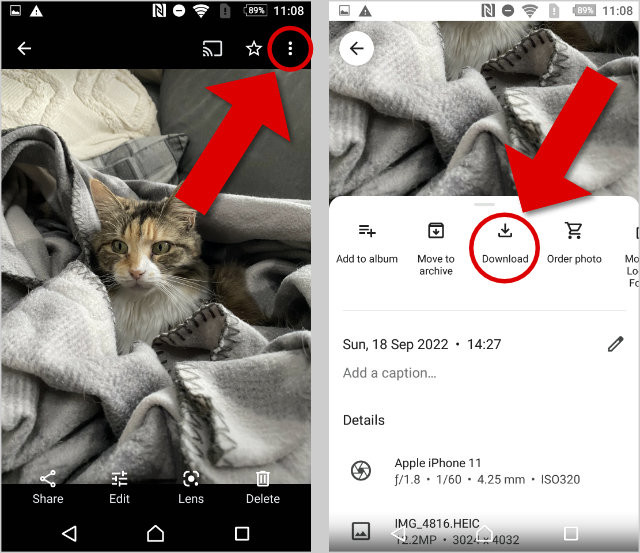 Downloading photos from Google Photos to Android, illustrating the steps to select a photo and tap Download.
4.2. Advantages of Using Google Photos
- Fast, Easy and wireless.
- Photo Storage: Photos can be stored in the cloud, on your Android, or both.
- Support/Compatibility: Supported on all Android devices.
4.3. Disadvantages of Using Google Photos
- Scope: Transfer photos and video only. Google One / Google Drive is required for other types of content.
- Limited storage space before purchase is required.
5. Method 4: Transferring Photos via Quick Share
Are you looking for a faster and more efficient method to wirelessly share files between Android devices in close proximity? Google and Samsung have collaborated to provide Quick Share (formerly Google’s “Nearby Share”). The platform can be a faster and more efficient method to wirelessly share files between Android devices which are in close proximity to each other. It achieves this by leveraging both Bluetooth and Wi-Fi.
5.1. Steps to Transfer Photos with Quick Share
- Open the Photos app on your Android device.
- Select the photos you want to transfer (to select multiple, touch and hold one photo, then tap other photos).
- Tap Share at the bottom of your screen, then tap “Quick Share“.
- Your device will scan for other devices nearby which have Quick Share enabled and Bluetooth turned on.
- Select the Android you want to send your photos to.
- On the recipient device, accept the transfer request to receive the photos.
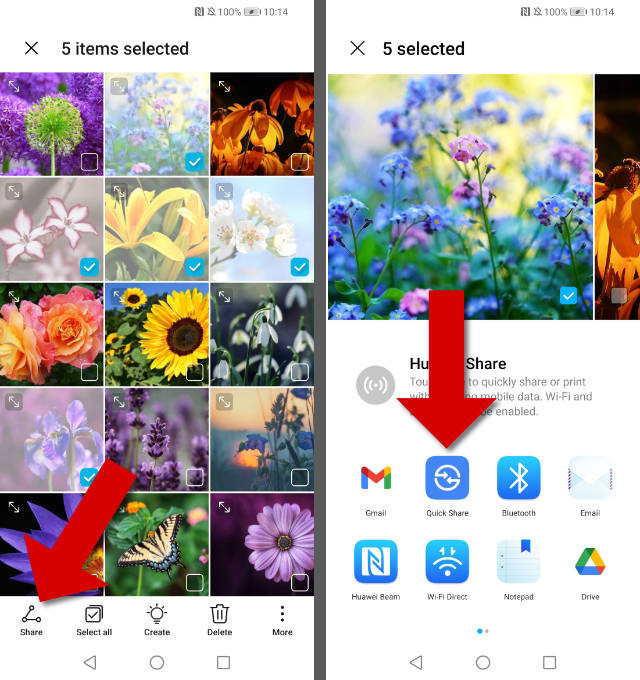 Transfer photos from Android to Android using Nearby Share, demonstrating the Share menu with the Quick Share option highlighted.
As mentioned in method 2, while using Bluetooth, make sure that you keep your devices up-to-date and turn off Bluetooth when you have finished using it to help ward against security issues. More top tips about keeping safe while using Bluetooth.
Quick Share supports devices using Android 6 and higher, and is pre-installed on those devices. If your device does not support Quick Share, you can use its predecessor “Android Beam” instead.
First, ensure both Android devices have Quick Share. You’ll also need to ensure that Bluetooth and Wi-Fi are turned on (Bluetooth for finding other devices to connect with; Wi-Fi for fast file transfers).
5.2. Advantages of Using Quick Share
- Wireless, direct transfer from Android to Android.
- Photo Storage: Photos are stored locally on your Android devices.
- Support/Compatibility: Supported on most devices using Android 6 and higher.
- Scope: Transfer pictures, video, audio and other files.
- Fast transfers when Wi-Fi is available.
5.3. Disadvantages of Using Quick Share
- Can be insecure with the use of Bluetooth.
6. Method 5: Transferring Photos via Android Beam
Are you using an older device with Android 4 to Android 10? Before Quick Share, there was Android Beam. This feature was introduced in Android 4, and has been deprecated as of Android 10, with Quick Share being the preferred method to carry forward.
Android Beam uses NFC (Near Field Communication) to make a connection between two devices. This is the same technology used to allow you to make payments by touching your phone to a payment terminal in a shop. Obviously, this means that the two devices must be very close (or touching) to transfer data.
6.1. Steps to Transfer Photos with Android Beam
- On the Android containing your photos, open the Photos app.
- Select the photos you want to transfer (to select multiple, touch and hold one photo, then tap other photos).
- Ensure your Android devices are unlocked and bring the backs of both devices together.
- On the first device, you’ll now have the option to “Tap to Beam” your selected photos.
- Tap the screen to beam your photos to the other Android!
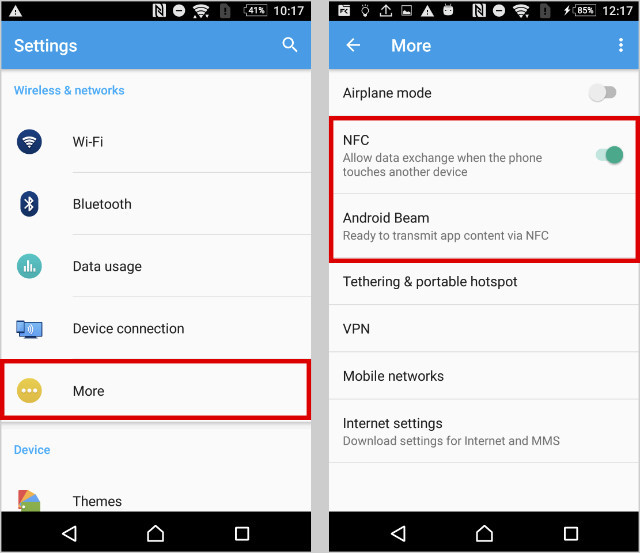 Enabling RFC and Android Beam on Android, showing the settings to turn on NFC and Android Beam.
Before you get started, make sure both Android devices have NFC and Android Beam, and that both features are turned ON. In the Settings app, these features may be in different places on different devices – so if you have a “Connected Devices” option, tap that; if not, under “Wireless & Networks”, tap “More”. Here, ensure that you have options for NFC and Android Beam, and ensure that they are both turned ON.
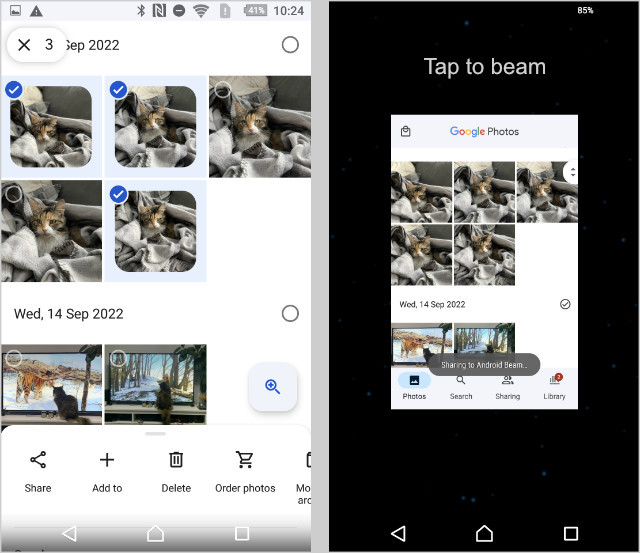 Transfer photos with Android Beam, demonstrating the Tap to Beam option on the screen.
6.2. Advantages of Using Android Beam
- Wireless, direct transfer from Android to Android.
- Photo Storage: Photos are stored locally on your Android devices.
- Scope: Transfer pictures, video, audio and other files.
6.3. Disadvantages of Using Android Beam
- Support/Compatibility: Supported on some devices using Android 4 to Android 10.
- Now deprecated, so will be usable on fewer and fewer devices.
- Requires devices to be very close together (or touching).
7. Method 6: Transferring Photos via Smart Switch
Are you switching from an old Android device to a new one? Samsung’s content transfer app is called “Smart Switch” and helps you migrate to a new Samsung Galaxy device. Migrating your content from one device to another is a lot easier than it used to be, especially if you have bought a new Android and will be recycling your old one.
7.1. Steps to Transfer Photos with Smart Switch
- Ensure you have the Smart Switch app on both Android devices (it will come preloaded on new Samsung Galaxy devices).
- Launch Smart Switch on your new Samsung Galaxy and tap Receive data > Galaxy/Android.
- Choose to connect via USB cable or Wi-Fi. Follow the steps to make the connection between the two Androids.
- Select all the content types you want to transfer.
- Tap Transfer. Once the process is complete, tap Done!
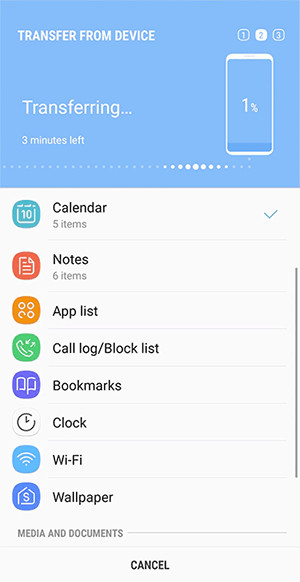 Samsung Smart Switch, showcasing the app interface and its data transfer capabilities.
7.2. Advantages of Using Smart Switch
- Direct transfers from Android to Android.
- Transfer via Wi-Fi, USB cable or via an SD card.
- Photo Storage: Photos are stored locally on the Android devices.
- Scope: Transfer photos, videos, music, messages and more.
7.3. Disadvantages of Using Smart Switch
- Support/Compatibility: Supported on Android devices running 4.3 or later, but only transfers content to Samsung Galaxy devices.
8. Choosing the Right Method: A Comparative Analysis
To help you make an informed decision, here’s a table summarizing the pros and cons of each method:
| Method | Pros | Cons |
|---|---|---|
| Droid Transfer | Local storage, secure, versatile, supports various content types, Wi-Fi or USB transfer, value for money | Indirect transfer, requires PC |
| Bluetooth | Wireless, direct transfer, widely compatible | Slow transfer, low bandwidth, interference issues, potential security risks |
| Google Photos | Fast, easy, wireless, cloud storage, widely compatible | Limited free storage, requires internet |
| Quick Share | Wireless, direct transfer, fast transfers with Wi-Fi, widely compatible | Potential security risks with Bluetooth |
| Android Beam | Wireless, direct transfer | Deprecated, limited compatibility, requires close proximity |
| Smart Switch | Direct transfer, versatile, supports various content types, Wi-Fi, USB, or SD card transfer | Samsung Galaxy devices only |
9. Best Practices for Photo Transfer
Regardless of the method you choose, following these best practices will ensure a smooth and secure transfer process:
9.1. Backup Before You Begin
Before transferring any photos, back up your data to avoid any potential loss. Cloud services, external hard drives, or even a computer can serve as backup destinations.
9.2. Check Storage Space
Ensure that both devices have sufficient storage space to accommodate all the photos being transferred.
9.3. Use a Secure Connection
When using Wi-Fi for cloud services or direct transfers, make sure you’re connected to a secure network to protect your data from potential threats.
9.4. Organize Your Photos
Before or after the transfer, take the time to organize your photos into folders or albums for easier management.
9.5. Verify the Transfer
After the transfer, verify that all photos have been successfully moved by comparing the number of files and previewing some of the images.
10. Tips for Optimizing Your Photo Library
Once you’ve successfully transferred your photos, consider these tips to optimize your photo library:
10.1. Use Cloud Storage Strategically
Leverage cloud storage services like Google Photos to back up your photos and access them from any device.
10.2. Compress Large Files
Compress large photo files to save storage space without significantly compromising image quality.
10.3. Delete Duplicates
Use duplicate photo finder apps to identify and delete duplicate photos, freeing up valuable storage space.
10.4. Edit and Enhance
Use photo editing apps to enhance the quality of your photos by adjusting brightness, contrast, and color.
10.5. Create Albums and Categories
Organize your photos into albums and categories for easy browsing and retrieval.
11. Keeping Up with the Latest Trends in Photo Transfer
The world of technology is ever-evolving, and photo transfer methods are no exception. Here are some emerging trends to keep an eye on:
11.1. Enhanced Wireless Transfer Technologies
Expect to see faster and more reliable wireless transfer technologies like Wi-Fi 6E and Ultra-Wideband (UWB) become more prevalent in Android devices.
11.2. AI-Powered Photo Management
Artificial intelligence (AI) is increasingly being used to automate photo organization, editing, and sharing tasks.
11.3. Blockchain-Based Photo Storage
Blockchain technology is being explored as a secure and decentralized way to store and share photos, ensuring privacy and control.
12. FAQ: Frequently Asked Questions
Still have questions about transferring photos from one Android to another? Here are some frequently asked questions to help clear things up:
-
Can I transfer photos from Android to iPhone? Yes, you can transfer photos from Android to iPhone using cloud storage services like Google Photos or direct transfer apps like SHAREit.
-
Is it possible to transfer photos without using a computer? Yes, you can transfer photos wirelessly using Bluetooth, Quick Share, or cloud storage services.
-
How do I transfer photos from Android to Android via Wi-Fi Direct? Enable Wi-Fi Direct on both devices, select the photos you want to transfer, and choose the receiving device.
-
What is the best way to transfer large video files between Android devices? For large video files, using a USB cable or a fast Wi-Fi connection with Quick Share is recommended.
-
Can I transfer photos from a broken Android phone? If the screen is broken but the phone is still functional, you can try connecting it to a computer and transferring the photos.
-
How do I transfer photos from Android to a USB drive? Connect the USB drive to your Android device, select the photos you want to transfer, and copy them to the USB drive.
-
What are the security risks of using Bluetooth for photo transfer? Bluetooth is susceptible to hacking and eavesdropping, so it’s essential to use a secure connection and keep your devices updated.
-
Is there a limit to the number of photos I can transfer using Google Photos? There is no limit to the number of photos you can back up to Google Photos, but you may need to purchase additional storage space if you exceed the free 15GB limit.
-
How do I ensure that my photos are transferred in full resolution? When using cloud storage services, make sure to select the “Original Quality” option to preserve the full resolution of your photos.
-
Can I transfer photos from an old Android phone to a new one without losing any data? Yes, by following the recommended methods and best practices, you can transfer your photos without losing any data.
13. Conclusion: Seamless Photo Transfer for Lasting Memories
Transferring photos from one Android device to another doesn’t have to be a daunting task. By understanding your specific needs, evaluating the available methods, and following best practices, you can ensure a smooth and secure transfer process. Whether you prefer local transfers, cloud storage, or direct sharing options, the key is to choose the method that best suits your requirements and priorities.
At dfphoto.net, we’re committed to providing you with the information and resources you need to capture, preserve, and share your visual memories. Explore our website for more tips, tutorials, and inspiration to elevate your photography journey.
Ready to dive deeper into the world of photography? Visit dfphoto.net today to discover a wealth of resources, including detailed tutorials, stunning photo galleries, and a vibrant community of photography enthusiasts. Whether you’re seeking to master new techniques, find creative inspiration, or simply connect with like-minded individuals, dfphoto.net has something for everyone. Don’t miss out – start your adventure now!
Address: 1600 St Michael’s Dr, Santa Fe, NM 87505, United States
Phone: +1 (505) 471-6001
Website: dfphoto.net
