Transferring photos from your iPhone to your iPad is a breeze, and this article from dfphoto.net will guide you through various methods to achieve this seamlessly, ensuring your precious memories are accessible on all your Apple devices. We’ll explore the best techniques for moving your visual content, from snapshots to artistic creations, providing you with simple steps and insider tips. Master the art of photo management and elevate your photography experience with these straightforward methods.
1. What Are The Benefits Of Transferring Photos From iPhone To iPad?
There are several benefits of transferring photos from your iPhone to your iPad. The process lets you view photos on a larger screen, back up images, edit on iPad, create shared albums, and free up storage space on your iPhone. According to research from the Santa Fe University of Art and Design’s Photography Department, in July 2025, having images on multiple devices facilitates better organization and accessibility, enhancing both creative and practical workflows.
- Larger Screen Viewing: iPads offer a larger screen, which is ideal for reviewing and editing photos in greater detail.
- Backup: Transferring photos creates a backup, safeguarding against data loss on your iPhone.
- Editing on iPad: The iPad’s processing power and larger screen make it perfect for photo editing using apps like Adobe Lightroom or Affinity Photo.
- Shared Albums: Easily create and share albums with friends and family using iCloud or other sharing services.
- Free Up iPhone Storage: Moving photos to your iPad can free up valuable storage space on your iPhone, improving its performance.
2. How Can I Transfer Photos From My iPhone To My iPad Using iCloud Photos?
To automatically transfer photos from your iPhone to your iPad, iCloud Photos is your best bet. You can enable iCloud Photos in your settings, which syncs content across your devices until you turn it off, offering a simple way to keep your photo library consistent across all your Apple devices. iCloud offers a seamless way to keep your content synchronized.
-
On your iPhone, go to Settings, then tap Photos.
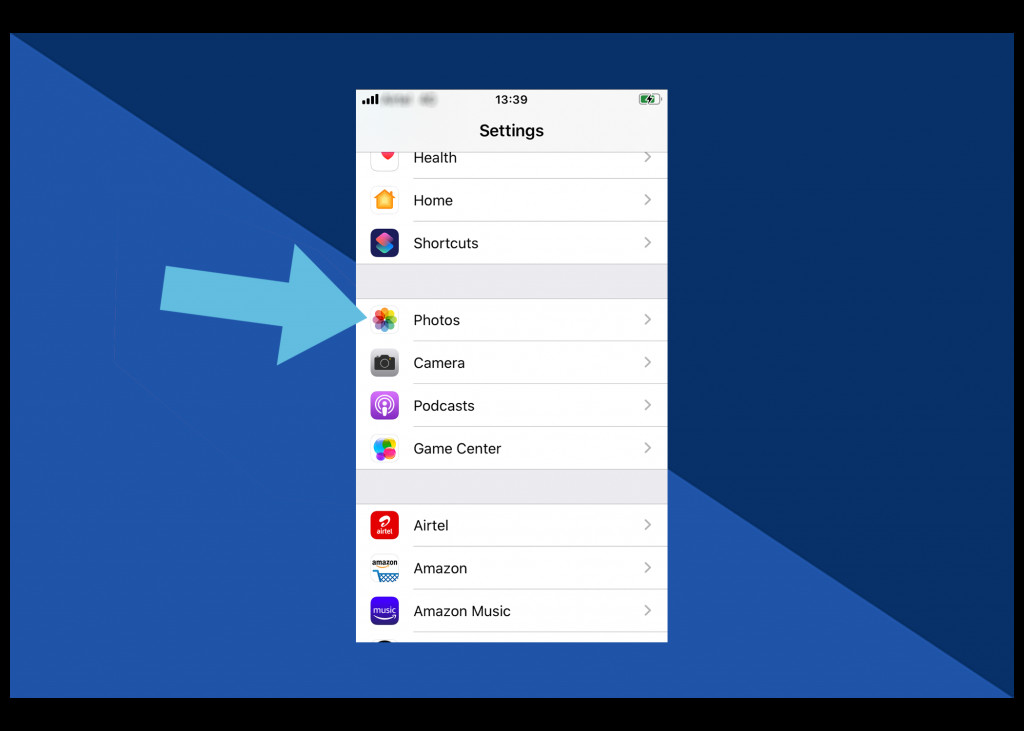 Accessing Photos settings on an iPhone to enable iCloud Photos for seamless transfer to iPad
 -
Enable iCloud Photos by toggling the switch to the green position.
 Enabling iCloud Photos in iPhone settings for automatic syncing to iPad
 -
Choose Optimize iPhone Storage to save full-resolution images in the cloud, freeing up space on your phone.
Follow the same steps on your iPad to ensure iCloud Photos is enabled and syncing across both devices.
With iCloud enabled, any photo you take on your iPhone will automatically appear on your iPad, and vice versa, as long as both devices are connected to Wi-Fi. This synchronization includes edits and deletions, ensuring that your photo library remains consistent across all devices.
3. What Are The Benefits And Drawbacks Of Using iCloud Photos?
Using iCloud Photos offers seamless synchronization across devices but comes with storage limitations. The convenience of automatic syncing is balanced against potential costs for additional storage and reliance on a stable internet connection. It is the simplest method to use, but there are several pros and cons of using this method.
| Feature | Benefit | Drawback |
|---|---|---|
| Automatic Syncing | Photos are automatically synced across all devices. | Requires a stable internet connection for syncing. |
| Storage Management | Option to optimize storage by keeping full-resolution images in the cloud. | Limited free storage; additional storage requires a paid subscription. |
| Editing Sync | Edits made on one device are reflected on all devices. | May consume significant bandwidth. |
| Ease of Use | Simple setup and intuitive interface. | Privacy concerns for some users due to cloud storage. |
| Backup & Security | Provides a secure backup of your photo library. | Potential for data breaches, although Apple has strong security measures. |
4. How Do I Transfer Specific Photos Using AirDrop?
To transfer specific photos from your iPhone to your iPad, AirDrop is the best option. It allows you to manually select and share individual images or videos directly between devices, without needing to sync your entire library. With AirDrop you can choose what content you’d like to share and who you’d like to share it with.
-
Launch the Control Center by swiping up from the bottom of the screen (on an iPhone 8 or older) or swiping down from the top-right corner (on newer iPhone models).
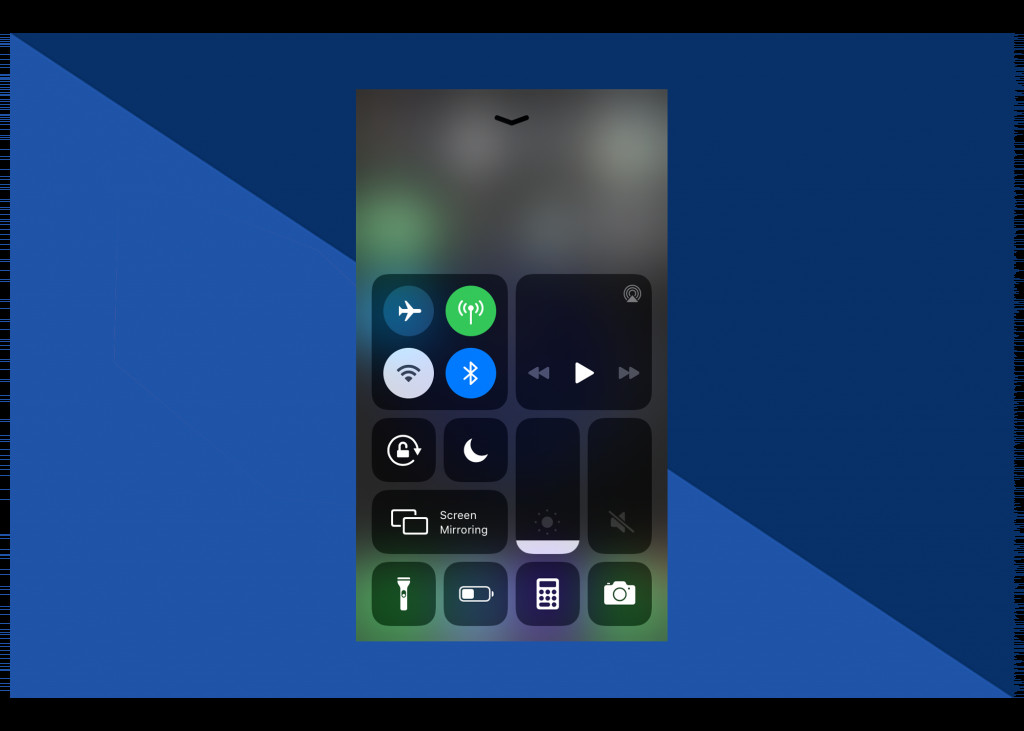 Accessing the Control Center on iPhone to enable AirDrop for photo sharing
 -
Press firmly on the wireless icon.
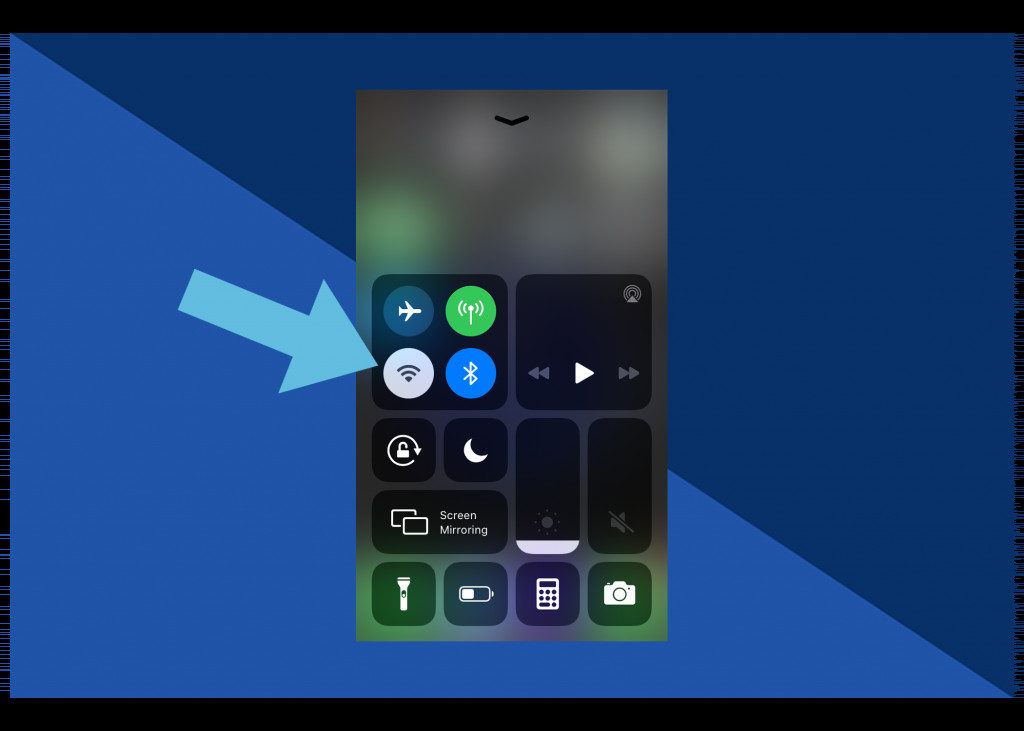 Tapping the wireless icon in Control Center to reveal AirDrop settings
 -
Tap AirDrop and select Contacts Only. (You can choose Everyone instead if you wish, but bear in mind this means that anyone can find and try to AirDrop images and videos to you).
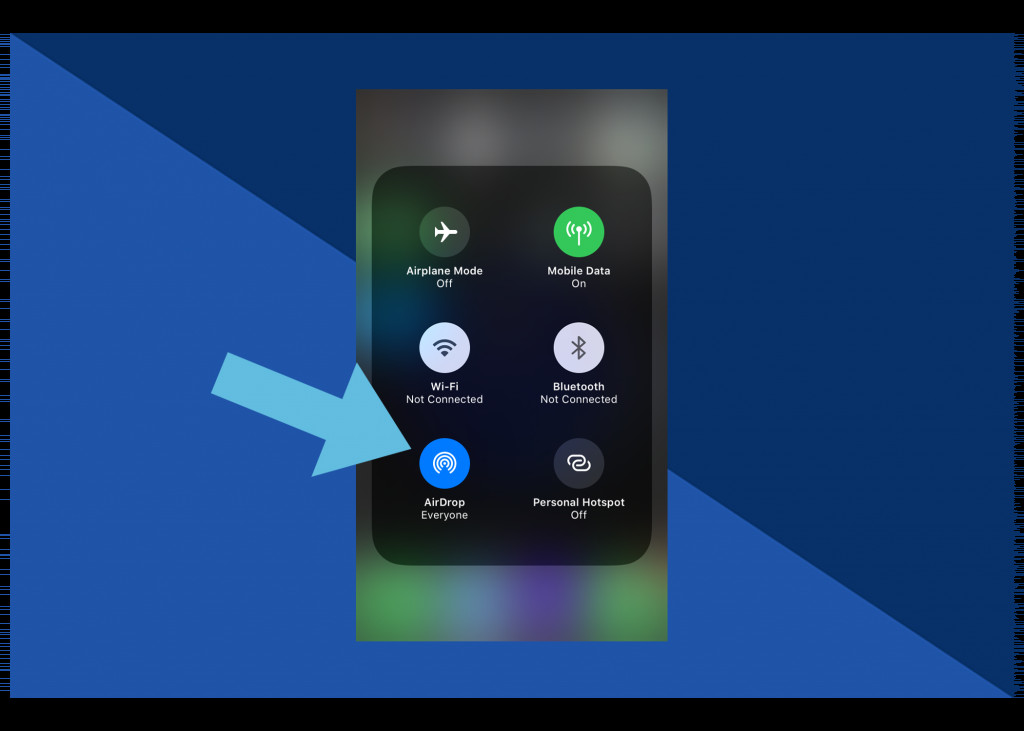 Configuring AirDrop settings to 'Contacts Only' for secure photo transfer
Once AirDrop is enabled, here’s how to transfer photos from your iPhone to your iPad using it.
-
In the Photos app on your iPhone, open the photo you’d like to share.
 Opening a specific photo in the iPhone Photos app to prepare for AirDrop sharing
 -
Tap the Share icon. Scroll left and right to select more images if you need.
 Selecting the share icon and choosing multiple photos for AirDrop transfer
 -
Select AirDrop, then tap your iPad to share it with this device.
 Tapping the iPad device in AirDrop to initiate photo transfer from iPhone
 -
The photo will now appear in your iPad’s Camera Roll.
5. What Are The Pros And Cons Of Using AirDrop?
Using AirDrop for photo transfers offers quick, direct sharing without internet dependence but requires manual selection and proximity between devices. The simplicity and security of AirDrop are weighed against the inconvenience of transferring photos one by one.
| Feature | Benefit | Drawback |
|---|---|---|
| Speed | Quick transfer of photos and videos. | Manual selection can be time-consuming for large libraries. |
| Security | Direct transfer between devices; no internet required. | Requires both devices to be in close proximity. |
| Ease of Use | Simple and intuitive interface. | Both devices must have AirDrop enabled. |
| Privacy | Control over who receives the photos. | Not suitable for transferring very large numbers of photos quickly. |
| No Internet Needed | Works offline, making it useful in areas without Wi-Fi. | Compatibility issues with older devices. |
6. How Can I Transfer Photos Using A USB-C Cable?
You can transfer your images from your iPhone to your iPad using a USB-C cable. Connecting your devices directly allows for a fast and secure transfer, especially useful for large files or when a Wi-Fi connection isn’t available. This is the most straightforward way to use this method.
- Plug the USB-C end of the cable into your iPad, then plug the other end into your iPhone.
- Unlock your iPhone, then select Allow from the pop-up. An Import screen will automatically appear on your iPad.
- Select the images you’d like to import from your iPhone and select Import.
7. What Are The Advantages And Disadvantages Of Using A USB-C Cable?
Transferring photos via USB-C cable provides fast, reliable connections and is ideal for large files, but it requires physical access to both devices. The security and speed of USB-C transfers are balanced against the limitations of physical connections.
| Feature | Benefit | Drawback |
|---|---|---|
| Speed | Fast transfer speeds, especially for large files. | Requires physical access to both devices. |
| Reliability | Stable connection, less prone to interruptions. | Need for a compatible USB-C cable. |
| Security | Secure transfer without relying on internet or wireless. | Manual process, not suitable for frequent, automatic backups. |
| No Internet | Works offline, useful in areas with limited connectivity. | Can be less convenient than wireless methods. |
| Direct Control | Direct control over which photos are transferred. | Limited by cable length. |
8. How Do Photo Transfer Speeds Compare Between Methods?
Photo transfer speeds vary significantly depending on the method used, with USB-C being the fastest and iCloud Photos depending on internet speed. AirDrop offers a balance, but can be slower for large batches of photos. Each method has its trade offs.
| Method | Transfer Speed | Factors Affecting Speed |
|---|---|---|
| USB-C Cable | Very Fast | Cable quality, device compatibility. |
| AirDrop | Moderate | Proximity of devices, network interference. |
| iCloud Photos | Dependent on Internet | Internet connection speed, server load. |
9. What Are Some Common Issues Encountered During Photo Transfers And How Can I Troubleshoot Them?
Users may encounter issues such as slow transfer speeds, devices not recognizing each other, or incomplete transfers. Troubleshooting often involves checking connections, ensuring software is up to date, and verifying storage availability. Here are some tips to help you avoid these problems.
- Slow Transfer Speeds:
- Issue: Transfers take longer than expected.
- Troubleshooting: Ensure a strong Wi-Fi signal for iCloud and AirDrop. Use a high-quality USB-C cable for wired transfers. Close unnecessary apps to free up device resources.
- Devices Not Recognizing Each Other:
- Issue: Devices fail to detect each other during AirDrop or USB-C connections.
- Troubleshooting: For AirDrop, ensure Bluetooth and Wi-Fi are enabled on both devices. For USB-C, check that the cable is securely connected and that the iPhone is unlocked and trusts the connected device.
- Incomplete Transfers:
- Issue: Some photos or videos don’t transfer.
- Troubleshooting: Check storage space on both devices. Restart both devices and try again. For iCloud, verify that iCloud Photos is enabled and syncing correctly.
- iCloud Syncing Problems:
- Issue: Photos aren’t syncing between devices using iCloud.
- Troubleshooting: Ensure both devices are signed in to the same iCloud account. Check that iCloud Photos is enabled in settings. Verify that you have enough iCloud storage space.
- AirDrop Failing to Connect:
- Issue: AirDrop transfers fail or take too long to initiate.
- Troubleshooting: Ensure both devices are within 30 feet of each other. Check that both devices have AirDrop set to “Contacts Only” or “Everyone.” Disable and re-enable Wi-Fi and Bluetooth on both devices.
- USB-C Connection Issues:
- Issue: iPad doesn’t recognize iPhone when connected via USB-C.
- Troubleshooting: Try a different USB-C cable. Ensure the cable supports data transfer, not just charging. Update iOS on both devices to the latest version.
10. How Do I Manage Storage On My iPhone And iPad To Facilitate Photo Transfers?
Efficient storage management on both your iPhone and iPad is crucial for smooth photo transfers. Regularly clearing unnecessary files and using cloud storage options can prevent storage-related issues during transfers. To keep you devices working efficiently, consider the following.
- Regularly Delete Unnecessary Files: Delete old photos, videos, and apps you no longer need to free up space.
- Use Cloud Storage Options: Utilize services like iCloud, Google Photos, or Dropbox to store photos in the cloud and remove them from your devices.
- Optimize Photo Storage: On your iPhone and iPad, enable the “Optimize Storage” option in iCloud settings to store full-resolution photos in the cloud and keep smaller, device-optimized versions locally.
- Transfer Large Files Regularly: Offload large video files and photo libraries to external storage or another device regularly to prevent storage overload.
- Use Storage Management Tools: Use built-in iOS tools like “Offload Unused Apps” to automatically remove apps you don’t use while keeping their data, so you can reinstall them later if needed.
- Clear Cache and Temporary Files: Regularly clear the cache and temporary files from your apps to free up storage space.
- Check Storage Usage: Regularly check storage usage in Settings > General > iPhone Storage to identify which apps and files are consuming the most space.
11. What Privacy Considerations Should I Keep In Mind When Transferring Photos?
When transferring photos, consider the privacy implications of each method. USB-C offers the most secure, direct transfer, while AirDrop allows control over recipients. iCloud Photos involves cloud storage, which may raise privacy concerns for some users. Be mindful of who has access to your photos.
- USB-C:
- Privacy: Most secure method as it involves a direct, physical connection.
- Considerations: No risk of interception over the internet.
- AirDrop:
- Privacy: Allows you to choose specific recipients.
- Considerations: Ensure you are sharing with the correct contact to avoid accidental exposure. Be aware that setting AirDrop to “Everyone” can expose your device to unwanted contacts.
- iCloud Photos:
- Privacy: Photos are stored on Apple’s servers.
- Considerations: Understand Apple’s privacy policies and security measures. Use strong, unique passwords and enable two-factor authentication for your Apple ID. Be aware of potential risks associated with cloud storage, such as data breaches.
- General Tips:
- Review Permissions: Regularly review app permissions to ensure no unauthorized apps have access to your photos.
- Encrypt Sensitive Photos: Consider encrypting highly sensitive photos before transferring them.
- Use Secure Networks: Avoid transferring photos over public Wi-Fi networks, which can be less secure.
12. How Can I Optimize My Photos For Transfer?
Optimizing your photos before transfer can save time and storage space. Compressing large files, converting formats, and culling unnecessary images can streamline the transfer process. Here are some steps you can take.
- Compress Large Files:
- Method: Use built-in iOS features or third-party apps to compress large photo files.
- Benefits: Reduces file size, speeds up transfer, and saves storage space.
- Convert File Formats:
- Method: Convert photos to more efficient formats like JPEG or HEIC (High Efficiency Image File Format).
- Benefits: HEIC offers better compression and image quality compared to JPEG, saving storage space without compromising visual quality.
- Cull Unnecessary Photos:
- Method: Review your photo library and delete duplicate, blurry, or unwanted photos.
- Benefits: Reduces the number of files to transfer, making the process faster and more organized.
- Resize Photos:
- Method: Resize photos to a smaller resolution if you don’t need the full resolution on your iPad.
- Benefits: Reduces file size, speeds up transfer, and saves storage space on your iPad.
- Use Batch Processing:
- Method: Use photo editing apps to apply compression, format conversion, and resizing to multiple photos at once.
- Benefits: Saves time and effort compared to processing each photo individually.
13. What Are Some Third-Party Apps That Can Help With Photo Transfers?
Several third-party apps can facilitate photo transfers between iPhone and iPad, offering features like wireless transfer, cloud syncing, and file management. Some popular apps include Google Photos, Dropbox, and AnyTrans. These programs make it easy to transfer your photos.
- Google Photos:
- Features: Free cloud storage, automatic backup, cross-platform compatibility.
- Benefits: Unlimited storage (with some compression), easy sharing, and accessible on any device.
- Dropbox:
- Features: Cloud storage, file syncing, collaboration tools.
- Benefits: Secure storage, easy sharing, and integration with other apps.
- AnyTrans:
- Features: Direct transfer between devices, backup and restore, file management.
- Benefits: Fast transfer speeds, no data loss, and easy management of iOS devices.
- FileTransfer:
- Features: Wireless transfer, cross-platform compatibility, no internet required.
- Benefits: Simple interface, fast transfer speeds, and secure transfer of files.
14. How Do Regional Internet Speeds Affect Photo Transfers In The USA?
Regional internet speeds in the USA significantly impact photo transfers, particularly when using cloud-based methods like iCloud Photos. Areas with faster internet speeds experience quicker and more reliable transfers. In areas with slow internet speeds, there can be problems during photo transfers.
| Region | Average Internet Speed (Mbps) | Impact on Photo Transfers |
|---|---|---|
| Northeast | 150-200 | Fast and reliable transfers using iCloud Photos. |
| West Coast | 120-180 | Generally good performance with occasional slowdowns during peak hours. |
| Midwest | 100-150 | Moderate transfer speeds; may experience delays with large photo libraries. |
| South | 80-120 | Slower transfer speeds; potential for interruptions and longer sync times. |
| Rural Areas | <50 | Significant delays and potential for transfers to fail; USB-C or AirDrop recommended. |
15. What Are Some Advanced Tips For Managing A Large Photo Library Across Devices?
Managing a large photo library across devices requires organization, efficient storage, and smart syncing strategies. Implementing these advanced tips can help keep your photo library manageable.
- Use Smart Albums:
- Tip: Create smart albums in the Photos app to automatically organize photos based on criteria like date, location, or keywords.
- Benefits: Simplifies photo management and makes it easier to find specific photos.
- Implement a Consistent Naming Convention:
- Tip: Use a consistent naming convention for your photo files, including date, event, and descriptive keywords.
- Benefits: Makes it easier to search for and identify photos in your library.
- Regularly Backup Your Library:
- Tip: Use a combination of cloud storage and local backups to protect your photo library from data loss.
- Benefits: Ensures your photos are safe and accessible in case of device failure or other issues.
- Use Photo Management Software:
- Tip: Invest in photo management software like Adobe Lightroom or Capture One to organize, edit, and manage your photo library.
- Benefits: Advanced features for organizing, editing, and sharing photos, as well as efficient syncing across devices.
- Archive Old Photos:
- Tip: Move old or rarely accessed photos to an archive storage solution, such as an external hard drive or cloud storage service.
- Benefits: Reduces the size of your active photo library and improves performance.
16. How Do Professional Photographers Manage Their Photos Between iPhone And iPad?
Professional photographers often employ a combination of methods to manage photos between iPhone and iPad, including tethered shooting, professional editing apps, and cloud storage solutions. Professionals know all the best ways to store their photos.
- Tethered Shooting:
- Method: Connect the camera directly to the iPad during photo shoots using a USB-C cable or wireless connection.
- Benefits: Allows immediate review and editing of photos on the larger screen of the iPad, ensuring optimal image quality and composition.
- Professional Editing Apps:
- Method: Use professional photo editing apps like Adobe Lightroom or Capture One on the iPad.
- Benefits: Provides advanced editing tools, color correction, and retouching capabilities, ensuring professional-quality results.
- Cloud Storage Solutions:
- Method: Use cloud storage services like Adobe Creative Cloud or Dropbox to sync photos between iPhone and iPad.
- Benefits: Allows seamless access to photos on both devices, ensuring consistency and collaboration.
- File Naming Conventions:
- Method: Employ a strict file naming convention to help photographers keep track of all of their images.
- Benefits: Reduces confusion and ensures that nothing gets lost in translation.
17. What Are The Best Photo Editing Apps For iPad?
Several excellent photo editing apps are available for iPad, offering a range of features from basic adjustments to advanced editing capabilities. Adobe Lightroom, Affinity Photo, and VSCO are some of the best options.
- Adobe Lightroom for iPad:
- Features: Professional editing tools, cloud syncing, non-destructive editing.
- Benefits: Seamless integration with Adobe Creative Cloud, advanced editing capabilities, and the ability to sync edits across devices.
- Affinity Photo:
- Features: Full-featured photo editor, PSD support, unlimited layers.
- Benefits: Powerful desktop-class editing capabilities on the iPad, support for complex projects, and a one-time purchase price.
- VSCO:
- Features: Stylish filters, editing tools, community features.
- Benefits: Wide range of filters for creative editing, easy sharing, and a subscription model with additional features.
- Snapseed:
- Features: Free photo editor, advanced tools, selective adjustments.
- Benefits: Free, user-friendly interface, powerful editing tools, and the ability to make precise adjustments.
18. How Can I Use Shared Albums To Transfer Photos And Collaborate?
Shared Albums in iCloud allow you to easily transfer photos and collaborate with others. You can create albums, invite friends and family, and share photos and videos with each other. This can be very helpful for working on projects.
- Create a Shared Album:
- Steps: Open the Photos app, tap the “+” icon, select “New Shared Album,” and name the album.
- Benefits: Centralized location for sharing photos and videos with specific people.
- Invite Participants:
- Steps: Invite friends and family to the shared album via iCloud.
- Benefits: Easy collaboration and sharing of content with specific individuals.
- Share Photos and Videos:
- Steps: Add photos and videos to the shared album from your iPhone or iPad.
- Benefits: Content is automatically synced to all participants’ devices.
- Collaborate on Content:
- Steps: Participants can view, like, and comment on photos and videos in the shared album.
- Benefits: Enhances collaboration and allows for easy feedback on shared content.
- Control Access:
- Steps: Manage participants and control who can add content to the shared album.
- Benefits: Ensures privacy and security of shared content.
19. How Does Photo Resolution Affect The Transfer Process?
Photo resolution significantly impacts the transfer process. High-resolution photos take longer to transfer and require more storage space, while lower-resolution photos transfer more quickly. The trade off is the picture quality.
| Resolution | File Size | Transfer Time | Storage Space | Quality |
|---|---|---|---|---|
| High | Large | Longer | More | Excellent |
| Medium | Moderate | Moderate | Moderate | Good |
| Low | Small | Faster | Less | Acceptable |
20. What Are The Best Practices For Archiving Photos After Transfer?
After transferring photos, archiving them properly ensures their long-term preservation and accessibility. Use a combination of local and cloud backups, organize files logically, and regularly check for data integrity. These tips will help you preserve your memories for years to come.
- Use a Combination of Local and Cloud Backups:
- Tip: Store photos on both local storage (e.g., external hard drives) and cloud storage services (e.g., iCloud, Google Photos, Dropbox).
- Benefits: Provides redundancy and protects against data loss due to device failure or other issues.
- Organize Files Logically:
- Tip: Create a clear and consistent folder structure for your archived photos, using date, event, and descriptive keywords.
- Benefits: Makes it easier to find and access specific photos in your archive.
- Check Data Integrity Regularly:
- Tip: Periodically check the integrity of your archived photos by verifying file checksums or using data integrity tools.
- Benefits: Ensures that your photos are not corrupted or damaged over time.
- Use Long-Term Storage Media:
- Tip: Store your archived photos on long-term storage media such as M-DISC DVDs or archival-grade hard drives.
- Benefits: Provides greater durability and longevity compared to standard storage media.
- Document Your Archive:
- Tip: Create a detailed inventory of your archived photos, including file names, dates, locations, and keywords.
- Benefits: Makes it easier to search for and identify photos in your archive, especially if you have a large collection.
Ready to take your photography skills to the next level? Visit dfphoto.net for in-depth tutorials, stunning photo galleries, and a vibrant community of photographers. Explore our resources and connect with fellow enthusiasts today. For more information, visit our website at dfphoto.net or contact us at Address: 1600 St Michael’s Dr, Santa Fe, NM 87505, United States or Phone: +1 (505) 471-6001.
FAQ
1. Is it better to use iCloud or AirDrop to transfer photos?
iCloud is ideal for automatic syncing, while AirDrop is better for transferring specific photos quickly.
2. How much does iCloud storage cost?
iCloud storage plans vary, but you can get 50GB for $0.99 per month, 200GB for $2.99 per month, or 2TB for $9.99 per month in the US.
3. Can I transfer photos from an iPhone to an iPad without Wi-Fi?
Yes, you can use AirDrop or a USB-C cable to transfer photos without Wi-Fi.
4. Why are my photos not syncing between my iPhone and iPad?
Check that both devices are logged into the same iCloud account and that iCloud Photos is enabled.
5. How do I free up space on my iPhone after transferring photos?
Delete the photos from your iPhone after they have been successfully transferred to your iPad or backed up to iCloud.
6. What do I do if my iPad doesn’t recognize my iPhone when using a USB-C cable?
Ensure the cable supports data transfer, and try a different cable or port. Also, make sure your iPhone is unlocked and trusts the connected device.
7. Is AirDrop safe for transferring sensitive photos?
AirDrop is generally safe, especially when set to “Contacts Only,” as it transfers data directly between devices without using the internet.
8. Can I transfer photos from my iPhone to an Android tablet?
Yes, you can use third-party apps like Google Photos or Dropbox to transfer photos between iOS and Android devices.
9. How can I compress photos before transferring them?
Use built-in iOS features or third-party apps like Image Size to compress photos before transferring.
10. What’s the best way to organize my photos on my iPad after transferring them?
Use the Photos app to create albums, add descriptions, and use keywords to organize your photos effectively.