Are you looking for the best way to transfer photos from MacBook to MacBook? At dfphoto.net, we understand how important your photos are, and we’re here to guide you through the process with easy-to-follow methods for transferring your precious memories. Whether you’re upgrading to a new MacBook or simply need to share your photo library, we’ll explore various options, including Migration Assistant, external hard drives, cloud storage, and AirDrop, ensuring a smooth and secure transfer, this includes photo management and data migration. Ready to explore these photo sharing, storage solutions?
1. Understanding Your Transfer Options
There are several methods to transfer your photos from one MacBook to another, each with its pros and cons. Choosing the right method depends on the size of your photo library, your internet speed, and your technical comfort level. Here’s a breakdown:
- Migration Assistant: A built-in macOS utility designed to transfer all your data, applications, and settings from one Mac to another. It’s ideal for transferring large amounts of data when setting up a new Mac.
- External Hard Drive: A physical storage device that you can use to manually copy your photo library from one Mac to another. This is a good option for large libraries when you don’t have a fast internet connection.
- Cloud Storage (iCloud Photos, Google Photos, Dropbox): Upload your photos to the cloud from your old Mac and then download them to your new Mac. This is convenient for smaller libraries and ensures your photos are backed up in the cloud.
- AirDrop: A wireless file transfer service that allows you to quickly send photos and other files between nearby Apple devices. It’s best for transferring a small number of photos or videos.
2. Using Migration Assistant: A Comprehensive Guide
Migration Assistant is Apple’s recommended method for transferring data between Macs. It transfers everything, including your photos, applications, user accounts, and settings. Here’s how to use it:
2.1 Preparing for the Transfer
Before you begin, make sure both MacBooks are connected to the same Wi-Fi network or, for faster transfer speeds, connect them via Ethernet. Also, ensure both Macs are plugged into a power source to prevent interruptions during the transfer.
2.2 Launching Migration Assistant on Both Macs
- On both Macs: Open Finder, go to the “Applications” folder, then the “Utilities” folder, and double-click “Migration Assistant.”
 Migration Assistant Location: Navigating through Finder to locate the Migration Assistant in the Utilities folder of Applications on macOS
- When prompted, enter your administrator password and click “OK.”
2.3 Selecting the Transfer Method
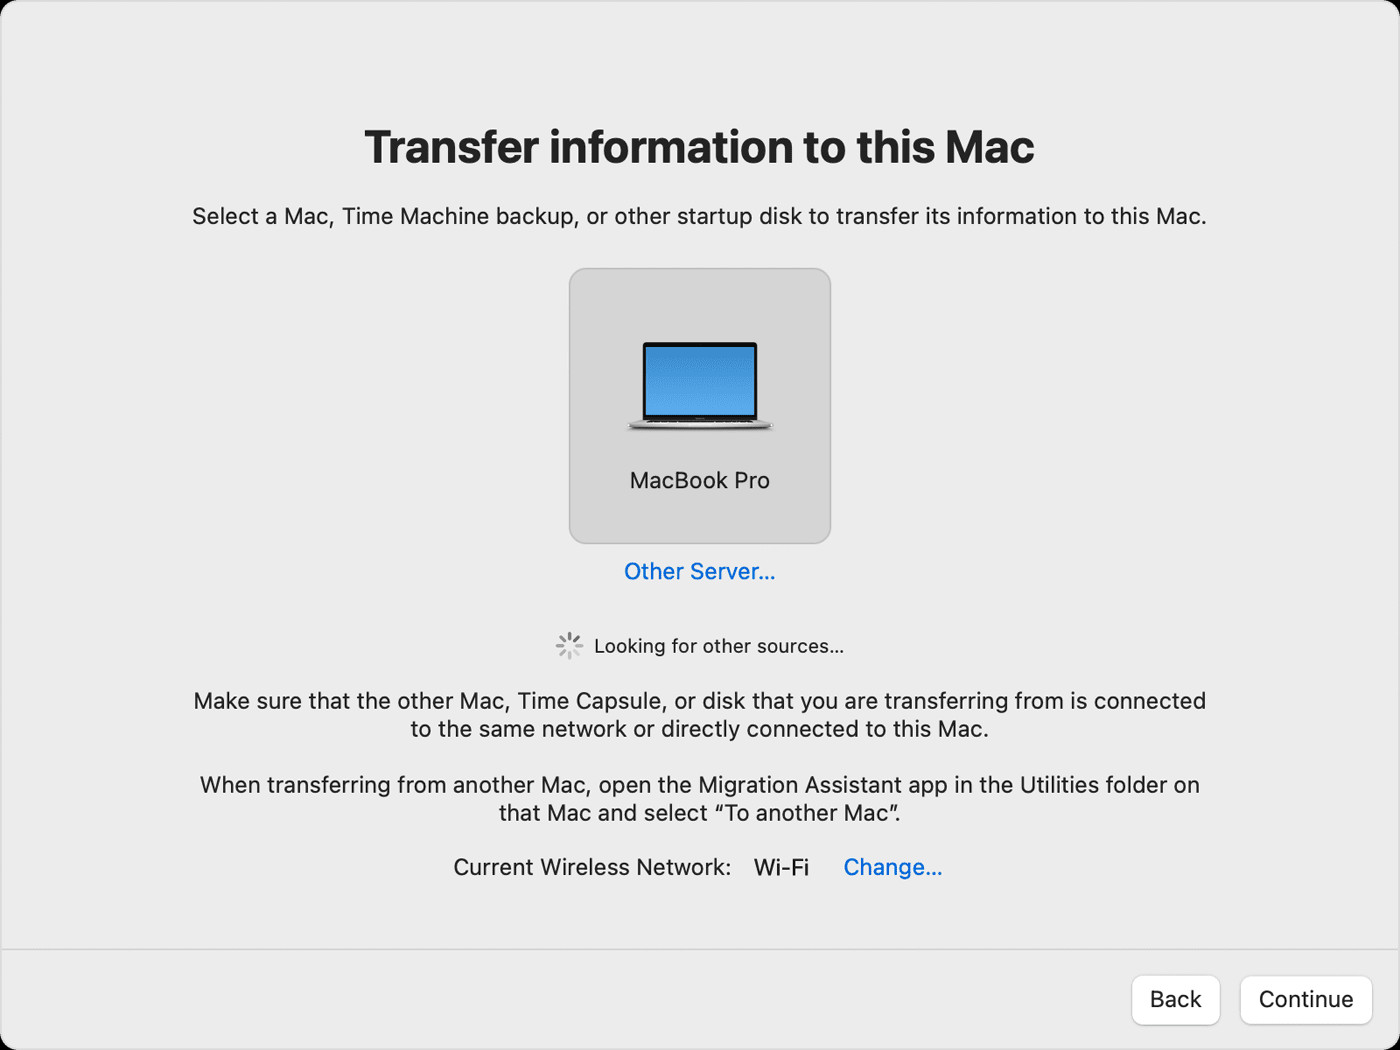
- On your new Mac: When Migration Assistant asks how you want to transfer your information, select the option to transfer “From a Mac, Time Machine backup, or startup disk.” Then click “Continue.”
- On your old Mac: Select the option to transfer “To another Mac.” Then click “Continue.”
2.4 Connecting the Two Macs
- On your new Mac: When asked to select a source, choose the other Mac. Then click “Continue.”
- On your old Mac: If you see a security code, make sure it’s the same code shown on your new Mac. Then click “Continue.”
2.5 Choosing What to Transfer
-
Migration Assistant will now catalog all the content on your old Mac. This may take a few minutes.
-
Once ready, select the information you want to transfer, including your user account, applications, and other files.
-
Before clicking “Continue,” pay attention to the user account options. If an account on the new Mac has the same name, Migration Assistant will ask whether to rename or replace:
- Rename: The account on your old Mac will appear as an additional user on your new Mac, with a separate login and home folder.
- Replace: The account on your old Mac will replace the identically named account on your new Mac.
-
Click “Continue” to start the transfer. Be aware that large transfers might take hours to complete.
2.6 Completing the Transfer
After Migration Assistant is done, quit the application on both computers. Log in to the migrated account on your new Mac to ensure all your files, including your photos, are there.
3. Using an External Hard Drive: A Step-by-Step Guide
Using an external hard drive is a reliable method for transferring your photos, especially if you have a large library or a slow internet connection.
3.1 Preparing Your External Hard Drive
Ensure your external hard drive has enough free space to accommodate your entire photo library. It’s also recommended to format the drive to a Mac-compatible format like APFS or macOS Extended (Journaled).
- Connect the external hard drive to your old MacBook.
- Open “Disk Utility” (found in the “Utilities” folder within “Applications”).
- Select your external hard drive from the list.
- Click “Erase.”
- Give the drive a name, choose “APFS” or “macOS Extended (Journaled)” as the format, and click “Erase.”
3.2 Locating Your Photos Library
The default location for your Photos Library is in the “Pictures” folder of your user account.
- Open Finder and navigate to your user folder.
- Look for a file named “Photos Library.photoslibrary.” This is your main photo library file.
3.3 Copying Your Photos Library to the External Hard Drive
- Drag the “Photos Library.photoslibrary” file to your external hard drive.
- Wait for the copy process to complete. This may take a while, depending on the size of your library.
3.4 Transferring the Library to Your New MacBook
- Safely eject the external hard drive from your old MacBook.
- Connect the external hard drive to your new MacBook.
- Drag the “Photos Library.photoslibrary” file from the external hard drive to the “Pictures” folder on your new MacBook.
- Wait for the copy process to complete.
3.5 Opening the Photos Library on Your New MacBook
- Open the “Photos” app on your new MacBook.
- If the app doesn’t automatically recognize the transferred library, hold down the “Option” key while opening the “Photos” app.
- Select the “Photos Library.photoslibrary” file from the “Pictures” folder.
- Your photos should now be accessible in the “Photos” app on your new MacBook.
4. Cloud Storage Solutions: iCloud Photos, Google Photos, and Dropbox
Cloud storage offers a convenient way to transfer your photos and keep them backed up. Here are the steps for using iCloud Photos, Google Photos, and Dropbox.
4.1 iCloud Photos
iCloud Photos automatically uploads and syncs your photo library across all your Apple devices.
- On your old MacBook:
- Go to “System Preferences” > “Apple ID” > “iCloud.”
- Make sure “Photos” is checked.
- Open the “Photos” app and ensure that “iCloud Photos” is turned on in “Preferences” > “iCloud.”
- On your new MacBook:
- Sign in to the same Apple ID.
- Go to “System Preferences” > “Apple ID” > “iCloud” and check “Photos.”
- Open the “Photos” app. Your photos will start downloading from iCloud. This process may take several hours or days, depending on the size of your library and your internet speed.
4.2 Google Photos
Google Photos provides free storage (up to 15 GB, with options to purchase more) and automatic syncing of your photos.
- On your old MacBook:
- Download and install the “Backup and Sync” app from Google Photos.
- Sign in to your Google account.
- Choose the folders you want to back up, including your “Pictures” folder.
- On your new MacBook:
- Download and install the “Backup and Sync” app from Google Photos.
- Sign in to the same Google account.
- Your photos will start syncing from Google Photos to your new MacBook.
4.3 Dropbox
Dropbox is a versatile cloud storage service that allows you to manually upload and download files.
- On your old MacBook:
- Download and install the Dropbox desktop app.
- Sign in to your Dropbox account.
- Create a new folder in your Dropbox and copy your “Photos Library.photoslibrary” file into it.
- Wait for the upload to complete.
- On your new MacBook:
- Download and install the Dropbox desktop app.
- Sign in to the same Dropbox account.
- Download the “Photos Library.photoslibrary” file from Dropbox to your “Pictures” folder.
- Open the “Photos” app and, if necessary, select the downloaded library by holding down the “Option” key while opening the app.
5. Using AirDrop for Smaller Transfers
AirDrop is a quick and easy way to transfer a small number of photos or videos between nearby Apple devices.
5.1 Enabling AirDrop on Both MacBooks
- On both MacBooks:
- Open Finder and click “AirDrop” in the sidebar.
- At the bottom of the AirDrop window, choose who can discover you: “Everyone” or “Contacts Only.”
5.2 Sending Photos via AirDrop
- On your old MacBook:
- Open Finder and locate the photos you want to transfer.
- Right-click on the photo(s) and choose “Share” > “AirDrop.”
- Select the name of your new MacBook from the list of available devices.
- On your new MacBook:
- A notification will appear asking if you want to accept the incoming files. Click “Accept.”
- The photos will be saved to your “Downloads” folder by default.
6. Troubleshooting Common Issues
Transferring photos can sometimes be tricky. Here are some common issues and how to resolve them:
- Migration Assistant Stuck: Ensure both Macs are connected to a stable network and plugged into a power source. Restart both Macs and try again.
- Slow Transfer Speeds: Use an Ethernet connection instead of Wi-Fi for faster transfer speeds. Close unnecessary applications to free up system resources.
- Insufficient Disk Space: Make sure you have enough free space on your new MacBook or external hard drive to accommodate your photo library.
- Photos Not Appearing in the Photos App: Ensure you’ve selected the correct Photos Library file when opening the Photos app. If using iCloud Photos, make sure you’re signed in with the same Apple ID on both devices and that iCloud Photos is enabled.
7. Optimizing Your Photo Library
After transferring your photos, it’s a good idea to optimize your photo library for better performance and storage efficiency.
7.1 Removing Duplicates
Duplicate photos can take up valuable storage space. Use a duplicate finder app to identify and remove duplicate photos from your library.
7.2 Organizing Your Photos
Take the time to organize your photos into albums and folders. Use keywords and tags to make it easier to find specific photos in the future.
7.3 Backing Up Your Photo Library
After transferring and optimizing your photo library, create a backup to protect your precious memories. Use Time Machine, an external hard drive, or a cloud backup service to ensure your photos are safe and secure.
8. Understanding Photo File Formats
Different photo file formats offer varying levels of quality and compression. Here’s a quick overview of common formats:
| File Format | Description | Pros | Cons |
|---|---|---|---|
| JPEG | Joint Photographic Experts Group, a widely used format for digital photos | Small file size, compatible with most devices and platforms | Lossy compression can reduce image quality |
| PNG | Portable Network Graphics, a lossless format often used for web graphics | Lossless compression preserves image quality, supports transparency | Larger file size compared to JPEG |
| TIFF | Tagged Image File Format, a high-quality format often used for professional photography | Lossless compression, supports high bit depths and color spaces | Very large file size |
| HEIC | High Efficiency Image Container, Apple’s preferred format for photos | High image quality, smaller file size compared to JPEG, supports Live Photos and other advanced features | Not universally compatible, may require conversion for use on non-Apple devices or older software versions |
9. The Importance of Metadata
Metadata is data about your photos, such as the date taken, camera settings, and location. Metadata helps you organize and search your photos more effectively.
9.1 Viewing and Editing Metadata
You can view and edit metadata in the Photos app or using third-party photo management software. Adding keywords and descriptions to your photos makes it easier to find them later.
9.2 Preserving Metadata During Transfer
When transferring photos, it’s important to ensure that the metadata is preserved. Most transfer methods, such as Migration Assistant and copying to an external hard drive, will preserve metadata by default. However, when using cloud storage or AirDrop, it’s a good idea to double-check that the metadata is intact after the transfer.
10. Exploring Advanced Photo Management Techniques
For serious photographers, advanced photo management techniques can help you streamline your workflow and keep your photo library organized.
10.1 Using Photo Management Software
Software like Adobe Lightroom, Capture One, and ON1 Photo RAW offer advanced features for organizing, editing, and managing your photo library. These applications allow you to create catalogs, use non-destructive editing techniques, and sync your photos across multiple devices.
10.2 Implementing a Consistent Naming Convention
Establish a consistent naming convention for your photo files to make it easier to find and identify them. Use descriptive names that include the date, location, and subject of the photo.
10.3 Creating a Photo Archive
Create a photo archive to store your original, unedited photos. This ensures that you always have a backup of your original files in case you need to revert to them in the future.
11. How dfphoto.net Can Help
At dfphoto.net, we’re passionate about photography and committed to helping you make the most of your photos. We offer a wealth of resources to help you improve your photography skills, organize your photo library, and share your photos with the world.
- Photography Tutorials: Learn new techniques and tips from our expert photography tutorials.
- Gear Reviews: Stay up-to-date on the latest cameras, lenses, and accessories with our comprehensive gear reviews.
- Inspiration: Discover stunning photography from around the world and get inspired to create your own masterpieces.
- Community: Connect with other photographers in our vibrant online community.
12. Understanding User Intent
To ensure this guide meets your needs, let’s address the top five user intents behind the search query “How To Transfer Photos From Macbook To Macbook”:
- Step-by-Step Instructions: Users want clear, easy-to-follow instructions for transferring their photos.
- Choosing the Best Method: Users want to understand the different transfer methods and choose the best one for their specific situation.
- Troubleshooting Help: Users want to find solutions to common issues that may arise during the transfer process.
- Ensuring Data Integrity: Users want to ensure that their photos are transferred safely and without any loss of quality or metadata.
- Optimizing Photo Library: Users want tips on how to organize and optimize their photo library after the transfer.
13. Staying Updated with the Latest Trends
The world of photography and technology is constantly evolving. Here are some of the latest trends to keep in mind:
- Cloud-Based Photo Management: More and more photographers are turning to cloud-based solutions for storing, organizing, and editing their photos.
- AI-Powered Photo Editing: Artificial intelligence is revolutionizing photo editing, with new tools that can automatically enhance your photos, remove unwanted objects, and more.
- High-Resolution Imaging: Cameras with higher megapixel counts are becoming more affordable, allowing you to capture more detail than ever before.
- Mobile Photography: Smartphones are now capable of capturing stunning photos, making mobile photography more popular than ever.
14. The Benefits of a Well-Managed Photo Library
A well-managed photo library can bring numerous benefits:
- Easy Access: Quickly find the photos you need, when you need them.
- Improved Workflow: Streamline your photo editing and sharing process.
- Preserved Memories: Ensure that your precious memories are safe and accessible for years to come.
- Enhanced Creativity: A well-organized photo library can inspire you to create new and exciting projects.
15. Why Choose dfphoto.net?
dfphoto.net is your ultimate resource for all things photography. Whether you’re a beginner or a seasoned pro, we have something for everyone. Our comprehensive guides, tutorials, and reviews will help you improve your skills, stay up-to-date on the latest trends, and connect with a community of passionate photographers.
Ready to take your photography to the next level? Visit dfphoto.net today to explore our extensive collection of articles, tutorials, and resources. Join our community and start sharing your photos with the world.
Address: 1600 St Michael’s Dr, Santa Fe, NM 87505, United States
Phone: +1 (505) 471-6001
Website: dfphoto.net
FAQ: Transferring Photos From MacBook to MacBook
1. What is the easiest way to transfer photos from one MacBook to another?
Migration Assistant is often the easiest way to transfer photos, along with all your other data, applications, and settings, from one MacBook to another. It’s a built-in macOS utility designed for this purpose.
2. How long does it take to transfer photos from one MacBook to another?
The transfer time depends on the size of your photo library and the transfer method you choose. Migration Assistant can take several hours, while AirDrop may only take a few minutes for a small number of photos.
3. Can I transfer photos from an old MacBook to a new MacBook wirelessly?
Yes, you can transfer photos wirelessly using Migration Assistant, iCloud Photos, Google Photos, Dropbox, or AirDrop.
4. Will I lose any photo quality when transferring photos from one MacBook to another?
No, if you use a lossless transfer method like Migration Assistant, an external hard drive, or iCloud Photos, you will not lose any photo quality. However, if you use a lossy compression method like JPEG, some quality may be lost.
5. How do I transfer photos from MacBook to MacBook without iCloud?
You can use an external hard drive, Migration Assistant, AirDrop, Google Photos, or Dropbox to transfer photos without using iCloud.
6. How do I transfer a Photos Library from one MacBook to another?
Locate the “Photos Library.photoslibrary” file in your Pictures folder and copy it to your new MacBook using an external hard drive, Migration Assistant, or a cloud storage service.
7. How do I ensure that my photo metadata is preserved during the transfer?
Most transfer methods, such as Migration Assistant and copying to an external hard drive, will preserve metadata by default. However, it’s a good idea to double-check that the metadata is intact after the transfer.
8. What should I do if Migration Assistant gets stuck during the transfer?
Ensure both Macs are connected to a stable network and plugged into a power source. Restart both Macs and try again.
9. Can I transfer only specific albums from one MacBook to another?
Yes, if you’re using an external hard drive or cloud storage, you can manually copy only the albums you want to transfer.
10. What are the best photo management software options for MacBooks?
Adobe Lightroom, Capture One, and ON1 Photo RAW are popular photo management software options for MacBooks.
16. External Resources and Further Reading
To deepen your understanding of photo transfer and management, consider exploring these resources:
- Apple Support: Move content to a new Mac
- Adobe: Tips for organizing photos in Lightroom
- Popular Photography: Stay updated with the latest trends and techniques in photography.
By following this comprehensive guide, you can confidently transfer your photos from one MacBook to another and keep your precious memories safe and organized. Happy photographing!