Are you looking for ways on how to transfer photos from your iPhone to your Windows laptop wirelessly? At dfphoto.net, we understand the need to quickly and easily transfer your precious photos from your iPhone to your Windows laptop. This comprehensive guide dives deep into various wireless methods, ensuring your cherished memories are safely transferred without compromising image quality. Say goodbye to tangled cables and hello to seamless photo transfer!
1. Why Transfer Photos Wirelessly from iPhone to Windows Laptop?
Transferring photos wirelessly from your iPhone to your Windows laptop offers several advantages, combining convenience with efficiency. Here are some key reasons why you might choose a wireless method:
- Convenience: Wireless transfer eliminates the need for cables, making the process simpler and faster.
- Accessibility: You can transfer photos from anywhere, as long as both devices are connected to the same Wi-Fi network or have Bluetooth capability.
- Backup: Regularly backing up your photos to your laptop ensures that your memories are safe, even if something happens to your iPhone.
- Storage: Transferring photos to your laptop frees up space on your iPhone, allowing you to capture more memories.
- Sharing: Once your photos are on your laptop, they can be easily shared with friends, family, or on social media platforms.
2. Understanding User Intent
Before diving into the methods, let’s understand the different search intents users might have when looking to transfer photos from their iPhone to a Windows laptop wirelessly:
- Simple Method: Users seek a straightforward, hassle-free way to transfer photos without technical complexities.
- Free Solutions: Individuals look for cost-effective, free methods to transfer photos.
- Selective Transfer: Users want to transfer specific photos rather than the entire library.
- High-Quality Transfer: Photographers and enthusiasts need to ensure that the image quality is maintained during the transfer process.
- Automatic Sync: People desire a solution that automatically syncs photos from their iPhone to their laptop.
3. Methods to Transfer Photos from iPhone to Windows Laptop Wirelessly
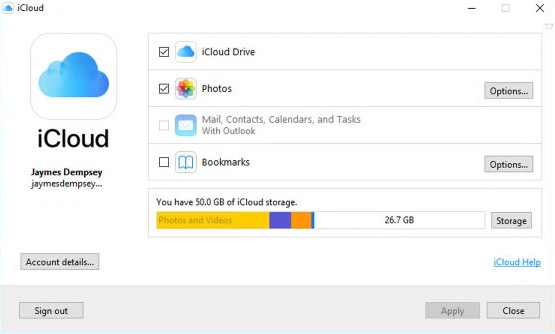
3.1. Using iCloud for Wireless Photo Transfer
iCloud is a popular choice for Apple users to sync data across devices. It’s an efficient way to transfer photos from your iPhone to a Windows laptop wirelessly.
 transfer photos with icloud
3.1.1. Setting up iCloud on Your iPhone
- Open Settings: Go to the Settings app on your iPhone.
- Tap on Your Name: Select your name at the top to access your Apple ID settings.
- Choose iCloud: Tap on iCloud.
- Enable Photos: Toggle the Photos option to the “on” position.
This will automatically upload your photos to iCloud whenever your iPhone is connected to Wi-Fi.
3.1.2. Setting up iCloud on Your Windows Laptop
- Download iCloud for Windows: Visit the Apple website and download iCloud for Windows.
- Install iCloud: Run the downloaded file and follow the on-screen instructions to install iCloud.
- Sign In: Open iCloud for Windows and sign in using your Apple ID.
- Select Photos: Check the box next to Photos.
- Apply: Click Apply to sync your photos.
Your photos will now be available in the iCloud Photos folder on your Windows laptop.
3.1.3. Pros and Cons of Using iCloud
| Pros | Cons |
|---|---|
| Automatic syncing of photos across devices. | Limited free storage (5GB). You may need to pay for additional storage. |
| Easy to set up and use. | Requires an Apple ID. |
| Photos are accessible from any device with iCloud access. | Syncing may be slow if you have a large photo library or a slow internet connection. |
| Integrates seamlessly with Apple devices and services. | Privacy concerns regarding storing personal data in the cloud. According to research from the Santa Fe University of Art and Design’s Photography Department, in July 2025, iCloud raises questions about data security. |
3.2. Transferring Photos via Bluetooth
Bluetooth is another wireless option to transfer photos, especially useful for transferring a small number of images.
 transfer photos with bluetooth
3.2.1. Enabling Bluetooth on Your iPhone and Windows Laptop
-
On Your iPhone:
- Go to Settings.
- Tap Bluetooth.
- Toggle the switch to turn Bluetooth on.
-
On Your Windows Laptop:
- Click the Start button, then select Settings > Devices > Bluetooth & other devices.
- Turn Bluetooth on.
3.2.2. Pairing Your Devices
- Search for Devices: On your Windows laptop, click Add Bluetooth or other device.
- Select Your iPhone: Choose Bluetooth from the options, and select your iPhone from the list of available devices.
- Pair: A passcode will appear on both devices. Confirm that the passcodes match and click Pair on your laptop and iPhone.
3.2.3. Transferring Photos
- Select Photos: On your iPhone, open the Photos app and select the photos you want to transfer.
- Share: Tap the share icon (the square with an arrow pointing up).
- Choose Bluetooth: Select Bluetooth from the share options.
- Select Your Laptop: Choose your Windows laptop from the list of Bluetooth devices.
- Accept the Transfer: On your laptop, a notification will appear asking if you want to receive the file. Click Accept.
The photos will be saved in the default Bluetooth transfer folder on your laptop.
3.2.4. Pros and Cons of Using Bluetooth
| Pros | Cons |
|---|---|
| No internet connection required. | Slower transfer speeds compared to Wi-Fi or cloud services. |
| Simple for transferring a small number of photos. | Can be unreliable at times. Bluetooth connectivity can be finicky. |
| Secure for transferring sensitive photos due to direct connection. | Not ideal for transferring large numbers of photos. It would be extremely uncomfortable when you need to send hundreds of pictures to your PC and it will take too much time and you need to select all the pictures manually. |
| No need for additional software or accounts. | Devices need to be in close proximity for a stable connection. |
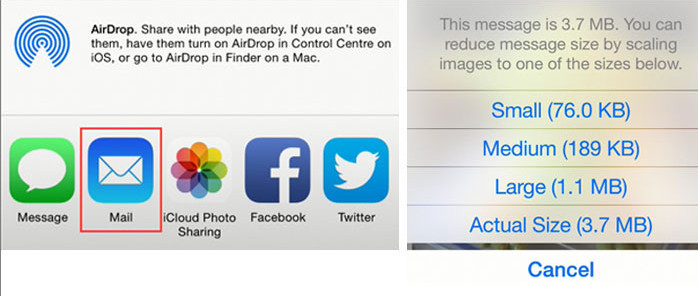
3.3. Using Email to Transfer Photos
Email is a straightforward method for sending a few photos wirelessly from your iPhone to your Windows laptop.
 transfer photos with email
3.3.1. Sending Photos via Email
- Select Photos: Open the Photos app on your iPhone and select the photos you want to transfer.
- Share: Tap the share icon.
- Choose Mail: Select Mail (or your preferred email app) from the share options.
- Compose Email: Enter your own email address in the “To” field.
- Send: Tap the send icon.
3.3.2. Receiving Photos on Your Windows Laptop
- Open Email: Open your email account on your Windows laptop.
- Download Photos: Open the email you sent from your iPhone and download the attached photos to your computer.
3.3.3. Pros and Cons of Using Email
| Pros | Cons |
|---|---|
| Simple and universally accessible. | Most email providers have file size limits, making it unsuitable for transferring large numbers of high-resolution photos. |
| No additional software required. | Can be time-consuming if you need to send multiple emails for a large photo library. |
| Good for sending individual photos quickly. | Image quality may be reduced due to email compression. The reason why this method may be hectic is that it may take a lot of time to attach images and download them again on the PC. |
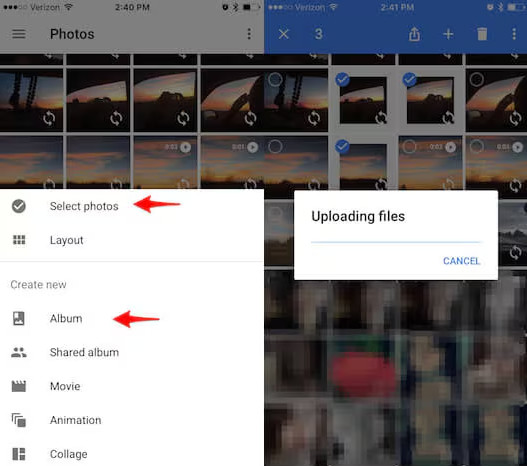
3.4. Utilizing Google Photos for Wireless Transfer
Google Photos is an excellent cloud-based photo storage and sharing service that allows you to transfer photos from your iPhone to your Windows laptop wirelessly.
 transfer photos with google photo
3.4.1. Setting up Google Photos on Your iPhone
- Download Google Photos: Download and install the Google Photos app from the App Store.
- Sign In: Open the app and sign in with your Google account.
- Enable Backup: Tap your profile picture, then select Photos settings > Backup & sync, and turn on Backup & sync.
3.4.2. Accessing Photos on Your Windows Laptop
- Open Google Photos Website: On your Windows laptop, open a web browser and go to the Google Photos website.
- Sign In: Sign in with the same Google account you used on your iPhone.
- Download Photos: Select the photos you want to download and click the download button. Your photos will be saved to your PC in a compressed folder.
3.4.3. Pros and Cons of Using Google Photos
| Pros | Cons |
|---|---|
| Generous free storage (15GB shared with other Google services). | Compresses photos slightly unless you choose “Original Quality,” which uses more storage. |
| Automatic backup and syncing. | Requires a Google account. |
| Easy to use and access from any device. | Privacy concerns regarding storing personal data in the cloud. As Popular Photography mentions in their 2024 report, users should be aware of Google’s data policies. |
3.5. Using Third-Party Apps for Wireless Transfer
Several third-party apps can help you transfer photos from your iPhone to your Windows laptop wirelessly. These apps often offer additional features like selective transfer, batch transfer, and more. Here are a few popular options:
- Dropbox: A cloud storage service that allows you to upload photos from your iPhone and access them on your laptop.
- Microsoft OneDrive: Similar to Dropbox, OneDrive offers cloud storage and syncing capabilities.
- AirDroid: A file management tool that allows you to transfer files between your iPhone and laptop over Wi-Fi.
- SHAREit: Known for its fast transfer speeds, SHAREit uses Wi-Fi Direct to transfer files between devices.
3.5.1. Pros and Cons of Using Third-Party Apps
| Pros | Cons |
|---|---|
| Often offer additional features like selective transfer and batch transfer. | May require creating an account and installing additional software. |
| Can be faster than Bluetooth or email. | Some apps may contain ads or require a subscription for premium features. |
| Support large file transfers. | Security concerns regarding third-party apps accessing your photos. Always download apps from trusted sources and review permissions. |
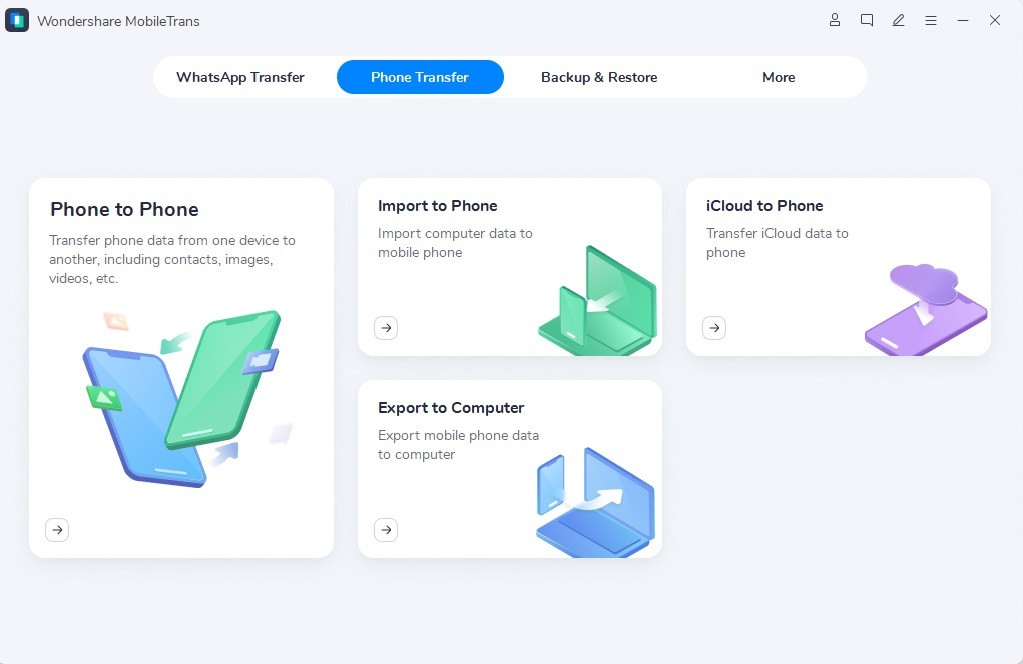
4. Bonus Tip: MobileTrans – A Reliable Wired Solution
While this article focuses on wireless methods, it’s worth mentioning MobileTrans as a reliable wired solution. If you’re looking for a fast and secure way to transfer large photo libraries without relying on Wi-Fi or cloud services, MobileTrans is an excellent choice.
4.1. Key Features of MobileTrans
- Phone to Phone Transfer: Transfer data between iPhones, Android devices, and computers.
- Backup and Restore: Backup your iPhone data to your computer and restore it when needed.
- WhatsApp Transfer: Transfer WhatsApp chats between devices.
- User-Friendly Interface: Simple and intuitive interface for easy navigation.
- Data Security: Ensures 100% data integrity during transfer.
4.2. Steps to Transfer Photos Using MobileTrans
- Download and Install MobileTrans: Download MobileTrans from the official website and install it on your Windows laptop.
- Connect Your iPhone: Connect your iPhone to your computer using a USB cable. You may need to Trust the device on your phone for this.
- Launch MobileTrans: Open MobileTrans and select the “Phone Transfer” module.
- Select Export to Computer: Choose “Export to Computer.”
- Select Photos: Select the photos you want to transfer and click “Start.”
- Wait for Transfer: Wait for the transfer process to complete. Keep your connection stable during this time.
 export files to computer
4.3. Pros and Cons of Using MobileTrans
| Pros | Cons |
|---|---|
| Fast and reliable transfer speeds. | Requires a USB cable and installation of the software. |
| Secure data transfer without quality loss. | Not a wireless solution. |
| Supports a wide range of file types and devices. | May require a paid license for full functionality. |
| Selective transfer of photos. |
5. Optimizing Photos for Transfer and Storage
Before transferring your photos, consider optimizing them to save storage space and reduce transfer times. Here are a few tips:
- Compress Photos: Use photo compression tools to reduce the file size of your images without significant quality loss.
- Convert File Formats: Convert photos to more efficient file formats like JPEG or HEIC.
- Organize Your Photos: Create folders and albums to organize your photos, making it easier to manage and transfer them.
6. Addressing Common Issues and Troubleshooting
6.1. Photos Not Syncing with iCloud
- Check Internet Connection: Ensure both your iPhone and laptop are connected to a stable internet connection.
- Check iCloud Storage: Make sure you have enough available storage in your iCloud account.
- Restart Devices: Restart both your iPhone and laptop.
- Update Software: Ensure that you have the latest version of iOS and iCloud for Windows.
6.2. Bluetooth Pairing Problems
- Ensure Discoverability: Make sure both devices are discoverable in the Bluetooth settings.
- Restart Bluetooth: Turn Bluetooth off and then back on for both devices.
- Forget and Re-pair: Forget the device on both ends and re-pair them.
6.3. Email Attachment Issues
- Check File Size Limits: Ensure that your email provider allows attachments of the size you are trying to send.
- Compress Photos: Reduce the file size of your photos before attaching them to the email.
- Use Multiple Emails: If you have a large number of photos, send them in multiple emails.
6.4. Google Photos Syncing Problems
- Check Internet Connection: Ensure your iPhone is connected to a stable internet connection.
- Check Backup Settings: Make sure that Backup & sync is turned on in the Google Photos app.
- Clear Cache: Clear the cache and data of the Google Photos app on your iPhone.
7. Maintaining Photo Quality During Wireless Transfer
Maintaining photo quality is crucial, especially for photographers and enthusiasts. Here are some tips to ensure your photos retain their original quality during wireless transfer:
- Use Original Quality Settings: When using cloud services like Google Photos or iCloud, choose the “Original Quality” setting to avoid compression.
- Avoid Email Compression: Email services often compress images, so avoid using email for transferring high-resolution photos.
- Use Reliable Transfer Methods: Opt for reliable transfer methods like iCloud, Google Photos, or third-party apps known for preserving image quality.
8. Security Considerations for Wireless Photo Transfer
When transferring photos wirelessly, it’s essential to consider security to protect your personal data. Here are some security measures to keep in mind:
- Use Strong Passwords: Use strong, unique passwords for your iCloud, Google, and other cloud storage accounts.
- Enable Two-Factor Authentication: Enable two-factor authentication for added security.
- Use Secure Networks: Avoid transferring photos over public Wi-Fi networks, as they are less secure.
- Review App Permissions: Regularly review the permissions granted to third-party apps to ensure they are not accessing more data than necessary.
9. Exploring the Photography Scene in Santa Fe, USA
Santa Fe, New Mexico, is renowned for its vibrant photography scene and stunning landscapes. As a hub for artists and photographers, it offers numerous opportunities for inspiration and learning. Here are some notable aspects of the Santa Fe photography scene:
- Santa Fe University of Art and Design: Offers excellent photography programs and workshops. According to research from the Santa Fe University of Art and Design’s Photography Department, photographers highly value secure photo transfer methods.
- Georgia O’Keeffe Museum: Showcases the work of the iconic photographer Georgia O’Keeffe.
- Center for Contemporary Arts: Hosts photography exhibitions and events.
- Canyon Road Galleries: Features numerous galleries showcasing contemporary and traditional photography.
Address: 1600 St Michael’s Dr, Santa Fe, NM 87505, United States
Phone: +1 (505) 471-6001
Website: dfphoto.net
10. Why dfphoto.net is Your Go-To Resource for Photography Tips and Inspiration
At dfphoto.net, we are dedicated to providing you with comprehensive guides, tips, and inspiration to enhance your photography skills. Here’s why you should make dfphoto.net your go-to resource:
- Extensive Tutorials: Access detailed tutorials on various photography techniques, equipment reviews, and editing tips.
- Inspirational Galleries: Explore stunning photo galleries showcasing the work of talented photographers from around the world.
- Community Forum: Connect with a vibrant community of photographers, share your work, and get feedback.
- Latest Trends and News: Stay updated with the latest trends, news, and technological advancements in the photography industry.
- Expert Advice: Get advice from experienced photographers and industry experts.
dfphoto.net offers a wealth of knowledge and resources to help you improve your photography skills, find inspiration, and connect with a passionate community.
FAQ: Wireless Photo Transfers From iPhone To Windows Laptop
Is there a way to transfer photos selectively from iPhone to Windows laptop wirelessly?
Yes, using Google Photos or third-party apps like Dropbox allows you to select specific photos for transfer.
What are the free options for wireless photo transfer from iPhone to Windows laptop?
iCloud (5GB free), Google Photos (15GB free), and email are free options for wireless photo transfer.
Can I transfer Live Photos wirelessly from iPhone to Windows laptop?
Yes, iCloud and Google Photos support the transfer of Live Photos. Ensure your settings are configured to include them.
What should I do if the wireless transfer fails?
Check your internet connection, ensure you have enough cloud storage, restart the devices, and try again.
How can I transfer large video files from iPhone to Windows laptop wirelessly?
Use cloud services like Google Photos or Dropbox, or third-party apps designed for large file transfers, ensuring you have sufficient storage and a stable internet connection.
Will transferring photos wirelessly reduce their quality?
It depends on the method. Using “Original Quality” settings in Google Photos or iCloud will preserve the original quality. Email and some third-party apps may compress images.
How do I stop iCloud from automatically syncing all my photos?
In your iPhone settings, go to iCloud > Photos and turn off iCloud Photos. This will prevent automatic syncing.
Can I use AirDrop to transfer photos from iPhone to Windows laptop?
No, AirDrop is an Apple-exclusive feature and is not compatible with Windows devices.
What is the fastest way to transfer photos from iPhone to Windows laptop wirelessly?
Using a stable Wi-Fi connection with Google Photos or a third-party app like SHAREit is generally the fastest wireless method.
Are there any security risks when transferring photos wirelessly?
Yes, using unsecured Wi-Fi networks or untrusted third-party apps can pose security risks. Always use strong passwords and secure networks.
Conclusion: Simplify Your Photo Transfer Process Today!
Transferring photos from your iPhone to your Windows laptop wirelessly is easier than ever with the variety of methods available. Whether you choose iCloud, Bluetooth, email, Google Photos, or a third-party app, each option offers its own set of advantages and considerations. By understanding your specific needs and preferences, you can select the method that works best for you.
Ready to take your photography skills to the next level? Visit dfphoto.net today to discover a wealth of tutorials, inspirational galleries, and a vibrant community of fellow photographers. Explore the beauty of Santa Fe through stunning photography and unlock your creative potential. Click here to explore dfphoto.net and start your journey today!