Transferring photos from your iPhone to your computer using iTunes is a straightforward process that allows you to back up your precious memories. At dfphoto.net, we’ll guide you through each step, ensuring you can easily manage your photos and create stunning visual art. Learn how to use iTunes for photo management, image transfer, and digital asset backup.
1. What is iTunes and How Does It Help with Photo Transfer?
iTunes, while primarily known as a media player and management application, also provides functionalities for managing and syncing data between your computer and Apple devices, including photo transfer. iTunes acts as a bridge, allowing you to copy photos from your iPhone to your computer for safekeeping, editing, or simply freeing up space on your device.
iTunes is a media management tool that also handles device syncing, which includes photo transfers from iPhones to computers. This method provides a way to create backups, edit photos on a larger screen, and manage digital assets effectively.
2. What Are the Benefits of Using iTunes to Transfer Photos?
Using iTunes to transfer photos from your iPhone to your computer offers several advantages, although it’s not the only method available. Here’s a breakdown of the benefits:
- Organization: iTunes allows you to organize your photos into albums and folders on your computer, making it easier to find and manage them.
- Backup: Transferring photos to your computer using iTunes creates a backup of your images, protecting them from loss due to device damage, theft, or accidental deletion.
- Free Up Space: Moving photos to your computer frees up valuable storage space on your iPhone, allowing you to capture more memories.
- Offline Access: Once transferred, you can access your photos on your computer without needing an internet connection.
- Editing: Transferring photos to your computer allows you to use more powerful photo editing software for advanced editing and retouching.
- Integration: iTunes seamlessly integrates with other Apple services and devices, making it easy to share your photos across your ecosystem.
3. What Are the Drawbacks of Using iTunes to Transfer Photos?
While iTunes offers a viable method for transferring photos, it’s not without its drawbacks. Understanding these limitations can help you make an informed decision about the best transfer method for your needs.
- One-Way Sync: iTunes primarily syncs photos from your computer to your iPhone. While it allows you to transfer photos from your iPhone to your computer, it’s not designed for two-way synchronization in the same way as cloud-based services like iCloud Photos.
- Potential for Data Loss: Incorrectly configured iTunes settings can sometimes lead to data loss during syncing, especially if you’re not careful about merging or replacing existing photo libraries.
- Can Be Slow: Transferring large photo libraries using iTunes can be a slow process, especially if you’re using a USB 2.0 connection or have a lot of photos and videos.
- Less Convenient Than Cloud Services: Compared to cloud-based services like iCloud Photos or Google Photos, iTunes requires a physical connection to your computer, which can be less convenient.
- Limited Editing Capabilities: iTunes itself offers very limited photo editing capabilities. You’ll need to use separate photo editing software for any significant adjustments.
- Not Ideal for Selective Transfers: While you can choose specific albums or folders to sync, iTunes isn’t the best option if you want to selectively transfer individual photos or videos.
4. What You Need Before You Start Transferring Photos with iTunes
Before you begin transferring photos from your iPhone to your computer using iTunes, make sure you have the following:
- A Computer: You’ll need a computer running Windows or macOS.
- iTunes Installed: Download and install the latest version of iTunes from the Apple website.
- iPhone and USB Cable: You’ll need your iPhone and a compatible USB cable to connect it to your computer.
- Sufficient Storage Space: Ensure your computer has enough free storage space to accommodate the photos you’re transferring.
- Latest iOS Version: Make sure your iPhone is running the latest version of iOS for optimal compatibility.
- Disable iCloud Photos (Optional): If you’re using iCloud Photos, you may want to temporarily disable it to avoid conflicts during the transfer process.
5. Step-by-Step Guide: How to Transfer Photos from iPhone to Computer Using iTunes
Here’s a detailed, step-by-step guide on how to transfer photos from your iPhone to your computer using iTunes:
-
Connect Your iPhone to Your Computer: Use a USB cable to connect your iPhone to your computer. If prompted on your iPhone, tap “Trust This Computer” and enter your passcode.
Alt text: iPhone connected to computer via USB cable, ready for photo transfer using iTunes
-
Open iTunes: Launch the iTunes application on your computer.
 iTunes application icon
 -
Select Your iPhone: Once your iPhone is connected, it should appear in iTunes as a device icon near the top-left corner of the window. Click on the iPhone icon to select it.
-
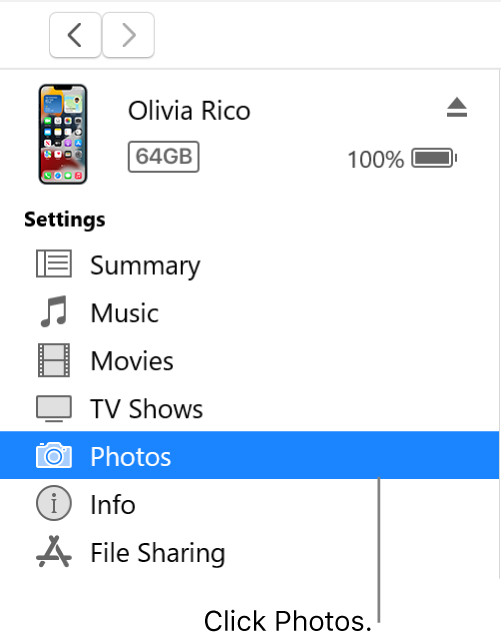
Navigate to the Photos Tab: In the left sidebar, under “Settings,” click on “Photos.”
iTunes application icon -
Enable Photo Syncing: Check the box next to “Sync Photos.” If you’re using iCloud Photos, a message will appear stating that iCloud Photos is enabled and you don’t need to sync with iTunes. To proceed with iTunes syncing, you’ll need to disable iCloud Photos on your iPhone temporarily (Settings > Photos > iCloud Photos, then toggle it off).
-
Choose Sync Source: Select the source of the photos you want to sync from the “Sync Photos From” dropdown menu. You can choose to sync from a specific folder on your computer or from applications like Adobe Photoshop Album or Adobe Photoshop Elements.
-
Select Albums or Folders: Choose whether to sync all folders or albums, or only selected ones. If you choose “Selected albums,” you can then select the specific albums or folders you want to transfer.
-
Include Full-Resolution Photos (Optional): For older iPod models (iPod classic and iPod nano), you can choose to include full-resolution photos.
-
Apply and Sync: Click the “Apply” button at the bottom-right corner of the iTunes window to start the syncing process.
Important Notes:
- The first time you sync photos, it may take a while. Subsequent syncs should be faster.
- Ensure your computer remains connected to your iPhone throughout the syncing process.
- Before disconnecting your iPhone, click the “Eject” button next to your device’s name in iTunes.
6. What If “Sync Photos” Option is Missing?
If you don’t see the “Sync Photos” option in iTunes, it likely means that iCloud Photos is enabled on your iPhone. When iCloud Photos is enabled, your photos are automatically synced to iCloud, and you don’t need to use iTunes for photo syncing. If you want to use iTunes to sync photos, you’ll need to temporarily disable iCloud Photos on your iPhone:
- Open the Settings app on your iPhone.
- Tap on Photos.
- Toggle iCloud Photos off.
- You may be asked if you want to download a copy of your iCloud Photos to your device. Choose the option that best suits your needs.
After disabling iCloud Photos, connect your iPhone to your computer and open iTunes. You should now see the “Sync Photos” option under the “Photos” tab.
7. What if iTunes Doesn’t Recognize Your iPhone?
If iTunes doesn’t recognize your iPhone when you connect it to your computer, try the following troubleshooting steps:
- Check the USB Connection: Ensure the USB cable is properly connected to both your iPhone and your computer. Try using a different USB port or a different USB cable.
- Restart Your iPhone and Computer: Sometimes, a simple restart can resolve connectivity issues.
- Trust This Computer: When you connect your iPhone to your computer, make sure you tap “Trust This Computer” on your iPhone. If you’ve already done this, try resetting the trusted computers list (Settings > General > Transfer or Reset iPhone > Reset > Reset Location & Privacy).
- Update iTunes: Make sure you’re using the latest version of iTunes.
- Update iOS: Ensure your iPhone is running the latest version of iOS.
- Apple Mobile Device USB Driver:
- Windows: Make sure the Apple Mobile Device USB Driver is properly installed. You can usually find it in Device Manager. If there’s an issue with the driver, try reinstalling iTunes or updating the driver manually.
- macOS: The necessary drivers are usually installed automatically with iTunes.
- Check for Software Conflicts: Some security software or firewalls may interfere with iTunes’ ability to recognize your iPhone. Try temporarily disabling these programs to see if it resolves the issue.
- Try a Different Computer: If possible, try connecting your iPhone to a different computer to see if the issue is with your iPhone or your computer.
8. What Are the Alternatives to Using iTunes for Photo Transfer?
While iTunes is a viable option for transferring photos, it’s not the only one. Several alternatives offer different features and levels of convenience. Here are some popular alternatives:
- iCloud Photos: If you’re already using iCloud Photos, your photos are automatically synced across all your Apple devices. You can access your photos on your computer by logging into iCloud.com or by enabling iCloud Photos in the Photos app on your Mac.
- AirDrop (macOS Only): AirDrop allows you to wirelessly transfer photos and other files between your iPhone and your Mac. It’s a quick and easy way to transfer photos without using a cable.
- Google Photos: Google Photos offers unlimited free storage (at a slightly reduced resolution) and automatic syncing across all your devices. You can access your photos on your computer by logging into the Google Photos website.
- Dropbox: Dropbox is a cloud storage service that allows you to upload and access your photos from any device. You can use the Dropbox app on your iPhone to automatically upload your photos to Dropbox, and then access them on your computer.
- Email: For transferring a small number of photos, you can simply email them to yourself.
- Third-Party Apps: Several third-party apps, such as iMazing and DearMob iPhone Manager, offer more advanced features for managing and transferring photos between your iPhone and your computer.
- Windows Photos App: The Windows Photos app can directly import photos from your iPhone when connected via USB.
- Image Capture (macOS): The Image Capture application on macOS provides a simple way to transfer photos from your iPhone to your computer.
9. Photo Formats Supported by iTunes
iTunes supports a variety of photo formats, ensuring compatibility with most images you capture on your iPhone. The commonly supported formats include:
- JPEG (.jpg): This is the most common format for photos, known for its good compression and wide compatibility.
- PNG (.png): PNG is a lossless format, meaning it preserves image quality without compression artifacts. It’s often used for graphics and images with text.
- GIF (.gif): GIF is primarily used for animated images but can also store static images.
- TIFF (.tif): TIFF is a high-quality, lossless format often used in professional photography and printing.
- HEIF (.heic): HEIF (High Efficiency Image File Format) is a newer format used by iPhones to store photos more efficiently without sacrificing quality.
- HEVC (.hevc): Similar to HEIF, HEVC (High Efficiency Video Coding) is used for storing videos efficiently.
While iTunes supports these formats, it’s always a good idea to ensure that your computer can also open and view these files. You may need to install additional codecs or software to view HEIF or HEVC files on older operating systems.
10. How to Manage Your Photos After Transferring Them
Once you’ve transferred your photos from your iPhone to your computer, it’s important to manage them effectively to keep them organized and accessible. Here are some tips for managing your photos:
- Create a Folder Structure: Create a logical folder structure on your computer to organize your photos. You can organize them by date, event, location, or any other criteria that makes sense to you.
- Rename Your Files: Rename your photo files with descriptive names that make it easy to identify them. For example, instead of “IMG_1234.JPG,” you could rename it “2023-12-24-Christmas-Dinner.jpg.”
- Use Photo Management Software: Consider using photo management software like Adobe Lightroom, Capture One, or Apple Photos to organize, edit, and manage your photos.
- Tag Your Photos: Use tags or keywords to add metadata to your photos, making it easier to search for specific images.
- Backup Your Photos: Create a backup of your photo library on an external hard drive or cloud storage service to protect them from data loss.
- Delete Duplicates: Use a duplicate photo finder to identify and delete any duplicate photos, freeing up storage space.
- Edit and Enhance Your Photos: Use photo editing software to improve the look of your photos by adjusting brightness, contrast, color, and other settings.
- Share Your Photos: Share your photos with friends and family through social media, email, or online photo galleries.
11. Troubleshooting Common Issues During Photo Transfer
Even with careful planning, you might encounter issues during the photo transfer process. Here’s how to troubleshoot some common problems:
- iPhone Not Recognized: Ensure the USB cable is properly connected, and the “Trust This Computer” prompt has been acknowledged on your iPhone. Restart both devices and check for driver updates.
- Syncing Errors: Ensure you have the latest version of iTunes and that your iPhone has sufficient storage space. Try syncing a smaller batch of photos to identify if a specific file is causing the error.
- Slow Transfer Speed: Use a USB 3.0 port if available, and close any unnecessary applications running in the background.
- Photos Not Appearing in iTunes: Check that iCloud Photos is disabled if you’re trying to sync via iTunes. Verify that the photos are in a supported format.
- Corrupted Photos: If photos appear corrupted after transfer, the original file might be damaged. Try transferring the photos again or use a different transfer method.
12. Understanding HEIF/HEVC and Compatibility
HEIF (High Efficiency Image File Format) and HEVC (High Efficiency Video Coding) are modern formats used by iPhones to store photos and videos more efficiently. However, they might not be compatible with older operating systems or software. Here’s what you need to know:
- Compatibility Issues: Older versions of Windows and macOS may not natively support HEIF/HEVC files. You may need to install additional codecs or software to view them.
- Converting to JPEG: You can configure your iPhone to capture photos in the more widely compatible JPEG format (Settings > Camera > Formats > Most Compatible).
- Converting After Transfer: If you’ve already transferred HEIF/HEVC files to your computer, you can use photo editing software or online converters to convert them to JPEG or other compatible formats.
- Apple Ecosystem: Within the Apple ecosystem, HEIF/HEVC files should work seamlessly between iPhones, iPads, and Macs running the latest operating systems.
13. Optimizing iPhone Storage for Photo and Video Capture
To make the most of your iPhone’s storage and capture high-quality photos and videos, consider these optimization tips:
- Use HEIF/HEVC: Enable HEIF/HEVC in your iPhone’s settings to save storage space without sacrificing quality (Settings > Camera > Formats > High Efficiency).
- Optimize Storage: Enable “Optimize iPhone Storage” in iCloud Photos settings (Settings > Photos > Optimize iPhone Storage). This will store full-resolution photos and videos in iCloud and keep smaller, device-optimized versions on your iPhone.
- Delete Unnecessary Photos and Videos: Regularly review your photo and video library and delete any duplicates, blurry photos, or unwanted videos.
- Use Cloud Storage: Use cloud storage services like iCloud Photos, Google Photos, or Dropbox to offload your photos and videos from your iPhone to the cloud.
- Adjust Video Resolution: Lower the video recording resolution in your iPhone’s settings to save storage space (Settings > Camera > Record Video).
- Live Photos: While Live Photos capture a short video clip along with the photo, they also take up more storage space. Consider turning off Live Photos if you’re running low on storage.
14. How to Safely Disconnect Your iPhone from Your Computer
Safely disconnecting your iPhone from your computer is important to prevent data corruption or other issues. Here’s how to do it:
- Eject in iTunes: In iTunes, click the “Eject” button next to your device’s name in the left sidebar.
- Close iTunes: After ejecting your iPhone, close the iTunes application.
- Disconnect the Cable: Once iTunes is closed, you can safely disconnect the USB cable from your iPhone and your computer.
Avoid disconnecting your iPhone while it’s syncing or transferring data, as this can lead to data corruption or other problems.
15. How to Find Inspiration and Improve Your Photography Skills with dfphoto.net
Looking to elevate your photography game? dfphoto.net is your ultimate resource. Explore a wealth of tutorials covering everything from basic composition to advanced editing techniques. Dive into our curated galleries showcasing stunning work from photographers around the globe, sparking your own creative vision. Stay up-to-date with the latest gear reviews and industry news, ensuring you’re always equipped with the knowledge to capture breathtaking images. Visit dfphoto.net today and unlock your full photographic potential.
FAQ: Transferring Photos from iPhone to Computer Using iTunes
1. Can I transfer photos from my iPhone to my computer without iTunes?
Yes, you can use iCloud Photos, AirDrop (macOS), Google Photos, Dropbox, email, the Windows Photos app, or third-party apps like iMazing.
2. Why is the “Sync Photos” option missing in iTunes?
This usually means iCloud Photos is enabled. Disable iCloud Photos on your iPhone to use iTunes for syncing.
3. What do I do if iTunes doesn’t recognize my iPhone?
Check the USB connection, restart your devices, trust the computer, update iTunes and iOS, and check the Apple Mobile Device USB Driver.
4. What photo formats does iTunes support?
iTunes supports JPEG, PNG, GIF, TIFF, HEIF, and HEVC.
5. How can I manage my photos after transferring them?
Create a folder structure, rename files, use photo management software, tag photos, and back them up.
6. What are HEIF and HEVC, and why are they important?
HEIF and HEVC are efficient formats for storing photos and videos. They save space but might not be compatible with older systems.
7. How do I optimize my iPhone’s storage for photos and videos?
Use HEIF/HEVC, optimize iCloud storage, delete unnecessary files, and use cloud storage.
8. How do I safely disconnect my iPhone from my computer?
Eject the iPhone in iTunes, close iTunes, and then disconnect the cable.
9. How can I troubleshoot common photo transfer issues?
Ensure a stable USB connection, disable iCloud Photos, update software, and try transferring smaller batches of photos.
10. What if my photos appear corrupted after transferring?
Try transferring the photos again, use a different method, or check if the original files are damaged.
Ready to take your photography skills to the next level? Visit dfphoto.net for a wealth of tutorials, inspiring galleries, and the latest gear reviews. Connect with a vibrant community of photographers and unlock your full creative potential today! Address: 1600 St Michael’s Dr, Santa Fe, NM 87505, United States. Phone: +1 (505) 471-6001. Website: dfphoto.net.